


DMTA-10040-01EN, Rev. E, February 2018
Chapter 4
116
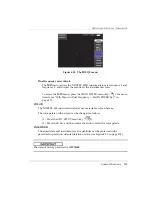
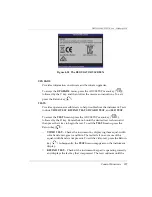
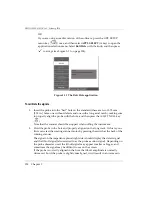
4.4.6
Display Menu in Dual Frequency — DISP Key
The display menu contains menus to control various functions such as
DSP MODE
(display mode)
CHANNEL
,
POSITION
,
H POS
and
V POS
(horizontal and vertical
position),
D ERASE
(display erase),
PERSIST
,
GRID
, and
ZOOM
.
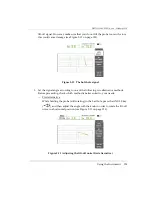
DSP MODE
(display mode)
When dual frequency is enabled, five display modes are available on the
NORTEC 600 instrument:
IMP
(impedance),
ALL
‑
IN
‑
1
(all in one),
DUAL IMP
(dual impedance, also named “split screen”),
SWP + IMP
(sweep + impedance)
and
SWEEP
.
To choose the
DSP MODE
(display mode), press the DISP menu key (
),
followed by the A key. With
DSP MODE
highlighted, rotate the knob to select the
desired mode.
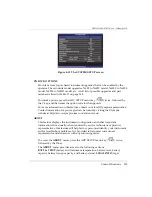
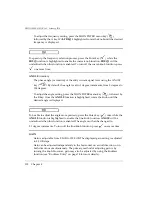
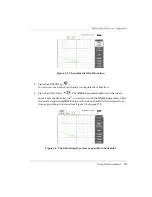
IMP
(impedance)
Impedance mode is the most common display mode. It incorporates a 10 × 10
grid configuration on the screen. The eddy current signal is shown moving
horizontally and vertically.
ALL
‑
IN
‑
1
ALL
‑
IN
‑
1
mode is used to display the signal traces associated with both
FREQ 1
,
FREQ 2
, and the
MIX
signal at the same time, each with a different
color to show how the individual signals interact.
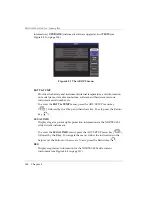
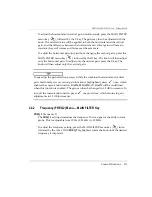
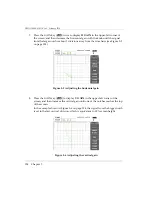
DUAL IMP
(dual impedance)
Dual impedance (split screen) mode divides the instrument screen into two
impedance displays with channel 1 on the left and channel 2 on the right. The
dual impedance screen is used to set up dual frequencies, and it displays
FREQ 1
(frequency 1) and
FREQ 2
(frequency 2).
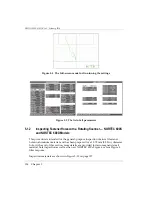
SWP + IMP
(sweep + impedance)
Sweep + impedance mode is similar to dual impedance mode except that the
instrument sweep display is shown on the left screen and the impedance
display on the right. As with the
DUAL IMP
(dual impedance) mode, it is
used to set up dual frequencies, and it displays
FREQ 1
(frequency 1) and
FREQ 2
(frequency 2).
SWEEP
Commonly used with rotating scanners. The eddy current signal is shown
moving horizontally at a fixed rate across the screen. In dual frequency mode,
Summary of Contents for nortec 600
Page 8: ...DMTA 10040 01EN Rev E February 2018 Table of Contents viii...
Page 16: ...DMTA 10040 01EN Rev E February 2018 Labels and Symbols 6...
Page 30: ...DMTA 10040 01EN Rev E February 2018 Introduction 20...
Page 58: ...DMTA 10040 01EN Rev E February 2018 Chapter 1 48...
Page 71: ...DMTA 10040 01EN Rev E February 2018 Software User Interface 61 Press the Return key to exit...
Page 72: ...DMTA 10040 01EN Rev E February 2018 Chapter 2 62...
Page 342: ...DMTA 10040 01EN Rev E February 2018 Chapter 7 332...
Page 356: ...DMTA 10040 01EN Rev E February 2018 Appendix B 346...
Page 366: ...DMTA 10040 01EN Rev E February 2018 List of Figures 356...
Page 368: ...DMTA 10040 01EN Rev E February 2018 List of Tables 358...