background image

25

3

EN

Selec
ting f

olders and files/D

ispla
ying file inf

orma

tion

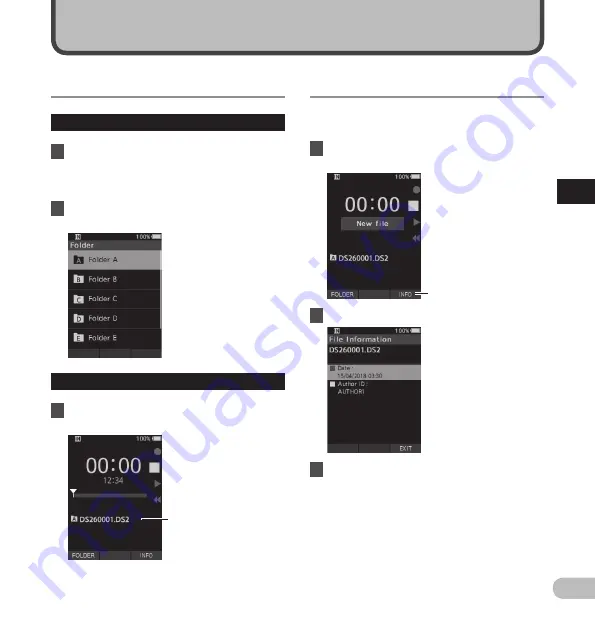
The recorder can display a variety of information 

related to the current file.


1

  Select the file containing the 

information to display.

[

INFO

]


2

  Press the 

F3

 (

INFO

) button.


3

  Press the 

F3

 (

EXIT

) button to exit the 

information screen.

Displaying file information

Advanced operations

Selecting folders and files

Changing folders


1

  When the file display screen appears, 

press the 

F1

 (

FOLDER

) button while the 

voice recorder is in stop mode.

•  The folder list screen will be displayed.


2

  Press the 

+

 or 

 button to select the 

folder.

Selecting a file


1

  While the file is being displayed, press 

the 

9

 or 

0

 button

.

Current folder and file name

Summary of Contents for DS-2600

Page 1: ...an Olympus digital voice recorder Please read these instructions for information about using the product correctly and safely Keep the instructions handy for future reference To ensure successful recording we recommend that you test the record function and volume before use ...

Page 2: ...ting a memory card 12 Setting time and date Time date 13 Changing the time and date 14 Operate the slide switch 15 2 Basic operations Recording 16 New recording 17 Overwrite recording 18 Insert recording 19 Recording monitor 20 Playback 21 Erasing 23 Erasing files 23 Partially erasing a file 23 3 Advanced operations Selecting folders and files 25 Displaying file information 25 Index marks 26 How t...

Page 3: ...essories optional 41 Copyright and trademark information 42 Safety precautions 43 Specifications 47 Indications used in this manual NOTE Describes precautions and operations that should be absolutely avoided in using the voice recorder TIP Describes useful information and hints that will help you getting the most out of your voice recorder Indicates reference pages describing details or related in...

Page 4: ...ect the one that is the best match for your purpose or usage environment P 29 s Lithium ion battery rechargeable via USB cable Getting started s This recorder is compatible with USB 2 0 enabling fast data transfer to a computer s Five folders and up to 200 files per folder for a maximum of 1 000 recordings P 16 s Large color LCD display s Index mark function which is useful to search particular po...

Page 5: ...olume button 6 0 rewind button 7 volume button 8 Built in speaker 9 SD card slot 0 m microphone jack Built in main microphone R NEW button LED indicator light Slide sREC 4STOP PLAY 7REV switch OK MENU button 9 fast forward button k erase button POWER ON OFF switch Battery cover release button Battery cover Docking station connector USB connector Recorder ...

Page 6: ...Stop indicator Playback indicator Fast rewind indicator 4 Current recording time 5 Recording level meter 6 File information area 7 Current playback time 8 File length 9 Current position 0 Playback position bar Device information area Meanings of indicators Internal memory SD card SD card lock status Battery Folder File lock etc Recording mode Microphone sensitivity VCVA Variable Control Voice Actu...

Page 7: ... has been left unattended for a long time P 8 Battery indicator The battery indicator on the display will decrease as the battery loses power 100 20 White 19 1 Red 0 When the battery indicator turns red charge the battery as soon as possible When the battery is too weak and Battery low will appear on the display and the recorder will shut down NOTE Turn off the recorder before removing the battery...

Page 8: ...re sold separately Charge using docking station and AC adapter Fully charge the battery approx 2 hours before use 1 Connect the AC adapter to the docking station 2 Firmly press the recorder all the way into the docking station as shown in the illustration Charge the battery 2 1 CHARGE indicator light The CHARGE indicator light turns on when charging starts and turns off when charging is complete C...

Page 9: ...arging the battery via the USB cable connection may not be successful depending on the power capacity of the USB port in your PC Use the AC adapter instead Do not set or remove the recorder from the docking station while operating Do not charge the recorder through a USB hub Do not attach or remove the battery if the USB cable is connected Using the lithium ion battery This recorder uses a lithium...

Page 10: ...tage If the recorder detects a DC power voltage outside the allowed voltage range 4 4 5 5V then Power supply error Remove power plug will appear on the display and all operation will stop The recorder will not be operable if abnormal voltage is detected Use the AC adapter Power supply from USB cable or AC adapter Use the AC adapter Plug the AC adapter into a household power outlet and connect the ...

Page 11: ...emory card confirm that no necessary data is stored on the memory card beforehand Initialization completely erases the existing data on the memory card Memory cards formatted initialized by another device like a computer may not be recognized Be sure to format them with this recorder before use The memory card has a service life When reaching the end of its life writing or erasing data on the memo...

Page 12: ... or at an angle could damage the contact area or cause the memory card to jam If the memory card is not inserted all the way into the slot data may not be written properly When an unformatted memory card is inserted into the card slot the recorder will automatically display the format menu options P 32 Use only memory cards formatted with the recorder P 32 Never remove the memory card while the re...

Page 13: ...elect the order of the Month Day and Year by pressing the F2 M D Y button while setting them 3 Press the OK MENU button to complete the setting The clock will start from the set date and time Press the OK MENU button according to the time signal TIP Moving the slide switch to a position other than STOP 4 while setting the time and date will cancel the time and date setting The recorder will return...

Page 14: ...ENU button while the voice recorder is in stop mode 2 Press the or button to select Device menu tab Device menu tab You can change the menu display by moving the settings tab cursor 3 Press the OK MENU or 9 button 4 Press the or button to select Time date 5 Press the OK MENU button The following steps are the same as Step 1 through Step 3 of Setting time and date Time date P 13 6 Press the F3 EXIT...

Page 15: ...ast rewind operations You can determine the current position at a glance even from the front because the slide switch works in conjunction with the slide switch guide on the screen The place indicated large in the slide switch guide is the current slide switch position POWER ON OFF Recording Stop Playback Fast rewind The figure shows the stop position Slide switch ...

Page 16: ...sition P 18 Insert The recorded file will be inserted in the middle of the previously recorded file starting from the chosen recording position The original file will be kept P 19 By default the RECORD function is configured to record using the overwrite option Recording will start from the current position of the existing file NOTE Append recording overwrite recording and insert recording are not...

Page 17: ...cordings to the same file move the slide switch to the REC s position again NOTE During recording a beep will sound whenever the remaining recording time reaches 60 30 and 10 seconds When the remaining recording time reaches 60 seconds the record indicator light will start flashing The light will flash faster when the remaining recording time decreases from 30 to 10 seconds Memory full or Folder f...

Page 18: ...e point you want to start overwriting NOTE A file s creation time and date will be updated to the time and date the file was last edited You cannot select a recording mode different from the one set onto the original file Overwrite recording is not available for MP3 files 2 Move the slide switch to the REC s position to start overwriting The LED indicator lights in red 3 Move the slide switch to t...

Page 19: ... to the REC s position to start inserting the additional recording Insert rec will appear on the display The LED indicator lights in blue aElapsed time during insert recording 4 Move the slide switch to the STOP 4 position to stop inserting the additional recording 5 Press the F3 EXIT button to stop insert recording NOTE The recording s time and date will be updated to the one of the latest record...

Page 20: ...ons to control the volume level Volume button NOTE When connecting an earphone or an external microphone s plug insert the plug all the way in as shown in the illustration above To avoid irritation to the ear insert the earphone after turning down the volume level Do not place earphones near a microphone as this may cause feedback The monitored audio may differ from the actually recorded audio Rec...

Page 21: ...ide switch to the PLAY position to start playback The LED indicator lights in green aElapsed playback time 2 Press the or button to adjust the volume The volume can be adjusted within a range from 00 to 30 3 Move the slide switch to the STOP 4 position at any point you want to stop the playback Playback a ...

Page 22: ...speed will change at each press of the F2 SPEED button Play playback Playback at normal speed Slow play slow playback Playback speed slows down 50 and Slow play will be displayed Fast play fast playback Playback speed becomes faster 50 and Fast play will be displayed NOTE If you press the 9 button once while fast forwarding or twice while in stop mode the recorder will stop at the end of the file ...

Page 23: ...iles cannot be erased in the following cases Files are locked P 29 Files stored on a locked memory card Partially erasing a file Any unnecessary part of a file can be erased 1 Playback the file you would like to partially erase 2 Press the k erase button at the point you want to start erasing While playback continues Start point will appear on the display 3 In the position you want to end partial ...

Page 24: ...splayed the recorder will revert to play back status MP3 files cannot be partially erased An erased file cannot be restored The erasing process may take up to 10 seconds Do not interrupt this process or data may be damaged Files cannot be partially erased in the following cases Files are locked P 29 Files are inside a locked memory card ...

Page 25: ...the F3 EXIT button to exit the information screen Displaying file information Advanced operations Selecting folders and files Changing folders 1 When the file display screen appears press the F1 FOLDER button while the voice recorder is in stop mode The folder list screen will be displayed 2 Press the or button to select the folder Selecting a file 1 While the file is being displayed press the 9 o...

Page 26: ...ile press and hold the 9 or 0 button 2 index mark The recorder stops for 1 second when it reaches the index mark Clearing an index mark 1 Select a file in which index marks you want to erase are contained 2 Press the 9 or 0 button to select the index mark to erase 3 While the index number appears for approximately 2 seconds on the display press the k erase button The index mark is erased NOTE Up t...

Page 27: ...ars press the OK MENU button while the voice recorder is in stop mode The menu will appear on the display 2 Press the or button to select the tab containing the item you want to set You can change the menu display by moving the settings tab cursor 3 PresstheOK MENUor9buttontomove thecursortothedesiredsettingitem You can change the menu display by moving the settings tab cursor 4 Press the or butto...

Page 28: ...USB class Reset settings Format 5 Press the OK MENU or 9 button Move to the setting of the selected item 6 Press the or button to change the setting 7 Press the OK MENU button to finalize the setting You will be informed that the settings have been established via the screen You can cancel the setting and return to the previous screen by pressing the F1 BACK or 0 button instead of the OK MENU butt...

Page 29: ...on Menu items Low The lowest recording sensitivity Suited to recording close talk Rec mode Three recording formats are available for selection DS2 WAV and MP3 1 Select DSS PCM or MP3 2 Select the options When DSS is selected DSS Pro QP DSS Pro SP The recorded file will be DS2 format When PCM is selected 22 05kHz Stereo 22 05kHz Mono The recorded file will be WAV format When MP3 is selected 128kbps...

Page 30: ...testing and adjustment of the start stop actuation level is recommended LCD Sound menu Backlight By default the display will remain lit for about 10 seconds when a button on the recorder is pressed 1 Select Lighting time Dim light time or Brightness 2 Select the options When Lighting time is selected 5 seconds 10 seconds 30 seconds 1 minute 2 minutes 5 minutes Set the backlight duration When Dim l...

Page 31: ... before the recorder will enter into Power Save mode Off Disables this function If any button is pressed time count will restart Time date Setting the time and date beforehand enables easier file management For details see Setting time and date Time date P 13 USB class You can set the USB class of this recorder with a USB connection to Composite or Storage Class Composite In the 3 classes of Stora...

Page 32: ...zed by the recorder must be formatted before they can be used with the recorder 1 Select Format at the Device menu screen 2 Press the OK MENU or 9 button 3 Press the or button to select SD card option Formatting the memory card Format 4 Press the OK MENU or 9 button 5 Press the button to select Start option 6 Press the OK MENU button ...

Page 33: ...damage the data or the memory card Remove the memory card Remove the battery Formatting the memory card will erase all the stored data including locked files When an unformatted memory card is inserted the format menu will be displayed automatically Locked memory cards cannot be initialized Memory cards will be formatted using quick format Formatting the memory card will reset the information in f...

Page 34: ... device Automatic download of Dictation by connecting the device Voice recorder s menu setting Direct recording and editing of existing Dictation through Voice recorder s button In order to download the software please access the website in your respective region Europe Middle east and Africa http www olympus eu sds downloads The Americas https www olympusamericaprodictation com odms r7 Oceania ht...

Page 35: ...compatible machines will not be covered under the operational warranty Macintosh version does not support voice recognition software For information on the latest OS upgrades compatibility visit the Olympus Web page at http www olympus global com Using online help For information on the DSS Player software usage and features refer to the online help To start online Help Windows 1 While DSS Player ...

Page 36: ... be destroyed Some PC s may not supply sufficient power and the recorder fails to connect Refer to your PC user s manual regarding the USB port on your PC Do not connect the recorder to a PC by using a USB hub Make sure to connect to a USB port on your PC Make sure to push the cable connector all the way in Otherwise the recorder may not operate properly Connecting to your PC using the docking sta...

Page 37: ...order s drive icon for this recorder displayed on the desktop to the Recycle Bin icon 2 Confirm that the record indicator light turns off before disconnecting the USB cable NOTE NEVER remove the memory card or disconnect the USB cable while the record indicator light is flashing If you do the data will be destroyed Never touch the contact points at the bottom of the docking station as this may cau...

Page 38: ...max 200 files per folder Erase unnecessary files P 23 Erasing error An error occurred while erasing Erase once again When an erase error occurs format the memory card P 32 Card error The memory card was not recognized correctly Remove and insert the memory card again P 12 Format error A formatting problem occurred Format again P 32 Memory error An internal memory error occurred Contact the Olympus...

Page 39: ...Unlock the file from the file menu P 29 The memory card is locked Unlock the memory card No playback tone heard The earphone is connected Unplug the earphones to use the internal speaker The volume level is set to 00 Adjust the volume level P 21 Unable to erase The file is locked Unlock the file from the file menu P 29 The memory card is locked Unlock the memory card Noise heard during playback Ob...

Page 40: ...he file from the file menu P 29 The memory card is locked Unlock the memory card Cannot find the recorded file Wrong recording media or folder Switch to the correct recording media or folder P 25 P 16 P 31 Cannot connect to a PC Sometimes a connection cannot be made with some PCs running Windows XP Vista 7 8 or 8 1 You need to change the PC s USB settings See DSS Player software online help for de...

Page 41: ...ecorded s Lithium ion battery LI 92B This lithium ion rechargeable battery is manufactured by Olympus It is best paired with the UC90 battery charger s AC adapter 5V A517 F 5AC In order to charge the battery the docking station CR21 will be necessary optional s Docking station CR21 CR15 The CR21 CR15 is designed for Olympus DS 9500 DS 9000 DS 2600 Use with only compatible Olympus products Device c...

Page 42: ...this document but if you find a questionable item error or omission please contact our Customer Support Center Any liability for passive damages or damage of any kind occurred due to data loss incurred by a defect of the product repair performed by the third party other than Olympus or an Olympus authorized service station or any other reason is excluded Trademarks and registered trademarks SD and...

Page 43: ...r to the Olympus Dictation Management System in Windows environment The word DSS Player is used to refer to the DSS Player for Mac in Apple Macintosh environment This manual shows the English on screen display in the illustrations and explanations You can select the display language for this recorder For details see Language P 31 Caution for usage environment To protect the high precision technolo...

Page 44: ...corder Do not disassemble repair or modify the unit yourself Use SD and SDHC memory cards only Never use other types of memory cards If you accidentally insert another type of memory card into the recorder contact an authorized distributor or service center Do not try to remove the memory card by force Do not operate the unit while operating a vehicle f Caution Stop using the recorder immediately ...

Page 45: ...ime or if it has not been used for a long period Rechargeable batteries have limited lifetime When the operating time becomes shorter even if the rechargeable battery is fully charged replace it with a new one Battery handling precautions f Danger The recorder uses a special lithium ion battery from Olympus Charge the battery with the specified AC adapter or charger Do not use any other AC adapter...

Page 46: ...mage the memory card Do not place the memory card in locations with static electricity Store the memory card in a location that is out of the reach of children In case of accidental ingestion consult a physician immediately Even when formatting or erasing are performed only the file management information of the internal memory and or memory card is updated and the recorded data is not completely ...

Page 47: ...aximum headphone output â 150 mV conforms to EN 50332 2 4 MIC jack ø 3 5 mm impedance 2 kΩ 4 MIC jack ø 3 5 mm impedance 8 Ω or more 4 Power source Standard voltage 3 6 V Battery Lithium ion battery LI 92B External power supply USB connection AC adapter A517 F 5AC DC5V 4 External dimensions 120 8 mm 49 8 mm 18 6 mm Not including largest projection 4 Weight 116 5 g including battery 4 Operating tem...

Page 48: ...0 h 4810 h 16 GB 1170 h 2410 h 8 GB 585 h 1200 h PCM format Recording media 22 05kHz Stereo 22 05kHz Mono Internal memory 2 GB 6 5 h 13 h SD card 32 GB 94 h 188 h 16 GB 47 h 94 h 8 GB 23 5 h 47 h MP3 format Recording media 128kbps Stereo 64kbps Mono Internal memory 2 GB 36 h 72 h SD card 32 GB 520 h 1040 h 16 GB 260 h 520 h 8 GB 130 h 260 h The above are the standard times and the available record...

Page 49: ...n the equipment and receiver Connect the equipment into an outlet on a circuit different from that to which the receiver is connected Consult the dealer or an experienced radio TV technician for help Use only Olympus supplied cable or AC adapter when you connect the applicable equipment to an external device or a power outlet FCC Caution Changes or modifications not expressly approved by the party...

Page 50: ...nce Italy Denmark Switzerland Portugal Norway Sweden Finland Spain Czech Republic Hungary Poland Iceland Bulgaria Israel Latvia Lithuania Estonia Russia South Africa Some phone service providers do not permit access to 00800 numbers or require an additional prefix Charges may apply here Please contact your service provider directly for more details The CE mark indicates that this product complies ...

Page 51: ...o olympus com http www olympusamerica com OLYMPUS AMERICA INC Premises Wendenstrasse 14 18 20097 Hamburg Germany Tel 49 40 23 77 3 0 Goods delivery Modul H Willi Bleicher Str 36 52353 Düren Germany Letters Postfach 10 49 08 20034 Hamburg Germany http www olympus europa com OLYMPUS EUROPA SE CO KG Level 4 97 Waterloo Road Macquarie Park NSW 2113 Tel 61 2 9886 3992 http www olympus com au OLYMPUS AU...

Reviews: