background image

101

White balance

Adjusting the image quality and exposure

6

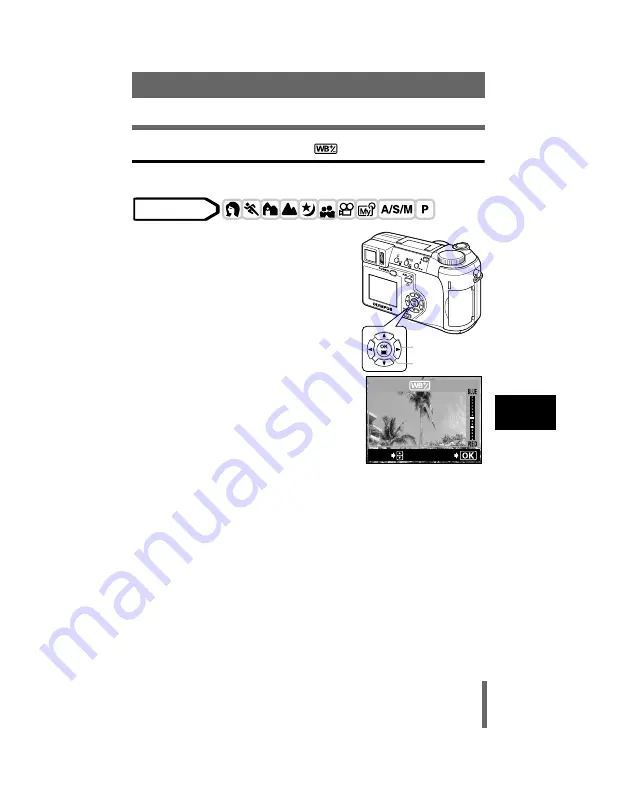
White balance adjustment 

This function lets you make fine changes to the current white balance setting.

1

In the top menu, select MODE 
MENU 

Æ

Æ

Æ

Æ

 PICTURE 

Æ

Æ

Æ

Æ


>

, and 

press 

d

.

g

“How to use the menus” (P.33)

• The white balance adjustment indicator 

appears on the screen.

2

The color becomes bluer each 
time you press 

a

, and redder 

each time you press 

c

, depending 

on the original white balance 
conditions. Press 

e

 to save your 

adjustment.

• The white balance can be adjusted in 7 

increments in both red and blue directions.

• After saving the adjustment, press 

e

 again to exit the menu.

Mode dial

Arrow pad

OK button

GO

ADJUSt

Summary of Contents for CAMEDIA C-740 Ultra Zoom

Page 1: ...Press ac to select the SETUP tab then press d Press ac to select X then press d Use ac to select the date format Adjust the date and time in the appropriate fields by using d to select the field and...

Page 2: ...you can always delete unwanted pictures to make room for more See Step 5 F2 8 F2 8 1600 1200 1600 1200 SQ1 SQ1 Flash indicator Green lamp Shutter button Pull to Zoom in Push to Zoom out Icon Flash Mo...

Page 3: ...REIL PHOTO NUM RIQUE DIGITALKAMERA C MARA DIGITAL C 740 Ultra Zoom BASIC MANUAL MANUEL DE BASE EINFACHE ANLEITUNG MANUAL B SICO ENGLISH FRAN AIS DEUTSCH ESPA OL basic_e_po167_6 fm Page 1 Tuesday Febru...

Page 4: ...16 SHOOTING BASICS 22 ADVANCED SHOOTING 30 PLAYBACK 32 PRINT SETTINGS 37 DOWNLOADING PICTURES TO A COMPUTER 38 ERROR CODES 40 SPECIFICATIONS 41 These instructions are only for quick reference For mor...

Page 5: ...nditions 1 This device may not cause harmful interference 2 This device must accept any interference received including interference that may cause undesired operation For customers in Canada This Cla...

Page 6: ...RTED J NAMES OF PARTS Lens Strap eyelet Self timer lamp DC IN jack Flash Video OUT jack USB connector Connector cover Mode dial Shutter button Zoom lever W T GU basic_e_po167_6 fm Page 4 Tuesday Febru...

Page 7: ...ss lamp Arrow pad acbd OK Menu button e Monitor Flash mode button Macro Spot button Diopter adjustment dial Self timer button Y Protect button 0 Rotation button y Flash lever Battery compartment cover...

Page 8: ...ation Exposure differential 2 0 2 0 3 0 3 0 5 Battery check e f 6 Green lamp 7 Flash stand by Camera movement warning Flash charge Lights Blinks 8 Macro mode Super macro mode Manual focus MF 9 Noise r...

Page 9: ...able still pictures Seconds remaining 30 36 18 AE lock AE memory B C 19 Spot metering n 20 ISO ISO 100 ISO 200 ISO 400 21 White Balance 5 3 1 w x y V 22 White balance compensation B1 B7 R1 R7 23 Satur...

Page 10: ...1536 1280 960 640 480 320 240 etc 6 Aperture value F2 8 F8 0 7 Shutter speed 16 1 1000 8 Exposure compensation 2 0 2 0 9 White Balance WB AUTO 5 3 1 w V 10 ISO ISO 100 ISO 200 ISO 400 11 Date and tim...

Page 11: ...ra is turned on or while the camera is in use F2 8 F2 8 1600 1200 1600 1200 SQ1 SQ1 Battery check indication Memory gauge Before shooting Gauge is off No more pictures can be taken Fully lit Wait unti...

Page 12: ...strap through the stopper A and make sure it is fastened securely 4 Attach the strap to the other eyelet in the same way J LOADING THE BATTERIES 1 Make sure the camera is turned off The monitor is off...

Page 13: ...ries charge them before use 5 Close the battery compartment cover then press it down C and slide it in the direction shown D Press the center of the cover as it may be difficult to close properly by p...

Page 14: ...priate direction Insert the card while keeping it straight The card will stop with a click when it is inserted all the way to the end Inserting the card the wrong way or at an angle could damage the c...

Page 15: ...e arrows and remove the lens cap 2 Press the power switch The power turns on and the lens extends when the mode dial is set to any mode other than q The viewfinder turns on When the mode dial is set t...

Page 16: ...w pad to select MODE MENU 4 Press ac to select the SETUP tab then press d 5 Press ac to select W then press d 6 Press ac to select a language then press e 7 Press e again to exit the menu 8 To turn th...

Page 17: ...revious setting press b The first two digits of the year are fixed 8 Repeat this procedure until the date and time are completely set The time is displayed in the 24 hour format Consequently 2 p m is...

Page 18: ...ting Press e e e e to complete setting Press e e e e again to exit the menu and return to shooting status WB DRIVE MODE MENU Take you directly to the setting screens Display operational buttons at the...

Page 19: ...prox 30x zoom Sets the image quality and resolution Still picture TIFF SHQ HQ SQ1 SQ2 Movie HQ SQ Sets the appropriate white balance according to the light source Sets the date and time Formats a card...

Page 20: ...speed sequential shooting k AF sequential shooting and BKT auto bracketing ISO Selects the ISO sensitivity from AUTO 100 200 and 400 A S M Selects the shooting mode from A Aperture priority shooting...

Page 21: ...method iESP or SPOT Allows pictures to be taken as close as 3 cm 1 2 from the subject PANORAMA Allows panorama pictures to be taken with Olympus CAMEDIA brand cards 2 IN 1 Combines two still pictures...

Page 22: ...SETUP Customizes settings which are activated in the r mode FILE NAME Changes how file names are assigned PIXEL MAPPING Checks the CCD and image processing functions for errors s Adjusts the brightne...

Page 23: ...PW ON OFF SETUP Sets the picture displayed on the monitor when the power is turned on and off SCREEN SETUP Registers a stored picture for use as the picture displayed when the power is turned on and...

Page 24: ...g no special functions or manual adjustments The camera sets the optimal focusing and exposure This is the simplest of all shooting modes i Portrait shooting Suitable for taking a portrait style shot...

Page 25: ...ed in normal shooting For example if you take a picture of a street at night in h mode the lack of brightness will result in a dark picture with the background underexposed and without details In the...

Page 26: ...rture and shutter speed manually Press d to increase the aperture value f number Press b to decrease the aperture value f number Press a to set a faster shutter speed Press c to set a slower shutter s...

Page 27: ...ter speed and aperture value automatically set by the camera are displayed except in M mode blinks to warn of camera movement Push the flash lever up to make the flash pop up When lights after the fla...

Page 28: ...re locked the green lamp lights The AF target mark moves to the focused position When the green lamp blinks the focus and exposure are not locked Release your finger from the shutter button re positio...

Page 29: ...the record mode and the amount of space available on the card J ZOOMING IN ON A SUBJECT OPTICAL ZOOM Telephoto and wide angle shooting are possible at 10x magnification the optical zoom limit equivale...

Page 30: ...ation The flash fires automatically in low light or backlight conditions Red eye reduction flash The red eye reduction flash mode reduces the red eye phenomenon by emitting pre flashes before firing t...

Page 31: ...hotograph 1 Mount the camera on a tripod or place it on a stable flat surface 2 Select Y Y Y Y by pressing Y Y Y Y 3 Take the picture The self timer lamp lights for about 10 seconds then starts blinki...

Page 32: ...is individually locked for each frame The AF sequential shooting speed is slower than for normal sequential shooting BKT When auto bracketing is set the exposure is changed automatically for each fram...

Page 33: ...de focusing is performed quickly When the optical zoom lever is at the maximum wide position and you are as close as 7 cm 2 8 to your subject you can fill the entire frame with your subject J SUPER MA...

Page 34: ...s and resume shooting quickly 1 Press f f f f twice quickly double click while in the shooting mode 2 Press the shutter button halfway to return to the shooting mode Close up playback Pictures display...

Page 35: ...lay the picture with n n n n you want to play back 2 Press e e e e The top menu is displayed 3 Press a a a a to select MOVIE PLAY 4 Press ac ac ac ac to select MOVIE PLAYBACK then press e e e e The mo...

Page 36: ...o cancel protection press 0 again Protected pictures cannot be erased by the single frame all frame erase function but they are all erased by formatting J ERASING PICTURES This function enables you to...

Page 37: ...uding protected data is erased when the card is formatted Once erased pictures cannot be restored so make sure that you do not erase important image data Download important image data to a PC before f...

Page 38: ...efer to your TV s instruction manual 3 Set the mode dial to q q q q and turn the camera on The last picture taken is displayed on the TV Use the arrow pad to select the picture you want to display The...

Page 39: ...or on a personal DPOF compatible printer All frame reservation Use this feature to print all the pictures stored on the card You can specify the desired number of prints and whether or not the date an...

Page 40: ...Windows 95 Mac OS 8 6 or lower excepMt Mac OS 8 6 equipped with USB MASS Storage Support 1 3 5 installed at the factory Data transfer is not guaranteed on a home built PC system or PCs with no factory...

Page 41: ...ur computer using the provided USB cable Does your computer have a USB interface Is there a port marked on your computer Does your computer have a built in PC card slot Consult your nearest Olympus re...

Page 42: ...on a PC Download the image to a PC and cancel the read only setting q CARD FULL The card is full No more pictures movies or information such as print reservation can be recorded Replace the card or er...

Page 43: ...When using a 32 MB card Approx 3 frames TIFF 2048 1536 Approx 16 frames SHQ 2048 1536 Approx 40 frames HQ 2048 1536 Approx 99 frames SQ1 1280 960 NORMAL Approx 331 frames SQ2 640 480 NORMAL No of eff...

Page 44: ...tion 10 to 90 storage Power supply 2 CR V3 lithium battery packs or 4 AA R6 alkaline batteries lithium batteries NiMH batteries or NiCd batteries AC adapter optional Manganese zinc carbon batteries ca...

Page 45: ...En 43 En MEMO basic_e_po167_6 fm Page 43 Thursday February 6 2003 12 02 PM...

Page 46: ...0 40 23 77 30 49 0 40 23 77 33 Letters Postfach 10 49 08 20034 Hamburg Germany European Technical Customer Support Please visit our homepage http www olympus europa com or call our TOLL FREE NUMBER 0...

Page 47: ...a longer service life Keep this manual in a safe place for future reference We recommend that you take test shots to get accustomed to your camera before taking important photographs In the interest o...

Page 48: ...omplies with the European requirements for safety health environment and customer protection CE mark cameras are intended for sales in Europe For customers in USA Declaration of Conformity Model Numbe...

Page 49: ...quality and exposure Useful functions Print setting Miscellaneous For playing back and editing pictures Settings that make the camera easier to operate Printing pictures Troubleshooting and other info...

Page 50: ...C adapter 20 Inserting a card 22 Card basics 22 Removing the card 23 Power on off 24 Startup Shutdown screen 25 If the card is not recognized card check 25 Selecting a language 26 Setting the date and...

Page 51: ...ntrol 62 5 Advanced shooting 63 A S M mode 63 Aperture priority shooting 64 Shutter priority shooting 65 Manual shooting 66 Using My Mode 67 Focusing applications 68 AF MODE Changing the focus range 6...

Page 52: ...ty and exposure 91 Record mode 91 Selecting a record mode 93 3 2 Resolution 95 ENLARGE SIZE 95 ISO sensitivity 96 Exposure compensation 97 White balance 98 Auto white balance 98 Preset white balance 9...

Page 53: ...erase 127 8 Useful functions 128 ALL RESET Saving the camera s settings 128 CUSTOM BUTTON 130 Setting the custom button 131 Using the custom button 132 SHORT CUT 133 Setting the shortcut menu 134 Usi...

Page 54: ...f menus 171 List of factory default settings 177 Modes and Shooting Functions 180 Camera maintenance 183 Specifications 184 Glossary of terms 186 Index 189 Indications used in this manual l Important...

Page 55: ...9...

Page 56: ...ts Camera Lens Strap eyelet gP 17 Self timer lamp gP 82 DC IN jack gP 20 Flash gP 55 Video OUT jack gP 120 USB connector Connector cover gP 20 120 Mode dial gP 42 Shutter button gP 46 Zoom lever W T G...

Page 57: ...gP 22 Card access lamp gP 46 Arrow pad acbd gP 32 OK Menu button e gP 32 Monitor gP 12 46 Flash mode button gP 55 Macro Spot button gP 75 80 Diopter adjustment dial gP 30 Self timer button Y gP 82 Pro...

Page 58: ...vie Item Indications Ref Page 1 Shooting modes P A S M N o m J L K I s P 42 2 Shutter speed 16 1 1000 P 65 3 Aperture value F2 8 F8 0 P 64 4 Exposure compensation Exposure differential 2 0 2 0 3 0 3 0...

Page 59: ...0 480 320 240 etc P 92 16 AF target mark P 46 17 Number of storable still pictures Seconds remaining 30 36 P 92 P 51 18 AE lock AE memory B C P 78 19 Spot metering n P 75 20 ISO ISO 100 ISO 200 ISO 40...

Page 60: ...SHQ HQ SQ1 SQ2 P 91 5 Resolution 2048 1536 1280 960 640 480 320 240 etc P 92 6 Aperture value F2 8 F8 0 P 64 7 Shutter speed 16 1 1000 P 65 8 Exposure compensation 2 0 2 0 P 97 9 White Balance WB AUTO...

Page 61: ...splayed during movie recording z z z zBattery check If the remaining battery power is low the battery check indication changes as follows when the camera is turned on or while the camera is in use Not...

Page 62: ...fer from the actual page in this manual Follow the arrows to perform menu operations For details on operating procedures see How to use the menus P 33 Set the mode dial to any of the marks shown here...

Page 63: ...end of the strap back through the ring and stopper as indicated by the arrows Adjust the strap to the desired length 5 Pull the strap through the stopper B to make sure it is fastened securely 6 Attac...

Page 64: ...ur finger to slide the cover Do not use your fingernail as this could result in injury 4 Insert the batteries making sure that they are correctly oriented as shown in the illustration When using recha...

Page 65: ...rely 6 Slide the battery compartment lock from to If the camera is left for about 1 hour with the batteries removed some of the internal settings may revert to the factory default settings C D Note Th...

Page 66: ...lkaline batteries When you need batteries in a hurry you can use AA R6 alkaline batteries which are easy to obtain anywhere However the number of pictures that you can take may vary considerably depen...

Page 67: ...batteries may vary according to the type of battery manufacturer shooting conditions etc Power is consumed continuously during the conditions described below This could shorten the life of the batteri...

Page 68: ...a PC c Index area You can write down the card s contents d Contact area Comes into contact with the camera s signal read contacts Compatible cards xD Picture Card 16 256 MB This camera may not recogni...

Page 69: ...il it clicks Removing the card 1 Push the card all the way in to unlock it then let it return slowly The card is ejected a short way and then stops Hold the card straight and pull it out Do not press...

Page 70: ...e mode dial is set to q the camera turns on in the playback mode and the monitor turns on 3 To turn the camera off press the power switch again TIPS To save battery power the camera automatically ente...

Page 71: ...ctive action q NO CARD There is no card in the camera or the card is not inserted properly Insert a card If a card is already inserted remove it and insert it again correctly The card cannot record pl...

Page 72: ...e area where you purchased this camera 1 Set the mode dial to P and press the power switch to turn the camera on 2 Press e The top menu is displayed 3 Press d on the arrow pad to select MODE MENU 4 Pr...

Page 73: ...s ac to select a language then press e 7 Press e again to exit the menu 8 To turn the camera off press the power switch CAM PIC CARD SEtUP ON ON 3 MIN 3 MIN SLEEP REC VIEW PW ON OFF SEtUP ALL RESEt ON...

Page 74: ...Press ac to select the SETUP tab then press d 5 Press ac to select X then press d The green frame moves to the selected item Arrow pad OK button Mode dial Power switch Top menu WB DRIVE MODE MENU CAR...

Page 75: ...is displayed in the 24 hour format Consequently 2 p m is displayed as 14 00 9 Press e For a more accurate setting press e when the time signal hits 00 seconds The clock starts when you press the butt...

Page 76: ...erson using the camera 1 Set the mode dial to h and press the power switch The camera and the viewfinder turn on 2 While looking through the viewfinder slowly turn the diopter adjustment dial 3 Turn t...

Page 77: ...s in the vertical position hold the camera so that the flash is higher than the lens Keep your fingers and the strap away from the lens and flash Clear pictures cannot be obtained if the camera moves...

Page 78: ...A S M SLOW AF BKt HI Take you directly to the setting screens Display operational buttons at the bottom of the screen The functions registered in the shortcut menus can also be accessed from the MODE...

Page 79: ...EW PW ON OFF SEtUP 1Press e to display the top menu Press d Top menu CAMERA tab PICTURE tab CARD tab SETUP tab 2Press ac to select a tab then press d Press b to return to the tab selection screen CARD...

Page 80: ...LL RESET Saving the camera s settings P 128 4Press acto select a setting Press e to complete setting Press e again to exit the menu and return to shooting status The green frame moves to the selected...

Page 81: ...sequential shooting and BKT auto bracketing P 83 Extends the maximum optical zoom making possible up to approx 30x zoom P 54 Sets the image quality and resolution Still picture TIFF SHQ HQ SQ1 SQ2 Mo...

Page 82: ...shortcut menu P 134 Still picture Movie Runs through all saved pictures one after another P 113 MOVIE PLAYBACK Plays back movies P 114 INDEX Creates an index picture of a movie in 9 frames P 116 EDIT...

Page 83: ...riority shooting and M Manual shooting P 63 r1 2 3 4 Selects a mode to be activated when taking pictures in r mode P 67 w Adjusts the amount of light emitted by the flash P 62 SLOW Selects from SLOW1...

Page 84: ...l effects to pictures BLACK WHITE SEPIA WHITE BOARD BLACK BOARD P 90 AF AREA Changes the position of the AF target mark using the arrow pad P 70 INFO Selects whether to display all the information suc...

Page 85: ...which are activated in the r mode P 136 FILE NAME Changes how file names are assigned P 148 PIXEL MAPPING Checks the CCD and image processing functions for errors P 149 s Adjusts the brightness of the...

Page 86: ...the current camera settings when you turn off the power P 128 W Selects a language for on screen display P 26 PW ON OFF SETUP Sets the picture displayed on the monitor when the power is turned on and...

Page 87: ...41 Mode Menus Using the menus 2 G Selects the number of frames in the index display P 112 8 Turns the beep sound used for button operations and warnings on and off P 145...

Page 88: ...pictures using no special functions or manual adjustments The camera sets the optimal focusing and exposure This is the simplest of all shooting modes i Portrait shooting Suitable for taking a portra...

Page 89: ...y The camera automatically sets the optimal shooting conditions m Night Scene shooting Suitable for shooting pictures in the evening or at night The camera sets a slower shutter speed than is used in...

Page 90: ...speed automatically By decreasing the aperture value F number the camera will focus within a smaller range producing a picture with a blurred background Increasing the value forces the camera to focu...

Page 91: ...o be saved for retrieving by this mode g MY MODE SETUP P 136 g Using My Mode P 67 n Movie record Allows you to record movies The camera sets the aperture and shutter speed automatically Even if the su...

Page 92: ...i j k l m o r p P and press the power switch g Power on off P 24 The viewfinder turns on 2 Decide the composition of the picture Mode dial Shutter button Mode dial Card access lamp Power switch Power...

Page 93: ...the way fully The camera takes the picture The card access lamp blinks while the picture is stored on the card TIPS The subject cannot be focused on g If correct focus cannot be obtained P 49 The gree...

Page 94: ...era is focusing on If you press f while pressing the shutter button halfway the area you are focusing on is enlarged Pressing f once more returns the size to normal This function is not available in t...

Page 95: ...ra at an object about the same distance away as the subject 2 Press the shutter button halfway until the green lamp lights When the focus and exposure are locked the green lamp lights The AF target ma...

Page 96: ...ocus lock recompose your shot and then take the picture If the subject has no vertical lines hold the camera vertically and focus the camera using the focus lock function by pressing the shutter butto...

Page 97: ...n the card that you are using is displayed 2 Decide the composition of the picture 3 Press the shutter button fully to start recording The card access lamp blinks while the movie is stored on the card...

Page 98: ...en the shutter button is pressed in step 3 causing the focus of some pictures to be compromised In n mode the flash and manual focus MF cannot be used Note Recording will continue until the card is fu...

Page 99: ...with the digital zoom zoom magnification can be increased to a maximum of approximately 30x Camera movement is likely to occur at higher magnifications Stabilize the camera with a tripod etc to avoid...

Page 100: ...of the zoom indicator indicates the optical zoom If the digital zoom is set to ON a red area appears on the zoom indicator When you reach the limit of the optical zoom the digital zoom is enabled Pict...

Page 101: ...2 Set the flash mode by repeatedly pressing The flash mode changes in the sequence shown below when all modes are available If no operation is performed for about 3 seconds the flash mode is set and...

Page 102: ...0 ft to 14 8 ft T max Approx 1 2 m to 3 5 m 3 9 ft to 11 5 ft Function restrictions according to mode F2 8 F2 8 1600 1200 1600 1200 SQ1 SQ1 mark 9 Available Not available Factory default setting The f...

Page 103: ...oom magnification is increased the camera will increase the locked shutter speed accordingly The flash does not fire in the following situations In the movie record mode during auto bracketing during...

Page 104: ...omenon After the pre flashes it takes about 1 second before the shutter is released Hold the camera firmly to avoid camera movement Effectiveness may be limited if the subject is not looking directly...

Page 105: ...lash is designed for slow shutter speeds Normally when shooting with a flash shutter speeds cannot go below a certain level to prevent camera movement But when shooting a night scene background fast s...

Page 106: ...S m mode 4 sec 1st curtain with red eye reduction HSLOW1 This mode is for when you want to use slow synchronization yet also reduce the red eye phenomenon For instance when shooting a person against...

Page 107: ...ation flash 1 In the top menu select MODE MENU CAMERA SLOW SLOW1 HSLOW SLOW2 and press e g How to use the menus P 33 Press e again to exit the menu Mode dial Arrow pad OK button CARD SEt PIC CAMERA DR...

Page 108: ...the range of 2 0 in 1 3 EV steps 1 In the top menu select MODE MENU CAMERA w and press d g How to use the menus P 33 2 Press ac to select a setting a Light emission is increased by 1 3EV each time you...

Page 109: ...e shooting mode to be used when the mode dial is set to p 1 In the top menu select MODE MENU CAMERA A S M A S or M and press e g How to use the menus P 33 Press e again to exit the menu Mode dial Arro...

Page 110: ...n green the setting will provide optimum exposure Aperture range Toward W f2 8 to f8 0 Toward T f3 7 to f8 0 When the flash is set to the auto flash mode the shutter speed is fixed at 1 30 sec in the...

Page 111: ...ke the following steps When the shutter speed is displayed in green the setting will provide optimum exposure Shutter speed range 1 to 1 1000 sec Shutter speeds that can be set differ according to the...

Page 112: ...er speed compared to the exposure level considered optimal by the camera is displayed If the exposure differential appears in red it indicates that the exposure differential is less than 3 0 EV or mor...

Page 113: ...create and save up to 4 different patterns g MY MODE SETUP P 136 1 In the top menu select MODE MENU CAMERA MY MODE MY MODE 1 to MY MODE 4 and press e g How to use the menus P 33 Press e again to exit...

Page 114: ...e center of the screen focusing is possible SPOT Focus selection is based on the subject within the AF target mark 1 In the top menu select MODE MENU CAMERA AF MODE iESP or SPOT and press e g How to u...

Page 115: ...utton halfway When ON is selected the focusing time is reduced letting you take successive snapshots 1 In the top menu select MODE MENU CAMERA FULLTIME AF ON and press e g How to use the menus P 33 Pr...

Page 116: ...d press d 3 Use the arrow pad to move the AF target mark to the area you want to focus on The AF target mark at the center of the screen can be moved vertically or horizontally 4 Take the picture To r...

Page 117: ...rget mark on the subject you want to focus on and press x The focus is locked and the AF lock mark is displayed To reset the AF lock press x again to cancel the AF lock Each time you press x AF lock i...

Page 118: ...memorized To cancel AF memory press x again AF lock was canceled Do not operate any of the buttons or the mode dial after performing AF lock AF lock will be canceled The camera had emerged from sleep...

Page 119: ...on the area you are focusing on is enlarged This lets you check whether the focus is in the right position The distance indicator on the left of the monitor is for reference only When the indicator is...

Page 120: ...cus lock 1 Position the AF target mark on a subject at the desired distance and press the shutter button halfway 2 Keeping the shutter button half pressed press e The distance indicator is displayed M...

Page 121: ...posure regardless of the background light gP 75 Multi metering Meters the brightness of the subject at up to 8 different points to set the optimal exposure based on the average brightness This method...

Page 122: ...3 In the top menu select MODE MENU CAMERA MULTI METERING ON and press e g How to use the menus P 33 Press e again to exit the menu 4 Position the AF target mark on the area you want to meter and press...

Page 123: ...en metering 2 points pressing x twice The aperture and shutter speed as calculated from the average values obtained by metering at 2 points These values are recalculated every time another metering po...

Page 124: ...alue exposure temporarily Next compose your shot again with the sun in the frame and take the picture 1 When using the camera in the p mode AE lock is not available in the M mode Set to any mode excep...

Page 125: ...x for more than 1 second C appears While C is displayed the exposure is saved Press x again to cancel the AE memory AE lock was canceled Do not operate any of the buttons or the mode dial after perfor...

Page 126: ...ll the entire frame with your subject If the center of the frame within the AF target mark is metered when you are close to the subject and you shoot with the optimal exposure the picture will turn ou...

Page 127: ...s fixed automatically and cannot be changed 1 In the top menu select MODE MENU CAMERA ON and press e g How to use the menus P 33 Press e again to exit the menu TIPS The subject is in shadow When takin...

Page 128: ...exited 2 Press the shutter button fully to take the picture Pressing the shutter button halfway locks the focus and exposure The self timer lamp lights for approximately 10 seconds then starts blinki...

Page 129: ...hite balance are locked at the first frame Approx 11 frames at 1 4 frames sec in HQ mode i Pictures can be taken at a faster speed than normal sequential shooting The sequential shooting speed varies...

Page 130: ...with exposure compensation than by using the exposure setting considered optimal by the camera When auto bracketing is set the exposure is changed automatically for each frame when you start shooting...

Page 131: ...BKT is not possible in the following situations When the TIFF or SHQ record mode is set to ENLARGE SIZE When NOISE REDUCTION is set to ON The flash does not fire in BKT mode If there is not enough sp...

Page 132: ...the top menu select MODE MENU CAMERA PANORAMA and press d g How to use the menus P 33 The PANORAMA mode is set 2 Use the arrow pad to choose at which edge you want to connect the pictures d The next...

Page 133: ...o use SQ mode for panorama shooting During panorama shooting the flash and sequential shooting are not available Images are saved in JPEG format when panorama shooting is done in the TIFF mode The siz...

Page 134: ...g How to use the menus P 33 The 2 IN 1 picture mode is set 2 Take the first shot The subject will be positioned on the left in the combined picture 3 Take the second shot The subject will be position...

Page 135: ...nd sequential shooting modes are not available To cancel 2 IN 1 picture mode after the first shot has been taken press e The first shot will not be saved Operating the mode dial will exit 2 IN 1 pictu...

Page 136: ...a black background emphasized to make them easier to read 1 In the top menu select MODE MENU CAMERA FUNCTION then select a mode and press e g How to use the menus P 33 WHITE BOARD and BLACK BOARD are...

Page 137: ...electing lets you print the entire image without losing its borders almost the same image size as that used by photo labs Clearer Normal Larger Smaller SHQ A high quality mode using the JPEG format Be...

Page 138: ...48 1360 1 3 1600 1200 2 5 1280 960 4 8 1024 768 6 13 640 480 16 33 SHQ 2048 1536 Low compression JPEG 8 16 2048 1360 8 17 ENLARGE SIZE 3200 2400 2 5 HQ 2048 1536 NORMAL 20 40 2048 1360 22 45 ENLARGE S...

Page 139: ...cable connected the movie recording time will differ from the time listed in the Movie Record Modes table Selecting a record mode 1 In the top menu select MODE MENU PICTURE K and press d g How to use...

Page 140: ...e size on a computer screen When a picture is transferred to a computer the size of the picture on the computer screen varies depending on the computer s monitor setting For instance a picture taken i...

Page 141: ...LARGE SIZE When ENLARGE SIZE is selected the actual 3 2 million pixels used by this camera can be increased to the equivalent of approx 8 million pixels 3200 2400 This allows you to make quality print...

Page 142: ...1 In the top menu select MODE MENU CAMERA ISO then choose the most suitable ISO sensitivity and press e g How to use the menus P 33 AUTO is not available in p mode Press e again to exit the menu Highe...

Page 143: ...ect a setting Adjust toward Press d to adjust up to 2 0 in 1 3 steps Adjust toward Press b to adjust up to 2 0 in 1 3 steps TIPS Often bright subjects such as snow will turn out darker than their natu...

Page 144: ...How to use the menus P 33 If WB is displayed on the top menu as a shortcut menu press the arrow pad in the same direction as the arrow shown next to WB g SHORT CUT P 133 2 Press ac to select AUTO PRE...

Page 145: ...fluorescent lamp 4 200K This type of lamp is generally used in offices etc The color temperature values K are approximate They are not an accurate indication of color TIPS You can also preview differ...

Page 146: ...rect setting may not be obtained if the light reflected by the paper is too bright or too dark White balance may not be effective under some special light sources After setting a white balance other t...

Page 147: ...o use the menus P 33 The white balance adjustment indicator appears on the screen 2 The color becomes bluer each time you press a and redder each time you press c depending on the original white balan...

Page 148: ...age contours are emphasized making the image appear sharper and more vivid Use this setting when you want to print pictures To reduce the sharpness Press c The image contours are softened Use this set...

Page 149: ...e the menus P 33 2 Press ac to adjust the contrast between 5 and 5 To increase the contrast Press a The light and dark areas are defined more clearly making the image look crisper To reduce the contra...

Page 150: ...s d g How to use the menus P 33 2 Press ac to adjust the saturation between 5 and 5 To increase the saturation Press a Colors become darker and more intense To reduce the saturation Press c Colors bec...

Page 151: ...ow to use the menus P 33 Press e again to exit the menu Noise reduction is always enabled in the m mode When noise reduction is set to ON the camera implements noise reducing processes after each shot...

Page 152: ...brightness and contrast of recorded pictures The histogram display can be set separately for shooting mode and playback mode Ex When a histogram is displayed in P mode When the image is bright When t...

Page 153: ...ack screen press e again to display the top menu and press c The histogram is not displayed in the following situations even if histogram display is set to ON During M mode panorama shooting 2 IN 1 sh...

Page 154: ...picture taken Single frame playback 2 Use the arrow pad to play back other pictures If the camera is not used for over 3 minutes the camera enters the sleep mode and the monitor turns off Mode dial Po...

Page 155: ...ng results and resume shooting quickly Functions available in normal playback mode are also available in QUICK VIEW 1 Press f twice quickly double click while in the shooting mode The camera immediate...

Page 156: ...the zoom lever toward T U Each time you pull the zoom lever the picture is enlarged gradually By using the arrow pad while the enlarged picture is displayed you can shift the picture in the desired d...

Page 157: ...he single frame playback mode push the zoom lever toward W G Use the arrow pad to select the picture b Moves to the previous frame d Moves to the next frame a Jumps to the previous index display the f...

Page 158: ...ction lets you select the number of pictures in an index display from 4 9 and 16 1 In the top menu select MODE MENU SETUP G 4 9 or 16 and press e Press e again to exit the menu g How to use the menus...

Page 159: ...menu 2 Press a to start the slideshow 3 Press e to stop the slideshow The slideshow will not stop until you cancel it by pressing e You are recommended to use the optional AC adapter when running a s...

Page 160: ...CK then press e The movie is played back When playback ends the display automatically returns to the beginning of the movie Fast forward fast rewind functions are available during playback d Fast forw...

Page 161: ...ovie can be played continuously by holding the button down b Displays the previous frame The movie can be played continuously in reverse by holding the button down e Displays the MOVIE PLAYBACK menu T...

Page 162: ...re EDIT This function lets you erase parts of the movie that you do not want 1 Use the arrow pad to select a picture with n 2 In the top menu select MOVIE PLAY then choose each item g How to use the m...

Page 163: ...ame of the index and press e 6 Press ac to select OK then press e The 9 frames extracted from the movie appear as an index display then the camera returns to the playback mode The index is stored as a...

Page 164: ...arrow pad to select the first frame of the part you want to keep and press e a Jumps to the first frame of the movie c Jumps to the last frame of the movie d Displays the next frame The movie can be...

Page 165: ...then press e NEW FILE Stores the edited movie as a new movie OVERWRITE Stores the edited movie with the same name as the original The original movie is not stored The edited movie is stored and the sc...

Page 166: ...ra on The last picture taken is displayed on the TV Use the arrow pad to select the picture you want to display The close up playback index display and slideshow functions can also be used on a TV scr...

Page 167: ...unction lets you turn such pictures 90 degrees counterclockwise or clockwise so that they are displayed vertically 1 In the single frame playback mode press y Each pressing rotates the image in the fo...

Page 168: ...ose each item g How to use the menus P 33 Select Q gP 122 Select P gP 123 Resizing 3 Select Q then press d 4 Press ac to select the picture size then press e The BUSY bar is displayed during resizing...

Page 169: ...al to vertical and vice versa when the maximum or minimum size is reached 6 Press e 7 Press ac to select OK then press e The BUSY bar is displayed during trimming After the image is saved the camera r...

Page 170: ...y space on the card or when the picture was taken with the record mode set to ENLARGE SIZE It may not be possible to trim pictures taken with another camera If pictures recorded in 3 2 are trimmed the...

Page 171: ...e all frame erase function 1 Use the arrow pad to display the picture you want to protect g Viewing still pictures P 108 2 Press 0 To cancel protection press 0 again Protected pictures cannot be erase...

Page 172: ...tures cannot be restored Check each picture before erasing to avoid accidentally erasing pictures you want to keep g Protecting pictures P 125 Single frame erase 1 Use the arrow pad to display the pic...

Page 173: ...menu select MODE MENU CARD CARD SETUP and press d g How to use the menus P 33 2 Press ac to select R ALL ERASE then press e 3 Press ac to select YES then press e All the pictures are erased Mode dial...

Page 174: ...one shooting mode this setting applies to all the other modes both shooting and playback ON All settings are returned to the factory default settings after the power is turned off OFF The settings mad...

Page 175: ...P 65 FULLTIME AF OFF P 69 F 0 P 97 AF MODE iESP P 68 FLASH MODE AUTO P 55 OFF P 81 w 0 P 62 FUNCTION OFF P 90 AF MF AF P 73 INFO OFF P 141 OFF P 75 80 u OFF P 106 Y OFF P 82 K HQ P 91 LCD OFF WB AUTO...

Page 176: ...U from the top menu Available functions Settings Ref Page AE LOCK factory default setting P 78 AF LOCK P 71 DRIVE o j i k BKT P 83 ISO AUTO 100 200 400 P 96 A S M A S M P 63 SLOW SLOW1 HSLOW1 SLOW2 P...

Page 177: ...utton 1 In the top menu select MODE MENU SETUP CUSTOM BUTTON and press d g How to use the menus P 33 2 Press ac to select a function then press d Press e again to exit the menu Mode dial Arrow pad OK...

Page 178: ...stom button TIPS When ISO is set to the custom button but you want to use AE lock The AE lock function cannot be used when a different function is set to the custom button Reset AE lock to the custom...

Page 179: ...tcut menu Ref Page Functions that can be set in the shortcut menu Ref Page DRIVE P 83 PANORAMA P 86 ISO P 96 2 IN 1 P 88 A S M P 63 FUNCTION P 90 r1 2 3 4 P 67 AF AREA P 70 w P 62 INFO P 141 SLOW P 61...

Page 180: ...the top menu select MODE MENU SETUP SHORT CUT and press d g How to use the menus P 33 2 Press ac to select A B or C then press d 3 Press ac to select a function then press e The shortcut menu is set P...

Page 181: ...rtcut menu you have set appears on the top menu 2 Press ab or c to select the shortcut menu The monitor jumps directly to the setting screen for that function Ex When is set in shortcut menu A You can...

Page 182: ...sitions are 38 mm 50 mm 100 mm 200 mm and 380 mm these numbers are based on the focal length of a 35 mm camera Functions that can be set in MY MODE Default setting Ref Page Functions that can be set i...

Page 183: ...ngs one by one The MY MODE SETUP screen appears 3 Select a MY MODE number Press ac to select MY MODE number from 1 to 4 then press e z z z zWhen selecting PRESENT in Step 2 4 Press ac to select SET th...

Page 184: ...setting then press e The setting is saved You can also change the other custom settings 5 When you have made all the settings you want press e The screen displayed in Step 2 appears Press e again to...

Page 185: ...g protected pictures are erased when the card is formatted Make sure that you save or transfer important data to a PC before formatting a used card 1 In the top menu select MODE MENU CARD CARD SETUP a...

Page 186: ...hen press e The BUSY bar is displayed and the card is formatted Never do the following during formatting as they may cause the card to malfunction Open the card cover Remove the battery Connect or dis...

Page 187: ...use the menus P 33 Pressing b in the top menu displays the full amount of shooting information on the monitor ON To turn INFO off press e to display the top menu and press b again Ex Playback mode If...

Page 188: ...In the top menu select MODE MENU SETUP s and press d g How to use the menus P 33 2 Press ac to adjust the brightness while looking in the monitor or viewfinder and when you have set the desired level...

Page 189: ...u have just taken Pressing the shutter button halfway during Rec View lets you resume shooting immediately OFF The picture being recorded to the card is not displayed This is useful when you want to p...

Page 190: ...he top menu select MODE MENU SETUP SLEEP 30 SEC 1 MIN 3 MIN 5 MIN or 10 MIN and press e g How to use the menus P 33 Press e again to exit the menu The sleep mode is not activated when using the AC ada...

Page 191: ...Beep You can turn off the beep sound used for button operations or warnings 1 In the top menu select MODE MENU SETUP 8 OFF and press e g How to use the menus P 33 Press e again to exit the menu Mode d...

Page 192: ...vorite picture g SCREEN SETUP P 147 OFF No picture is displayed 1 Factory default setting 2 Selects a picture already registered If there is no picture registered nothing is displayed when the power i...

Page 193: ...een is displayed asking if you want to cancel the currently registered picture and register a new one To register a new picture select RESET and press e If you select KEEP the screen returns to the me...

Page 194: ...o No 100 and the file number returns to No 0001 This method is useful when grouping files on separate cards AUTO Even if a new card is inserted the folder number and file number are retained from the...

Page 195: ...ra to check and adjust the CCD and image processing functions It is not necessary to operate this function frequently Approximately once a year is recommended Wait a few minutes after the monitor is u...

Page 196: ...eters or feet in the manual focus mode m At long ranges the camera measures in meters and at shorts ranges in centimeters ft At long ranges the camera measures in feet and at short ranges in inches 1...

Page 197: ...back the recorded pictures properly on the TV 1 In the top menu select MODE MENU SETUP VIDEO OUT NTSC or PAL and press e g How to use the menus P 33 Press e again to exit the menu The factory default...

Page 198: ...out at home on a personal DPOF compatible printer z z z zPrinting on an Olympus CAMEDIA P 400 or P 200 digital printer Printing is possible directly from a card containing print reservation data with...

Page 199: ...is camera Make changes using the original device If a card contains DPOF reservations set by another device entering reservations using this camera may overwrite the previous reservations You may not...

Page 200: ...u cannot make the print reservation for pictures with n 2 Press The PRINT ORDER screen appears Press ac to select U then press e If print reservation data is already stored on the card the PRINT ORDER...

Page 201: ...z zSet the date time printing data Press ac to select NO DATE or TIME then press e NO The pictures are printed without the date and time DATE All the pictures are printed with the shooting date TIME A...

Page 202: ...ake the print reservation for pictures with n 2 Press The PRINT ORDER screen appears Press ac to select then press e If data is already stored on the card the PRINT ORDER SETTING screen appears giving...

Page 203: ...umber of prints X date time or P trimming then press d 6 Perform each setting z z z zSet the number of prints Press ac to set the number of prints then press e a Increases the number c Decreases the n...

Page 204: ...ress e to complete the reservations The screen in Step 3 is restored and appears on the displayed picture 8 Press e to display the single frame reservation menu 9 Press b to select END The PRINT ORDER...

Page 205: ...If trimming has already been set the P screen appears Press ac to select RESET then press e 2 Use the arrow pad and zoom lever to decide the trimming position and size Press acbd to move the trimming...

Page 206: ...until the playback screen appears The size of the printed picture varies depending on the printer settings If the trimmed picture size is small printing magnification increases accordingly resulting i...

Page 207: ...n data is already stored on the card the PRINT ORDER SETTING screen appears 3 To reset all print reservation data press ac to select RESET then press e Press b to return to the playback screen To rese...

Page 208: ...rame reservation menu is displayed 6 Press c to select CANCEL Print reservation is canceled and the screen in step 5 is restored 7 If you are finished resetting print reservation data press e to displ...

Page 209: ...recorded image has been protected read only on a PC Download the image to a PC and cancel the read only setting q CARD FULL The card is full No more pictures movies or information such as print reserv...

Page 210: ...will not operate while it is connected to a PC Condensation When it is cold outside the water vapor in the air is rapidly cooled and turns to droplets of water Condensation occurs when the camera is...

Page 211: ...ie mode The flash does not fire in the movie mode Set a different shooting mode P 51 FUNCTION is set to BLACK WHITE BOARD The flash does not fire in the BLACK WHITE BOARD mode P 90 Super macro mode is...

Page 212: ...e shooting mode Press f twice quickly or set the mode dial to q P 108 109 There are no pictures on the card NO PICTURE appears on the monitor Record pictures There is a problem with the card Refer to...

Page 213: ...e SETUP tab in the mode menu and set ALL RESET to OFF P 128 No picture is displayed on the TV when connected to the camera The video output signal is incorrect Set the video output signal according to...

Page 214: ...e the flash pop up P 55 The subject was too small and was backlit Set the flash to fill in mode or use the spot metering mode P 55 75 The sequential shooting mode was used Higher shutter speeds are us...

Page 215: ...commercially available blower blush and then wipe with a lens cleaner to remove dust Mold may form on the lens surface if the lens is left dirty P 183 The picture was out of focus even though the gree...

Page 216: ...in a cold environment Battery performance deteriorates in low temperatures Keep the camera warm by putting it inside your coat or clothing The camera misread the remaining battery power When the powe...

Page 217: ...171 Miscellaneous 10 List of menus z z z zh mode Top menu Setting Ref Page DRIVE o j i k BKT P 83 K SHQ 2048 1536 HQ 2048 1536 SQ1 1280 960 SQ2 640 480 P 91 X P 28 CARD SETUP YES NO P 139...

Page 218: ...2 P 61 NOISE REDUCTION 4 OFF ON P 105 MULTI METERING 5 OFF ON P 76 DIGITAL ZOOM 6 OFF ON P 54 FULLTIME AF OFF ON P 69 AF MODE iESP SPOT P 68 6 OFF ON P 81 PANORAMA 7 P 86 2 IN 1 P 88 FUNCTION OFF BLAC...

Page 219: ...available in r mode Top menu Tab Function Setting Ref Page MODE MENU SETUP ALL RESET 8 OFF ON P 128 W ENGLISH FRANCAIS DEUTSCH ESPA OL P 26 PW ON OFF SETUP OFF 1 2 P 146 REC VIEW OFF ON P 143 SLEEP 30...

Page 220: ...WHITE SEPIA P 90 PICTURE 7 7 P 101 SHARPNESS 5 5 P 102 CONTRAST 5 5 P 103 SATURATION 5 5 P 104 CARD CARD SETUP YES NO P 139 SETUP ALL RESET OFF ON P 128 W ENGLISH FRANCAIS DEUTSCH ESPA OL P 26 PW ON...

Page 221: ...IT Q 640 480 320 240 CANCEL P 122 P NEW FILE CANCEL P 123 CARD CARD SETUP ALL ERASE FORMAT P 127 139 SETUP ALL RESET OFF ON P 128 W ENGLISH FRANCAIS DEUTSCH ESPA OL P 26 PW ON OFF SETUP OFF 1 2 P 146...

Page 222: ...ALL ERASE FORMAT P 127 139 SETUP ALL RESET OFF ON P 128 W ENGLISH FRANCAIS DEUTSCH ESPA OL P 26 PW ON OFF SETUP OFF 1 2 P 146 s P 142 X P 28 VIDEO OUT NTSC PAL P 151 G 4 9 16 P 112 8 OFF ON P 145 MOVI...

Page 223: ...000 sec ZOOM WIDE LCD OFF F 0 FLASH AUTO S M SLOW1 n OFF AF MF AF Y OFF DRIVE o BKT 1 EV 3 ISO AUTO A S M 100 p A r1 2 3 4 MY MODE 1 w 0 SLOW SLOW1 NOISE REDUCTION OFF m fixed on ON MULTI METERING OFF...

Page 224: ...back mode TIFF 2048 1536 SHQ 2048 1536 HQ 2048 1536 SQ1 1280 960 NORMAL SQ2 640 480 NORMAL WB AUTO 0 SHARPNESS 0 CONTRAST 0 SATURATION 0 REC VIEW ON SLEEP 3 MIN FILE NAME RESET m ft m SHORT CUT A DRIV...

Page 225: ...factory default settings Miscellaneous 10 z z z zOthers Settings differ according to the region where the camera is sold ALL RESET ON W ENGLISH PW ON OFF SETUP 1 s NORMAL X Y M D 2003 01 01 00 00 VID...

Page 226: ...ng on the modes set in the MY MODE SETUP menu Mode h ijk lmo p P n Function A S M p 9 Zoom 9 DIGITAL ZOOM 9 1 AF 9 Focus lock 9 AF MODE 9 FULLTIME AF 9 AF AREA 9 Manual focus 9 FLASH MODE AUTO 9 9 9 9...

Page 227: ...AMA 9 1 9 2 IN 1 9 FUNCTION BLACK WHITE 9 SEPIA 9 WHITE BOARD 9 BLACK BOARD 9 K 9 ISO 9 F 9 9 WB 9 9 SHARPNESS 9 CONTRAST 9 SATURATION 9 NOISE REDUCTION 9 INFO 9 u 9 9 ALL RESET 9 3 W 9 PW ON OFF SETU...

Page 228: ...ous 9 Available Not available 1 Cannot be selected in o mode 2 Cannot be selected in m mode 3 Cannot be selected in r mode FILE NAME 9 PIXEL MAPPING 9 s 9 X 9 m ft 9 VIDEO OUT 9 SHORT CUT 9 CUSTOM BUT...

Page 229: ...k the cloth in mild soapy water and wring well Wipe the camera with the damp cloth and then dry it with a dry cloth If you have used the camera at the beach use a cloth soaked in clean water and well...

Page 230: ...els TIFF SQ2 No of storable pictures When using a 32 MB card Approx 3 frames TIFF 2048 1536 Approx 16 frames SHQ 2048 1536 Approx 40 frames HQ 2048 1536 Approx 99 frames SQ1 1280 960 NORMAL Approx 331...

Page 231: ...F to 140 F storage Humidity 30 to 90 operation 10 to 90 storage Power supply 2 CR V3 lithium battery packs or 4 AA R6 alkaline batteries lithium batteries NiMH batteries or NiCd batteries AC adapter...

Page 232: ...and the sharper the background Aperture is measured in f stops Larger aperture values indicate smaller apertures and smaller aperture values indicate larger apertures CCD Charge Coupled Device This co...

Page 233: ...g to appear in the corners of the image Effective Pixel Resolution The number of pixels used in the CCD to create the image EV Exposure Value A system for measuring exposure EV0 is when the aperture i...

Page 234: ...is the smallest unit dot used to make up an image Clear large sized printed images require millions of pixels S Shutter Priority Mode Also called Shutter Priority AE mode The user selects the shutter...

Page 235: ...ound 8 145 BKT 84 BLACK WHITE 90 BLACK BOARD 90 C Camera movement warning 57 Card 22 Card access lamp 11 46 Card check 25 Card cover 11 22 CARD SETUP 139 Close up playback U 110 Cloudy day 3 99 Connec...

Page 236: ...ns cap 17 Lens cap string 17 Lithium battery pack 20 M Macro spot button 75 80 Macro mode shooting 80 Manual focus 73 Manual shooting M 45 66 Measurement units 150 Memory gauge 15 Metering n 75 Mode 4...

Page 237: ...Self timer button Y 11 82 Self timer lamp 10 82 SEPIA 90 Sequential shooting j 83 SHARPNESS 102 Shooting mode 12 Shooting mode menu 42 SHORT CUT 133 SHQ 91 Shutter button 10 47 Shutter priority shoot...

Page 238: ...192 Index W White balance WB 98 White balance adjustment 101 WHITE BOARD 90 X xD Picture Card 22 Z Zoom lever 54 110 111...

Page 239: ...rg Germany Tel 49 0 40 23 77 30 49 0 40 23 77 33 Letters Postfach 10 49 08 20034 Hamburg Germany European Technical Customer Support Please visit our homepage http www olympus europa com or call our T...

Page 240: ...ra Thank you for purchasing an Olympus digital camera This manual provides instructions on how to install the USB driver To ensure correct installation refer only to these installation procedures DIGI...

Page 241: ...e its accuracy However if you find any errors or incomplete information please contact your local Olympus representative It is prohibited by copyright laws to duplicate in part or in whole the informa...

Page 242: ...3 Macintosh Windows INDEX Flowchart 4 Identifying the OS 6 Windows 98 Me 2000 XP 8 Macintosh OS 9 X 23 Downloading image files using other OS For other OS users 31...

Page 243: ...Windows 95 NT 4 0 Windows 98 98 SE upgrade from Windows 95 Mac OS 8 6 or lower except Mac OS 8 6 equipped with USB MASS Storage Support 1 3 5 installed at the factory Data transfer is not guaranteed...

Page 244: ...he AC adapter disconnect the camera from the computer and make sure that the camera is turned off To avoid computer malfunctions do not turn off the camera when the camera is connected to a computer I...

Page 245: ...your desktop When the My computer icon is not on your desktop click Control Panel from the Start menu 2 Double click the Control Panel icon 3 Double click the System icon The way the file icons inside...

Page 246: ...ose the window If your OS is Windows 98 98 SE proceed to Installing the USB driver for Windows 98 p 9 Users running Windows Me 2000 XP p 11 Users running other OS p 31 Mac OS Macintosh Select About Th...

Page 247: ...camera the camera will turn off in the middle of the operation and this could destroy image files data If you are using batteries make sure that there is sufficient remaining battery power Installing...

Page 248: ...necting the camera to the computer p 11 1 Insert the provided software CD into your CD ROM drive 2 The Olympus Windows Installer should automatically launch Click USB Driver If the USB driver is alrea...

Page 249: ...Continue The installation of the USB driver will start 4 Click OK to restart your computer and the installation is complete 5 When the computer has restarted installation is complete If the Olympus W...

Page 250: ...cable to the USB connector on the camera The location of the USB connector or multi connector varies depending on the camera model Refer to the camera manual for details The location of the USB port...

Page 251: ...onitor button When the camera is turned on the lamp on the right of the viewfinder lights up Camera with a mode Set the mode dial to If the camera has a power switch as well as a mode dial turn the po...

Page 252: ...ws XP You can download image files from the camera easily Select Copy pictures to folder on my computer using Microsoft Scanner and Camera Wizard then follow the on screen instructions You may also se...

Page 253: ...be other Removable Disk icons for other devices such as a removable media drive or USB SmartMedia Reader Writer In this case the digital camera is recognized as another Removable Disk If you cannot fi...

Page 254: ...e Disk follow the procedure below to check whether the USB driver has been fully installed 1 Open My Computer and double click the Control Panel icon For users running Windows XP open Control Panel fr...

Page 255: ...nd start again Users running Windows 98 98 SE start again from Confirming the USB driver is installed and Users running Window Me 2000 XP start from Connecting the camera to the computer If the USB dr...

Page 256: ...as a Removable Disk 3 Double click the Dcim folder If an error message appears when you double click the icon there may be a problem with one of the following the camera s power source the AC adapter...

Page 257: ...he My Documents icon The camera automatically assigns folder names and file names according to the following rules Serial numbers of image files run from 0001 to 9999 Serial numbers of folders run fro...

Page 258: ...ge files downloaded to your computer The files will be opened in the default image viewer of the operating system If you want to view the image a different size or process it you will need to open the...

Page 259: ...the viewfinder or the card access lamp is not blinking Some camera models have either a lamp on the right of the viewfinder or a card access lamp and the location varies depending on the model Refer...

Page 260: ...cable from the camera 6 Remove the USB cable from your computer Windows Me 2000 XP 1 Make sure that the lamp on the right of the viewfinder or the card access lamp is not blinking Some camera models...

Page 261: ...rs 3 Click on the message The Unplug or Eject Hardware window appears 4 When a message appears click OK 5 Remove the USB cable from the camera 6 Remove the USB cable from your computer If the window r...

Page 262: ...age files data If you are using batteries make sure that there is sufficient remaining battery power If you are running Mac OS X the connection to the computer and downloading the image data are verif...

Page 263: ...nnector or multi connector varies depending on the camera model Refer to the camera manual for details The location of the USB port varies depending on the computer For details refer to your computer...

Page 264: ...power switch to ON Camera with a mode Camera setup connection mode Set the mode dial to to turn the camera on 4 The computer recognizes the camera as a new device The computer recognizes the camera au...

Page 265: ...ror message appears when you double click the icon there may be a problem with one of the following the camera s power source the AC adapter is not properly connected or the battery power is low the c...

Page 266: ...names according to the following rules Serial numbers of image files run from 0001 to 9999 Serial numbers of folders run from 100 to 999 When file number 9999 is reached a new folder is created and a...

Page 267: ...les in the Hard Disk folder The files will be opened in the default image viewer of the operating system If you want to view the image a different size or process it you will need to open the image wi...

Page 268: ...Capture software dialog appears 1 From the Download To menu select a destination folder 2 To download all images click Download All To selectively download images click Download Some and highlight the...

Page 269: ...iewfinder or the card access lamp is not blinking 2 Drag the untitled icon on the desktop to Trash 3 Make sure that the lamp on the right of the viewfinder or the card access lamp is not blinking 4 Re...

Page 270: ...d slot Consult your nearest Olympus representative Is your OS one of the following Windows 98 Windows 2000 Windows Me Windows XP Mac OS 9 X Yes No No Yes Connect the camera directly to your computer u...

Page 271: ...rg Germany Tel 49 0 40 23 77 30 49 0 40 23 77 33 Letters Postfach 10 49 08 20034 Hamburg Germany European Technical Customer Support Please visit our homepage http www olympus europa com or call our T...

Page 272: ......

Page 273: ......

Page 274: ......

Page 275: ......

Page 276: ......

Page 277: ......

Page 278: ......

Page 279: ......

Page 280: ......

Page 281: ......

Page 282: ......

Page 283: ......

Page 284: ......

Page 285: ......

Page 286: ......

Page 287: ......

Page 288: ......

Page 289: ......

Page 290: ......

Page 291: ......

Page 292: ......

Page 293: ......

Page 294: ......

Page 295: ......

Page 296: ......

Page 297: ......

Page 298: ......

Page 299: ......

Page 300: ......

Page 301: ......

Page 302: ......

Page 303: ......

Page 304: ......

Page 305: ......

Page 306: ......

Page 307: ......

Page 308: ......

Page 309: ......

Page 310: ......

Page 311: ......

Page 312: ......

Page 313: ......

Page 314: ......

Page 315: ......

Page 316: ......

Page 317: ......

Page 318: ......

Page 319: ......

Page 320: ......

Page 321: ......

Page 322: ......

Reviews: