background image

73

G

Create scenes

13.  Create scenes

You can create scenes in the 

Tuya Smart

 app. With a scene, you can, for example, switch on another device 

controlled via the 

Tuya Smart

 app when an alarm is triggered on the alarm system. You can also trigger the alarm 

system by another device controlled via the 

Tuya Smart

 app.

The sensors registered to the alarm system cannot be used to trigger a scene. Triggering a scene when an 

alarm is triggered is independent of the triggering sensor on the alarm system. 

For information on which function of another device controlled via the 

Tuya Smart

 app is controlled via a 

scene or is available for triggering a scene, refer to the operating instructions of the device in question.
For other devices controlled via the 

Tuya Smart

 app, the menu navigation may differ.

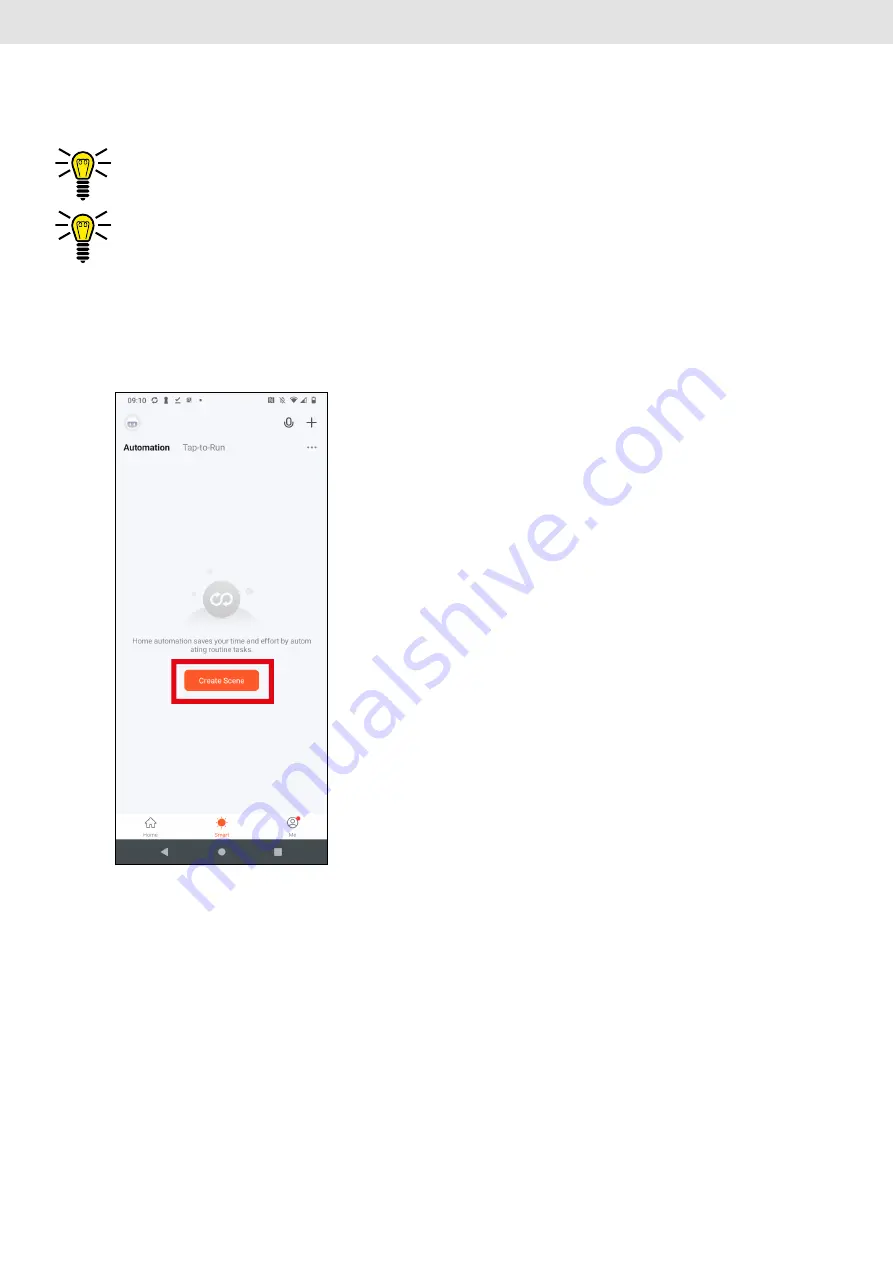
13.1  Example: Alarm on the alarm system controls a camera

IIn the following example, the alarm on the alarm system is to activate a camera.

1. 

In the 

Tuya Smart

 app, tap 

Smart

 at the bottom to go to the scene creation area.

2. 

Tap on 

Create scene

.

Summary of Contents for ProDomo

Page 1: ...ProDomo GO Europe GmbH Zum Kraftwerk 1 45527 Hattingen Germany www go europe com V1 11 12 2021 ID 6032 D Bedienungsanleitung 2 G Manual 44 ...

Page 2: ...m Hotspot Mode 13 10 Zubehör anmelden z B Sensoren 18 10 1 Anmeldung über App Tuya Smart 18 10 2 Anmeldung über Alarmanlage 20 11 Bedienung über App Tuya Smart 21 11 1 Alarm aktivieren deaktivieren 21 11 2 Alarm auslösen 22 11 3 Verlauf Aufzeichnung 23 11 4 Zubehör einrichten 24 11 5 Einstellungen für Ihre Alarmanlage 27 12 Türklingel Funktion 30 13 Szenen erstellen 31 13 1 Beispiel Alarm an der A...

Page 3: ...ie können Sensoren der Protect ProHome Serie an der Alarmanlage anmelden 1 2 Sicherheitshinweise beachten Lesen und beachten Sie die Warnhinweise um sich und die Umwelt zu schützen WARNUNG Lebensgefahr durch Stromschlag Verwenden Sie das Gerät NIEMALS wenn Sie Beschädigungen am Netzstecker vermuten oder Beschädigungen am Netzstecker zu sehen sind WARNUNG Führen Sie Reparaturen am Gerät NIEMALS sel...

Page 4: ...nen erstellen siehe Abschnitt 13 Szenen erstellen auf Seite 31 2 4 Systemvoraussetzungen Sie benötigen ein internetfähiges Smartphone Tablet mit den Betriebssystemen Android ab 4 4 oder iOS ab 10 und die aktuellste Version der App Tuya Smart Verbinden Sie für die erstmalige Inbetriebnahme Ihre Alarmanlage mit der App Tuya Smart und dem WLAN Ihres Routers Beachten Sie bei der Auswahl des Montageort...

Page 5: ...ors Alarm bei Auslösen eines Sensors 24H Zone Alarm bei Auslösen eines Sensors Alarm bei Auslösen eines Sensors Alarm bei Auslösen eines Sensors 3 Ihre ProDomo im Detail Die folgende Übersicht zeigt Ihnen Ihre Alarmanlage im Detail 1 2 3 4 5 Nr Bedeutung Nr Bedeutung 1 Funktionstaste 4 Netzstecker 2 Leuchtring 5 Lautsprecher 3 Einstelltaste 4 Symbole Die folgenden Symbole finden Sie auf der Verpac...

Page 6: ...ben und ausschalten öffnen Sie vor dem Einschalten die App Tuya Smart Wenn Sie die App Tuya Smart beim Einschalten nicht geöffnet haben können Einstellungen verloren gehen 5 2 Einstelltaste Funktion Bedienung Zubehör anmelden Drücken Sie die Einstelltaste bis die Alarmanlage 1 mal piept Der Leuchtring blinkt grün Die Alarmanlage ist im Anmeldemodus Drücken Sie im Anmeldemodus die Einstelltaste kur...

Page 7: ...sam Die Alarmanlage befindet sich im Hotspot Mode Dauerleuchten Die Netzwerkverbindung ist gut 7 Alarmanlage anschließen Platzieren der Alarmanlage Platzieren Sie die Alarmanlage nicht auf oder in unmittelbarer Nähe von großen Metallgegenständen oder elektri schen Störquellen die die Funkübertragung beeinträchtigen Platzieren Sie die Alarmanlage möglichst zentral um eine optimale Funkübertragung a...

Page 8: ...bbildungen beider Betriebs systeme dargestellt 1 Laden Sie die App Tuya Smart aus dem App Store bzw von Google Play herunter oder scannen Sie diesen QR Code Achten Sie darauf dass sich Ihre Alarmanlage und Ihr Smartphone Tablet im Bereich des gleichen Heimnetzwerks WLAN befinden 2 Öffnen Sie die App Tuya Smart 3 Erstellen Sie ein neues Konto oder melden Sie sich mit einem vorhandenen Konto an Wenn...

Page 9: ...manlage mit Ihrem Heimnetzwerk WLAN verbinden Stellen Sie sicher dass Ihr Smartphone Tablet mit Ihrem Heimnetzwerk WLAN verbunden ist und das WLAN Ihres Routers auf 2 4 GHz eingestellt ist 9 1 Verbinden im Fast Mode 1 Tippen Sie in der App Tuya Smart oben rechts auf das Plus oder auf Gerät hinzufügen ...

Page 10: ... tippen Sie auf Alarm Wi Fi 3 Wählen Sie Ihr Heimnetzwerk aus und geben Sie das Passwort für Ihr Heimnetzwerk ein 4 Drücken Sie die Einstelltaste für 3 bis 5 Sekunden bis die Alarmanlage 2 mal piept Der Leuchtring blinkt schnell in blau Die Alarmanlage befindet sich im Fast Mode ...

Page 11: ...11 D Alarmanlage verbinden 5 Bestätigen Sie in der App Tuya Smart dass die Anzeige schnell blinkt und Tippen Sie auf Weiter Es läuft ein Zähler rückwärts bis die Verbindung hergestellt wurde ...

Page 12: ...Leuchtring leuchtet dauerhaft in blau Die Alarmanlage kann über die App Tuya Smart eingerichtet werden Bei einer Verbindungs Zeitüberschreitung können Sie den Vorgang wiederholen oder in den Hotspot Mode wechseln 1 Tippen Sie auf Wiederholen um den Vorgang zu wiederholen oder tippen Sie auf Pairing Modus wechseln um in der Hotspot Mode zu wechseln ...

Page 13: ... Wenn im Fast Mode keine Verbindung hergestellt werden konnte wechseln Sie in den Hotspot Mode 1 Tippen Sie in der App Tuya Smart oben rechts auf das Plus oder auf Gerät hinzufügen 2 Wählen Sie den Bereich Sicherheitssensor aus und tippen Sie auf Alarm Wi Fi ...

Page 14: ...Heimnetzwerk ein 4 Tippen Sie in der App Tuya Smart oben rechts auf EZ Modus Fast Mode und wählen Sie den AP Modus Hotspot Mode aus 5 Drücken Sie die Einstelltaste und die Funktionstaste gleichzeitig für 3 Sekunden Der Leuchtring blinkt langsam in blau Die Alarmanlage befindet sich im Hotspot Mode ...

Page 15: ...15 D Alarmanlage verbinden 6 Bestätigen Sie in der App Tuya Smart dass die Anzeige langsam blinkt und Tippen Sie auf Weiter ...

Page 16: ... Tablet wechselt in die WLAN Einstellung und zeigt alle vorhandenen Hotspots an Android iOS Home SmartLife D051 xxx xxx yy 01 asd xx mnb_01 gudi aaaa bbb_56 SD_002 kiku_x udo_nv HNO_AE Home xxx xxx SmartLife D051 8 Wählen Sie den Hotspot SmartLife XXXX bzw SL XXXX aus und tippen Sie auf Verbinden ...

Page 17: ...ähler rückwärts bis die Verbindung hergestellt wurde 10 Wenn die Alarmanlage erfolgreich hinzugefügt wurde tippen Sie in der App Tuya Smart oben rechts auf Fertigstellung Der Leuchtring leuchtet dauerhaft in blau Die Alarmanlage kann über die App Tuya Smart eingerichtet werden ...

Page 18: ...önnen Zubehör der Protect ProHome Serie verwenden Melden Sie mehrere Sensoren nacheinander an Sensoren können nicht gleichzeitig angemeldet werden 10 1 Anmeldung über App Tuya Smart 1 Öffnen Sie die App Tuya Smart und tippen Sie auf Ihre Alarmanlage Wählen Sie in den Einstellungen unter Meistersprache Ihre Sprache aus um angemeldete Geräte in Ihrer Sprache anzuzeigen ...

Page 19: ...den z B Sensoren 2 Tippen Sie auf Zubehör 3 Tippen Sie oben rechts auf das Plus um Zubehör hinzuzufügen In der App Tuya Smart wird der Anmeldemodus angezeigt Die Alarmanlage ist im Anmeldemodus Der Leuchtring blinkt grün ...

Page 20: ...ste bis die Alarmanlage 1 mal piept Die Alarmanlage ist im Anmeldemodus Der Leuchtring blinkt grün 2 Lösen Sie den Anmeldevorgang am anzumeldenden Gerät aus Wie Sie den Anmeldevorgang am anzumeldenden Gerät auslösen entnehmen Sie der Anleitung für das anzumeldende Gerät Einige Geräte melden sich durch Einlegen der Batterie an Sollte die Anmeldung durch Einlegen der Batterie fehlschlagen versuchen ...

Page 21: ...ive Betriebsmodus wird farblich hervorgehoben und in der Anzeige darüber angezeigt Deaktiviert Im Betriebsmodus Deaktiviert lösen nur Sensoren einen Alarm aus die der 24H Zone zugeordnet sind Unterwegs aktiviert Im Betriebsmodus Unterwegs aktiviert lösen alle Sensoren Normal Zone Heim Zone oder 24H Zone einen Alarm aus Heim aktiviert Im Betriebsmodus Heim aktiviert lösen nur Sensoren einen Alarm a...

Page 22: ...dienung über App Tuya Smart 22 D 11 2 Alarm auslösen Über die Schaltfläche Alarm auslösen können Sie manuell einen Alarm auslösen 1 Tippen Sie auf die Schaltfläche Alarm auslösen Der Alarm wird ausgelöst ...

Page 23: ...uya Smart 11 3 Verlauf Aufzeichnung Unter Verlauf Aufzeichnung werden die Aktivierung Deaktivierung der Alarmanlage und die Alarme aufgezeichnet 1 Tippen Sie auf die Schaltfläche Verlauf Aufzeichnung Der Verlauf wird angezeigt ...

Page 24: ...eigt Sie können Zubehör aktivieren deaktivieren löschen umbenennen und Einstellungen für das Zubehör vornehmen Zubehör löschen oder umbenennen 1 Wischen Sie in der Zeile mit dem Zubehör nach links Rechts werden Schaltflächen zum Löschen und Umbenennen angezeigt 2 Tippen Sie auf um das Zubehör umzubenennen oder tippen Sie auf um das Zubehör zu löschen ...

Page 25: ...ng zu ändern Gerät ausgeschaltet Tippen Sie auf den Schalter um das Zubehör ein auszuschalten Zone Attribute Weisen Sie das Zubehör einer Zone zu Normal Zone Sensoren in der Normal Zone lösen einen Alarm aus wenn der Modus Unterwegs aktiviert ist Heim Zone Sensoren in der Heim Zone lösen einen Alarm aus wenn der Modus Unterwegs oder Heim aktiviert ist 24H Zone Sensoren in der 24H Zone lösen in jed...

Page 26: ...echts auf Speichern um die Einstellungen zu speichern Die Einstellungen wurden übernommen Tippen Sie oben rechts auf Speichern um die Einstellungen zu speichern Wenn Sie nicht auf Speichern tippen werden die Änderungen an den Einstellungen nicht übernommen ...

Page 27: ... Prüfton Ein Der Bestätigungston beim Aktivieren Deaktivieren oder bei Einstellungen ist eingeschaltet Aus Der Bestätigungston beim Aktivieren Deaktivieren oder bei Einstellungen ist ausgeschaltet Modus Licht Ein Der Leuchtring ist eingeschaltet Aus Der Leuchtring ist ausgeschaltet Alarm Nachricht auslösen Ein Bei Alarmauslösung wird eine Nachricht auf Ihrem Smartphone Tablet angezeigt Aus Bei Ala...

Page 28: ...len Sie die Zeit ein wann eine Aktion ausgeführt werden soll 3 Unter Wiederholen können Sie Wochentage auswählen an denen die Aktion wiederholt werden soll Wenn nichts ausgewählt ist wird die Aktion nur einmal ausgeführt 4 Geben Sie unter Anmerkung eine Information zur Aktion ein Optional 5 Stellen Sie den Schalter hinter Ausführungsmeldung an wenn eine Ausführungsmeldung auf Ihr Smart phone Table...

Page 29: ...29 D Bedienung über App Tuya Smart 7 Tippen Sie oben rechts auf Speichern um die Einstellungen zu speichern Die Aktion wurde erstellt Wenn Sie nicht auf Speichern tippen wird die Aktion nicht erstellt ...

Page 30: ...lingel verwenden wollen unter Zubehör hinzu 2 Öffnen Sie die Einstellungen für den Sensor 3 Tippen Sie auf Geräteart und wählen Sie aus der Liste Doorbell aus 4 Tippen Sie auf Zone Attribute und wählen Sie aus der Liste 24H Zone aus 5 Ändern Sie die Gerätebezeichnung 6 Tippen Sie oben rechts auf Speichern um die Einstellungen zu übernehmen Bei Auslösen des Sensors ertönt der Türklingelton an der A...

Page 31: ...e bei Auslösung eines Alarms ist unabhängig vom auslösenden Sensor an der Alarmanlage Welche Funktion eines anderen über die App Tuya Smart gesteuerten Geräts über eine Szene gesteuert oder zum Auslösen einer Szene zur Verfügung stehen entnehmen Sie der Bedienungsanleitung des betref fenden Geräts Bei anderen über die App Tuya Smart gesteuerten Geräten kann die Menüführung abweichen 13 1 Beispiel ...

Page 32: ...ie den Zustand aus welcher eine Szene auslösen soll Wählen Sie das Feld wenn sich der Gerätestatus ändert aus wenn die Auslösung eines Alarms an der Alarmanlage eine Szene auslösen soll 4 Wählen Sie aus den Geräten die Alarmanlage aus ...

Page 33: ...ie unter Master Status den Zustand Aus aus wenn die Auslösung eines Alarms an der Alarm anlage eine Szene auslösen soll 6 Wählen Sie das Feld Betreiben Sie das Gerät aus um ein anderes über die App Tuya Smart gesteuertes Gerät zu steuern ...

Page 34: ...n erstellen 34 D 7 Wählen Sie das Gerät aus das in der Szene gesteuert werden soll 8 Wählen Sie die Funktion aus die in der Szene ausgeführt werden soll z B Motion Alert einschalten und tippen Sie auf Weiter ...

Page 35: ...re Aufgaben hinzufügen den Namen der Szene verändern und Zeiteinstellungen für die Szene vornehmen Tippen Sie auf Speichern um die Szene zu speichern Die Szene wurde erstellt 10 Sie können die Szene mit dem Schalter rechts aktivieren oder deaktivieren ...

Page 36: ...piel soll ein über die App Tuya Smart gesteuerter Tür Fenstersensor einen Alarm an der Alarm anlage auslösen 1 Tippen Sie auf Szene erstellen 2 Wählen Sie den Zustand aus welcher eine Szene auslösen soll Wählen Sie das Feld wenn sich der Gerätestatus ändert aus wenn das Auslösen des Türsensors eine Szene auslösen soll ...

Page 37: ...7 D Szenen erstellen 3 Wählen Sie aus den Geräten den Tür Fenstersensor aus 4 Wählen Sie die unter Schalter den Zustand Offen aus wenn das Öffnen des Sensors einen Alarm an der Alarmanlage auslösen soll ...

Page 38: ...Szenen erstellen 38 D 5 Wählen Sie das Feld Betreiben Sie das Gerät aus um die Alarmanlage zu steuern 6 Wählen Sie die Alarmanlage aus ...

Page 39: ...39 D Szenen erstellen 7 Wählen Sie unter Alarm auslösen den Zustand Alarm auslösen aus 8 Speichern Sie die Auswahl und tippen Sie oben rechts auf Weiter ...

Page 40: ...re Aufgaben hinzufügen den Namen der Szene verändern und Zeiteinstellungen für die Szene vornehmen Tippen Sie auf Speichern um die Szene zu speichern Die Szene wurde erstellt 10 Sie können die Szene mit dem Schalter rechts aktivieren oder deaktivieren ...

Page 41: ...hör befinden Prüfen Sie die Batterien im Zubehör bzw die Stromversorgung des Zubehörs Auf Ihrem Smartphone Tablet wird keine Alarmmeldung angezeigt Prüfen Sie in Ihrem Smartphone Tablet ob Benachrichtigungen eingeschaltet sind Einstellungen in der App Tuya Smart werden nicht übernommen Tippen Sie in den Einstellungen oben rechts auf Speichern nachdem Sie Einstellungen vorgenommen haben Szenen funk...

Page 42: ... gesetz licher Bestimmungen getrennt vom Hausmüll zu entsorgen sind Entsorgen Sie Ihr Gerät bei der Sammelstelle Ihres kommunalen Entsorgungsträgers Informieren Sie sich über die Möglichkeiten der unentgeltlichen Rücknahme von Altgeräten bei Ihrem Händler Daten vom Gerät entfernen Löschen Sie alle Benutzereinstellungen von Ihrem Gerät bevor Sie das Gerät entsorgen Zurücksetzen auf Werks einstellun...

Page 43: ...se oder durch Scannen des QR Codes http productip com f 14d841 14 6 Technische Daten Merkmal Wert Versorgungsspannung 100 V 240 V AC Eingangsleistung max 0 2 W Sendeleistung 20 dBm WLAN Standard IEEE 802 11 b g n Funkfrequenz für Zubehör 868 5 MHz Reichweite max 70 m Lautstärke in 1 Meter Entfernung Niedrig 80 dB Mittel 85 dB Hoch 90 dB Abmessungen B H T 81 6 81 6 74 2 mm Gewicht 100 g Zulässige U...

Page 44: ...e 51 9 2 Connecting in Hotspot Mode 55 10 Registering accessories e g sensors 60 10 1 Registering via the Tuya Smart app 60 10 2 Registration via alarm system 62 11 Operation via Tuya Smart app 63 11 1 Activate deactivate alarm 63 11 2 Trigger alarm 64 11 3 History recording 65 11 4 Set up accessories 66 11 5 Settings for your alarm system 69 12 Doorbell function 72 13 Create scenes 73 13 1 Exampl...

Page 45: ...rm system 1 2 Pay attention to the safety instructions Read and observe the warnings to protect yourself and the environment WARNING Danger to life due to electric shock NEVER use the device if you suspect damage to the power plug or if damage is visible on the power plug WARNING NEVER carry out repairs on the device yourself Do not open the device it does not contain any parts to be serviced by t...

Page 46: ...do this you can create scenes in the Tuya Smart app see section 13 Create scenes on page 73 2 4 System Requirements You need an Internet enabled smartphone tablet with the Android from 4 4 or iOS from 10 operating systems and the latest version of the Tuya Smart app For the initial start up connect your alarm system with the Tuya Smart app and the WLAN of your router When selecting a mounting loca...

Page 47: ... a sensor is triggered Alarm when a sensor is triggered 24H zone Alarm when a sensor is triggered Alarm when a sensor is triggered Alarm when a sensor is triggered 3 Your ProDomo in detail The following overview shows your alarm system in detail 1 2 3 4 5 No Meaning No Meaning 1 Function key 4 Power plug 2 Illuminated ring 5 Speaker 3 Setting key 4 Symbols The following symbols can be found on the...

Page 48: ...If you have set up the alarm system and switch it off open the Tuya Smart app before switching it on If you have not opened the Tuya Smart app when you switch it on settings may be lost 5 2 Setting key Function Operation Registering accessories Press the setting key until the alarm system beeps 1 time The illuminated ring flashes green The alarm system is in registration mode Press the setting key...

Page 49: ...rm system is in Fast Mode Flashing slowly The alarm system is in Hotspot Mode Steady light The network connection is good 7 Installing the alarm system Positioning the alarm system Do not place the alarm system on or in the immediate vicinity of large metal objects or sources of electrical interfe rence that will impair radio transmission Place the alarm system as centrally as possible to ensure o...

Page 50: ...re In case of significant differences the illustrations of both operating systems are shown 1 Download the Tuya Smart app from the App Store or Google Play or scan this QR code Make sure that your alarm system and your smartphone tablet are within the range of the same home network WLAN 2 Open the Tuya Smart app 3 Create a new account or log in with an existing account If you create a new account ...

Page 51: ...tem you need to connect the alarm system to your home network WLAN Make sure your smartphone tablet is connected to your home network WLAN and your router s WLAN is set to 2 4 GHz 9 1 Connect in Fast Mode 1 In the Tuya Smart app tap the plus in the upper right corner or Add Device ...

Page 52: ...ction and tap Alarm Wi Fi 3 Select your home network and enter the password for your home network 4 Press the setting button for 3 to 5 seconds until the alarm beeps 2 times The illuminated ring flashes quickly in blue The alarm system is now in Fast mode ...

Page 53: ...53 G Connect the alarm system 5 Confirm in the Tuya Smart app that the indicator is blinking rapidly and tap Next A counter runs backwards until the connection is established ...

Page 54: ...er of the Tuya Smart app The illuminated ring lights up continuously in blue The alarm system can be set up via the Tuya Smart app If the connection timeout occurs you can repeat the process or switch to Hotspot Mode 1 Tap Retry to repeat the process or tap Switch Pairing Mode to switch to Hotspot Mode ...

Page 55: ... 2 Connecting in Hotspot Mode If a connection could not be established in Fast Mode switch to Hotspot Mode 1 In the Tuya Smart app tap the plus in the upper right corner or Add Device 2 Select the Sensors section and tap Alarm Wi Fi ...

Page 56: ... for your home network 4 In the Tuya Smart app tap EZ Mode Fast Mode in the upper right corner and select AP Mode Hotspot Mode 5 Press the setting key and the function key simultaneously for 3 seconds The illuminated ring flashes slowly in blue The alarm system is in hotspot mode ...

Page 57: ...57 G Connect the alarm system 6 In the Tuya Smart app confirm that the indicator is blinking slowly and tap Next ...

Page 58: ...smartphone tablet switches to the WLAN setting and displays all available hotspots Android iOS Home SmartLife D051 xxx xxx yy 01 asd xx mnb_01 gudi aaaa bbb_56 SD_002 kiku_x udo_nv HNO_AE Home xxx xxx SmartLife D051 8 Select the SmartLife XXXX or SL XXXX hotspot and tap Connect ...

Page 59: ...counter will run backwards until the connection is established 10 When the alarm is successfully added tap Done in the upper right corner of the Tuya Smart app The illuminated ring lights up continuously in blue The alarm system can be set up via the Tuya Smart app ...

Page 60: ...larm system You can use accessories from the Protect ProHome series Register several sensors one after the other Sensors cannot be registered at the same time 10 1 Registering via the Tuya Smart app 1 Open the Tuya Smart app and tap on your alarm system In the settings select your language under Master Language to display enrolled devices in your language ...

Page 61: ...ssories e g sensors 2 Tap Accessories 3 Tap the plus in the upper right corner to add accessories In the Tuya Smart app the login mode is displayed The alarm system is in registration mode The illuminated ring flashes green ...

Page 62: ... system beeps 1 time The alarm system is in registration mode The illuminated ring flashes green 2 Trigger the registration process on the device to be registered Refer to the instructions for the device to be registered for information on how to initiate the registration process on the device to be registered Some devices register by inserting the battery If registration by inserting the battery ...

Page 63: ...activate the operating mode The active operating mode is highlighted in color and shown in the display above Disarmed In Disarmed mode only sensors assigned to the 24H zone will trigger an alarm Away Armed In Away Armed mode all sensors Ordinary zone Home zone or 24H zone trigger an alarm Home Armed In Home armed mode only sensors assigned to the Home zone or 24H zone will trigger an alarm ...

Page 64: ...Operation via Tuya Smart app 64 G 11 2 Trigger alarm You can trigger an alarm manually via the Trigger alarm button 1 Tap the Trigger alarm button The alarm is triggered ...

Page 65: ...Operation via Tuya Smart app 11 3 History recording Under History records the activation deactivation of the alarm system and the alarms are recorded 1 Tap the History records button The history is displayed ...

Page 66: ...Others of all registered devices are displayed You can activate deactivate delete rename and make settings for accessories Deleting or renaming accessories 1 Swipe the accessory row to the left Buttons for deleting and renaming are displayed on the right 2 Tap to rename the accessory or tap to delete the accessory ...

Page 67: ...e enabled Tap the switch to turn the accessory on off Zone attribute Attach the accessories to a zone Ordinary zone Sensors in the Ordinary zone trigger an alarm when the Away Armed mode is activated Home zone Sensors in the Home zone trigger an alarm when the Away Armed or Home Armed mode is activated 24H zone Sensors in the 24H zone trigger an alarm in any mode including Disarmed mode Device typ...

Page 68: ...rt app 68 G 3 Tap Save in the upper right corner to save the settings The settings have been applied Tap Save in the upper right corner to save the settings If you do not tap Save the changes to the settings are not applied ...

Page 69: ...ation Control sound On The confirmation tone when activating deactivating or making settings is switched on Off The confirmation tone during activation deactivation or settings is switched off Mode light On The illuminated ring is switched on Off The light ring is switched off Alarme message propel On A message is displayed on your smartphone tablet when the alarm is triggered Off No message is di...

Page 70: ...n action 2 Set the time when an action should be executed 3 Under Repeat you can select days of the week when the action should be repeated If nothing is selected the action will be executed only once 4 Under Note enter information about the action Optional 5 Set the switch behind Notification if you want an execution message to be sent to your smartphone tablet 6 Select the action to be executed ...

Page 71: ...71 G Operation via Tuya Smart app 7 Tap Save in the upper right corner to save the settings The action has been created If you do not tap Save the action is not created ...

Page 72: ...he sensor you want to use as a doorbell under Accessories 2 Open the settings for the sensor 3 Tap Device Type and select Doorbell from the list 4 Tap Zone attribute and select 24H zone from the list 5 Change the Sub device name 6 Tap Save in the upper right corner to apply the settings When the sensor is triggered the doorbell sounds on the alarm system ...

Page 73: ...alarm is triggered is independent of the triggering sensor on the alarm system For information on which function of another device controlled via the Tuya Smart app is controlled via a scene or is available for triggering a scene refer to the operating instructions of the device in question For other devices controlled via the Tuya Smart app the menu navigation may differ 13 1 Example Alarm on the...

Page 74: ...es 74 G 3 Select the state that you want to trigger a scene Select the When device status changes field if triggering an alarm on the alarm system should trigger a scene 4 Select the alarm system from the devices ...

Page 75: ...enes 5 Select the Alarm state under Master status if the triggering of an alarm at the alarm system is to trigger a scene 6 Select the Run the device field to control another device controlled via the Tuya Smart app ...

Page 76: ...Create scenes 76 G 7 Select the device to be controlled in the scene 8 Select the function you want to perform in the scene such as Turn On Motion Alert and tap Next ...

Page 77: ... can add more tasks to the scene change the name of the scene and make time settings for the scene Tap Save to save the scene The scene has been created 10 You can activate or deactivate the scene with the switch on the right ...

Page 78: ...n the following example a door window sensor controlled via the Tuya Smart app is to trigger an alarm at the alarm system 1 Tap Create scene 2 Select the state that you want to trigger a scene Select the field When device status changes if the triggering of the door sensor should trigger a scene ...

Page 79: ...79 G Create scenes 3 Select the Door window sensor from the devices Door Window Sensor 4 Select the Open state under Switch if opening the sensor is to trigger an alarm at the alarm system ...

Page 80: ...Create scenes 80 G 5 Select the Run the device field to control the alarm system 6 Select the alarm system Door Window Sensor ...

Page 81: ...81 G Create scenes 7 Under Trigger alarm select the Trigger alarm state 8 Save the selection and tap Next in the upper right corner ...

Page 82: ...ame of the scene and make time settings for the scene Tap Save to save the scene Door Window Sensor If Door Window Sensor swich Open Alarm Tuya Trigger alarm Trigger alarm The scene has been created 10 You can activate or deactivate the scene with the switch on the right ...

Page 83: ...between the alarm system and the accessory Check the batteries in the accessory or the power supply to the accessory No alarm message is displayed on your smartphone tablet Check in your smartphone tablet if notifications are turned on Settings in the Tuya Smart app are not applied Tap Save in the top right of the settings after you have made settings Scenes do not work Check if the scene is enabl...

Page 84: ...ls Defective or empty batteries must be recycled in accordance with Directive 2006 66 EC and its amend ments Return batteries and the device via the collection points provided Defective or empty batteries must be recycled in accordance with Directive 2006 66 EC and its amend ments Return batteries and the device via the collection points provided Find out about the possibilities of taking back use...

Page 85: ...website or by scanning the QR code http productip com f 14d841 14 6 Technical data Feature Wert Supply voltage 100 V 240 V AC Power input Max 0 2 W Transmit power 20 dBm WLAN standard IEEE 802 11 b g n Radio frequency for acces sories 868 5 MHz Range Max 70 m Loudness at 1 meter distance Low 80 dB Medium 85 dB High 90 dB Dimensions W H D 81 6 81 6 74 2 mm Weight 100 g Ambient conditions 10 C bis 5...

Page 86: ...GO Europe GmbH Zum Kraftwerk 1 45527 Hattingen Germany V1 11 12 2021 ID 6032 ...

Reviews: