4-4
Printing from PC > Printing from PC
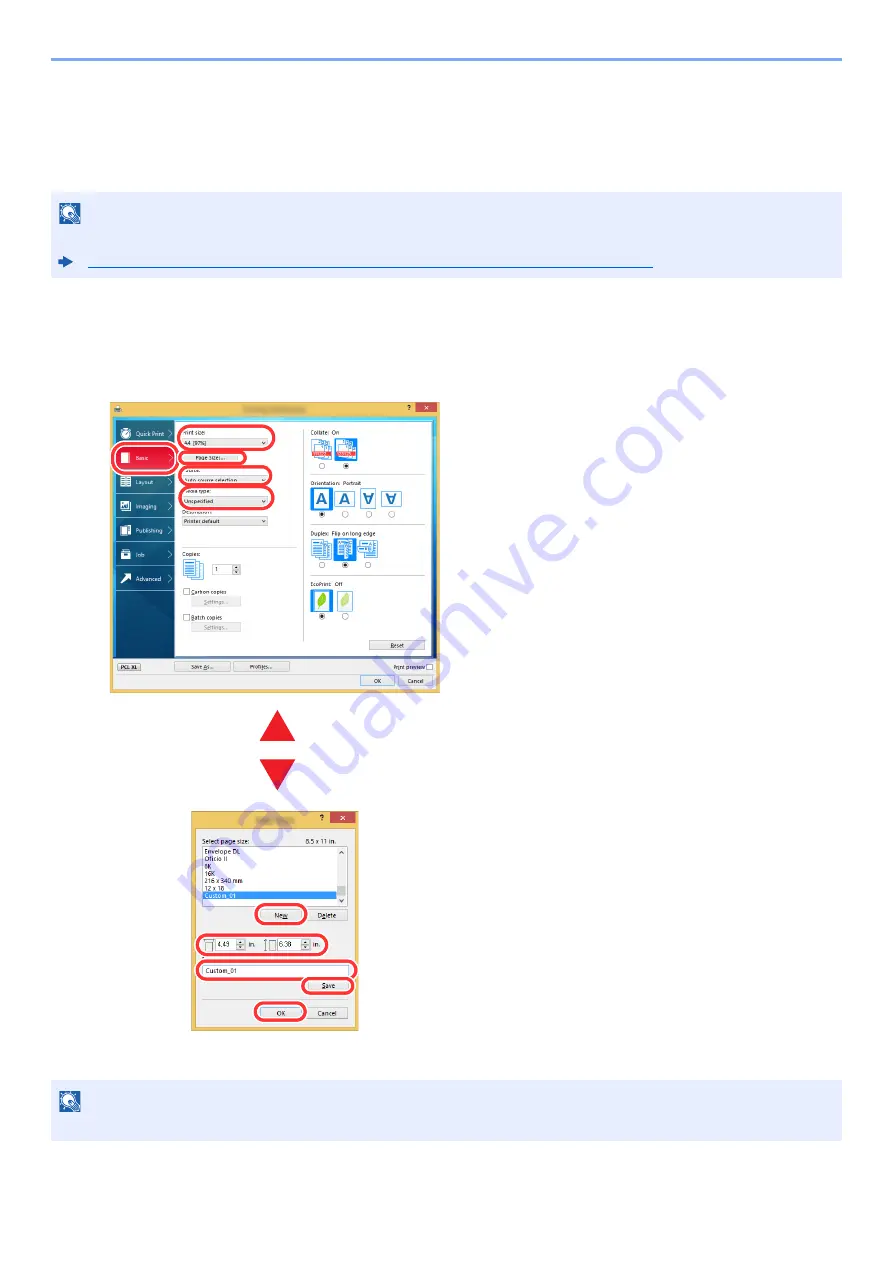
Printing on Non-standard Sized Paper
If you loaded a paper size that is not included in the print sizes of the machine, register the paper size in the [
Basic
]
tab of the print settings screen of the
Printing System Driver
.
The registered size can be selected from the "Print size" menu.
1
Display the print settings screen.
2
Register the paper size.
NOTE
To execute printing at the machine, set the paper size and type in the following:
Paper Size and Media Type for the Multi Purpose Tray (MP Tray Setting) (page 3-16)
NOTE
If you loaded a postcard or envelope, select [
Cardstock
] or [
Envelope
] in the "Media type" menu.
3
4
5
6
7
1 Click the [
Basic
] tab.
2 Click the [
Page Size...
] button.
3 Click the [
New
] button.
4 Enter the paper size.
5 Enter the name of the paper.
6 Click the [
Save
] button.
7 Click the [
OK
] button.
8 In the "Print size" menu, select the paper size
(name) that you registered in steps 4 to 7.
9 Select the type of paper in the "Media type"
menu.
10 Click [
MP tray
] in the "Source" menu.
1
10
8
2
9
Summary of Contents for d-COPIA4513MF plus
Page 396: ...10 8 Troubleshooting Regular Maintenance 4 5 6 IMPORTANT Do not touch the points shown below ...
Page 422: ...10 34 Troubleshooting Troubleshooting Duplex Unit 1 2 3 ...
Page 426: ...10 38 Troubleshooting Troubleshooting 5 d COPIA 5514MF d COPIA 6014MF 1 2 3 ...
Page 427: ...10 39 Troubleshooting Troubleshooting 4 ...
Page 470: ......


