background image

2PV/2PW

1-5-82

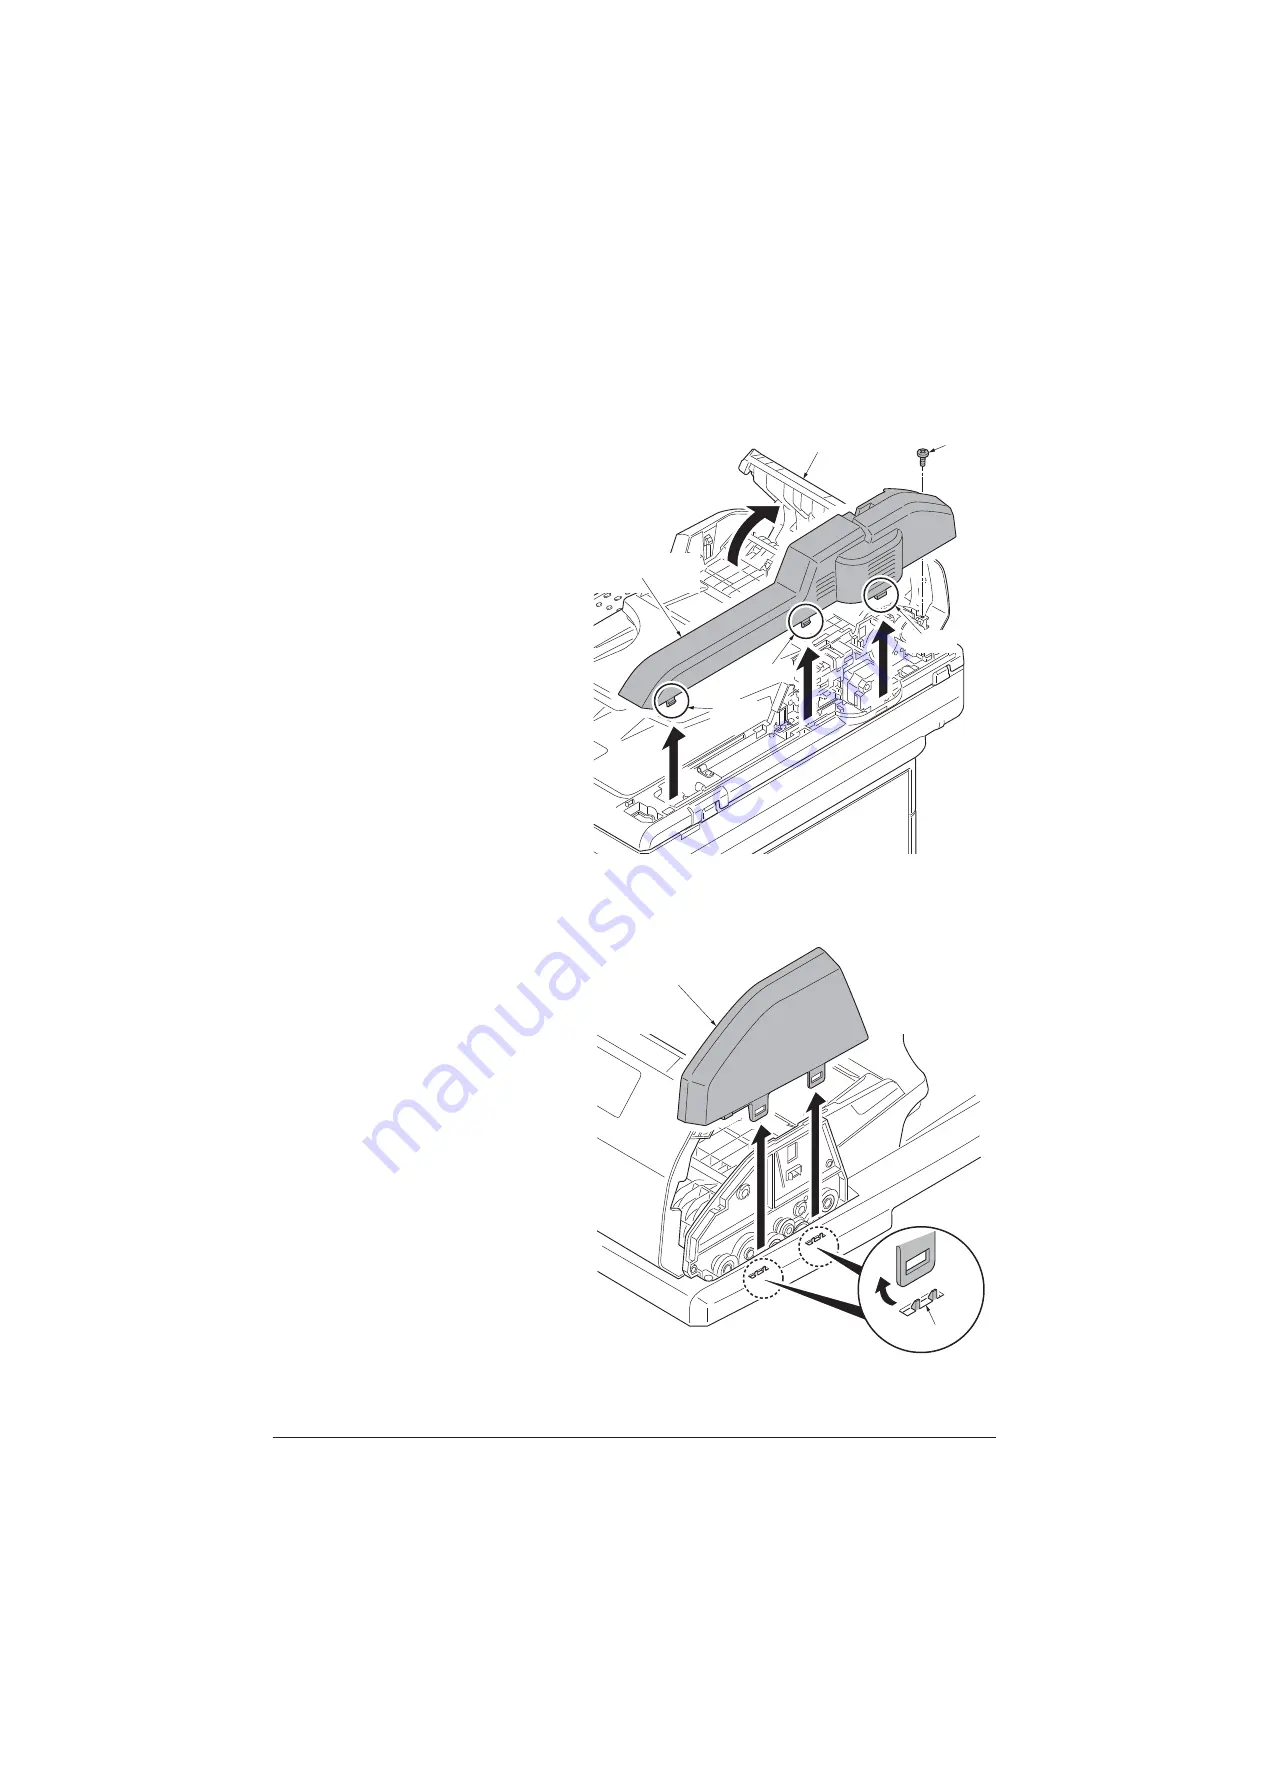
(2) Detaching and refitting the DP paper feed pulley unit

Procedure

1. Open the DP top cover.
2. Remove the screw.
3. Release three hooks and then remove

the DP rear cover.

Figure 1-5-134

4. Release two hooks and then remove

the DP front cover.

Figure 1-5-135

Screw

DP top cover

Hook

Hook

Hook

DP rear cover

DP front cover

Hooks

Service Manual

Y116650-5

Summary of Contents for d-Color MF2613En

Page 1: ...SERVICE MANUAL Multifuction Digital Copier d Color MF2613En d Color MF2614En Code Y116650 5...

Page 2: ...PUBLICATION ISSUED BY Olivetti S p A Gruppo Telecom Italia Via Jervis 77 10015 Ivrea TO Copyright 2014 Olivetti All rights reserved...

Page 3: ...ficials for details in your area for proper disposal ATTENTION IL Y A UN RISQUE D EXPLOSION SI LA BATTERIE EST REMPLACEE PAR UN MODELE DE TYPE INCORRECT METTRE AU REBUT LES BATTERIES UTILISEES SELON L...

Page 4: ...This page is intentionally left blank...

Page 5: ...sonnel to ensure the safety of their customers their machines as well as themselves during maintenance activities Service personnel are advised to read this booklet carefully to familiarize themselves...

Page 6: ...this symbol CAUTION Bodily injury or damage to property may result from insufficient attention to or incorrect com pliance with warning messages using this symbol Symbols The triangle symbol indicates...

Page 7: ...or dusty place This may cause fire or electric shock Do not install the copier near a radiator heater other heat source or near flammable material This may cause fire Allow sufficient space around th...

Page 8: ...carefully Always check that the copier is correctly connected to an outlet with a ground connection Check that the power cable covering is free of damage Check that the power plug is dust free If it i...

Page 9: ...caution labels that should be present on the machine according to the instruction handbook are clean and not peeling Replace with new ones if necessary Handle greases and solvents with care by followi...

Page 10: ...This page is intentionally left blank...

Page 11: ...isfeed indication 1 4 1 2 Paper misfeed detection condition 1 4 2 1 4 2 Self diagnostic function 1 4 6 1 Self diagnostic function 1 4 6 2 Self diagnostic codes 1 4 7 1 4 3 Image formation problems 1 4...

Page 12: ...r and left lower cover 1 5 9 4 Detaching and refitting the inner cover 1 5 11 1 5 3 Paper feed section 1 5 13 1 Detaching and refitting the retard roller unit 1 5 13 2 Detaching and refitting the pape...

Page 13: ...nt 1 6 1 Upgrading the firmware 1 6 1 1 6 2 Remarks on engine PWB replacement 1 6 3 2 1 Mechanical Construction 2 1 1 Paper feed conveying section 2 1 1 1 Cassette paper feed section 2 1 1 2 MP tray p...

Page 14: ...e PWB 2 3 3 2 3 3 Main PWB 2 3 13 2 3 4 Drum relay PWB 2 3 20 2 3 5 DP drive PWB 2 3 23 2 4 Appendixes 2 4 1 Appendixes 2 4 1 1 Maintenance kits 2 4 1 2 Repetitive defects gauge 2 4 2 3 Firmware envir...

Page 15: ...B5 ISO B5 B6 Letter Legal Statement Executive Oficio II Folio 16K Envelope 10 Envelope 9 Envelope 6 Envelope Monarch Envelope DL Envelope C5 Postcards Return postcard Youkei 2 Youkei 4 Custom 216 340...

Page 16: ...U PowerPC465S 667MHz Main memory Standard 1 GB Maximum 2 GB Interface Standard USB interface connector 1 USB Hi speed USB host 2 Network interface 1 10BASE T 100BASE TX 1000BASE T Option eKUIO slot 1...

Page 17: ...n Letter 13 sheets min Legal 12 sheets min First print time A4 feed from cassette B W 9 0 s or less Color 10 0 s or less Excluding time for system stabilization immediately after turning on the main p...

Page 18: ...AT compatible CPU Celeron 600 MHz or higher RAM 128 MB or more HDD free space 20 MB or more Interface Ethernet Resolution 600 dpi 400 dpi 300 dpi 200 dpi 200 400dpi 200 100dpi File format JPEG TIFF PD...

Page 19: ...tic document feed Max 50 sheets Scanner resolution Horizontal Vertical 200 100 dpi Normal 8 dot mm 3 85 line mm 200 200 dpi Fine 8 dot mm 7 7 line mm 200 400 dpi Super fine 8 dot mm 15 4 line mm 400 4...

Page 20: ...ss 3 Original size Indicator plate 4 Operation panel 5 Inner tray lever 6 Paper stopper 7 Inner tray 8 MP Multi Purpose tray 9 Cassette 10 USB memory slot 11 Main power switch 12 Toner container K 13...

Page 21: ...ar cover 20 Rear cover lever 21 IF cover 22 Memory cover 23 Power cord cover 24 Paper conveying unit 25 Power cord connector 26 USB memory slot 27 USB interface connector 28 Network interface connecto...

Page 22: ...ument processor Figure 1 1 3 31 33 36 32 32 37 34 35 31 DP top cover 32 Original width guides 33 Original table 34 Original eject table 35 Switchback table 36 Original stopper 37 Opening Handle Servic...

Page 23: ...d destination key 10 On Hook key 11 One touch keys 12 Shift Lock key 13 Auto color key 14 Full color key 15 Black and White key 16 Message display 17 Left Select key 18 Right Select key 19 Processing...

Page 24: ...4 Laser scanner unit KM 5 Laser scanner unit CY 6 Drum unit K 7 Drum unit M 8 Drum unit C 9 Drum unit Y 10 Developing unit K 11 Developing unit M 12 Developing unit C 13 Developing unit Y 14 Toner co...

Page 25: ...ty an abrupt change in the environmental temperature and cool or hot direct air Avoid places subject to dust and vibrations Choose a surface capable of supporting the weight of the machine Place the m...

Page 26: ...bag 650 650 6 Left spacer 7 Bottom pads 8 Bottom case 9 Front pad 10 Rear pad 11 Top pad L 12 Top pad R 13 Plastic bag 240 350 14 Installation guide etc 15 CD ROM 16 Middle spacer 17 Power cord 18 Was...

Page 27: ...bag 650 650 6 Left spacer 7 Bottom pads A 8 Bottom pads B 9 Bottom case 10 Front pad 11 Rear pad 12 Top pad L 13 Top pad R 14 Plastic bag 240 350 15 Installation guide etc 16 CD ROM 17 Middle spacer...

Page 28: ...2PV 2PW 1 2 4 1 Open the DP 2 Remove two tapes 3 Remove the sheet Figure 1 2 4 4 Remove the paper Figure 1 2 5 Removing the tapes and pads DP Tape Tape Sheet Paper Service Manual Y116650 5...

Page 29: ...r to the position of release When turning on power if the lock lever is not released the error message is displayed 7 Remove tape B 8 Close the DP Figure 1 2 6 9 Remove two tapes Figure 1 2 7 Tape B D...

Page 30: ...V 2PW 1 2 6 10 Open the DP top cover 11 Remove two tapes 12 Close the DP top cover Figure 1 2 8 13 Remove six tapes Figure 1 2 9 Tape DP top cover Tape Tape Tape Tape Tape Tapes Service Manual Y116650...

Page 31: ...14 Remove five tapes Figure 1 2 10 15 Open the inner tray 16 Remove the tape 17 Remove pads A and B 18 Close the inner tray Figure 1 2 11 Tape Tape Tapes Tape Inner tray Pad A Pad B Tape Service Manu...

Page 32: ...elease lever backward Figure 1 2 12 2 Facing the toner feed slot up and shake the toner container 5 to 6 times Figure 1 2 13 Installing the toner containers Release lever Toner container Toner feed sl...

Page 33: ...toner cover 2 Open the cap of the waste toner box 3 Install the waste toner box 4 Close the waste toner cover Figure 1 2 15 Inner tray Toner container Y Toner container K Toner container M Toner cont...

Page 34: ...t the paper length guide to fit the paper size Figure 1 2 16 4 Load the paper in the cassette 5 Turn the paper size dial so that it shows the paper size you are going to use 6 Insert the cassette Figu...

Page 35: ...ine and the wall outlet 3 Refit the power cord cover 4 Press the main power switch to turn power on 5 Installing the printer driver refer to operation guide Figure 1 2 19 Connecting the interface cabl...

Page 36: ...Caution Do not insert or remove expansion memory while machine power is on Doing so may cause damage to the machine and the expansion memory 2 Remove the memory cover Figure 1 2 20 3 Release the hook...

Page 37: ...e fan bracket 6 Refit the memory cover 7 Print a status page to check the mem ory expansion see page 1 3 82 If memory expansion has been properly performed information on the installed memory is print...

Page 38: ...2PV 2PW 1 2 14 This page is intentionally left blank Service Manual Y116650 5...

Page 39: ...item number using the cursor left right keys or numeric keys The selected maintenance item is run Press the stop key Press the start key Start End Maintenance mode is entered The maintenance item is...

Page 40: ...Leading Edge Timing 0 0 0 0 0 U072 Adjust DP Original Center 0 12 0 Operation panel and support equipment U203 Checking DP operation U222 Setting the IC card type Other Mode setting U250 Setting the m...

Page 41: ...size paper is set 7 22 26 U612 Setting system 3 Selecting if auto reduction in the auxiliary direction is to be performed Setting the automatic printing of the protocol list Setting how trailing edge...

Page 42: ...time out time Setting the Ta time out time Setting the Tb1 time out time Setting the Tb2 time out time Setting the Tc time out time Setting the Td time out time 56 36 69 30 20 80 60 9 120 V 6 220 240...

Page 43: ...g writing U920 Checking the copy counts U927 Clearing the all copy counts and machine life counts one time only U928 Checking machine life counts U977 Data capture mode U995 Memory data Individual set...

Page 44: ...he USB memory 1 Press the power key on the operation panel and after verifying the main power indicator has gone off switch off the main power switch 2 Insert USB memory in USB memory slot 3 Turn the...

Page 45: ...01 08 01 01 4020 01 08 01 01 0501 01 08 01 01 4020 01 08 01 01 0501 01 08 01 01 4020 01 08 01 01 0501 01 08 01 01 4020 01 08 01 01 0501 01 08 01 01 4020 01 08 01 01 Data and Time 2013 03 02 11 11 201...

Page 46: ...troller sequence error 0211 Rear cover open paper feeder 1 0212 Rear cover open paper feeder 2 0213 Rear cover open paper feeder 3 0501 No paper feed from cassette 1 0502 No paper feed from cassette 2...

Page 47: ...4209 Eject sensor does not turn ON MP tray 4211 Eject sensor does not turn OFF Cassette 4212 Eject sensor does not turn OFF Paper feeder 1 4213 Eject sensor does not turn OFF Paper feeder 2 4214 Eject...

Page 48: ...elf diagnostics error Self diagnostic error code See page 1 4 7 Example 01 6000 01 Self diagnostic error 6000 Self diagnostic error code number 9 Maintenance Log Count Item Remembers 1 to 8 of occurre...

Page 49: ...ainer f Paper jam g Self diagnostic error h Maintenance item replacing Indicates the log counter of paper jams depending on location Refer to Paper Jam Log All instances includ ing those are not occur...

Page 50: ...the image scanner unit to the home position Method 1 Press the start key 2 Select Mode1 All using the cursor up down keys 3 Press the start key The imege scanner unit returns to the home position 4 T...

Page 51: ...tch with that of main PWB Setting Carry out if the machine serial number does not match 1 Press Execute 2 Press the start key Writing of serial No starts Completion Press the stop key The screen for s...

Page 52: ...9 and or is certainly included 3 Select the Excute 4 Press the start key ID is set 5 Turn the main power switch off and on Allow more than 5 seconds between Off and On Setting Initialaize 1 Select th...

Page 53: ...up down keys Completion Press the stop key The screen for selecting a maintenance item No is displayed Item No Description Display Description Main Main ROM MMI Operation ROM Engine Engine ROM Engine...

Page 54: ...ault Method 1 Press the start key 2 Select Execute 3 Press the start key All data other than that for adjustments due to variations between machines is initialized based on the destination setting 4 T...

Page 55: ...lect the item to be adjusted 5 Change the setting value using the cursor left rigrt keys or numeric keys For output example 1 increase the value For output example 2 decrease the value Figure 1 3 2 6...

Page 56: ...tment If the image is still incorrect perform the following adjustments in maintenance mode Completion Press the stop key The screen for selecting a maintenance item No is displayed Item No Descriptio...

Page 57: ...t the item to be adjusted Adjustment Main Scan 1 Change the setting value using the cursor left rigrt keys or numeric keys For copy example 1 increase the value For copy example 2 decrease the value I...

Page 58: ...py example 2 decrease the value Increasing the value makes the image longer while decreasing the value makes the image shorter Figure 1 3 5 2 Press the start key The value is set Completion Press the...

Page 59: ...rease the value Increasing the value moves the image forward and decreasing the value moves the image backward Figure 1 3 6 7 Press the start key The value is set Caution If the above adjustment does...

Page 60: ...r copy example 2 increase the value Increasing the value moves the image leftward and decreasing it moves the image rightward Figure 1 3 7 7 Press the start key The value is set Caution If the above a...

Page 61: ...ecreased 4 Press the start key The value is set 5 Select Black Line 6 Change the setting using the left right keys or numeric keys 7 Press the start key The value is set 8 Set the original the one whi...

Page 62: ...ue using the cursor left right keys or numeric keys For copy example 1 increase the value For copy example 2 decrease the value Increasing the value makes the image longer while decreasing the value m...

Page 63: ...e a test copy 4 Press the system menu key 5 Select the item to be adjusted l Item No Description Display Description Setting range Initial setting Change in value per step Front Head Leading edge regi...

Page 64: ...tment does not optimize the leading edge registration proceed with the follow ing maintenance modes Adjustment Trailing edge registration 1 Change the setting value using the cursor left right keys or...

Page 65: ...he value moves the image rightward and decreasing it moves the image leftward Figure 1 3 11 7 Press the start key The value is set Caution If the first side is adjusted check the second side and if ad...

Page 66: ...keys 6 Press the start key The operation starts 7 To stop continuous operation press the stop key Completion Press the stop key The screen for selecting a maintenance item No is displayed Item No Desc...

Page 67: ...rt key 2 Select the item using the cursor up down keys Initial setting Other 3 Press the start key The setting is set Completion Press the stop key The screen for selecting a maintenance item No is di...

Page 68: ...Cnt A using the cursor up down keys 2 Change the setting using the cursor left right keys or numeric keys 3 Press the start key The value is set Clearing 1 Select Clear using the cursor up down keys...

Page 69: ...ount is displayed Setting 1 Select M Cnt A using the cursor up down keys 2 Change the setting using the cursor left right keys or numeric keys 3 Press the start key The count is set Clearing 1 Select...

Page 70: ...4 Turn the main power switch off and on Supplement The specified initial settings are provided according to the destinations in the maintenance items below To change the initial settings in those item...

Page 71: ...ng a maintenance item No is displayed U260 Selecting the timing for copy counting Description Changes the copy count timing for the total counter and other counters Purpose To be set according to user...

Page 72: ...tting Setting 1 Press the start key 2 Select On or Off using the cursor up down keys Initial setting On 3 Press the start key The setting is set Completion Press the stop key The screen for selecting...

Page 73: ...r coverage counter displays 1 Select the mode Initial setting 0 If 0 has been changed to 1 revert the U260 feed eject counter switch to its initial state Eject 2 Press the start key The setting is set...

Page 74: ...age is displayed Purpose To change the time for maintenance due indication Setting 1 Press the start key 2 Select Cnt using the cursor up down keys 3 Change the setting using the cursor left right key...

Page 75: ...rt key 2 Select On or Off Initial setting On 3 Press the start key The setting is set Completion Press the stop key The screen for selecting a maintenance item No is displayed Item No Description Disp...

Page 76: ...rt key The value is set Caution If the above adjustment does not optimize the margins perform the following maintenance modes Completion Press the stop key The screen for selecting a maintenance item...

Page 77: ...is set Caution If the above adjustment does not optimize the margins perform the following maintenance modes Completion Press the stop key The indication for selecting a maintenance item No appears It...

Page 78: ...7 Press the start key The value is set Caution If the above adjustment does not optimize the margins perform the following maintenance modes Completion Press the stop key The screen for selecting a ma...

Page 79: ...original Place approximately 20 sheets of white paper on the test pattern 2 and set them 7 Press the start key Adjustment is made second time 8 When normally completed Finish is displayed If a problem...

Page 80: ...Press the start key 2 Select the item The screen for executing is displayed Item No Description Display Description Original to be used for adjustment P N Table Automatic adjustment in the scanner se...

Page 81: ...35K on the DP face up 2 Enter maintenance item U411 3 Select DP 4 Press the start key Auto adjustment starts When automatic adjustment has normally completed OK is displayed If a problem occurs during...

Page 82: ...P auxiliary scanning direction trailing edge 0e DMA time out 0f Auxiliary scanning direction magnification error 10 Auxiliary scanning direction leading edge error 11 Auxiliary scanning direction trai...

Page 83: ...k patch for the original for adjustment Gray1 Setting the Gray1 patch for the original for adjustment Gray2 Setting the Gray2 patch for the original for adjustment Gray3 Setting the Gray3 patch for th...

Page 84: ...sing the cursor right left keys or numeric keys in Dist2 6 Press the start key The value is set 7 Measure the distance from the top edge of black belt 1 to the bottom of black belt 3 of the original a...

Page 85: ...ack belt of leading edge inside to the black belt of trailing edge inside of the original at C 6 Enter the measured value using the cursor right left keys or numeric keys in Sub Scan 7 Press the start...

Page 86: ...necessary 3 Select Execute and press the start key Data initialization starts To cancel data initialization press the stop key 4 After data initialization the entered destination OEM codes and ROM ver...

Page 87: ...s To cancel data initialization press the stop key 4 After data initialization the entered destination OEM codes and ROM version are displayed A ROM version displays three kinds application boot and I...

Page 88: ...s the start key The value is set Completion Press the stop key The screen for selecting a maintenance item No is displayed U605 Clearing data Description Initializes data related to the fax transmissi...

Page 89: ...lume exceeds the record ing capacity when the data is recorded in the auto reduction mode If the number of excess lines is below the setting those lines are ignored If over the setting the entire data...

Page 90: ...r reduced so that it can be recorded on the same page 1 Change the setting using the cursor left right keys or numeric keys Increase the setting if a page received in the reduction mode is over reduce...

Page 91: ...s set Sets the number of adjustment lines for automatic reduction when letter size paper is set 1 Change the setting using the cursor left right keys or numeric keys 2 Press the start key The value is...

Page 92: ...utomatic printing of the protocol list Sets if the protocol list is automatically printed out 1 Select the setting using the cursor left right keys Initial setting Off 2 Press the start key The settin...

Page 93: ...scription Sets the signal detection method for remote switching Be sure to change the setting according to the type of telephone connected to the machine Setting 1 Press the start key 2 Select Remort...

Page 94: ...val 1 Change the setting using the cursor left right keys 2 Press the start key The value is set Setting the number of times of auto redialing 1 Change the setting using the cursor left right keys or...

Page 95: ...the sender is informed of using the DIS or NSF signal When the destination unit has V 34 capability V 34 is selected regardless of the setting 1 Select the setting using the cursor up down keys Initia...

Page 96: ...fore an NSF CSI or DIS signal is sent after a CED signal is received Used when problems occur due to echoes at the receiver 1 Select the setting using the cursor up down keys Initial setting 75 2 Pres...

Page 97: ...net Protocol telephone line 1 Select the setting using the cursor up down keys Initial setting On 2 Press the start key The setting is set Setting the frequency of the CED signal Sets the frequency of...

Page 98: ...to select mode Sets the CNG detection times in the fax telephone auto select mode 1 Select the setting using the cursor up down keys Initial setting 2Time 2 Press the start key The setting is set Comp...

Page 99: ...symbol speed 3429 Hz is used 1 Select the setting using the cursor up down keys Initial setting On 2 Press the start key The setting is set Item No Description Display Description V 34 Enables or dis...

Page 100: ...on Press the stop key The screen for selecting a maintenance item No is displayed U634 Setting communication control 5 Description Sets the maximum number of error bytes judged acceptable when receivi...

Page 101: ...e the setting using the cursor left right keys 2 Press the start key The value is set Setting the continuous detection time for remote switching 1 Change the setting using the cursor left right keys 2...

Page 102: ...right keys 2 Press the start key The value is set Setting the T1 time out time Sets the time before receiving the correct signal after call reception No change is necessary for this maintenance item 1...

Page 103: ...ceive a call 1 Change the setting using the cursor left right keys 2 Press the start key The value is set Figure 1 3 17 Ta Tb1 Tb2 time out time Setting the Tb1 time out time In the fax telephone auto...

Page 104: ...elephone fails to receive a call 1 Change the setting using the cursor left right keys 2 Press the start key The value is set Setting the Td time out time Sets the length of the time required to deter...

Page 105: ...etting 0dB 2 Press the start key The setting is set Setting the G3 reception cable equalizer 1 Select 0dB 4dB 8dB or 12dB using the cursor up down keys Initial setting 0dB 2 Press the start key The se...

Page 106: ...eys 3 Change the setting using the cursor left right keys or numeric keys 4 Press the start key The setting is set Completion Press the stop key The screen for selecting a maintenance item No is displ...

Page 107: ...Selects if the dial tone is detected to check the telephone is off the hook when a fax is connected to a public switched telephone network 1 Select the setting using the cursor up down keys Initial se...

Page 108: ...cted to a PBX According to the type of the PBX connected select the mode to connect an outside call 1 Select the setting using the cursor up down keys Initial setting Loop 2 Press the start key The se...

Page 109: ...maintenance item No is displayed Item No Description Display Description Sys Conf Report Outputs a list of software switches self telephone number confidential boxes ROM versions and other information...

Page 110: ...ri Chg 1 Select ON or OFF using the cursor left right keys Initial setting Off 2 Press the start key The setting is set Completion Press the stop key The screen for selecting a maintenance item No is...

Page 111: ...1 5 Press the start key to set the value Completion Press the stop key The screen for selecting a maintenance item No is displayed List of Software Switches of Which the Setting Can Be Changed Communi...

Page 112: ...rn 122 7654 Busy tone detection pattern 1 Busy tone detection in automatic FAX TEL switching 125 76543210 Access code registration for connection to PSTN 126 7654 FAX TEL automatic switching ringback...

Page 113: ...he service status report Purpose To clear data as required at times such as during maintenance service Method 1 Press the start key 2 Select Execute using the cursor up down keys 3 Press the start key...

Page 114: ...ed are also retrieved or written in Item No Description Display Description Import Writing data from the USB memory to the machine Export Retrieving from the machine to a USB memory Display Descriptio...

Page 115: ...e0300 to e03ff User managements processing error e0400 to e04ff Panel program processing error e0500 to e05ff FAX transmission processing error e0600 to e06ff System setting processing error e0700 to...

Page 116: ...ess the stop key The screen for selecting a maintenance item No is displayed U920 Checking the copy counts Description Checks the copy counts Purpose To check the copy counts Method 1 Press the start...

Page 117: ...start key All copy counts and machine life counts are cleared Completion Press the stop key The screen for selecting a maintenance item No is displayed U928 Checking machine life counts Description Di...

Page 118: ...t Execute 6 Press the start key 7 Send the print data to the machine Once the print data is stored into USB memory OK will be displayed Completion Press the stop key The screen for selecting a mainten...

Page 119: ...Press the System Menu Counter key Select Adjust Maint using the cursor up down keys and press the start key The selected service mode is run Press the stop key Select Service Setting using the cursor...

Page 120: ...e status page includes various settings and service cumulative Purpose To acquire the current printing environmental parameters and cumulative information Method 1 Enter the Service Setting menu 2 Sel...

Page 121: ...d Connected UG 33 Not Installed US English FAX Information Rings Normal Rings FAX TEL Rings TAD 3 3 3 Print Coverage Average Total K 1 10 C 2 20 M 3 30 Y 4 40 Copy K 1 10 C 2 20 M 3 30 Y 4 40 Printer...

Page 122: ...000 0000 0000 0000 0000 0000 0000 0000 0000 0000 0000 0000 0000 0000 0000 0000 0000 0000 0000 0000 0000 0000 0000 0000 0000 0000 0000 0000 0000 0000 0000 0000 0000 0000 0000 12345678 11223344 00001234...

Page 123: ...nce or absence of the optional memory card Installed Not Installed 17 Presence or absence of the optional IC card authentication kit Installed Not Installed Trial 18 Presence or absence of UG 33 Insta...

Page 124: ...on _ 1F3 1225 _ 1F3 1225 a b c d e f a Consistency of the present software version and the database _ underscore OK Asterisk NG b Database version c The oldest time stamp of database version d Consist...

Page 125: ...er source unit 53 Auto cassette change 0 OFF 1 ON 54 Color printing double count mode 0 All single counts 3 Folio Single count Less than 330 mm length 55 Black and white printing double count mode 0 A...

Page 126: ...on 1 to 5 76 Configuring toner coverage counters 0 Full color count display 1 Color coverage count display 77 Low coverage setting 0 1 to 100 0 78 Middle coverage setting 0 1 to 100 0 79 Toner low set...

Page 127: ...e To acquire the detailed network setting information Method 1 Enter the Service Setting menu 2 Select Network Status using the cursor up down keys 3 Press the start key 4 Press Yes the Left Select ke...

Page 128: ...t key Test page will be printed 1 Since focusing in yellow is hardly readable yellow is mixed with cyan for more readability resulting in green 2 Each portion of colors has three different magnitude o...

Page 129: ...it Purpose To set the initial value after replacing the developing unit Method 1 Enter the Service Setting menu 2 Select DeveloperSetting using the cursor up down keys 3 Press the start key Enter the...

Page 130: ...r is not fed Purpose To perform cleaning when faulty images occur and a line appears longitudinally Method 1 Enter the Service Setting menu 2 Select DeveloperRefresh using the cursor up down keys 3 Pr...

Page 131: ...ion Press the stop key Drum surface refreshing Performing drum surface refreshing Description Rotates the drum approximately 2 minutes with toner lightly on the overall drum The cleaning blade in the...

Page 132: ...ys 5 Press the start key The setting is set Completion Press the stop key Main charger adjustment Setting main charger output Description Sets the main charger output This is executable only when the...

Page 133: ...setting is set 6 Press the start key Data initialization starts Destination code list Completion Press the stop key Service items Description Code Destination Code Destination 000 Japan 250 Russia 007...

Page 134: ...art key 3 Select PBX or PSTN using the cursor up down keys 4 Press the start key The setting is set Setting for PBX 1 Select PBX Setting using the cursor up down keys 2 Press the start key 3 Select Lo...

Page 135: ...e Setting menu 2 Select Remote Diag Set using the cursor up down keys 3 Press the start key 4 Select On using the cursor up down keys 5 Press the start key The setting is set 6 Select Remote Diag ID u...

Page 136: ...2PV 2PW 1 3 98 This page is intentionally left blank Service Manual Y116650 5...

Page 137: ...occurs the machine immediately stops printing and displays the paper misfeed mes sage on the operation panel To remove paper misfed in the machine pull out the cassette open the rear cover or paper co...

Page 138: ...rs Registration sensor MP paper conveying sensor Eject sensor PF feed sensor 1 PF feed sensor 2 DP timing sensor 1 2 3 4 5 6 Paper jam location Cassette 1 MP tray Machine inside Fuser Eject sections D...

Page 139: ...501 No paper feed from cassette 1 The registration sensor RS does not turn on dur ing paper feed from cassette A 0502 No paper feed from cassette 2 PF feed sensor 1 PFFS1 does not turn on during paper...

Page 140: ...ot turn on dur ing paper feed from MP tray A 4012 Registration sensor stay jam The registration sensor RS does not turn off dur ing paper feed from paper feeder 1 C 4013 The registration sensor RS doe...

Page 141: ...01 An original jam in the original conveying section DP timing sensor DPTS turns off within the speci fied time since the sensor turns on H 9003 An original jam in the original switchback section 1 Du...

Page 142: ...cted the machine stops print ing and display an error message on the operation panel An error message consists of a message prompting a contact to service personnel and a four digit error code indicat...

Page 143: ...ry Replace the main PWB and check for cor rect operation see page 1 5 30 Defective engine PWB Replace the engine PWB and check for cor rect operation see page 1 5 27 0130 Backup memory read write erro...

Page 144: ...page 1 5 36 0840 Faults of RTC The time is judged to go back based on the comparison of the RTC time and the current time or five years or more have passed The battery is dis connected from the main P...

Page 145: ...rs rotate smoothly If not grease the bushes and gears Check for broken gears and replace if any Defective lift motor Replace the lift motor Defective engine PWB Replace the engine PWB and check for co...

Page 146: ...al for the paper feeder 1500 PF heater 1 high tempera ture error paper feeder 1 A temperature higher than 75 C 167 F is detected Defective connec tor cable or poor contact in the con nector Reinsert t...

Page 147: ...r to the service manual for the paper feeder Defective PF fan motor 2 Replace the side heater unit Refer to the service manual for the paper feeder Defective PF main PWB Replace the PF main PWB Refer...

Page 148: ...WB or PF main PWB Refer to the service manual for the paper feeder 1620 PF heater 1 low temperature error paper feeder 2 An external temperature higher than 5 C 9 F is not detected when one minute ela...

Page 149: ...talla tion paper feeder Follow installation instruction carefully again Defective connec tor cable or poor contact in the con nector Reinsert the connector Also check for conti nuity within the connec...

Page 150: ...or and engine PWB YC38 Defective drive transmission sys tem of the fuser pressure release motor Check if the rollers and gears rotate smoothly If not grease the bushes and gears Check for broken gears...

Page 151: ...e PF paper feed motor and PF main PWB YC6 Defective drive transmission sys tem of the PF paper feed motor Check if the rollers and gears rotate smoothly If not grease the bushes and gears Check for br...

Page 152: ...connector Also check for conti nuity within the connector cable If none replace the cable Developing release motor and engine PWB YC35 Defective drive transmission sys tem of the develop ing release...

Page 153: ...for cor rect operation see page 1 5 30 3200 Exposure lamp error The exposure lamp does not turn on when power is on The lamp s luminosity does not stabilize in one minute after power is on Error is de...

Page 154: ...27 4002 Polygon motor CY error The polygon motor CY ready input is not given for 10 s dur ing the polygon motor is ON Defective connec tor cable or poor contact in the con nector Reinsert the connecto...

Page 155: ...in photo signal is not output from PD PWB Y for one second while laser is emitted Defective connec tor cable or poor contact in the con nector Reinsert the connector Also check for conti nuity within...

Page 156: ...amp C wire When the cleaning lamp C is driven the lamp over current detection signal is detected continuously for 10 times 1 s at 100 ms intervals Defective connec tor cable or poor contact in the con...

Page 157: ...re of fuser thermistor does not rise 1 C 1 8 F after the fuser heater has been turned on continuously for 10 s during printing Defective connec tor cable or poor contact in the con nector Reinsert the...

Page 158: ...r unit see page 1 5 26 Defective engine PWB Replace the engine PWB and check for cor rect operation see page 1 5 27 6000 6020 6030 Com bined Broken fuser heater wire Abnormally high fuser thermistor t...

Page 159: ...oner motor C is driven the motor over current detection signal is detected continuously for 50 times 5 s at 100 ms intervals Defective connec tor cable or poor contact in the con nector Reinsert the c...

Page 160: ...K Replace the developing unit K see page 1 5 19 Defective engine PWB Replace the engine PWB and check for cor rect operation see page 1 5 27 7402 Developing unit C non installing error No density det...

Page 161: ...Reinsert the connector Also check for conti nuity within the connector cable If none replace the cable Drum unit K and Drum relay PWB YC2 Drum relay PWB YC1 and engine PWB YC34 Defective drum PWB K R...

Page 162: ...conti nuity within the connector cable If none replace the cable Drum unit Y and Drum relay PWB YC5 Drum relay PWB YC1 and engine PWB YC34 Defective drum PWB Y Replace the drum unit Y see page 1 5 21...

Page 163: ...art the machine If the error is not resolved replace main PWB see page 1 5 30 Replace the engine PWB and check for cor rect operation see page 1 5 27 F041 Main PWB scanner engine communication error D...

Page 164: ...4 30 6 The back ground is col ored 7 White streaks are printed verti cally 8 Black streaks are printed verti cally 9 Streaks are printed horizon tally 10 Spots are printed See page 1 4 31 See page 1...

Page 165: ...er unit KM CY see page 1 5 45 Defective engine PWB Replace the engine PWB see page 1 5 27 Print example Causes Check procedures corrective measures No main charging Defective connector cable or poor c...

Page 166: ...developing bias output Defective developing unit Replace the developing unit for the color that causes an error see page 1 5 19 Defective high voltage PWB Replace the high voltage PWB see page 1 5 35...

Page 167: ...measures Foreign object in one of the developing units Replace the developing unit for the color that causes an error see page 1 5 19 Adhesion of soiling to transfer belt Clean the transfer belt Repla...

Page 168: ...rocedures corrective measures Dirty contact glass Clean the contact glass Dirty or flawed drum Perform the drum surface refreshing see page 1 3 93 Flawed drum Replace the drum unit see page 1 5 21 Def...

Page 169: ...cifications Replace paper Print example Causes Check procedures corrective measures Paper damp Check the paper storage conditions Paper creased Replace the paper Drum condensation Perform the drum sur...

Page 170: ...easures Defective color calibration Perform the color calibration refer to operation guide Slip the mirror position of laser scanner unit Perform the normal color registration When the problem is not...

Page 171: ...r cable or poor con tact in the connector Reinsert the connector Also check for continuity within the connector cable If none replace the cable Duplex motor and engine PWB YC37 2 Defective drive trans...

Page 172: ...1 5 27 8 ISU motor does not operate 1 Defective connector cable or poor con tact in the connector Reinsert the connector Also check for continuity within the connector cable If none replace the cable...

Page 173: ...connector cable or poor con tact in the connector Reinsert the connector Also check for continuity within the connector cable If none replace the cable Cassette PWB YC1 and engine PWB YC21 2 Deformed...

Page 174: ...he rollers and gears rotate smoothly If not grease the bushes and gears Check for broken gears and replace if any 3 Defective motor Replace the DP paper feed motor 4 Defective PWB Replace the DP drive...

Page 175: ...ams when the main power switch is turned on 1 A piece of paper torn from an original is caught around the DP timing sensor Check visually and remove it if any 2 Defective DP timing sensor Replace the...

Page 176: ...talled incorrectly Check the paper width guide visually and remedy or replace if necessary 4 Multiple sheets of paper are fed Check if the paper is excessively curled Change the paper Paper is loaded...

Page 177: ...age 1 5 86 9 Originals jam Originals outside the specifications are used Use only originals conforming to the specifications Check if the surfaces of the following pul leys are dirty with paper powder...

Page 178: ...Destined host folder and or file names are invalid 1 Check illegal characters are not contained within these names 2 Check the name of the folder and files conform with the naming syntax 3 Confirm de...

Page 179: ...4 Confirm device s network parameters 5 Confirm the network parameters the device is con nected 6 Check the FTP server name 2102 Access to the FTP server has failed Connection timeout 1 Check the FTP...

Page 180: ...rk parameters 2 Confirm the network parameters the device is con nected 3101 FTP server responded with an error 1 Confirm device s network parameters 2 Confirm the network parameters the device is con...

Page 181: ...rver 2102 Connection to the SMTP POP3 server has failed Connection timeout 1 Check the SMTP POP3 server name 2 Check the SMTP POP3 port number 3 Confirm device s network parameters 4 Confirm the netwo...

Page 182: ...uding CRAM MD5 DIGEST MD5 PLAIN and LOGIN 4803 Failed to establish the SSL session 1 Verify the self certificate of the device 2 Check the server certificate of the SMTP POP3 server 3 Check the SMTP P...

Page 183: ...with an E indica tion followed by five digits The upper three of the five digits indicate general classification of the error and its cause while the lower two indicate the detailed classification Ite...

Page 184: ...4 mode refer to 1 4 53 U017XX error code table U018XX A communication error occurred before starting T 30 protocol during reception in V 34 mode refer to 1 4 53 U018XX error code table U03000 No docum...

Page 185: ...k reception or restricted reception was interrupted because the permit ID s did not match the rejected FAX number s did match or the destination receiver did not return its phone number U05300 The pas...

Page 186: ...nfidential reception was interrupted because the specified subad dress box was not registered U00450 The destination transmitter disconnected because the permit ID s did not agree with while the desti...

Page 187: ...sfers was exceeded ECM U01022 No relevant signal was received after transmission of an RR signal and the preset num ber of command retransfers was exceeded ECM U01028 T5 time out was detected during E...

Page 188: ...N signal was received after transmission of a DTC signal U01143 A DCN signal was received after transmission of an FTT signal U01155 A DCN signal was received after transmission of an SPA signal short...

Page 189: ...ining For example INFO0 B Bbar A Abar for polling reception probing tone was not detected U01810 A communication error that occurs at the receiver unit in phase 3 primary channel equivalent device tra...

Page 190: ...2PV 2PW 1 4 54 This page is intentionally left blank Service Manual Y116650 5...

Page 191: ...hook of the connector be sure to release the hook Take care not to get the cables caught To reassemble the parts use the original screws If the types and the sizes of screws are not known refer to the...

Page 192: ...band when seen through the left side window A shiny or gold colored band when seen through the right side window The above will reveal that the toner container is a genuine Olivetti branded toner con...

Page 193: ...r left upper cover and front cover Procedure 1 Open the paper conveying unit 2 Release the hook and then remove the IF cover Figure 1 5 3 3 Remove two screws and then remove the rear upper cover Figur...

Page 194: ...e the right upper cover backward and then remove it Figure 1 5 5 6 Release the hook Slide the left upper cover backward and then remove it Figure 1 5 6 Hook Right upper cover Right upper cover Hook In...

Page 195: ...2PV 2PW 1 5 5 7 Release five hooks hook A B and then remove the front cover Figure 1 5 7 Front cover Hook A Hook A Hook B Hooks B Service Manual Y116650 5...

Page 196: ...pper cover left upper cover and front cover see page 1 5 3 2 Slide the power source cover backward and then remove it Figure 1 5 8 3 Remove the screw 4 Release four hooks Slide the right rear cover ba...

Page 197: ...r and then remove it Figure 1 5 10 6 Open the waste toner cover 7 Push the lock release button and then remove the waste toner box Figure 1 5 11 Memory cover Waste toner box Waste toner cover Lock rel...

Page 198: ...ver forward and then remove it 9 Remove the waste toner cover Figure 1 5 12 10 Release the hook Slide the right lower cover forward and then remove it Figure 1 5 13 Right cover Hook B Hooks C Hook A W...

Page 199: ...er right upper cover left upper cover and front cover see page 1 5 3 2 Release the hook Slide the left rear cover upward and then remove it Figure 1 5 14 3 Release four hooks hook A B and then remove...

Page 200: ...V 2PW 1 5 10 4 Remove the screw 5 Release three hooks hook A B C and then remove the left lower cover Figure 1 5 16 Left lower cover Left lower cover Hook A Hook B Hook C Screw Service Manual Y116650...

Page 201: ...11 4 Detaching and refitting the inner cover Procedure 1 Remove the cassette Figure 1 5 17 2 Remove the MP tray cover see page 1 5 17 3 Remove the MP tray Figure 1 5 18 Cassette MP tray Service Manua...

Page 202: ...ght rear cover and right cover see page 1 5 6 6 Remove the left rear cover and left cover see page 1 5 9 7 Release three hooks and then remove the switch holder 8 Release four hooks and then remove th...

Page 203: ...veying unit 2 Pull the middle roller unit forward to the hook 3 While pressing the right and left hooks outwards unlatch the shaft from the rail and remove the middle roller unit Figure 1 5 20 Middle...

Page 204: ...down and remove 5 Release two hooks and then remove the retard roller unit 6 Check or replace the retard roller unit and refit all the removed parts Figure 1 5 21 Retard cover Retard roller unit Hook...

Page 205: ...ing the paper feed roller unit Procedure 1 Remove the retard roller unit see page 1 5 13 2 Turn forward the lever of the feed pin to release the lock 3 Slide the feed pin Figure 1 5 22 Feed pin Feed p...

Page 206: ...2PV 2PW 1 5 16 4 Remove the paper feed roller unit 5 Check or replace the paper feed roller unit and refit all the removed parts Figure 1 5 23 Paper feed roller unit Service Manual Y116650 5...

Page 207: ...move the guide sections of the MP tray cover from the MP tray 3 Raise the MP tray cover upward Release two hooks and then remove the MP tray cover Figure 1 5 24 4 Open the conveying lower cover Figure...

Page 208: ...26 6 Pull the hook forward and then slide the MP feed shaft 7 Remove the MP paper feed roller 8 Check or replace the Mp paper feed roller and refit all the removed parts Figure 1 5 27 MP paper feed lo...

Page 209: ...e developing unit Procedure 1 Remove the intermediate transfer unit see page 1 5 22 2 Remove drum units K M C Y 3 Pinch the lever of developing unit 4 Remove developing units K M C Y Figure 1 5 28 Dev...

Page 210: ...developing unit When reinstalling the developing unit press it down until the lever of developing unit is engaged with the notch If it is difficult to engage the lever press the unit down while rotati...

Page 211: ...and refitting the drum unit Procedure 1 Remove the intermediate transfer unit see page 1 5 22 2 Remove drum units K M C Y 3 Check or replace the drum unit and refit all the removed parts Figure 1 5 3...

Page 212: ...the intermediate transfer unit Procedure 1 Open the inner tray and the paper con veying unit 2 Remove toner containers K M C Y Figure 1 5 31 3 Slide the container guide forward and then remove it Figu...

Page 213: ...2PV 2PW 1 5 23 4 Open the RFID holder Figure 1 5 33 5 Slide the shutter forward and seal the toner inlet 6 Remove the screw Figure 1 5 34 RFID holder Screw Shutter Service Manual Y116650 5...

Page 214: ...PV 2PW 1 5 24 7 Remove the intermediate transfer unit 8 Check or replace the intermediate transfer unit and refit all the removed parts Figure 1 5 35 Intermediate transfer unit Service Manual Y116650...

Page 215: ...ler unit Procedure 1 Open the paper conveying unit 2 Release two hooks and then remove the transfer roller unit 3 Check or replace the transfer roller unit and refit all the removed parts Figure 1 5 3...

Page 216: ...5 3 3 Remove the screw and then fuser wire cover Figure 1 5 37 4 Remove three connectors 5 Remove two screws and then remove the fuser unit 6 Check or replace the fuser unit and refit all the removed...

Page 217: ...ver see page 1 5 9 2 Remove all connectors from the engine PWB Figure 1 5 39 YC23 YC40 YC3 YC14 YC21 YC8 YC9 YC34 YC27 YC33 YC17 YC29 YC18 YC6 YC7 YC36 YC35 YC13 YC19 YC24 YC38 YC15 YC37 YC25 YC11 YC1...

Page 218: ...gine PWB 4 Check or replace the engine PWB and refit all the removed parts To replace the engine PWB remove the EEPROM U1 from the old engine PWB and mount it to the new engine PWB Figure 1 5 40 Screw...

Page 219: ...s A and B are unidentical there fore do not mix up Figure 1 5 41 3 Remove all connectors from power source PWB 4 Remove two screws 5 Release three hooks and then remove the power source PWB 6 Check or...

Page 220: ...ower cover see page 1 5 6 3 Remove four screws and then remove the power source shield Screws A and B are unidentical there fore do not mix up Figure 1 5 43 4 Open the fan bracket 5 Slide the fan plat...

Page 221: ...screw and then remove the fuser wire cover Figure 1 5 45 7 Remove five screws and then remove the controller shield Figure 1 5 46 Screw Fuser wire cover Controller shield Screw Screw Screw Screw Scre...

Page 222: ...tor 9 Open the fan bracket and then remove it Figure 1 5 47 10 Remove seven connectors YC15 YC37 YC41 YC40 YC38 YC39 and YC42 from the main PWB Figure 1 5 48 Fan bracket Connector YC41 1 2 YC42 YC39 Y...

Page 223: ...ooks and then remove the wire holder Figure 1 5 49 13 Remove three connectors YC36 YC32 YC12 and two FFCs YC8 YC43 from the main PWB Figure 1 5 50 Wire holder Hook Hook Hook Screw Screw YC36 YC32 YC10...

Page 224: ...2PV 2PW 1 5 34 14 Remove three screws and then remove the main PWB 15 Check or replace the main PWB and refit all the removed parts Figure 1 5 51 Main PWB Screw Screw Screw Service Manual Y116650 5...

Page 225: ...1 5 6 2 Remove the FFC from the high voltage PWB Figure 1 5 52 3 Remove the screw 4 Release eight hooks and then remove the high voltage PWB 5 Check or replace the high voltage PWB and refit all the r...

Page 226: ...n 1 model with FAX only Procedure 1 Remove the IF cover see page 1 5 3 2 Remove two screws and then remove the FAX control PWB 3 Check or replace the FAX control PWB and refit all the removed parts Fi...

Page 227: ...r and left lower cover see page 1 5 9 4 Remove the inner cover see page 1 5 11 5 Remove the engine PWB see page 1 5 27 6 Release three hooks and then remove the left fan motor Figure 1 5 55 7 Turn the...

Page 228: ...ft upper cover and front cover see page 1 5 3 3 Remove the left rear cover left cover and left lower cover see page 1 5 9 4 Remove the engine PWB see page 1 5 27 5 Remove the screw and release the hoo...

Page 229: ...screws and then remove drum developing drive unit 8 Check or replace the drum developing drive unit and refit all the removed parts Figure 1 5 59 Drum Developing drive unit Screw Screw Screw Screw Sc...

Page 230: ...emove the left rear cover left cover and left lower cover see page 1 5 9 3 Remove connector YC3 from engine PWB Figure 1 5 60 4 Remove four screws and then remove the paper feed drive unit 5 Check or...

Page 231: ...he fuser unit see page 1 5 26 2 Remove the rear upper cover right upper cover left upper cover and front cover see page 1 5 3 3 Remove the left rear cover and left cover see page 1 5 9 4 Remove connec...

Page 232: ...ove three screws 7 Release two hooks remove the fuser pressure drive unit 8 Check or replace the fuser pressure drive unit and refit all the removed parts Figure 1 5 63 Screws Screw Hook Hook Fuser pr...

Page 233: ...age 1 5 22 2 Remove the rear upper cover right upper cover left upper cover and front cover see page 1 5 3 3 Remove the left rear cover and left cover see page 1 5 9 4 Remove the fuser pressure drive...

Page 234: ...Figure 1 5 65 7 Remove three screws and then remove the middle transfer drive unit 8 Check or replace the middle transfer drive unit and refit all the removed parts Figure 1 5 66 Screw ID guide Screw...

Page 235: ...its K M C Y see page 1 5 21 19 3 Remove the rear upper cover right upper cover left upper cover and front cover see page 1 5 3 4 Remove the left rear cover and left cover see page 1 5 9 5 Remove two c...

Page 236: ...over see page 1 5 6 8 Remove the controller shield see page 1 5 30 9 Remove two connectors YC38 YC40 from main PWB Figure 1 5 69 10 Draw two connectors YC38 YC40 into the machine inside Figure 1 5 70...

Page 237: ...three screws and then remove laser scanner unit KM CY 12 Check or replace the laser scanner unit and refit all the removed parts Figure 1 5 71 Screw Screw Laser scanner unit CY Laser scanner unit KM S...

Page 238: ...r see page 1 5 78 2 Remove the connector YC36 and two FFCs YC8 YC43 from main PWB 3 Open the scanner unit Figure 1 5 72 4 Remove the motor wire CCD wire and LCD wire from the wire holder Figure 1 5 73...

Page 239: ...9 5 Release each four hooks and then remove left and right rails Figure 1 5 74 6 Remove two springs from left and right rails Figure 1 5 75 Rail Rail Hooks Rail Hooks Springs Holder Holder Service Man...

Page 240: ...and right rails from the scanner unit Figure 1 5 76 8 Remove left and right washers and springs and then pull pins out Figure 1 5 77 Holder Holder Scanner unit 1 1 2 2 Washer Washer Spring Spring Pin...

Page 241: ...2PV 2PW 1 5 51 9 Remove the scanner unit Figure 1 5 78 Scanner unit Service Manual Y116650 5...

Page 242: ...re Detach the covers 1 Open the paper conveying unit 2 Release the hook and then remove the IF cover Figure 1 5 79 3 Remove two screws and then remove the rear uppercover Figure 1 5 80 IF cover Paper...

Page 243: ...de the right upper cover backward and then remove it Figure 1 5 81 6 Release the hook Slide the left upper cover backward and then remove it Figure 1 5 82 Right upper cover Right upper cover Hook Hook...

Page 244: ...e five hooks hook A B and then remove the front cover Figure 1 5 83 8 Slide the power source cover backward and then remove it Figure 1 5 84 Front cover Hook A Hook A Hook B Hook B Power source cover...

Page 245: ...lease four hooks Slide the right rear cover backward and then remove it Figure 1 5 85 11 Open the memory cover and then remove it Figure 1 5 86 Right rear cover Right rear cover Screw Hook Hook Hook H...

Page 246: ...he cap of the waste toner box Figure 1 5 87 14 Open the MP tray 15 Release four hooks hook A B C Slide the right cover forward and then remove it 16 Remove the waste toner cover Figure 1 5 88 Waste to...

Page 247: ...t Processor and the scanner unit 18 Remove the left and right pins by push ing the pins out from inside while open ing the top tray till the half way of the opening angle After this procedure the top...

Page 248: ...9 Release each four hooks and remove the left and right rails Figure 1 5 91 20 Remove two springs from the left and right holders Figure 1 5 92 Rail Rail Hooks Rail Hooks Springs Holder Holder Service...

Page 249: ...ront of the triangle ribs of the ISU frame If the holders are behind the triangle ribs the scanner unit cannot be closed Figure 1 5 93 22 Release four hooks and remove the upper middle cover Figure 1...

Page 250: ...t and then remove the FFC 25 After surely slanting the high voltage PWB till ninety degree pull it out toward the machine right side If trying to pull out the PWB on the way of slanting till ninety de...

Page 251: ...Remove two pins and then pull out the hard disk or the network interface card Figure 1 5 96 28 Remove four screws and then remove the power source shield Screws A and B are unidentical Thus do not mix...

Page 252: ...ok B and slide the fan plate to release the remaining three hooks and then remove it Figure 1 5 98 31 Remove the screw and remove the fuser wire cover 32 Remove the cap Figure 1 5 99 Fan plate Fan bra...

Page 253: ...ontroller shield Figure 1 5 100 34 Disconnect the connector YC41 of the controller fan motor 35 Open the fan bracket and remove it Figure 1 5 101 Controller shild Screw Screw Screw Screw Screw Fan bra...

Page 254: ...de of the main PWB Be sure to retighten the screws after reat taching the wire holder Figure 1 5 102 38 Remove the wires from the wire holder 39 Remove two screws 40 Release three hooks and then remov...

Page 255: ...e wire holder detached at Step 40 Figure 1 5 104 42 Remove the wire holder and the ferrite core Figure 1 5 105 43 Reattach the left and right holders in a reverse manner of removal at Step 20 21 Close...

Page 256: ...DP top cover and remove the screw fixing the DP rear cover Figure 1 5 106 45 Open the Document Processor and release two hooks fixing the original tray And close the Document Processor Figure 1 5 107...

Page 257: ...r in the order of hook A B C Release the hook D and E at the machine front side while rotating the DP rear cover in the arrow s direction and then remove it Release the hook A B and C while press ing...

Page 258: ...WB Figure 1 5 110 49 Press the DP lock lever through the hole at the bottom right side of the scanner unit by inserting a screwdriver etc and open the Document Proces sor Figure 1 5 111 DP wire Screws...

Page 259: ...2PV 2PW 2 1 5 69 50 Remove the wire cover Figure 1 5 112 51 Detach the Document Processor Figure 1 5 113 Wire cover Document processor Service Manual Y116650 5...

Page 260: ...2PV 2PW 2 1 5 70 52 Open the scanner unit and release four hooks and then forward slide the oper ation cover Figure 1 5 114 Hooks Operation cover Hooks of the ISU cover Service Manual Y116650 5...

Page 261: ...cover Remove the ISU cover while pushing the DP lock lever to the right using a flat blade screw driver Do not touch the inner side of the contact glass removed with the ISU cover Dirt adhered trigge...

Page 262: ...ight direction Confirm the end of the ground spring surely fits the groove F of the shaft when reattaching Figure 1 5 116 55 Slightly lift up the ISU and remove the ISU drive belt from the groove lock...

Page 263: ...the scanner unit Take off the bending part of the FFC wire from the two double sided tapes on the wire alignment part Detach the ISU Then peel off the double sided tapes and clean the affixing part t...

Page 264: ...from the Alignment H to make Alignment J 3 Fold the FFC wire in 180 degrees at the Alignment J The reference length from the Alignment J to the wire s edge is about 195mm 4 Unfold the FFC wire to easi...

Page 265: ...n the figure Figure 1 5 121 60 Pass the shaft removed at Step 54 through the holes K L of the scanner frame s machine left side and the ISU s machine rear side and then fit the groove of the shaft to...

Page 266: ...for service while aligning their edges to the engravings on the scanner frame 63 Affix the ISU side s folding part of the FFC wire to the double sided tapes 64 Refit the ISU cover and the operation c...

Page 267: ...gure to the right Seven alignment ribs and one ferrite core Figure 1 5 125 67 Insert the end of the FFC wire into the connector YC8 on the main PWB 68 Refit all the parts and the unit detached in the...

Page 268: ...rear upper cover right upper cover left upper cover and front cover see page 1 5 3 2 Remove left and right pins and then close the inner tray Figure 1 5 127 3 Release three hooks and then remove the...

Page 269: ...e controller shield see page 1 5 30 6 Remove connector YC32 from main PWB Figure 1 5 129 7 Cut the band and then remove the it 8 Remove the DP wire and ground wire from wire holder 9 Close the scanner...

Page 270: ...1 5 80 10 Press the DP lock lever through the hole at the bottom right side of the scanner unit and open the document processor Figure 1 5 131 DP lock lever Hole Document processor Service Manual Y11...

Page 271: ...2PV 2PW 1 5 81 11 Remove the wire cover Figure 1 5 132 12 Remove the document processor Figure 1 5 133 Wire cover Document processor Service Manual Y116650 5...

Page 272: ...e 1 Open the DP top cover 2 Remove the screw 3 Release three hooks and then remove the DP rear cover Figure 1 5 134 4 Release two hooks and then remove the DP front cover Figure 1 5 135 Screw DP top c...

Page 273: ...r feed clutch from the PF shaft 7 Remove the stop ring B and then remove the PF collar spring spring col lar pin and bush from the PF shaft Figure 1 5 137 Bush Stop ring Bush DP paper feed clutch PF s...

Page 274: ...B 12 Remove the PF collar spring spring collar and pin from the PF shaft 13 Remove the DP feed pulley one way clutch PF pulley gear and pin from the PF shaft Figure 1 5 139 DP forwarding pulley unit S...

Page 275: ...e LF shaft and then remove the LF gear 18 joint gear and DP for warding pulley 17 Check or replace the DP feed pulley and DP forwarding pulley and refit all the removed parts Figure 1 5 140 Stop ring...

Page 276: ...DP separation pad Procedure 1 Remove the DP paper feed pulley unit see page 1 5 82 2 Remove the DP separation pad 3 Check or replace the DP separation pad and refit all the removed parts Figure 1 5 14...

Page 277: ...ar cover see page 1 5 82 2 Remove all connectors from DP drive PWB 3 Remove the screw and then remove the DP drive PWB 4 Check or replace the DP drive PWB and refit all the removed parts Figure 1 5 14...

Page 278: ...taching and refitting the paper conveying unit Procedure 1 Open the rear cover 2 Remove left and right straps Figure 1 5 143 3 Remove the rear cover unit Figure 1 5 144 Rear cover Strap 1 1 2 Rear cov...

Page 279: ...2PV 2PW 1 5 89 4 Remove the paper conveying unit Figure 1 5 145 Paper conveying unit 1 2 2 Service Manual Y116650 5...

Page 280: ...Procedure 1 Release four hooks and then remove the operation panel 2 Remove the FFC from connector 3 Check or replace the operation panel and refit all the removed parts Figure 1 5 146 Operation pane...

Page 281: ...1 Remove the power source PWB see page 1 5 29 2 Remove the connector and release the hook and then remove the right fan motor Figure 1 5 147 3 Remove the screw of the grounding wire Figure 1 5 148 Rig...

Page 282: ...Figure 1 5 149 5 Check or replace the power source inlet and refit all the removed parts Before mounting the AC inlet on the main unit twist the wires 5 to 7 turns Figure 1 5 150 Screw Power source in...

Page 283: ...areful of the airflow direction intake or exhaust Figure 1 5 151 Right fan motor Rating label Inside Fuser fan motor Rating label Inside Left fan motor Rating label Inside Container fan motor Rating l...

Page 284: ...2PV 2PW 1 5 94 This page is intentionally left blank Service Manual Y116650 5...

Page 285: ...ndicator this shows to start the download 5 Display the software that now upgrad ing FW Update CTRL FW Update ENGN FW Update PF1 FW Update PF2 FW Update SCAN FW Update FAX FW Update OPT FW Update CLT...

Page 286: ...ration Emergency Update is displayed on the LCD of the operation panel 5 Completed will be displayed when rewriting is successful Failed will be displayed when rewrit ing is failed 6 Turn the main pow...

Page 287: ...on engine PWB replacement When replacing the engine PWB remove the EEPROM U1 from the engine PWB that has been removed and then reattach it to the new engine PWB Figure 1 6 3 U1 EEPROM Engine PWB EEPR...

Page 288: ...Service Manual Y116650 5 This page is intentionally left blank...

Page 289: ...tion The cassette can contain 250 sheets The sheet from the cassette is pulled out by rotation of the pickup roller and sent to the paper conveying section by rotation of the paper feed roller Also th...

Page 290: ...1 2 Cassette paper feed section block diagram CPWB EPWB LM PFCL FEDCLDRN LIFTSEN PAPVOL LMOTDRN YC3 3 FEMOTRDYN YC3 6 FEMOTCLK YC3 7 FEMOTREN YC3 8 5 4 3 YC21 4 YC21 3 YC1 2 YC1 3 YC27 1 PFM PS LS Se...

Page 291: ...lso function of the MPF separation pad prevents paper from multiple feeding Figure 2 1 3 MP tray paper feed section 1 11 3 2 4 8 7 9 10 5 6 1 MP paper feed roller 2 MPF separation pad 3 MPF bottom pla...

Page 292: ...2PV 2PW 2 1 4 Figure 2 1 4 MP tray paper feed section block diagram MPPS MPSOL EPWB 5 4 3 PFM FEMOTRDYN MPFPAP YC3 6 YC16 3 FEMOTCLK YC3 7 MPSOLDRN YC4 2 FEMOTREN YC3 8 Service Manual Y116650 5...

Page 293: ...ned on and then sent to the transfer separation section by the front registration roller and rear registration roller Figure 2 1 5 Paper conveying section 1 1 1 3 5 6 11 12 8 2 4 2 2 10 9 7 1 MPF feed...

Page 294: ...r conveying section block diagram EPWB RYPWB MPPCS RS RCL REGCLDRN YC3 13 MCL MIDCLDRN YC3 11 MP FCL MPFCLDRN YC3 1 FEMOTRDYN YC3 6 MPFJAM YC9 18 YC4 2 REGPAP YC18 3 FEMOTCLK YC3 7 FEMOTREN YC3 8 5 4...

Page 295: ...complete toner remaining on the drum surface is chipped off with the cleaning blade and is collected to the waste toner box with the drum screw The cleaning lamp CL consists of LEDs and removes resid...

Page 296: ...2 8 YC3 2 YC3 3 YC3 4 YC3 7 YC3 8 CL M EEPROM DRPWB M EECLK ERASEMDR EEPROM ERASECDR EEDATA DA0 DA1 YC4 2 YC4 3 YC4 4 YC4 7 YC4 8 CL C DRPWB C EECLK ERASECDR EEPROM ERASEYDR EEDATA DA0 DA1 YC5 2 YC5 3...

Page 297: ...screws that agitate the toner Also the toner sensor TS checks whether or not toner remains in the developing unit Figure 2 1 9 Developing section 6 2 4 1 7 9 5 3 10 8 1 Sleeve roller 2 Magnet roller...

Page 298: ...Magnet bias C Sleeve bias C DEVPWB C TS C TNSENC YC10 2 Magnet bias M Sleeve bias M DEVPWB M TS M TNSENM YC7 2 Magnet bias K Sleeve bias K DEVPWB K TS K TNSENY YC13 2 EPWB TNSENM TNSENK DLPTHERM TNSEN...

Page 299: ...an electrical signal If a document processor is used the image scanner unit stops at the position of the DP contact glass and scans sequentially one row of the image on the original in synchronization...

Page 300: ...15 7 8 3 14 4 1 12 13 1 Unit cover 2 ISU housing 3 Reflector 4 Transparent material 5 Mirror A 6 Mirror B 7 Mirror C 8 Mirror D 9 Mirror E 10 ISU lens 11 CCD PWB CCDPWB 12 DriverPWB DRPWB 13 LED PWB L...

Page 301: ...block diagram CCD image sensor MPWB CCDPWB HPSWN YC8 16 YC36 1 2 3 4 SCMOTB2 SCMOTA1 SCMOTB1 SCMOTA2 LED LEDDR PWB ISUM HPS Scanner unit Mirrors and lens Image scanner unit ISU Original Contact glass...

Page 302: ...nd mirror are housed in the laser scanner unit adjust the diameter of the laser beam and focalize it at the drum surface Also the LSU cleaning motor LSUCM is activated to conduct automatically cleanin...

Page 303: ...C1 6 YC1 3 YC1 4 YC1 5 LONBCN ENBCN PDKN YC31 3 YC31 4 YC31 5 YC1 3 YC1 4 YC1 5 YC32 12 YC32 13 YC32 14 PM KM 1 2 3 POLCLK1 POLRDYN1 POLONN1 YC31 12 YC31 13 YC31 14 PD PWB Y PDCN PDMN PDKN PD PWB C La...

Page 304: ...ages formed on each drum onto the transfer belt Also with the ID sensors IDS mounted on the machine frame the toner density on the transfer belt is measured The transfer cleaning unit collects toner r...

Page 305: ...rimary transfer bias K Cleaning bias HVPWB EPWB Intermediate transfer unit IDS1 T1CCNT T1MCNT CLCNT LEDREFL VOPL VOSL YC6 4 YC6 2 YC6 1 YC1 2 YC1 4 YC1 5 IDS2 FUM LEDREFR VOPR IMAMOTREN IMAMOTCLK VOSR...

Page 306: ...HVPWB The toner image formed on the transfer belt is transferred to the paper by the potential difference and the paper is separated by curvature separation Figure 2 1 18 Secondary transfer roller sec...

Page 307: ...press spring The surface temperature of heat roller is detected by the fuser thermistor FTH and controlled by the engine PWB EPWB If the fuser section shows extremely high temperature the power line...

Page 308: ...S EVSW FH FTHERM FTHERM PDIRN PDIRN YC3 2 YC2 3 YC19 3 YC19 1 YC1 4 YC1 6 RYPWB YC1 11 YC1 13 YC4 16 YC4 14 LIVE NEUTRAL FUM IMAMOTREN IMAMOTCLK YC15 3 3 IMAMOTRDYN YC15 2 2 YC15 1 HEATRE1 ZCROSS YC9...

Page 309: ...er that has passed the fuser section to the inner tray or the duplex conveying section Figure 2 1 22 Eject Feed shift section 2 1 7 8 3 4 6 5 9 1 Eject roller 2 Eject pulley 3 Eject roller 4 Eject pul...

Page 310: ...2PV 2PW 2 1 22 Figure 2 1 23 Eject Feed shift section block diagram EJPWB EPWB FUSPAP STDUAN YC37 2 STDUBN YC37 1 2 3 4 STDUA YC37 4 STDUB YC37 3 1 YC19 4 YC1 3 DUM ES Service Manual Y116650 5...

Page 311: ...hich sends the paper sent from the eject feedshift section to the paper feed conveying section when duplex printing Figure 2 1 24 Duplex conveying section 3 5 1 2 3 4 4 6 3 4 1 Duplex roller L 2 Eject...

Page 312: ...2PV 2PW 2 1 24 Figure 2 1 25 Duplex conveying section block diagram EJPWB EPWB FUSPAP STDUAN YC37 2 STDUBN YC37 1 2 3 4 STDUA YC37 4 STDUB YC37 3 1 YC19 4 YC1 3 DUM ES Service Manual Y116650 5...

Page 313: ...ction Original is fed by the rotation of the DP forwarding pulley and DP feed pulley Figure 2 1 26 Original feed section 11 3 1 2 9 12 6 5 4 7 8 10 1 DP forwarding pulley 2 DP feed pulley 3 LF holder...

Page 314: ...ram DPDPWB MPWB DPOS DPPFCL DPPFM DPMOT1A YC3 1 ORGSWN YC2 6 DPMOT2A YC3 2 DPMOT1B YC3 3 DPMOT2B MOTA1 MOTB1 FEEDCL ORGSWN MOTA2 MOTB2 YC3 4 YC1 1 YC1 2 YC1 3 YC1 4 YC8 10 YC8 4 YC32 16 YC32 15 YC32 1...

Page 315: ...scanned by the optical section CCD of main machine when it passes through the DP contact glass of main machine Figure 2 1 28 Original conveying section 7 1 5 3 4 6 2 1 Conveying roller A 2 Conveying p...

Page 316: ...agram DPDPWB MPWB DPTS DPPFCL DPPFM DPMOT1A YC3 1 TIMSWN YC2 9 DPMOT2A YC3 2 DPMOT1B YC3 3 DPMOT2B MOTA1 MOTB1 FEEDCL TIMSWN MOTA2 MOTB2 YC3 4 YC1 1 YC1 2 YC1 3 YC1 4 YC8 10 YC8 3 YC32 16 YC32 15 YC32...

Page 317: ...x switchback scanning an original is conveyed temporarily to the switchback tray and conveyed again to the original conveying section by the switchback roller Figure 2 1 30 Original switchback eject s...

Page 318: ...M DPMOT1A YC3 1 TIMSWN YC2 9 DPMOT2A YC3 2 DPMOT1B YC3 3 DPMOT2B MOTA1 MOTB1 RELSOLN TIMSWN MOTA2 MOTB2 YC3 4 YC1 1 YC1 2 YC1 3 YC1 4 YC8 7 YC8 3 YC32 16 YC32 15 YC32 14 YC32 13 YC32 4 PRESOLN YC8 8 Y...

Page 319: ...witching for converting to 24 V DC and 5V DC for output Controls the fuser heater 4 High voltage PWB HVPWB Generates main charging developing bias transfer bias and cleaning bias 5 Operation panel PWB...

Page 320: ...eveloping unit M 16 Developing PWB C DEVPWB C Relays wirings from electrical components on the developing unit C 17 Developing PWB Y DEVPWB Y Relays wirings from electrical components on the developin...

Page 321: ...WB PARTS PWB ASSY EXIT SP 9 Cassette PWB CPWB PARTS PWB ASSY CASSETTE SP 10 Drum PWB K DRPWB K 11 Drum PWB M DRPWB M 12 Drum PWB C DRPWB C 13 Drum PWB Y DRPWB Y 14 Developing PWB K DEVPWB K 15 Develop...

Page 322: ...ay 8 MP paper conveying sensor MPFS Detects a paper misfeed in the MP paper conveying section 9 Eject sensor ES Detects a paper misfeed in the fuser or eject section 10 Home position sensor HPS Detect...

Page 323: ...TSW Detects the opening and closing of the inner tray 21 Toner container sensor TCS Detects the presence of the toner container 22 Waste toner cover sensor WTCS Detects the opening and closing of the...

Page 324: ...otor C TM C Replenishes toner to the developing unit C 10 Toner motor Y TM Y Replenishes toner to the developing unit Y 11 Polygon motor KM PM KM Drives the polygon mirror KM 12 Polygon motor CY PM CY...

Page 325: ...er fan motor CONFM Cools the controller section 19 Fuser fan motor FUFM Cools the toner container section 20 Container fan motor CFM Cools the toner container section 21 ISU motor ISUM Drives the ISU...

Page 326: ...leaning lamp K CL K Eliminates the residual electrostatic charge on the drum black 7 Cleaning lamp M CL M Eliminates the residual electrostatic charge on the drum magenta 8 Cleaning lamp C CL C Elimin...

Page 327: ...e original scanning timing 4 DP open close sensor DPOCS Detects the opening closing of the DP 5 DP paper feed motor DPPFM Drives the original feed section 6 DP paper feed clutch DPPFCL Controls the dr...

Page 328: ...2PV 2PW 2 2 10 This page is intentionally left blank Service Manual Y116650 5...

Page 329: ...2PV 2PW 2 3 1 2 3 Operation of the PWBs 2 3 1 Power source PWB Figure 2 3 1 Power source PWB silk screen diagram YC103 YC105 YC104 YC101 YC102 Service Manual Y116650 5...

Page 330: ...24V2 O 24 V DC 24 V DC power to RYPWB via ILSW 7 24V2 O 24 V DC 24 V DC power to RYPWB via ILSW 8 24V2 O 24 V DC 24 V DC power to RYPWB via ILSW 9 24V2 O 24 V DC 24 V DC power to RYPWB via ILSW 10 PSS...

Page 331: ...YC6 YC7 YC36 YC35 YC13 YC19 YC24 YC38 YC15 YC37 YC25 YC2 YC41 YC28 YC30 YC11 U3 U11 U9 U8 U10 U6 U4 U5 U7 U1 U2 YC12 YC31 YC32 YC4 YC16 YC10 YC42 YC20 YC26 1 1 1 1 1 1 6 1 1 1 1 32 1 1 1 18 1 1 1 1 3...

Page 332: ...C power to PFM 11 MIDCLDRN O 0 24 V DC MCL On Off 12 24V3 O 24 V DC 24 V DC power to MCL 13 REGCLDRN O 0 24 V DC RCL On Off 14 24V3 O 24 V DC 24 V DC power to RCL YC4 1 24V3 O 24 V DC 24 V DC power to...

Page 333: ...V DC pulse Zero cross signal 4 RELAY O 0 3 3 V DC Power relay signal 5 HEATRE1 O 0 3 3 V DC FH On Off 6 HEATRE2 Not used 7 VSYNC O 0 3 3 V DC Vertical synchronizing signal 8 EGIRN O 0 3 3 V DC Engine...

Page 334: ...g magnet roller bias control voltage Black 11 T1YCNT O PWM Primary transfer bias control voltage Yellow 12 BKSCNT O PWM Developing sleeve roller bias control voltage Black 13 T1KCNT O PWM Primary tran...

Page 335: ...LK O 0 3 3 V DC pulse DRM clock signal 5 MOTEN O 0 3 3 V DC DRM On Off 6 GND Ground 7 24V3 O 24 V DC 24 V DC power to DRM YC14 1 24V3 O 24 V DC 24 V DC power to DEVM Connected to developing motor 2 GN...

Page 336: ...ver sensor 2 GND Ground 3 TCONTN I 0 3 3 V DC TCS On Off 4 3 3V2_LED7 O 3 3 V DC 3 3 V DC power to WTCS 5 GND Ground 6 WSTOPN I 0 3 3 V DC WTCS On Off YC21 1 GND Ground Connected to cassette PWB 2 PAP...

Page 337: ...C Not used 3 LONBKN O 0 3 3 V DC APCPWB K sample hold signal 4 ENBKN O 0 3 3 V DC APCPWB K laser enable signal 5 PDKN I 0 3 3 V DC pulse Horizontal synchronizing signal 6 GND Ground 7 N C Not used 8 L...

Page 338: ...nal 14 POLONN0 O 0 3 3 V DC PM CY On Off 15 GND Ground 16 24V3 O 24 V DC 24 V DC power to PM CY YC33 1 GND Ground Connected to paper feeder 2 OPSCLK O 0 3 3 V DC pulse Paper feeder clock signal 3 OPRD...

Page 339: ...ase switch and developing release motor 2 GND Ground 3 DLPCMOTA O 24 0 V DC DEVRM Forward Stop Reverse 4 DLPCMOTB O 24 0 V DC DEVRM Reverse Stop Forward YC36 1 LSUMOTA O 24 0 V DC LSUCM Forward Stop R...

Page 340: ...AIRTEMP I Analog OTEMS detection voltage temperature 3 WETCLK0 O 0 3 3 V DC pulse OTEMS clock signal 4 WETCLK1 O 0 3 3 V DC pulse OTEMS clock signal 5 AIRWETOUT I Analog OTEMS detection voltage humid...

Page 341: ...iagram YC42 2 1 1 17 16 2 YC39 YC38 2 1 12 11 YC40 1 2 11 12 YC41 1 2 YC37 4 1 YC36 1 4 YC32 1 15 YC2000 1 10 11 12 YC107 1 5 YC8 YC43 1 9 1 2 32 31 U2004 U35 U2000 YC2004 L1 L2 R1 R1 L3 L4 R9 R10 YC1...

Page 342: ...CCDPH2P O LVDS CCD shift register clock signal 13 CCDPH2N O LVDS CCD shift register clock signal 14 NC Not used 15 3 3VS O 3 3 V DC 3 3 V DC power to CCDPWB 16 HPSWN I 0 3 3 V DC HPS On Off 17 NC Not...

Page 343: ...V DC DPPFCL On Off Connected to DP drive PWB 2 REVSOL O 0 24 V DC DPSBSOL On Off 3 PRESOLN O 0 24 V DC DPPRSOL On Press Off 4 RELSOLN O 0 24 V DC DPPRSOL On Release Off 5 DPDETN I 0 3 3 V DC DP set s...

Page 344: ...e 9 3 3V3 O 3 3 V DC 3 3 V DC power to APCPWB K 10 PDKN I 0 3 3 V DC pulse Horizontal synchronizing signal 11 VDOKP O LVDS APCPWB K video data signal 12 VDOKN O LVDS APCPWB K video data signal YC39 1...

Page 345: ...O LVDS APCPWB C video data signal 12 VDOCN O LVDS APCPWB C video data signal YC41 1 24V1 O 24 V DC 24 V DC power to CONFM Connected to controller fan motor 2 CONTFAN DRN O 0 12 24 V DC CONFM Full spe...

Page 346: ...7 AUDIO I Analog Audio signal 8 RESERVE 9 RESERVE 10 RESERVE 11 GND Ground 12 RESERVE 13 RESERVE 14 GND Ground 15 RESERVE 16 RESERVE 17 GND Ground 18 USB_DP I O USB data signal 19 USB_DN I O USB data...

Page 347: ...Control signal 11 COMMON 0 3 3 V DC Control signal 12 WP I 0 3 3 V DC Control signal YC2004 1 TCT O 3 3 V DC 3 3 V DC power output Connected to ethernet 2 TD O 0 3 3 V DC pulse Transmission data 3 TD...

Page 348: ...2PV 2PW 2 3 20 2 3 4 Drum relay PWB Figure 2 3 4 Drum relay PWB silk screen diagram YC9 YC5 YC4 YC3 YC2 YC8 YC1 YC7 YC6 4 1 4 1 13 1 4 1 4 1 8 7 2 1 8 7 2 1 8 7 2 1 8 7 2 1 Service Manual Y116650 5...

Page 349: ...ND Ground Connected to drum PWB K 2 EECLK O 0 3 3 V DC pulse EEPROM clock signal 3 ERASEKDR O 0 24 V DC CL K On Off 4 EEDATA I O 0 3 3 V DC pulse EEPROM data signal 5 N C Not used 6 3 3V2 O 3 3 V DC 3...

Page 350: ...DC power to DEVPWB K 4 DLPTHERM I Analog DEVTH detection voltage YC7 1 GND Ground Connected to developing PWB M 2 TNSENM I Analog TS M detection voltage 3 3 3V2 O 3 3 V DC 3 3 V DC power to DEVPWB M...

Page 351: ...2PV 2PW 2 3 23 2 3 5 DP drive PWB Figure 2 3 5 DP drive PWB silk screen diagram YC7 YC1 YC8 1 1 2 2 6 1 10 9 YC6 YC4 YC2 YC3 YC5 1 1 1 9 1 4 2 2 1 3 Service Manual Y116650 5...

Page 352: ...3 V DC DPOS On Off 7 3 3V2 O 3 3 V DC 3 3 V DC power to DPTS 8 GND Ground 9 TIMSWN I 0 3 3 V DC DPTS On Off YC3 1 DPMOT1A O 0 24 V DC pulse DPPFM drive control signal Connected to DP paper feed motor...

Page 353: ...ORGSWN O 0 3 3 V DC DPOS On Off 5 OPSWN O 0 3 3 V DC DPOCS On Off 6 DPDETN O 0 3 3 V DC DP set signal 7 RELSOLN I 0 24 V DC DPPRSOL On Release Off 8 PRESOLN I 0 24 V DC DPPRSOL On Press Off 9 REVSOL...

Page 354: ...2PV 2PW 2 3 26 This page is intentionally left blank Service Manual Y116650 5...

Page 355: ...pages MK 590 MAINTENANCE KIT B0950 Developing unit K DV 560 K Developing unit M DV 560 M Developing unit C DV 560 C Developing unit Y DV 560 Y Drum unit DK 590 Intermediate transfer unit TR 590 Fuser...

Page 356: ...rating conditions 31 mm 1 1 4 38 mm 1 1 2 First occurrence of defect 50 mm 1 15 16 50 mm 1 15 16 59 mm 2 5 16 79 3 1 8 mm 82 3 1 4 mm 94 3 11 16 mm Rear registration roller Charger roller Front regist...

Page 357: ...ize command R FRPO INIT EXIT The FRPO command is sent to the printer in the following sequence R FRPO parameter value EXIT Example Changing emulation mode to PCL6 R FRPO P1 6 EXIT FRPO parameters Item...

Page 358: ...rescribe EXIT and formfeed commands 10 Page eject commands if AES fails resolves to KPDL 120V 11 220 240V 10 Command recognition character P9 ASCII code of 33 to 126 82 R Default paper size R2 0 Size...

Page 359: ...k 5 Sweden 6 Italy 7 Spain 8 Japan 9 US Legal 10 IBM PC 850 Multilingual 11 IBM PC 860 Portuguese 12 IBM PC 863 Canadian French 13 IBM PC 865 Norwegian 14 Norway 15 Denmark 2 16 Spain 2 17 Latin Ameri...

Page 360: ...regular 5 Color mode W1 0 Black white 1 Color 1 Gloss mode W6 0 Low normal 1 High 0 Paper type for the MP tray X0 1 Plain 2 Transparency 3 Preprinted 4 Label 5 Bond 6 Recycle 7 Vellum 9 Letterhead 10...

Page 361: ...gh quality 21 to 28 Custom1 to 8 1 PCL paper source X9 0 Paper selection depending on an escape sequence compatible with HP LJ5Si 2 Paper selection depending on an escape sequence compatible with HP L...

Page 362: ...hrough the image Loads Letter A4 size paper depending on the image size 8 Through the image Loads paper from the current paper cassette 9 Through the image Loads Letter A4 size paper depending on the...

Page 363: ...stment if there is a regular error between the left edges of the copy image and original Example Set the leading edge of MP tray to 30 dots R KCFG PFRC 0 1 30 EXIT Format R KCFG PFRC 1 2 3 Parameter 1...

Page 364: ...OM set to 55 X SCAN ZOOM set to 10 R KCFG SCAN 8 1 55 KCFG SCAN 8 2 10 EXIT Format R KCFG SCAN 8 1 2 EXIT Parameter 1 1 Y SCAN ZOOM Scanner magnification in the main scanning direction 2 X SCAN ZOOM S...

Page 365: ...ween the leading edges of the copy image and original Example Scanner leading edge registration set to 10 to increase 0 86mm R KCFG SCAN 5 1 10 EXIT Format R KCFG SCAN 5 1 2 EXIT Parameter 1 1 Scanner...

Page 366: ...of the copy image and original Example Scanner leading edge registration set to 20 to increase 1 72mm R KCFG SCAN 6 1 20 EXIT Format R KCFG SCAN 6 1 2 EXIT Parameter 1 1 Scanner center line 2 Scanner...

Page 367: ...t proper when the DP is used Exe cute KCFG EESS 4 107 1 1 command to adjust the timing of DP leading edge when the scanning posi tion is changed Example DP READ set to 15 BLACK LINE set to 3 R KCFG SC...

Page 368: ...correct in the auxiliary scanning direction when the DP is used Example DP scanning magnification set to 20 to increase 2 R KCFG SCAN 4 2 20 EXIT Leading edge registration Format R KCFG SCAN 4 1 2 EXI...

Page 369: ...ion Format R KCFG SCAN 2 1 2 EXIT Parameter 1 1 FRONT HEAD Leading edge registration first page 2 FRONT TAIL Trailing edge registration first page 3 BACK HEAD Leading edge registration second page 4 B...

Page 370: ...en the centers of the original and the copy image when the DP is used Example FRONT set to 15 BACK set to 3 R KCFG SCAN 3 1 15 KCFG SCAN 3 2 3 EXIT DP center line Format R KCFG SCAN 3 1 2 EXIT Paramet...

Page 371: ...0 31 32 1 2 3 4 5 6 7 8 9 10 11 12 13 14 1 2 3 4 5 6 7 8 9 10 11 12 13 14 17 16 15 14 13 12 11 10 9 8 7 6 5 1 2 3 4 5 6 7 8 9 10 11 12 13 3 2 1 1 2 1 2 1 2 1 2 3 2 1 1 2 1 2 Y C M K 1 2 3 4 5 6 7 8 9...

Page 372: ...YN LSUTHERMY 1 2 3 4 1 2 3 4 3 3V1 DBTXD DBRXD DBCLK GND 1 2 3 4 5 1 2 3 4 5 1 2 3 4 5 6 1 2 3 4 5 6 1 2 3 4 5 6 7 8 9 10 11 12 13 14 15 16 17 18 1 2 3 4 5 1 2 3 4 5 1 2 3 4 5 6 7 8 9 10 11 12 13 14 1...

Page 373: ...3 3V2 TNSEN GND GND TNSENM 3 3V2 N C GND TNSENC 3 3V2 N C GND TNSENY 3 3V2 N C 1 8 1 8 1 2 3 4 1 2 3 4 1 8 1 8 Thermistor 1 2 3 4 5 6 7 8 9 10 11 12 13 1 2 3 4 5 6 7 8 9 10 11 12 13 3 3V2 LEDREFR GND...

Page 374: ...3VS_LED 1 2 1 2 1 2 3 4 6 5 4 3 2 1 6 5 4 3 2 1 3 3V2 GND TIMSWN ORGSWN OPS WN DPDETN RELSOLN PRESOLN REVSOL FEEDCL 1 2 3 4 5 6 7 8 9 10 11 12 13 14 15 16 17 18 19 20 21 22 23 24 25 26 27 28 29 30 31...

Page 375: ...UPDATINGSTATUS DATE UPDATEDPAGES PAGES CODE 07 2014 1ST EDITION 375 Y116650 5...

Reviews: