background image

d-Color MF4003/MF3303

J BILLING SETTING/ENHANCED SECURITY/DEBUG SETTINGS > 2. ENHANCED

SECURITY

J-28

NOTE

▪ It is displayed when Backup Settings is enabled.

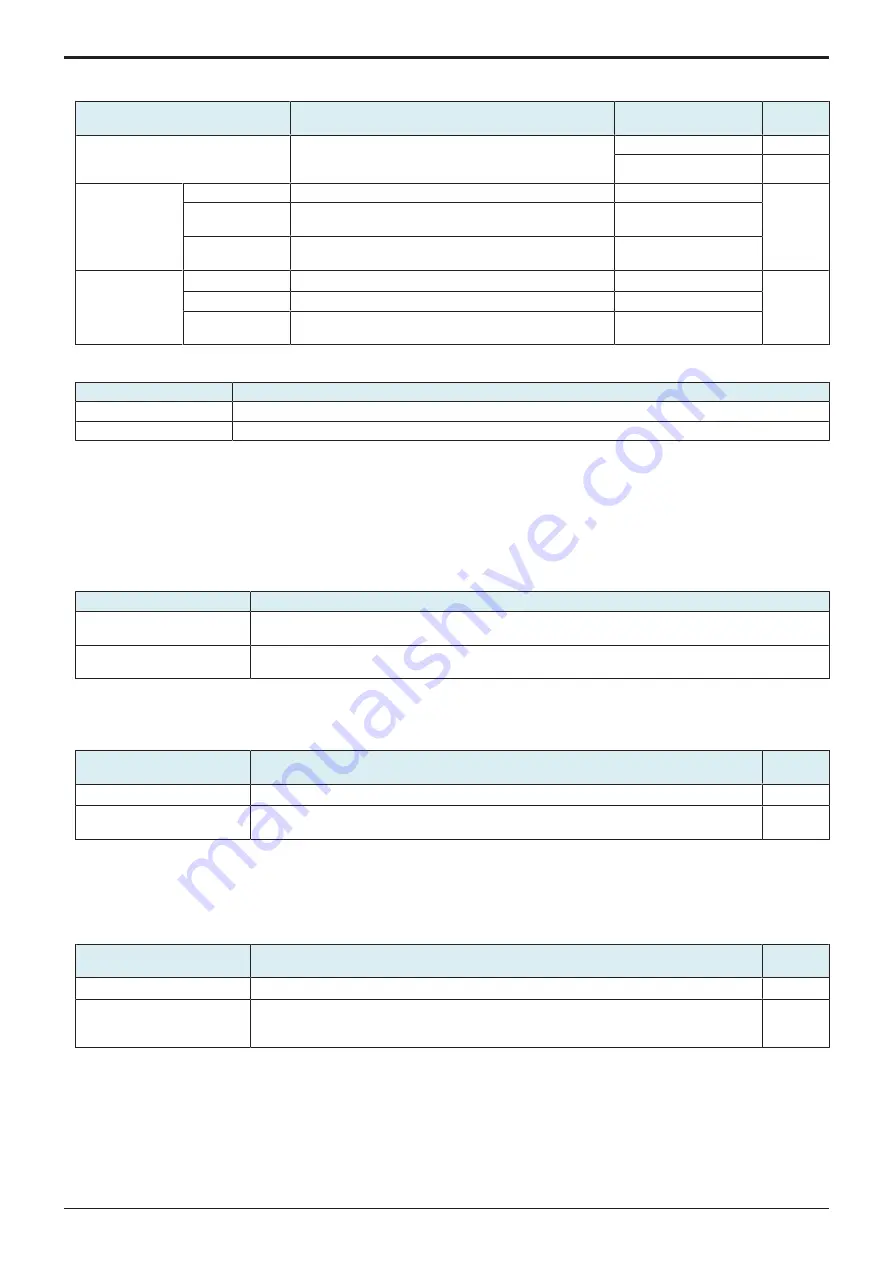
Setting item

Contents

Setting value

Default

setting

Enable Settings

To set whether to execute auto backup.

• When “Yes” is selected, configure the following

settings.

ON

Disable

Full Backup

Interval of day(s)

Select the backup as Interval of day(s).

1 to 30 days

-

Weekly frequency

Select the backup as Weekly frequency.

Sun, Mon, Tue, Wed, Thu,
Fri, Sat

Backup time

To setting a time to back up.

Hour: 00 - 23
Minute: 00 - 59

Diff. Backup

Disable

Select not to backup Diff. backup.

-

-

Time Setting

Select the backup period by time setting.

1 to 48 hours

Time Setting

Select the backup period by time setting.

Hour: 00 - 23
Minute: 00 - 59

<Backup reservation>

• To select the backup reservation.

Setting item

Contents

Full Backup

Select to make backup Full backup.

Diff. Backup

Select to make backup Diff. backup.

NOTE
To select the backup reservation and touch [Fix].

<Backup history>

• To make a confirmation of the date and time when the final backup is completed successfully.
• Up to 100 backup logs can be displayed in the order from the latest backup.

(2)  Restore from Server

Restore Mode Select

• Select the restore method.

Setting item

Contents

Restore from Server

Select to make restore from the server.
Set “Setting when selecting restore from the server”.

Restore from Server 2

Select to make restore from the server as restore 2.
Set “Setting when selecting restore from the server 2”.

Setting when selecting restore from the server

<Restore setting>

• To specify a location from where restore data is to be downloaded.
• Select a server and press “Start” to start restoring.

Setting item

Contents

Default

setting

Acquire from backup

Execute restore from a location other than the server specified in Backup Settings.

Edit Restore path

Execute restore other than from a location other than the server specified in Backup Settings.

• When Edit Restore path is selected, enter WebDAV setting and Encryption Password.

<Restore result>

• To display the final date of restore.

Setting when selecting restore from the server 2

<Restore setting>

• To specify a location from where restore data is to be downloaded.
• Select machine, restore data and restore target from [Restore Data Select] and press “Start” to start restoring.

Setting item

Contents

Default

setting

Acquire from Backup

Execute restore from a location other than the server specified in Backup Settings.

Edit Restore path

Execute restore other than from a location other than the server specified in Backup Settings.

• When Edit Restore path is selected, enter Download Protocol and SMB setting, or HTTP

Setting and Encryption Password.

<Restore history>

• Restore history is displayed.
• Insert USB memory, touch the start key and save the restore result details in the USB memory.

2.12.2  Server Function

• Use MFP as backup server (WebDAV server).

Service Manual

Y119930-3

Summary of Contents for d-Color MF 4003

Page 1: ...Multifunction Digital Copier d Color MF4003 MF3303 Service Manual Version 2 0 Code Y119930 3 ...

Page 2: ...PUBLICATION ISSUED BY Olivetti S p A Gruppo Telecom Italia www olivetti com Copyright 2020 Olivetti All rights reserved ...

Page 3: ...nal Laser Radiation A 20 3 5 3 Laser Safety Label A 21 3 5 4 Laser Warning Label A 21 3 5 5 PRECAUTIONS FOR HANDLING THE LASER EQUIPMENT A 22 4 WARNING INDICATIONS ON THE MACHINE A 23 4 1 Warning indications inside the machine A 23 4 2 Warning indications on the boards A 24 5 MEASURES TO TAKE IN CASE OF AN ACCIDENT A 25 B NOTATION OF THE CONTENTS B 1 1 PRECAUTION ON HANDLING THIS MANUAL B 1 2 PROD...

Page 4: ...E 11 3 1 12 Replacing the fusing unit E 12 3 2 PF P20 PF P21 E 14 3 2 1 Replacing the tray 2 3 pick up roller feed roller E 14 3 2 2 Replacing the tray 2 3 separation roller E 14 4 Cleaning parts list E 16 4 1 d Color MF4003 MF3303 E 16 4 2 PF P20 PF P21 E 16 5 Cleaning Lubrication procedure E 17 5 1 d Color MF4003 MF3303 E 17 5 1 1 Cleaning original glass E 17 5 1 2 Cleaning tray 1 pick up roller...

Page 5: ...drive unit F 18 4 2 9 ADF F 20 4 2 10 CIS module F 20 4 2 11 DF CIS module assy F 21 4 2 12 Scanner unit F 22 4 3 Boards F 24 4 3 1 Base board BASEB F 24 4 3 2 Storage board STRGB F 25 4 3 3 CPU board CPUB F 26 4 3 4 DC power supply DCPS F 28 4 3 5 Backup board ERB F 30 4 3 6 TPM board TPMB F 31 4 3 7 High voltage unit HVPS F 32 4 3 8 Machine condition monitor board Fr MCMB Fr F 33 4 3 9 Machine c...

Page 6: ... 1 Wireless LAN board UK 221 F 58 8 EK P08 EK P09 F 59 8 1 USB hub board EK P08 EK P09 F 59 9 KP 102 F 60 9 1 Keypad KP 102 F 60 10 UK P19 F 61 10 1 Multi feed detection board TX MFDB TX F 61 10 2 Multi feed detection board RX MFDB RX F 62 11 CU 202 Only for Europe F 64 11 1 Clean unit CU 202 F 64 11 2 UFP filter F 64 11 3 Clean unit drive board CUDB F 65 11 4 Exhaust fan 1 FM1 F 65 11 5 Exhaust f...

Page 7: ...s H 15 6 3 26 Widget Function Settings H 15 6 3 27 Bypass Tray Overwrite Settings for Print PC H 15 6 3 28 Network Selection Settings H 15 6 3 29 Job History Display Setting H 15 6 3 30 Default Bypass Paper Type Setting H 15 6 3 31 Page Number Print Position H 15 6 3 32 ADF original skew adj setting H 16 6 3 33 Def operation mode set H 16 6 3 34 Paper Size Type Settings Screen Display H 16 6 4 Sec...

Page 8: ...hine I 5 5 1 Fusing Temperature I 5 5 2 Fusing Transport Speed I 5 5 3 Printer Area I 5 5 3 1 Leading Edge Adjustment I 5 5 3 2 Printer Image Centering Side 1 I 6 5 3 3 Leading Edge Adj Side 2 Duplex I 6 5 3 4 Prt Image Center Side 2 Dup I 7 5 3 5 Paper Feed Direction Adj I 7 5 3 6 Tray Printing Position Tip I 8 5 4 Scan Area I 8 5 4 1 Test chart I 8 5 4 2 Image Position Leading Edge I 8 5 4 3 Sca...

Page 9: ... No 12 I 31 8 2 14 SW No 14 I 32 8 2 15 SW No 15 I 32 8 2 16 SW No 18 I 32 8 2 17 SW No 21 I 33 8 2 18 SW No 22 I 33 8 2 19 SW No 23 I 34 8 3 Remote Analysis I 34 8 3 1 Outline I 34 8 3 2 Function Setting I 34 8 3 3 Send I 35 8 3 4 History Output I 36 8 3 5 CS Remote Analysis Error Code List I 36 9 System 1 I 38 9 1 Marketing Area I 38 9 1 1 List of functions affected by marketing area setting I 3...

Page 10: ...2 Multifeed Sensor Status I 52 10 13 User Paper Settings I 52 10 14 Coverage Rate Screen I 53 10 15 JAM Code Display Setting I 53 10 16 Import Config Data I 53 10 16 1 BootUp Screen I 53 10 16 2 Machine Image I 53 10 16 3 Custom Auth Setting I 54 10 17 Install Data I 54 10 18 Local Interface Kit Setting I 54 10 19 Display Eco Index I 55 10 20 Internal Error Auto Cancel I 55 10 21 Acquiring Setting...

Page 11: ...gnostic function I 69 13 12 2 Self diag Full I 70 13 12 3 Self diag Individual I 71 14 Test Mode I 73 14 1 Test Pattern I 73 14 1 1 Gradation Pattern I 73 14 1 2 Halftone Pattern I 73 14 1 3 Lattice Pattern I 73 14 1 4 Solid Pattern I 74 14 1 5 Color Sample I 74 14 1 6 8 Color Solid Pattern I 75 14 1 7 CMM pattern I 75 14 2 Paper Passage Test I 75 14 3 Fax Test I 76 15 ADF I 78 15 1 Original Stop ...

Page 12: ...gs I 126 18 2 Machine Auto Update setting I 126 18 2 1 Auto Update setting I 126 18 2 2 Relay server setting I 131 18 2 3 Transmission log Update I 132 18 2 4 Transmission Server Log I 133 18 2 5 Update Log Display I 133 18 2 6 Relay Server Log Confirmation I 133 18 2 7 Manually Update I 134 18 2 8 Machine Import setting I 134 18 2 9 Machine Export setting I 134 18 2 10 Machine Update Password I 1...

Page 13: ...Mode J 30 3 4 Remote Log Retrieval J 31 3 5 Remote Log Server Settings J 31 3 6 Enable Core Dump J 32 3 7 USB Password J 32 3 8 Other J 32 3 8 1 Screen Capture J 32 3 8 2 Panel Operation Playback J 33 K FIRMWARE K 1 1 Overview K 1 2 USB memory K 2 2 1 Preparation K 2 2 2 Rewriting of Firmware K 2 2 3 Action when data transfer fails K 4 3 Internet ISW K 5 3 1 Service environment K 5 3 2 Preparation...

Page 14: ...1 Overview of trouble code L 19 3 2 Overview of troubleshooting procedure L 19 3 2 1 Troubleshooting procedure L 20 3 3 Trouble resetting procedure L 20 3 3 1 Trouble resetting procedure by Trouble Reset key L 20 3 3 2 Trouble resetting procedure by the auto cancel function L 21 3 3 3 Trouble resetting procedure by remote operation L 21 3 4 Nonvolatile memory clear function L 21 3 4 1 Data to be c...

Page 15: ...6751 L 44 3 12 6 C6752 L 44 3 12 7 C6753 L 45 3 12 8 C6754 C6755 L 45 3 12 9 C6756 L 45 3 12 10 C6902 C6903 C6912 C6913 L 46 3 12 11 C6F01 C6F02 C6F03 C6F04 C6F05 C6F06 C6F07 C6F08 C6F09 C6F0A C6FDC C6FDD L 46 3 13 C7 L 46 3 13 1 C7111 L 46 3 13 2 C7131 L 47 3 13 3 C7133 L 47 3 13 4 C7201 L 47 3 13 5 C7206 L 47 3 13 6 C720A L 48 3 13 7 C720B L 48 3 13 8 C720D L 48 3 13 9 C720E L 48 3 13 10 C720F L...

Page 16: ...1 CD042 CD043 CD044 CD045 CD046 L 63 3 18 8 CD047 CD048 CD049 CD04A CD04B L 63 3 18 9 CD050 L 63 3 18 10 CD073 L 64 3 18 11 CD110 L 64 3 18 12 CD201 CD202 CD203 L 64 3 18 13 CD211 CD212 L 64 3 18 14 CD241 CD242 L 65 3 18 15 CD261 L 65 3 18 16 CD262 L 65 3 18 17 CD2D1 L 65 3 18 18 CD3 L 66 3 18 19 CD313 L 66 3 18 20 CD38E L 67 3 18 21 CD390 L 67 3 18 22 CD391 L 67 3 18 23 CD392 L 67 3 18 24 CD3B1 C...

Page 17: ...12 1 E12 2 L 82 4 26 E12 3 L 83 5 TROUBLESHOOTING WHEN NG IS DISPLAYED ON THE SELF DIAG INDIVIDUAL L 84 5 1 I2S check L 84 5 1 1 Troubleshooting when NG is displayed for AUDIO voice L 84 5 2 Various USB Check L 84 5 2 1 Troubleshooting when NG is displayed for Keyboard L 84 5 2 2 Troubleshooting when NG is displayed for USB Memory L 84 5 3 CPU board check L 84 5 3 1 Troubleshooting when NG is disp...

Page 18: ...DES L 113 10 1 Outline L 113 10 2 Explanation L 113 10 2 1 The diagnostic code L 113 10 2 2 Information of communication results and conditions L 113 11 NETWORK FAX ERROR CODE L 115 11 1 Error code list of the transmission system L 115 11 2 Error code list of the reception system L 115 12 PANEL BLACKOUT TROUBLE BOOT DIAGNOSIS FUNCTION L 117 12 1 Boot diagnosis function L 117 12 1 1 Boot diagnosis ...

Page 19: ... Foggy background L 140 16 3 11 Void areas White spots L 142 16 3 12 Color spot L 143 16 3 13 Blurred image L 145 16 3 14 Back marking L 145 16 3 15 Blank copy Black copy L 146 16 3 16 Uneven pitch L 147 16 3 17 Uneven gloss Rough gloss L 148 16 3 18 Poor fusing performance Offset L 149 16 3 19 Brush effect Image bleeding L 149 16 3 20 Blurred fine lines L 150 16 3 21 Moire L 151 16 3 22 Distorted...

Page 20: ... 7 1 5 TONER SUPPLY SECTION P 11 1 5 1 Configuration P 11 1 5 2 Drive P 12 1 5 3 Operation P 12 1 6 IMAGING UNIT P 15 1 6 1 Imaging unit overall configuration P 15 1 6 2 Imaging unit charge corona P 17 1 6 3 Imaging unit photoconductor P 19 1 6 4 Imaging unit developing P 22 1 7 1ST TRANSFER SECTION P 25 1 7 1 Configuration P 25 1 7 2 Drive P 26 1 7 3 Operation P 26 1 8 2ND TRANSFER SECTION P 31 1...

Page 21: ...own control P 68 2 3 2 Pick up roller retract mechanism P 70 2 3 3 Separation roller retract mechanism P 70 2 3 4 Paper feed control P 70 2 3 5 Paper guide plate P 71 2 3 6 Paper size detection P 71 2 3 7 Paper empty condition detection control P 71 2 3 8 Tray open close detection control P 72 2 3 9 Paper misfeed detection control P 72 2 3 10 Paper feed tray stopper release mechanism P 72 3 FS P04...

Page 22: ... 3 V8 V34 sequence P 94 8 2 FUNCTION P 102 8 2 1 Telephone function P 102 8 2 2 F code P 103 8 2 3 Transmission function P 107 8 2 4 Reception function P 107 9 CU 202 P 110 9 1 CONFIGURATION P 110 9 1 1 Configuration P 110 9 1 2 Unit internal configuration P 110 9 2 OPERATION P 110 9 2 1 Airflow P 110 9 2 2 Fan control P 111 ...

Page 23: ...03 A SAFETY AND IMPORTANT WARNING ITEMS A 1 A SAFETY AND IMPORTANT WARNING ITEMS Read carefully the safety and important warning items described below to understand them before doing service work Y119930 3 Service Manual ...

Page 24: ...rvice manual is complete and accurate The user of this service manual must assume all risks of personal injury and or damage to the product while servicing the product for which this service manual is intended Therefore this service manual must be carefully read before doing service work both in the course of technical training and even after that for performing maintenance and control of the prod...

Page 25: ...ion having a possibility of suffering death or serious injury CAUTION Action having a possibility of suffering a slight wound and property damage 2 2 Description items for safety and important warning items Symbols used for safety and important warning items are defined as follows Precaution when servicing the product General precaution Electric hazard High temperature Prohibition when servicing t...

Page 26: ...refore strictly prohibited the points listed below are not exhaustive but they illustrate the reasoning behind this policy 3 1 1 Actions requiring special attention WARNING Do not make any modifications to the product unless otherwise instructed by OLI Do not use any part not specified by OLI Do not use any power cord or power plug not specified by OLI Use only the protective fuses specified by OL...

Page 27: ... engineer hereafter called the CE to attach the appropriate power plug or power cord set in order to connect the product to the supply 3 2 1 Power Cord Set or Power Plug WARNING Use a power supply cord set which meets the following criteria provided with a plug having configuration intended for the connection to wall outlet appropriate for the product s rated voltage and current and the plug has p...

Page 28: ...t leads to the product connecting to inadequate power supply voltage current capacity grounding and may result in fire or electric shock The wires in the power supply cord shall be connected to the terminals of the plug in accordance with the following Color of the wire Terminal of the plug Brown White Light Blue Black Green and Yellow Marked with L A or W or colored RED Marked with N or colored B...

Page 29: ...y the CE must perform regular safety checks 3 3 1 Power Supply 1 Connection to Power Supply WARNING The power outlet should have a capacity of at least the maximum power consumption and be dedicated only to the product The current that can be passed through the outlet is limited and any current exceeding the limit could result in fire kw If the wall outlet has two or more receptacles and the produ...

Page 30: ...o result in an electric shock due to a grounding failure If the plug shape does not match the wall outlet request the user to perform power source installation work Make sure the power cord is plugged into the wall outlet securely If the power plug is left loose in the wall outlet contact failure may occur leading to abnormal heating of the power plug and a risk of fire 2 Ground Connection WARNING...

Page 31: ...ne line Risk of electric shock or fire during lightning d Water pipe and faucet These parts do not serve as a ground connection because of a plastic part that is very often installed midway within the water pipe 3 Power Plug and Cord WARNING When using the power cord set inlet type that came with this product make sure the connector is securely inserted in the inlet of the product When a securing ...

Page 32: ...in fire or electric shock Do not bundle or tie the power cord Overheating may occur there leading to a risk of fire Check whether dust is collected around the power plug and wall outlet Using the power plug and wall outlet without removing dust may result in fire Do not insert the power plug into the wall outlet with a wet hand The risk of electric shock exists When unplugging the power cord grasp...

Page 33: ...s limited and fire may result from the use of an inappropriate type of an extension cable Do not use an extension cable reel with the cable taken up Fire may result 3 3 2 Installation Requirements 1 Prohibited Installation Places WARNING Do not place the product near flammable materials or volatile materials that may catch fire A risk of fire exists Do not place the product in a place exposed to w...

Page 34: ... power outlet Dust collected around the power plug and outlet may cause fire 3 Ventilation CAUTION The product generates ozone gas during operation If the smell of ozone is present in the following cases ventilate the room a When the product is used in a poorly ventilated room b When making a lot of copies c When using multiple products at the same time 4 Stability CAUTION Be sure to lock the cast...

Page 35: ...nd using only the prescribed tools Do not make any adjustment not described in the documentation If the prescribed procedure or tool is not used the product may break and a risk of injury or fire exists Before conducting an inspection be sure to disconnect the power plugs from the Main Body and Accessories Options When the power plug is inserted into the wall outlet some units are still powered ev...

Page 36: ...Powered On WARNING Take every care when making adjustments or performing an operation check with the product powered If you make adjustments or perform an operation check with the external cover detached you may touch live or high voltage parts or you may be caught in moving gears or the timing belt leading to a risk of injury Take every care when servicing with the external cover detached High vo...

Page 37: ...ion of the other workers performing the task Another worker may be injured by a pinch point between the machine and the option When mounting an option on the machine be careful about the clearance between the machine and the option You may be injured with your finger or hand pinched between the machine and the option When removing a part that secures a motor gear or other moving part disassembling...

Page 38: ...ursting into flame Check wiring for pinched and any other damage Current can leak leading to a risk of electric shock or fire Check high voltage cables and sheaths for any damage Damage may lead to product failure and or the risk of fire Do not disassemble or adjust the write unit PH unit incorporating a laser The laser light can enter your eye leading to a risk of loss of eyesight Do not supply p...

Page 39: ...d parts Damage may lead to the risk of electric shock or fire Make sure that all screws components wiring connectors etc that were removed for safety check and maintenance have been reinstalled in the original location Pay special attention to forgotten connectors pinched cables forgotten screws etc A risk of product trouble personal injury electric shock and fire exists Never use any flammable or...

Page 40: ...amage may lead to product failure and or the risk of fire When replacing a battery replace it with a new one as specified Dispose of the used battery as instructed on its packaging or by local ordinance There is a risk of explosion if the battery is replaced with an incorrect type 4 Handling of Consumables WARNING For handling of consumables toner developer photoconductor etc and their storage pre...

Page 41: ...ommandé par le constructeur Mettre au rebut les batteries usagées conformément aux instructions du fabricant 3 4 4 Denmark ADVARSEL Lithiumbatteri Eksplosionsfare ved fejlagtig håndtering Udskiftning må kun ske med batteri af samme fabrikat og type Levér det brugte batteri tilbage til leverandøren 3 4 5 Finland Sweden VAROlTUS Paristo voi räjähtää jos se on virheellisesti asennettu Vaihda paristo ...

Page 42: ...h 770 to 800 nm at laser aperture of the Print Head Unit 2 1 1 Laser Aperture of the Print Head Unit 2 Print Head Unit 1 U S A Canada CDRH Regulation This machine is certified as a Class 1 Laser product under Radiation Performance Standard according to the Food Drug and Cosmetic Act of 1990 Compliance is mandatory for Laser products marketed in the United States and is reported to the Center for D...

Page 43: ...ormance of procedures other than those specified in this manual may result in hazardous radiation exposure semiconductor laser Maximum power of the laser diode 25 mW Wavelength 770 to 800 nm 3 5 3 Laser Safety Label A laser safety label is attached to the outside of the machine as shown below 3 5 4 Laser Warning Label A laser warning label is attached to the inside of the machine as shown below Y1...

Page 44: ... unit If it is absolutely unavoidable to perform a service job with the power cord plugged in strictly observe the following precautions 1 Before starting the service job take off your watch ring and other reflective articles and be sure to wear laser protective goggles 2 Keep other personnel away from the work site 3 Do not bring any highly reflective tool into the laser beam path during the serv...

Page 45: ...reas for maintenance repair or adjustment special care should be taken to avoid burns and electric shock 4 1 Warning indications inside the machine CAUTION You may be burned or injured if you touch any area that you are advised not to touch by any caution label Do not remove caution labels If any caution label has come off or soiled and therefore the caution cannot be read contact our service offi...

Page 46: ...A SAFETY AND IMPORTANT WARNING ITEMS 4 WARNING INDICATIONS ON THE MACHINE A 24 d Color MF4003 MF3303 4 2 Warning indications on the boards Service Manual Y119930 3 ...

Page 47: ...de relief to affected persons and to prevent further damage 2 If a report of a serious accident has been received from a customer an on site evaluation must be carried out quickly and OLI must be notified 3 To determine the cause of the accident conditions and materials must be recorded through direct on site checks in accordance with instructions issued by OLI 4 For reports and measures concernin...

Page 48: ...This page is intentionally left blank ...

Page 49: ...N HANDLING THIS MANUAL B 1 d Color MF4003 MF3303 B NOTATION OF THE CONTENTS 1 PRECAUTION ON HANDLING THIS MANUAL CAUTION Use of this manual should be strictly supervised to avoid disclosure of confidential information Y119930 3 Service Manual ...

Page 50: ...l each of the products is described as follows 1 d Color MF4003 MF3303 Main body 2 Microsoft Windows 7 Windows 7 3 Microsoft Windows 8 1 Windows 8 1 4 Microsoft Windows 10 Windows 10 5 When the description is made in combination of the OS s mentioned above Windows 7 8 1 10 Service Manual Y119930 3 ...

Page 51: ...ER COMPANIES The company names and product names mentioned in this manual are the brand name or the registered trademark of each company OWN TRADEMARKS KONICA MINOLTA KONICA MINOLTA logo and bizhub are the registered trademarks of KONICA MINOLTA INC 2019 KONICA MINOLTA INC Y119930 3 Service Manual ...

Page 52: ...ge feeding is called the long edge feeding Short edge feeding will be identified with S abbreviation for Short edge feeding on the paper size No specific notation is added for the long edge feeding When the size has only the short edge feeding with no long edge feeding S will not be added to the paper size Sample notation Paper size Feeding direction Notation A5 Long edge feeding A5 Short edge fee...

Page 53: ...ote for the Specifications B 5 5 Note for the Specifications These specifications are subject to change without notice Some models within the product series listed in this manual may not be available in some countries and regions Y119930 3 Service Manual ...

Page 54: ...This page is intentionally left blank ...

Page 55: ...olygon mirror scan exposure system Exposure resolution Main scan direction 1200 dpi Sub scan direction 1200 dpi Image loss Copy Leading edge 4 mm 3 16 inch Trailing edge 4 mm 3 16 inch Rear edge 4 mm 3 16 inch Front edge 4 mm 3 16 inch PC print Leading edge 4 2 mm 3 16 inch Trailing edge 4 2 mm 3 16 inch Rear edge 4 2 mm 3 16 inch Front edge 4 2 mm 3 16 inch Warm up time at an ambient temperature ...

Page 56: ...puter cannot be used Material Toner cartridge Imaging unit Waste toner box Transfer belt unit Fusing unit For details refer to PERIODICAL MAINTENANCE 1 1 2 Paper Type Size Tray 1 Manual bypass tray Plain paper 60 to 90 g m2 15 15 16 to 23 15 16 lb 500 sheets 100 sheets Recycled paper 60 to 90 g m2 15 15 16 to 23 15 16 lb 1 sided special paper 60 to 90 g m2 15 15 16 to 23 15 16 lb Plain paper 91 to...

Page 57: ...5 lbs including main body DF TB IU WTB North America Approx 39 2kg 86 7 16 lbs including main body DF TB IU WTB Operating environment Temperature 10 to 30 C 50 to 86 F with a fluctuation of 10 C 18 F or less per hour Humidity 15 to 85 Relative humidity with a fluctuation of 10 or less per hour Levelness Difference between front and back right and left should be 1 degree or under 1 Utility Maintena...

Page 58: ...ost interface Ethernet 10Base T 100Base TX 1000Base T USB2 0 1 1 USB_Host Built in fonts PCL European 80 fonts Japanese HGMinchoL HGPMinchoL HGGothicB HGPGothicB Built in fonts PostScript 3 Emulation European Type1 font 137 fonts Japanese HGMinchoL HGGothicB 1 1 6 Scan function Items Specifications Scannable scan range Conforms to the basic specifications Scanning resolution Push 200 dpi 300 dpi 4...

Page 59: ...4 1 16 lb Scan FAX mode Plain paper 1 sided mode 35 to 128 g m2 9 5 16 to 34 1 16 lb 2 sided mode 50 to 128 g m2 13 5 16 to 34 1 16 lb Original size Standard mode Scan FAX mode B6S to A3 5 1 2 x 81 2 to 11 x 17 Capacity Standard mode 130 sheets 68 g m2 18 1 16 lb or stack of 12 mm 1 2 inches and below including paper curl Mixed original detection mode Scan FAX mode 100 sheets 68 g m2 18 1 16 lb or...

Page 60: ...thod MH MR MMR JBIG Modulation method V 27 ter V 29 V 33 V 33 is for reception only V 17 V 8 V 34 Communication resolution Normal 8 lines mm 3 85 lines mm 200 dpi x 100 dpi Fine 8 lines mm 7 7 lines mm 200 dpi x 200 dpi Super fine 8 lines mm 15 4 lines mm only for reception 16 lines mm 15 4 lines mm 400 dpi x 400 dpi Ultra fine 600 dpi x 600 dpi Fixed to mm at transmission except 600 dpi mm and in...

Page 61: ... A3 A4 and B4 A4 Automatically reduced and sent in accordance with the recording paper size of remote station Rotation transmission A4 Letter size only LEF documents are rotated by 90 degrees at sending to send it in SEF direction Page division at sending No Halftone 256 level error diffusion Users can change settings by using the Text Text Photo Printed Text Photo PhotoPaper Photo Printed Photo P...

Page 62: ...top by using the stop key Possible to appoint to stop from the job list so as to stop during operations of the multi jobs FAX free memory display RDH memory indication on LCD during scanning recording and stand by File memory Display in the JOB LIST screen File existence indication In the following cases the data Indicator LED on the control panel lights up Upon reception of FAX When a document is...

Page 63: ... D x 145 mm H 17 11 16 inches W x 20 13 16 inches D x 5 11 16 inches H Weight PF P20 Approx 7 8 kg 17 3 16 PF P21 Approx 8 4 kg 18 1 2 lb Operating environment Conforms to the operating environment of the main body 1 4 FS P04 Type Items Specifications Name Finisher FS P04 Type Off line type stapler Paper Items Specifications Paper type Weight 52 to 90 g m2 Thickness 2 2 mm or less Staple capacity ...

Page 64: ...ce Planning system and print it from this machine You can directly print data without using the printer driver LK 106 Unicode font Allows you to print text information unicode of multiple languages sent to this machine from the ERP Enterprise Resource Planning system You can directly print data without using the printer driver LK 107 OCR font OCR font can be used on this machine OCR font is standa...

Page 65: ...ed for restoring the TPM key can be saved for backup in a USB memory device LK 115 v2 Virus Scan Functions To run the virus scan on a file which is to be read or written via the file system The virus scan is to be ran on such a data that it is sent or received between the external cloud PC or USB memory LK 116 IP fax SIP Sends and receives a fax via network communication without using a telephone ...

Page 66: ... Local Interface Kit EK P08 P09 11 Local Interface Kit EK P10 12 Upgrade Kit UK 221 13 Double Feed Detection Kit UK P19 2 1 2 Optional configuration 1 Combination configuration of main body and paper feed options 1 Main body PF P20 PF P21 2 Main body DK P04 DK P05 3 Main body PF P20 PF P20 PF P21 PF P21 4 Main body PF P20 PF P22 PF P21 PF P25 5 Main body PF P22 PF P22 PF P25 PF P25 2 Combination c...

Page 67: ...verse section 4 Duplex section 5 Fusing section 6 2nd transfer section 7 Registration section 8 Paper feed section Manual bypass tray 9 Paper feed section 10 Write section PH section 11 Imaging unit 12 1st transfer section 13 Toner supply section 2 3 Paper path Main body PF P20 PF P20 Main body PF P21 PF P21 List of drive rollers and sensors in the paper path Y119930 3 Service Manual ...

Page 68: ...ng processing section 2 Printer image processing The electric signal is converted to digital image signals After going through some corrections video signals C M Y and K are output to the printer image processing section D A conversion will be performed after the VIDEO signals Y M C K are corrected This data will control the emission of the laser diode 3 Photoconductor The image of the original pr...

Page 69: ...nd transfer process is neutralized so that it can be properly separated from the transfer belt by the paper separator claws 10 Transfer belt cleaning Residual toner on the surface of the transfer belt is collected for cleaning by cleaning blade 11 Fusing The visible toner image transferred onto the surface of the paper is melted by the heat of the fusing roller and fixed to the paper by pressure 1...

Page 70: ...This page is intentionally left blank ...

Page 71: ... 1 d Color MF4003 MF3303 Service material list Name Shape Parts No Remarks Cleaning pad 30 pcs No Code 30pcs 1 pack Hydro wipe No Code 10pcs 1pack Tool list Tool name Shape Quantity Parts No Remarks Color chart 1 AVGR06936 D Monochrome chart 1 AVGR29733 W Y119930 3 Service Manual ...

Page 72: ...CC_LDR tar to the root directory of the USB memory NOTE Please do not save any other data in the USB memory 10 Call the Service Mode to the screen of the MFP 11 Select System 2 Driver Install Install 12 Connect the USB memory in which the loadable driver has been saved to the USB port on the side of the control panel 13 Select Loadable driver and touch the Start to install the loadable driver 14 R...

Page 73: ...YSoft CRv2 YSoft CRv3 NOTE If a YSoft card reader is used when performing authentication the default setting for the loadable driver makes the card to be informed as an HID Prox card regardless of which type you are using To change the card type when performing authentication using Auth Device Tool Advanced for YSoft CRv2 YSoft CRv3 to choose a corresponding card type to be reported to the authent...

Page 74: ...et the authentication user c Auth Device Tool Advanced for SCL 010 1 Install the loadable driver for SCL 010 to the MFP 2 Start the Auth Device Tool Advanced for SCL 010 3 Select card type 4 Select IC card information setting file in Export Format and click Export 5 Set the encrypted password 6 Save the file iccConfig bin 7 Start the Data Administrator and select the target MFP 8 In the Settings f...

Page 75: ... RFID 125kHz EM4100 EM4102 RFID 125kHz KM USB Reader v2 Mot Ind W26 Indala Indala KM USB Reader v2 HID Prox HID Prox HID Prox 1 2 KM USB Reader v2 HID iCLASS HID iCLASS HID iCLASS 1 3 KM USB Reader v3 MF Legic LEGIC TypeA 1 1 KM USB Reader v3 Indala Indala Indala KM USB Reader v3 MF EM4100 EM4102 RFID 125kHz EM4100 EM4102 RFID 125kHz Mifare TypeA 1 1 HID Prox HID Prox 1 2 HID iCLASS HID iCLASS 1 3...

Page 76: ...This page is intentionally left blank ...

Page 77: ...000 sheets 4687M 4921M North America 55 000 sheets Europe 55 000 sheets d Color MF3303 56 000 sheets 5694M 5979M Transfer belt unit d Color MF4003 Japan 167 000 sheets 8619M 9050M North America 167 000 sheets Europe 168 000 sheets d Color MF3303 North America 158 000 sheets 10472M 10996M Europe 159 000 sheets Transfer roller d Color MF4003 Japan 167 000 sheets 8619M 9050M North America 167 000 she...

Page 78: ... Concept of maintenance E 2 Europe Items d Color MF4003 d Color MF3303 Printing Color 4 P J 3 P J Black 4 P J 3 P J Paper size A4S Coverage Each color 5 Average print volume month 928 prints month 646 prints month Service Manual Y119930 3 ...

Page 79: ...pad AVGR29899 R 1 200 000 E 3 1 5 Replacing the manual bypass tray separation pad Processing section Toner cartridge Y TCY B1339 1 9 000 1 3 E 3 1 6 Replacing the toner cartridge Toner cartridge K 1 13 000 Imaging unit Y M C 1 1 3 E 3 1 7 Replacing the imaging unit 55 000 E u r o p e 1 56 000 Imaging unit K 168 000 1 159 000 Toner filter AVGR27491 T 1 200 000 2 E 3 1 8 Replacing the toner filter W...

Page 80: ...A waste toner full condition is detected with detecting the actual waste toner emissions 2 2 PF P20 PF P21 Part name Parts No Qt Replacing cycle Descriptions Ref page Pick up roller AVGR25619 K 1 200 000 1 2 E 3 2 1 Replacing the tray 2 3 pick up roller feed roller Feed roller AVGR25620 R 1 200 000 Separation roller AVGR06906 N 1 200 000 E 3 2 2 Replacing the tray 2 3 separation roller 1 Life coun...

Page 81: ...y 1 F 4 1 7 Tray1 3 2 1 2 Release the tab 1 of each roller and remove the tray 1 feed roller 2 and tray 1 pick up roller 3 3 To reinstall reverse the order of removal 4 Select Service Mode Counter Life and clear the count of 1st Feed Count 3 1 2 Replacing the tray 1 separation roller 1 Slide out the tray 1 1 2 Remove the cover 1 1 3 Remove the spring 1 1 2 4 Remove the tray 1 separation roller ass...

Page 82: ...2 5 Manual bypass tray roller unit 1 5 Remove the C clip 1 2 1 3 4 6 Slide the gear 1 gear 2 and feed roller 3 and remove the pin 4 NOTE Be careful not to loss the pin 2 1 3 7 Slide the shaft 1 and remove the pin 2 NOTE Be careful not to loss the pin 8 Pull out the haft 1 and remove the feed roller 3 9 To reinstall reverse the order of removal 10 Select Service Mode Counter Life and clear the coun...

Page 83: ... Manual Tray Feed Count 3 1 5 Replacing the manual bypass tray separation pad 1 Open the right door 1 2 2 Remove two screws 1 and remove the cover 2 1 1 2 3 4 3 Remove five screws 1 and the plate 2 4 Remove the screw 3 and the plate 4 1 2 5 Slide the shaft 1 and remove the separation pad assy 2 1 2 6 Remove the spring 2 from the separation pad 1 7 To reinstall reverse the order of removal 8 Select...

Page 84: ...at may cause trouble 2 To reinstall reverse the order of removal 3 1 7 Replacing the imaging unit 1 Remove the toner cartridge of the same color as the imaging unit to be removed and remove the right neighbor toner cartridge E 3 1 6 Replacing the toner cartridge 2 Remove the waste toner bottle E 3 1 9 Replacing the waster toner bottle 3 2 1 3 3 Remove the screw 1 and remove the cover 2 NOTE Make s...

Page 85: ...on 12 Select Service Mode Imaging Process Adjustment Stabilizer Stabilization Only and perform the function 13 Repeat the step 10 and 11 until the Main Scanning Direction Zoom Adjustment is met 14 Select Service Mode Machine Color Registration Adjustment and perform the adjustment for correcting the color shift 15 Select Service Mode Machine Printer Area Printer Image Centering Side 1 to adjust th...

Page 86: ... 1 10 Replacing the transfer belt unit 1 Removal procedure 1 Remove the toner cartridge E 3 1 6 Replacing the toner cartridge 2 Remove the waste toner bottle E 3 1 9 Replacing the waster toner bottle 3 Remove the imaging unit E 3 1 7 Replacing the imaging unit 4 Remove the IDC sensor assy F 4 7 1 IDC sensor IDCS1 1 5 Remove two screws 1 1 6 Hook two transfer unit pressers 1 on the fusing unit 1 1 ...

Page 87: ...transfer belt lightly wipe it using the Hydro wipe 65AA 99 Do not clean with alcohol or water 2 3 1 2 Hold up the transfer belt 1 and insert the transfer belt unit so that the groove 2 is along the rail 3 3 To reinstall reverse the order of removal 4 Carry out the Service Mode Counter Life New Release 5 Select Service Mode Machine Color Registration Adjustment to adjust the value for correcting th...

Page 88: ... 1 3 3 2 Insert two protrusions 1 of the transfer roller unit into the center of the pressure spring 2 3 Lock the lock levers 3 at two places NOTE Make sure that the levers are locked in position both at front and rear 4 Close the right door 5 Carry out the Service Mode Counter Life New Release 3 1 12 Replacing the fusing unit CAUTION The temperature gets high in the vicinity of the fusing unit Yo...

Page 89: ... screw 1 and remove the cover 2 1 2 4 Remove the cable tie 1 from the main body and disconnect the connector 2 5 NOTE When installing the cover make sure that the harness is once routed downward then in the horizontal direction Make sure not to pinch the harness by the cover when installing the cover Y119930 3 Service Manual ...

Page 90: ... due to its weight 8 To reinstall reverse the order of removal 9 Carry out the Service Mode Counter Life New Release 3 2 PF P20 PF P21 3 2 1 Replacing the tray 2 3 pick up roller feed roller 1 Remove the tray 2 or tray 3 F 6 3 Tray 2 tray 3 PF P20 PF P21 1 2 3 2 Unhook the tab 1 and remove the feed roller 2 and pick up roller 3 3 To reinstall reverse the order of removal 4 Select Service Mode Coun...

Page 91: ...assy 1 NOTE Make sure not to lose the collar 2 when removing the separation roller assy 2 3 1 5 Remove the C clip 1 pull out the shaft 2 and remove the separation roller assy 3 6 To reinstall reverse the order of removal 7 Select Service Mode Counter Life and clear the count of 2nd Feed Count or 3rd Feed Count Y119930 3 Service Manual ...

Page 92: ...H window At abnormal image occurring E 5 1 8 Cleaning the PH window Transport section Registration roller 60 000 E 5 1 9 Cleaning of the registration roller Image transfer section Around waste toner collecting port 60 000 E 5 1 10 Cleaning of the area around the waste toner collecting port 2nd image transfer entrance guide 200 000 or When transfer belt unit is replaced E 5 1 11 Cleaning of the 2nd...

Page 93: ...ipe the original glass 1 clean of dirt 1 3 Using a cleaning pad dampened with alcohol wipe the document reading glass 1 clean of dirt 5 1 2 Cleaning tray 1 pick up roller tray 1 feed roller 1 Remove the tray 1 F 4 1 7 Tray1 1 2 2 Using a cleaning pad dampened with alcohol wipe the tray 1 feed roller 1 and tray 1 pick up roller 2 clean of dirt 5 1 3 Cleaning tray 1 separation roller 1 Slide out the...

Page 94: ...eparation pad 1 Open the right door 2 Remove the manual bypass tray separation pad E 3 1 5 Replacing the manual bypass tray separation pad 1 3 Using a cleaning pad dampened with alcohol wipe the manual bypass tray separation pad 1 5 1 7 Cleaning the transfer belt unit 1 Remove the transfer belt E 3 1 10 Replacing the transfer belt unit 1 2 Using a hydro wipe 65AA 99 wipe the transfer belt 1 NOTE D...

Page 95: ...rt 5 1 10 Cleaning of the area around the waste toner collecting port 1 Remove the waste toner bottle E 3 1 9 Replacing the waster toner bottle 1 2 Wipe the areas 1 around the waste toner collecting port clean of spilled toner and dirt 5 1 11 Cleaning of the 2nd image transfer entrance guide 1 Open the right door 2 Remove the IDC sensor assy F 4 7 1 IDC sensor IDCS1 1 3 Wipe the 2nd transfer entra...

Page 96: ... transport roller 1 clean of dirt 5 1 14 Cleaning ADF paper guide 1 Open the ADF 1 2 Using a cleaning pad dampened with alcohol wipe the ADF paper guide 1 clean of dirt 5 1 15 ADF pick up roller ADF feed roller ADF separation pad NOTE The alcohol described in the cleaning procedure of maintenance represents the isopropyl alcohol 1 1 Open the ADF upper door 1 1 2 Using a cleaning pad dampened with ...

Page 97: ...5 2 1 Cleaning the tray 2 3 pick up roller feed roller 1 Remove the tray 2 or tray 3 1 2 2 Using a cleaning pad dampened with alcohol wipe the feed roller 1 and pick up roller 2 clean of dirt 3 To reinstall reverse the order of removal 5 2 2 Cleaning the tray 2 3 separation roller 1 Slide out the tray 2 or tray 3 1 2 Using a cleaning pad dampened with alcohol wipe the separation roller 1 clean of ...

Page 98: ...This page is intentionally left blank ...

Page 99: ...d that when two or more screws are used for a single part only one representative screw may be marked with the red paint 1 3 Variable resistors on board NOTE Do not turn the variable resistors on boards for which no adjusting instructions are given in Adjustment Setting 1 4 Warnings for disassembly WARNING When accessing a hard to view or narrow spot be careful about sharp edges and burrs on the f...

Page 100: ...ion on the machine be careful about the clearance between the machine and the option You may be injured with your finger or hand pinched between the machine and the option CAUTION Do not leave the machine unattended during transportation installation and or inspection If the machine is left unattended face protrusions toward the wall or take other necessary precautions to prevent A user or other p...

Page 101: ...laser runs inside the PH unit Opening the cover may cause dust to enter and interrupt the laser Do no remove any screw which may disassemble the PH unit 2 2 Fusing unit 2 2 1 Reason for prohibition Inner part of the fusing unit and the position of the fusing belt are adjusted prior to shipping Do not remove any screw which may disassemble the fusing unit Y119930 3 Service Manual ...

Page 102: ...hazards area on DC power supply unit with the lid opening for 12 hours after unplugging the power cord The voltage may take time to drop after unplugging the power cord if the device is experiencing a malfunction CAUTION When removing or installing a circuit board or other electrical component refer to Handling of PWBs and follow the corresponding removal or installing procedures The removal proce...

Page 103: ...e order of removal 4 1 2 Left cover 1 Remove the toner filter assy E 3 1 8 Replacing the toner filter 2 Remove the rear cover F 4 1 3 Rear cover 3 Slide out the tray 1 4 Open the front door 1 2 3 3 4 5 Remove three screws 1 and remove the left cover 2 NOTE When mounting the left cover make sure nine claws 3 and a boss 4 are attached to the main body 6 To reinstall reverse the order of removal 4 1 ...

Page 104: ...2 Left cover 1 4 Remove the exit cover 1 2 1 1 3 5 NOTE When mounting the exit cover make sure that tabs of the exit cover are hooked firmly into the four holes 1 When mounting the exit cover pay attention not to damage the speaker 2 by the tabs If the clearance 3 is wide the tabs may not be hooked Check the state of the tabs 6 To reinstall reverse the order of removal 4 1 5 Control panel unit 1 R...

Page 105: ... 5 Remove the cable from the wire saddle 1 6 Disconnect the cable 2 then remove the cable from the cable guide 2 1 1 1 7 Remove seven screws 1 and remove the plate 2 2 1 3 8 Disconnect the connector 1 cut the cable tie 2 and remove the control panel unit 3 NOTE When reinstalling the control panel unit use the new cable tie 9 To reinstall reverse the order of removal Y119930 3 Service Manual ...

Page 106: ...emove the cover 3 from the control panel cover 2 1 3 2 4 Raise the protrusion 2 of the cover 1 along the groove 3 and remove the cover 1 2 1 5 Incline the control panel 1 to about 45 degrees 6 Remove the control panel cover 2 7 To reinstall reverse the order of removal 4 1 7 Tray1 1 Slide out the tray 1 and unload paper from it Service Manual Y119930 3 ...

Page 107: ...the order of removal 4 1 8 Scanner upper cover 1 Remove the ADF F 4 2 9 ADF 1 2 1 1 2 Remove 10 screws 1 and remove the scanner upper cover 2 3 To reinstall reverse the order of removal 4 1 9 Front cover ADF 1 1 Open the ADF upper door 1 2 1 2 Remove two screws 1 and remove the front cover 2 3 To reinstall reverse the order of removal Y119930 3 Service Manual ...

Page 108: ...two screws 1 release two tabs 2 and remove the rear cover 3 4 To reinstall reverse the order of removal 1 1 5 NOTE When mounting the rear cover place an order including the film part No AVGR30158 G After mounting the rear cover stick the film 1 on the position shown in the illustration 4 2 Units 4 2 1 Manual bypass tray unit 1 Open the right door Service Manual Y119930 3 ...

Page 109: ...2 2 Remove two screws 1 and remove the cover 2 1 1 2 3 Remove two screws 1 and remove the cover 2 1 4 Disconnect two connectors 1 1 1 1 5 Remove six screws 1 1 6 Open the manual bypass tray unit 1 and remove it 7 To reinstall reverse the order of removal Y119930 3 Service Manual ...

Page 110: ...e mentioned activity may cause blindness 1 Remove the toner filter assy E 3 1 8 Replacing the toner filter 2 Remove the rear cover F 4 1 3 Rear cover 3 Remove the left cover F 4 1 2 Left cover 1 4 1 2 3 4 Remove the cable and ground wire from four wire saddles 1 and disconnect the connector 2 5 Remove the screw 3 and remove the plate 4 1 3 3 2 4 3 6 Remove the cable from the edge cover 1 and disco...

Page 111: ...Select Service Mode Machine Color Registration Adjustment to adjust the value for correcting the color shift to 0 18 Select Service Mode Imaging Process Adjustment Stabilizer Initialize Image Stabilization and perform the function 19 Select Service Mode Machine Main Scanning Direction Zoom to adjust the zoom in main scanning direction 20 Select Service Mode Imaging Process Adjustment Stabilizer St...

Page 112: ... Main drive unit 1 Remove the toner cartridge Y M C K E 3 1 6 Replacing the toner cartridge 2 Remove the waste toner bottle E 3 1 9 Replacing the waster toner bottle 3 Remove the imaging unit Y M C K E 3 1 7 Replacing the imaging unit 4 Remove the transfer belt unit E 3 1 10 Replacing the transfer belt unit 5 Remove the toner filter assy E 3 1 8 Replacing the toner filter 6 Remove the rear cover F...

Page 113: ...s guide 3 1 3 1 1 2 15 Remove eight screws 1 16 Remove the tab 2 and remove the main drive unit 3 17 To reinstall reverse the order of removal 18 NOTE When installing the main drive unit be sure to tighten the screws from 1 to 8 in that order 4 2 5 Manual bypass tray roller unit 1 Open the right door 2 Remove the manual bypass tray unit F 4 2 1 Manual bypass tray unit 3 Remove the bypass tray pape...

Page 114: ...nit 1 Slide out the tray 1 2 Remove the rear cover F 4 1 3 Rear cover 3 Open the right door 4 Remove the IDC sensor assy F 4 7 1 IDC sensor IDCS1 2 3 1 5 Remove the harness from three wire saddles 1 and disconnect two connectors 2 6 Remove the screw 3 1 2 7 Remove the screw 1 and remove the cover 2 4 3 1 2 8 Pull the harness 1 out of the hole 2 9 Remove the harness from three wire saddles 3 10 Pul...

Page 115: ...assy E 3 1 8 Replacing the toner filter 2 Remove the rear cover F 4 1 3 Rear cover 3 Remove the left cover F 4 1 2 Left cover 1 4 1 2 3 4 Remove the cable and ground wire from four wire saddles 1 and disconnect the connector 2 5 Remove the screw 3 and remove the plate 4 1 3 3 2 4 3 6 Remove the cable from the edge cover 1 and disconnect the connector 2 7 Remove five screws 3 and remove the plate 4...

Page 116: ...emoving the flat cable 5 unlock the connector 6 and remove the cable together with the connector 3 2 1 3 3 4 13 Pass the flat cable 1 through the hole 2 14 Remove five screws 3 and remove the PWB box 4 15 To reinstall reverse the order of removal 4 2 8 Fusing drive unit 1 Remove the fusing unit E 3 1 12 Replacing the fusing unit 2 Remove the toner filter assy E 3 1 8 Replacing the toner filter 3 R...

Page 117: ...nit 2 2 1 10 NOTE When installing the fusing drive unit make sure insert the tip of the exit path switch solenoid lever 1 to the position 2 as shown in the illustration placing state the edge of lever 1 on the guide in the back of the plate 1 2 11 NOTE After installing the fusing drive unit check that the edge of the exit path switch solenoid 2 operates together moving the switchback guide 1 up an...

Page 118: ...the connector 2 5 Remove five screws 3 and remove the plate 4 3 1 2 4 6 Remove the screw 1 and disconnect two connectors 2 and the flat cable 3 NOTE When removing the flat cable 3 unlock the connector 4 and remove the cable together with the connector 2 1 7 Remove the screw 2 while lifting up the ADF 1 and remove the ADF 1 8 To reinstall reverse the order of removal 4 2 10 CIS module 1 Remove the ...

Page 119: ...nnect the flat cable connector 2 and remove the CIS module 1 7 To reinstall reverse the order of removal 4 2 11 DF CIS module assy 1 Remove the rear cover ADF F 4 1 10 Rear cover ADF 2 Remove the front cover ADF F 4 1 9 Front cover ADF 2 1 3 Remove the screw 1 and remove the document feed tray 2 1 1 4 Remove two screws 1 1 2 1 5 Remove four screws 1 and evacuate the DF lower guide assy 2 Y119930 3...

Page 120: ...ppers 2 of the DF CIS module 1 2 8 Remove the screw 1 and evacuate the stopper 2 of the DF CIS module 3 1 2 9 Remove the screw 1 10 Rotate the adjustment screw 2 and slide the DF CIS module assy 3 1 3 2 11 Raise the DF CIS module assy 1 and remove the flat cable 3 from the harness guide 2 12 Remove the DF CIS module assy 1 13 To reinstall reverse the order of removal 4 2 12 Scanner unit 1 Open the...

Page 121: ...cover 6 Remove the exit cover F 4 1 4 Exit cover 7 Remove the control panel cover F 4 1 6 Control panel cover 8 Open the right door 1 9 Remove the cover 1 3 1 2 4 10 Remove the screw 1 and disconnect two connectors 2 and the flat cable 3 NOTE When removing the flat cable 3 unlock the connector 4 and remove the cable together with the connector 1 1 11 Remove three screws 1 2 1 1 12 Remove three scr...

Page 122: ...board BASEB 1 Remove the rear cover F 4 1 3 Rear cover 2 Remove the CPU board F 4 3 3 CPU board CPUB 3 Remove the TPM board F 4 3 6 TPM board TPMB 1 4 4 5 4 5 3 2 4 Remove the harness from the wire saddle 1 5 Remove all connectors and flat cables NOTE When removing the flat cable 2 unlock the connector 3 and remove the cable together with the connector 6 Remove five screws 4 and remove two plates ...

Page 123: ...s the same problem Never replace the storage board and CPU board with new one at the same time 1 Remove the rear cover F 4 1 3 Rear cover 1 4 1 2 3 2 Remove the cable and ground wire from four wire saddles 1 and disconnect the connector 2 3 Remove the screw 3 and remove the plate 4 1 3 3 2 4 3 4 Remove the cable from the edge cover 1 and disconnect the connector 2 5 Remove five screws 3 and remove...

Page 124: ... is acquired through the backup utility conduct the recovery of data 4 3 3 CPU board CPUB NOTE Never use the combination of the used CPU board removed from another machine and the storage board This combination causes corruption of stored data Note that the combination of the original CPU board and the used storage board removed from another machine also causes the same problem Never replace the C...

Page 125: ...reen touch Recover Data to start the recovery of data 4 Turn OFF and ON the main power switch 5 If a data is acquired through the backup utility conduct the recovery of data 6 Check the firmware version of the Power Control CPU 2 and MFP Controller BOOT Program I 6 Firmware Version 7 If the firmware version of the Power Control CPU 2 and MFP Controller BOOT Program is not the latest upgrade the fi...

Page 126: ...s of the serial number AAJN A93E Machine 11 11 Type 1 2 4 3 4 DC power supply DCPS WARNING To prevent electric shock do not touch the hazards area on DC power supply unit with the lid opening for 12 hours after unplugging the power cord The voltage may take time to drop after unplugging the power cord if the device is experiencing a malfunction Service Manual Y119930 3 ...

Page 127: ... connected to the rear part and the black harness 2 is connected to the front part of the AC inlet 1 2 CAUTION Make sure that the harness is routed inside the main body Make sure that the harness is routed through the wire saddle 1 1 1 Remove the rear cover F 4 1 3 Rear cover 2 1 1 2 Remove four screws 1 and remove the plate 2 Y119930 3 Service Manual ...

Page 128: ...ng the DC power supply make sure the position of the tie band 1 2 1 5 Remove three screws 1 and remove the DC power supply 2 6 To reinstall reverse the order of removal 4 3 5 Backup board ERB 1 Remove the rear cover F 4 1 3 Rear cover 1 4 1 2 3 2 Remove the cable and ground wire from four wire saddles 1 and disconnect the connector 2 3 Remove the screw 3 and remove the plate 4 2 2 3 1 4 Disconnect...

Page 129: ...e main power switch 11 Turn ON the main power switch and close the front door Check to see that warm up and image stabilization operations are completed normally 12 Enter the Service Mode again Make individual adjustments shown in Table 2 Readjustment items in the order listed using the machine management list and the adjustment lists that were output at the time of main body installation and main...

Page 130: ...e the plate 2 1 1 2 7 Remove five screws 1 and remove the plate 2 8 Remove the fax kit F 5 1 Fax Kit 2 1 9 Remove the screw 1 and remove the TPM board 2 10 To reinstall reverse the order of removal 4 3 7 High voltage unit HVPS 1 Remove the toner filter assy E 3 1 8 Replacing the toner filter 2 Remove the rear cover F 4 1 3 Rear cover 3 Remove the left cover F 4 1 2 Left cover 4 Remove the exit cov...

Page 131: ...arts from being damaged When installing the high voltage unit assy push the press part 7 to lock the tab When installing the high voltage unit assy make sure that the tab 5 is locked 1 2 9 Remove three screws 1 and remove the high voltage unit 2 10 To reinstall reverse the order of removal 4 3 8 Machine condition monitor board Fr MCMB Fr 1 Remove the control panel cover F 4 1 6 Control panel cover...

Page 132: ...ect the connector 1 and remove the machine condition monitor board Edg assy 2 1 2 4 Release the lock 1 and remove the machine condition monitor board Edg 2 5 To reinstall reverse the order of removal 4 3 10 NFC board NFCB 1 Slide out the tray 1 2 Open the front door 3 Open the right door 1 2 4 Remove two screws 1 and remove the front right cover 1 2 1 5 Slide out the NFC board 1 Service Manual Y11...

Page 133: ... ADF F 4 1 10 Rear cover ADF 2 Disconnect all connectors from the DF control board 1 2 3 Remove the screw 1 and disconnect the ground wire 4 Remove the harness from the edge cover 2 2 1 5 Remove two screws 1 and remove the DF control board assy 2 2 2 1 6 Remove four screws 1 and remove the DF control board 2 7 To reinstall reverse the order of removal 4 4 Motors 4 4 1 Main motor M1 1 Remove the re...

Page 134: ... the gears When removing or installing the motor do not hold the rotor but hold the plate of the motor or the board When installing the motor use care not to mistake in the kind of the mounting screws M3x5 mm 8 To reinstall reverse the order of removal 4 4 3 Fusing motor M3 1 Remove the toner filter assy E 3 1 8 Replacing the toner filter 2 Remove the rear cover F 4 1 3 Rear cover 3 Remove the lef...

Page 135: ... connector 3 and remove the toner supply motor YM 4 10 Remove two screws 5 and the connector 6 and remove the toner supply motor CK 7 11 To reinstall reverse the order of removal 4 4 5 Tray 1 lift up motor M6 1 Remove the rear cover F 4 1 3 Rear cover 2 Remove the DC power supply F 4 3 4 DC power supply DCPS 1 2 2 3 3 Disconnect the connector 1 4 Remove three screws 2 and remove the tray 1 lift up...

Page 136: ... Remove two screws 1 and remove the document main motor 2 7 To reinstall reverse the order of removal 4 4 7 Scanner motor M9 1 Remove the rear cover F 4 1 3 Rear cover 2 Remove the ADF F 4 2 9 ADF 3 Remove the scanner upper cover F 4 1 8 Scanner upper cover 2 1 4 Slide the CIS module assy 2 to the position shown in the illustration while holding the belt 1 1 3 2 5 Remove the belt 3 from the pulley...

Page 137: ...e plate spring 2 and remove the scanner motor assy 3 2 1 9 Remove the screw 1 and remove the plate 2 3 2 2 1 10 Disconnect the connector 1 11 Remove two screws 2 and remove the scanner motor 3 12 To reinstall reverse the order of removal 4 5 Clutches 4 5 1 Bypass tray paper feed clutch CL2 1 Open the right door 2 Remove the manual bypass tray unit F 4 2 1 Manual bypass tray unit Y119930 3 Service ...

Page 138: ...4 Remove the paper feed unit F 4 2 6 Paper feed unit 2 6 3 1 4 5 5 Remove the harness from the wire saddle 1 and disconnect the connector 2 6 Remove the harness from the edge cover 3 and the harness guide 4 7 Remove the E ring 5 and remove the tray 1 paper feed clutch 6 8 To reinstall reverse the order of removal 4 5 3 Registration clutch CL4 1 Remove the rear cover F 4 1 3 Rear cover 2 Open the r...

Page 139: ...tch CL5 1 Open the right door 1 1 2 2 Remove two screws 1 and remove the cover 2 1 3 2 3 Remove the screw 1 and remove the harness guide 2 and the gear assy 3 3 1 2 4 Disconnect the connector 1 5 Remove the E ring 2 and remove the ADU transport clutch 3 6 To reinstall reverse the order of removal 4 5 5 ADU feed clutch CL6 ADU reversal clutch CL7 1 Remove the toner filter assy E 3 1 8 Replacing the...

Page 140: ...ectors 2 7 Remove the screw 3 and remove the ADU clutch assy 4 NOTE Make sure not to drop the two gears 5 1 3 2 8 Remove the harness from the harness guide 1 and remove the ADU forward rotation clutch 2 or the ADU reverse rotation clutch 3 9 To reinstall reverse the order of removal 4 5 6 Document paper feed clutch CL8 1 Remove the rear cover ADF F 4 1 10 Rear cover ADF 2 3 1 4 2 Remove the E ring...

Page 141: ...e three screws 1 and remove the plate 2 1 6 Remove the document paper feed clutch 1 7 To reinstall reverse the order of removal 4 5 7 Document registration clutch CL9 1 Remove the rear cover ADF F 4 1 10 Rear cover ADF 2 Remove the front cover ADF F 4 1 9 Front cover ADF 2 1 3 Remove the screw 1 and remove the document feed tray 2 1 1 4 Remove two screws 1 Y119930 3 Service Manual ...

Page 142: ...e edge cover 2 2 1 8 Remove the E ring 1 and remove the document registration clutch 2 9 To reinstall reverse the order of removal 4 6 Fan motor 4 6 1 Machine cooling fan FM1 1 Remove the rear cover F 4 1 3 Rear cover 2 Remove the DC power supply F 4 3 4 DC power supply DCPS 1 2 3 Remove the harness from two wire saddles 1 and disconnect the connector 2 3 2 1 4 4 Remove two screws 1 5 Remove the c...

Page 143: ...r F 4 1 3 Rear cover 3 Remove the left cover F 4 1 2 Left cover 4 Remove the PWB box F 4 2 7 PWB box 3 1 2 2 5 Disconnect the connector 1 6 Remove three screws 2 and remove the toner suction fan assy 3 2 3 1 7 Remove the harness from the harness guide 1 8 Remove two screws 2 and remove the toner suction fan 3 9 To reinstall reverse the order of removal 4 6 3 DF cooling fan motor FM4 1 Remove the r...

Page 144: ... 4 7 Others 4 7 1 IDC sensor IDCS1 1 Open the right door 1 2 2 Remove the screw 1 and remove the cover 2 2 1 OK NG 3 NOTE When mounting the cover make sure the spring 1 locates within the spring supporting 2 4 1 2 5 3 4 Disconnect connector 1 and remove the harness from the harness guide 2 and the wire saddle 3 5 Remove the screw 4 and remove the IDC sensor assy 5 Service Manual Y119930 3 ...

Page 145: ...e right door 3 Remove the IDC sensor assy F 4 7 1 IDC sensor IDCS1 4 Remove the paper feed unit F 4 2 6 Paper feed unit 1 2 3 5 Remove the screw 1 6 Disconnect the connector 2 and remove the temperature humidity sensor 3 7 To reinstall reverse the order of removal 4 7 3 Exit path switch solenoid SD1 1 Remove the fusing unit E 3 1 12 Replacing the fusing unit 2 Remove the toner filter assy E 3 1 8 ...

Page 146: ...order of removal 4 7 4 Fax speaker SP1 1 Remove the toner filter assy E 3 1 8 Replacing the toner filter 2 Remove the rear cover F 4 1 3 Rear cover 3 Remove the left cover F 4 1 2 Left cover 4 Remove the exit cover F 4 1 4 Exit cover 1 2 5 Remove two screws 1 and slide out the fax speaker 2 1 2 6 Disconnect the connector 1 and remove the fax speaker 2 7 To reinstall reverse the order of removal Se...

Page 147: ...Remove the screw 3 and remove the plate 4 1 3 3 2 4 3 4 Remove the cable from the edge cover 1 and disconnect the connector 2 5 Remove five screws 3 and remove the plate 4 2 1 1 6 Remove four screws 1 and remove the plate 2 1 1 2 7 Remove five screws 1 and remove the plate 2 2 1 4 3 8 Disconnect two connectors 1 and remove the harness from the wire saddle 2 9 Remove two screws 3 and remove the fax...

Page 148: ...ew 11 To reinstall reverse the order of removal 5 2 FAX board FAXB 1 Remove the rear cover F 4 1 3 Rear cover 2 Remove the fax kit F 5 1 Fax Kit 1 2 1 3 Remove four screws 1 and remove the cover 2 1 2 3 2 4 Disconnect two connectors 1 5 Remove four screws 2 and remove the FAX board 3 6 To reinstall reverse the order of removal Service Manual Y119930 3 ...

Page 149: ... the order of removal 6 3 Tray 2 tray 3 PF P20 PF P21 NOTE The tray 2 and the tray 3 have same mechanism This procedure shows the steps taken for the tray 2 1 Slide out the tray 2 and unload paper from it 2 1 2 Slide the stopper 1 3 Hold up the tray 2 2 to remove it 4 To reinstall reverse the order of removal 6 4 Paper Feed Unit PF P20 NOTE Assign an appropriate number of persons for moving the ma...

Page 150: ...2 4 Remove two screws 1 and remove the two plates 2 5 Slide the tray 2 back in 6 Install the tray 1 2 1 7 Remove two screws 1 and remove the plate 2 1 8 Remove the cover 1 2 1 9 Remove the screw 1 and remove the plate 2 1 10 Disconnect the connector 1 Service Manual Y119930 3 ...

Page 151: ...ever removing or reinstalling the paper feed unit be sure first to unplug the power cord of the printer from the power outlet 1 Remove the rear cover F 4 1 3 Rear cover 2 Remove the tray 1 F 4 1 7 Tray1 3 Slide out the tray 2 1 2 1 2 4 Remove two screws 1 and remove the two plates 2 2 1 5 Remove the screw 1 and remove the cover 2 6 Slide the tray 2 back in 7 Install the tray 1 2 1 8 Remove two scr...

Page 152: ...he connector 1 2 1 11 Remove the screw 1 and remove the plate 2 2 1 12 Lift the main body 1 and then remove the paper feed unit 2 from the main body 6 6 PC control board PCCB PF P20 PF P21 1 Remove the rear cover F 6 1 Rear cover PF P20 F 6 2 Rear cover PF P21 2 Remove the drive motor Service Manual Y119930 3 ...

Page 153: ...motor do not hold the rotor but hold the plate of the motor or the board 4 To reinstall reverse the order of removal 6 8 Drive assy PF P20 PF P21 1 Remove the rear cover F 6 1 Rear cover PF P20 F 6 2 Rear cover PF P21 2 Remove the drive motor F 6 7 Drive motor M1 PF P20 PF P21 2 3 1 3 Disconnect two connectors 1 and remove the harness from two wire saddles 2 and the edge cover 3 1 1 2 4 Remove thr...

Page 154: ...20 PF P21 1 Remove the rear cover F 6 1 Rear cover PF P20 F 6 2 Rear cover PF P21 2 Remove the drive motor F 6 7 Drive motor M1 PF P20 PF P21 3 Remove the drive assy F 6 8 Drive assy PF P20 PF P21 1 5 4 3 5 4 3 5 2 6 4 Remove the harness from three wire saddles 1 and the edge cover 2 5 Remove two E rings 3 two bushings 4 and four screws 5 and remove the drive plate 6 1 3 2 6 Remove two E rings 1 t...

Page 155: ...1 Rear cover PF P20 F 6 2 Rear cover PF P21 2 Remove the drive motor F 6 7 Drive motor M1 PF P20 PF P21 3 Remove the drive assy F 6 8 Drive assy PF P20 PF P21 1 5 4 3 5 4 3 5 2 6 4 Remove the harness from three wire saddles 1 and the edge cover 2 5 Remove two E rings 3 two bushings 4 and four screws 5 and remove the drive plate 6 1 2 6 Remove the E ring 1 and remove the transport clutch 2 7 To rei...

Page 156: ...K 221 1 Slide out the tray 1 2 Open the front door 3 Open the right door 1 2 4 Remove two screws 1 and remove the front right cover 1 2 1 5 Disconnect the USB cable 1 1 2 6 Remove the screw 1 and remove the wireless LAN board 2 7 To reinstall reverse the order of removal Service Manual Y119930 3 ...

Page 157: ...t cover 1 2 2 3 1 2 5 By twisting the ends of the stopper 1 remove it from the main body 6 Remove four screws 2 and remove the right front cover 2 3 1 2 7 Remove the screw 1 and remove the USB hub board 2 3 4 5 1 2 8 Disconnect the connector 1 the connector 2 EK P09 only and the USB cable 3 and remove the harness from the edge cover 4 9 Remove the USB hub board 5 10 To reinstall reverse the order ...

Page 158: ...MBLY 9 KP 102 F 60 9 KP 102 9 1 Keypad KP 102 1 2 1 Remove the screw 1 and remove the cover 2 2 3 1 2 Disconnect the connector 1 3 Remove two screws 2 and remove the keypad 3 4 To reinstall reverse the order of removal Service Manual Y119930 3 ...

Page 159: ...ear cover ADF 2 Remove the front cover ADF F 4 1 9 Front cover ADF 2 1 3 Remove the screw 1 and remove the document feed tray 2 1 1 4 Remove two screws 1 1 2 1 5 Remove four screws 1 and evacuate the DF lower guide assy 2 1 6 Remove the screw 1 and pull out the multi feed detection board TX assy 2 1 7 Disconnect the connector 1 Y119930 3 Service Manual ...

Page 160: ... 1 Remove the rear cover ADF F 4 1 10 Rear cover ADF 2 Remove the front cover ADF F 4 1 9 Front cover ADF 2 1 3 3 Remove the screw 1 disconnect the connector 2 and remove the the ground wire and the harness from the wire saddle 3 1 2 4 Remove the screw 1 and remove the the upper door 2 1 2 5 Remove the pick up roller assy 1 6 Peel off the film 2 2 1 1 7 Remove six screws 1 and remove the cover 2 S...

Page 161: ...30014 J After mounting the cover stick the film 1 on the position shown in the illustration 3 1 2 9 Remove the screw 1 and remove the ground wire from the wire saddle 2 10 Disconnect the connector 3 2 1 11 Remove two screws 1 and remove the multi feed detection board RX 2 12 To reinstall reverse the order of removal Y119930 3 Service Manual ...

Page 162: ... the clean unit 2 1 2 2 Disconnect the connector 1 3 Remove the screw 2 and remove the earth cable 4 To reinstall reverse the order of removal 11 2 UFP filter 1 Remove the clean unit F 11 1 Clean unit CU 202 3 1 2 2 Remove the screw 1 and remove the earth cable 3 Remove two screws 2 and remove the duct 3 2 1 4 Remove two screws 1 and remove the duct 2 Service Manual Y119930 3 ...

Page 163: ... the clean unit F 11 1 Clean unit CU 202 2 Remove the UFP filter F 11 2 UFP filter 2 1 3 Remove two screws 1 and remove the cover 2 3 1 2 4 Disconnect two connectors 1 and remove two screws 2 5 Remove the clean unit drive board 3 6 To reinstall reverse the order of removal 11 4 Exhaust fan 1 FM1 1 Remove the clean unit F 11 1 Clean unit CU 202 2 Remove the UFP filter F 11 2 UFP filter Y119930 3 Se...

Page 164: ...3 4 Disconnect three connectors 1 and remove the harness from the harness guide 2 and two wire saddles 3 1 2 1 5 Remove four screws 1 and remove the exhaust fan 1 2 assy 2 1 3 2 6 Remove the screw 1 and unlock two tabs 2 7 Remove the exhaust fan 1 assy 3 1 2 8 Remove the screw 1 remove the duct 2 Service Manual Y119930 3 ...

Page 165: ...ve the exhaust fan 1 5 11 To reinstall reverse the order of removal 11 5 Exhaust fan 2 FM2 1 Remove the clean unit F 11 1 Clean unit CU 202 2 Remove the UFP filter F 11 2 UFP filter 1 3 Remove the exhaust fan assy 1 1 2 3 1 3 4 Disconnect three connectors 1 and remove the harness from the harness guide 2 and two wire saddles 3 1 2 1 5 Remove four screws 1 and remove the exhaust fan 1 2 assy 2 Y119...

Page 166: ...ust fan 2 2 9 To reinstall reverse the order of removal 11 6 Exhaust fan 3 FM3 1 Remove the clean unit F 11 1 Clean unit CU 202 2 Remove the UFP filter F 11 2 UFP filter 1 3 Remove the exhaust fan assy 1 4 2 1 3 4 Disconnect the connector 1 and remove the harness from the wire saddle 2 5 Remove two screws 3 and remove the exhaust fan 3 4 6 To reinstall reverse the order of removal Service Manual Y...

Page 167: ...t cover ADF F 4 1 9 Front cover ADF 2 1 3 Remove the screw 1 and remove the document feed tray 2 1 1 4 Remove two screws 1 1 2 1 5 Remove four screws 1 and evacuate the DF lower guide assy 2 1 6 Loosen the screw 1 1 2 3 7 Rotate the adjustment screw 1 and slide the DF CIS module assy 3 while referring the graduation 2 to make adjustment 8 After completing the adjustment tighten the screw loosened ...

Page 168: ...uate the DF lower guide assy 2 1 2 3 6 Loosen the screw 1 7 Slide the DF CIS module assy 3 while checking the graduation 2 to make adjustment 8 After completing the adjustment tighten the screw loosened in step 6 1 3 Adjusting original reading start position 1 Remove the front cover ADF F 4 1 9 Front cover ADF 2 1 3 2 Loosen the screw 1 3 Slide the document feed tray 3 while checking the graduatio...

Page 169: ...E Keys displayed on screens are different depending on the setting For details of the utility functions refer to User s Guide Starting procedure 1 Touch Utility on the Home screen 2 The Utility Mode screen will appear Exiting procedure 1 Touch the Home key Y119930 3 Service Manual ...

Page 170: ...2 is mounted It will be normally unselectable when Administrator System Settings Reset Settings Job Reset Default Basic Enlarge Display Common Setting is set to OFF System Auto Reset Confirmation Auto Reset Confirmation Enlarge Display Mode Confirmation Message Display Time Color Reversal Screen Display Setting Sound Setting Voice Guidance Settings It will be displayed when the voice data is insta...

Page 171: ...H 3 3 Counter Key name Function Precondition Copy Print Scan Fax Other Eco Info Power Consumption and CO2 Emission will not be displayed when Service Mode System 2 Display Eco Index Power Savings Display Level is set to OFF Y119930 3 Service Manual ...

Page 172: ...n conducting user authentication MFP only it will be displayed when the authentication is complete It will be displayed when Administrator Security Administrator Security Levels is set to Level 2 Change PIN Code It will be displayed when a user PIN code is set in Administrator User Auth Account Track User Authentication Setting User Registration 4 2 System Settings Key name Function Precondition M...

Page 173: ...stration Bulletin Board User Box It will be displayed when fax kit is mounted It will not be displayed when Service Mode Billing Setting Management Function Choice is set to Vendor 2 It will be displayed when the key counter is mounted It will not be displayed due to functional restriction upon user authentication when User Box is set to Restrict It will not be displayed when Administrator System ...

Page 174: ...hen setting other than Prohibit is selected in Administrator Security Administrator Security Levels Specify Default Tray when APS Off It will be displayed when setting other than Prohibit is selected in Administrator Security Administrator Security Levels Print Jobs During Copy Operation It will be displayed when Administrator Security Administrator Security Levels is set to Level 2 Card Shot Layo...

Page 175: ...o Paper Select When Auto is selected and paper larger than the image size is not in the paper trays paper size error occurs Security Setting Verify XPS OOXML Digital Signature OOXML Print Settings Sheet Book Print Paper Size The paper size selected in Service Mode System 1 Foolscap Size Setting is displayed Paper Type Page Layout Settings 4 6 Store Address NOTE In a machine where the user authenti...

Page 176: ... scan operation Distributed Scan XPS Settings 4 8 Fax Settings Key name Function Precondition Fax Default Settings It will not be displayed when Service Mode Billing Setting shows that Authentication Device2 is mounted and user authentication is not conducted This menu is not available when the key counter is set or when WARNING appears to inform that the vendor s main power switch needs to be che...

Page 177: ...fault Application Screen Type Setting Function Display Key Copy Print This is not displayed when Administrator System Settings Function Display Key Permission Setting Copy Print is turned OFF Send Save This is not displayed when Administrator System Settings Function Display Key Permission Setting Send Save is turned OFF Fax Tx Y119930 3 Service Manual ...

Page 178: ...ction Key name Function Precondition Language Selection Display The language as a default depend on the marketing area set in Marketing Area available from System 1 under Service Mode Panel Keyboard Language Selection External Keyboard Language Selection Service Manual Y119930 3 ...

Page 179: ...rvice Mode System 2 Software Switch Setting Sleep Mode Setting When Service Mode System 1 Sleep ON OFF Choice Setting is set to Permit the setting to turn sleep on and off displays and becomes selectable The sleep mode will begin in 48 hours even if it sets it to OFF The upper limit can be set up to 240 min only when the switch number 157 is specified to 02 at HEX assignment by setting Service Mod...

Page 180: ...1 Remote Care Remote Access Setting This displays when using the CS Remote Care system For details of the functions refer to H 12 1 3 Remote Access Setting 6 3 System Settings 6 3 1 Machine Setting Key name Function Precondition Device Location Administrator Registration Input Machine Address 6 3 2 Register Support Information Key name Function Precondition Register Support Information 6 3 3 Reset...

Page 181: ...ty Skip Job Fax Skip Job Copy Print 6 3 10 System Connection Setting Key name Function Precondition System Connection Setting Mobile Connection Settings Simple Connection Setting QR Code Display Setting Enable NFC This setting is synchronized with Administrator User Auth Account Track Authentication Type Enable NFC Enable Bluetooth LE It will be displayed when the optional local interface kit voic...

Page 182: ... name Function Precondition Meter Count and Device Confirmation Tx Settings The counter information is collected via CS Remote Care Though this setting is enabled the information is not sent if Service Mode System 2 Acquiring Settings is set to OFF Management List It will not be displayed when Service Mode Billing Setting Management Function Choice is set to Vendor 2 It will be displayed when the ...

Page 183: ...out 6 3 23 Main Menu Default Classic Style Key name Function Precondition Main Menu Default Classic Style List 6 3 24 Main Menu Default Basic Style Key name Function Precondition Main Menu Default Basic Style List 6 3 25 Display 10 Keypad when entering Number of Sets Key name Function Precondition Display 10 Keypad when entering Number of Sets 6 3 26 Widget Function Settings Key name Function Prec...

Page 184: ...s Changing Zoom Ratio Change Registered Overlay Copy security It will be displayed when the security kit is mounted Auto Logout Administrator Password Setting When Administrator Security Security Details Password Rules is enabled the following passwords cannot be accepted password of single repeated characters password same as the one before being changed and password where the number of character...

Page 185: ...it our service representative to back up or restore the storage on this machine For details of the functions refer to Service Mode Enhanced Security Storage Data Backup Hide Personal Information MIB If Administrator Security Enhanced Security Mode is set to ON disabling this setting cancels enhanced security mode Display Activity Log Quick Security Setting For details of the functions refer to H 1...

Page 186: ...nput Method This setting is not available without the account track Password Only cannot be set when using both user authentication and account track Synchronize User Authentication Account Track The setting is available only when carrying out the user authentication and account track Number of Counters Assigned It will not be displayed when Service Mode Billing Setting Management Function Choice ...

Page 187: ...r System Settings Custom Function Profile User Account is unset to ON Account Track Counter Prohibited Function Login Setting Print without Authentication If Administrator Security Enhanced Security Mode is set to ON selecting allow cancels enhanced security mode Simple Authentication setting LDAP IC Card Authentication Setting It will be displayed when Service Mode Billing Setting shows that the ...

Page 188: ...unted E mail RX Print It will not be displayed when Service Mode Billing Setting shows that Authentication Device2 is mounted E Mail Body Print displays only when Switch No 152 is set to 01 in HEX Assignment in Service Mode System 2 Software Switch Setting FTP Setting FTP TX Setting SNMP Setting It will not be displayed when Service Mode Billing Setting shows that Authentication Device2 is mounted...

Page 189: ...ctions refer to H 12 6 1 Internet ISW Settings Update Firmware at Specified Time This is displayed when Function Setting is set to ON in Service Mode Machine Update Setting Internet ISW Internet ISW Set This is displayed when Open Mode Settings is set to Set in Service Mode Machine Update Setting Internet ISW Internet ISW Set For details of the functions refer to H 12 6 1 Internet ISW Settings Fir...

Page 190: ...Box List New Registration Bulletin Board User Box It will be displayed when fax kit is mounted It will not be displayed when Service Mode Billing Setting Management Function Choice is set to Vendor 2 It will be displayed when the key counter is mounted It will not be displayed due to functional restriction upon user authentication when User Box is set to Restrict It will not be displayed when Admi...

Page 191: ...ng is set to ON Internet Fax Setting will be available when I Fax Function Setting in Administrator Network Settings Network Fax Setting is enabled Group Destination Information Limiting Access to Destinations Subject It will not be displayed when Service Mode Billing Setting Management Function Choice is set to Management Device 2 Text Call Rejection Setting Only for Japan Setting will be availab...

Page 192: ...x Settings TX RX Settings Print Separate Fax Pages is set to ON Letter Ledger over A4 A3 Print Paper Selection Print Paper Size To make the setting of Print Paper Size enable set Administrator Fax Settings TX RX Settings Paper Tray Setting to Auto Incorrect User Box No Entry RX from Rejected Fax No Only for Japan It will be displayed when Service Mode FAX System Display Setting Reject Calls is set...

Page 193: ...ddress except a case of the fax specify File Type a fax can be converted into a file The file types able to be specified are PDF XPS and TIFF However when a received job is an Internet Fax or IP Address Fax you can specify other file types by changing the switch No 124 to 00000001 at Bit assignment 01 at HEX assignment in Service Mode System 2 Software Switch Setting PC Fax RX Setting Dail In only...

Page 194: ... Rings Receive Time Interval Setting When Service Mode FAX Line 2 to 4 Network Network Setting 1 Receive Signal Detection Mode is set to Time Receive Time Interval Setting will be displayed Line Monitor Sound Pause Time Function Setting Number Display Function Only for Japan Multi Line Usage Setting Line Setting Sender Fax No 6 10 7 Network Fax Setting Key name Function Precondition Black Compress...

Page 195: ...TILITY MODE 6 Administrator H 27 Key name Function Precondition Auto Zoom ADF Specify Default Tray when APS Off Print Jobs During Copy Operation Eco Copier Settings Combine Duplex Settings Color Setting Y119930 3 Service Manual ...

Page 196: ...he key counter is not inserted while Key Counter Only is set by Service Mode Billing Setting Management Function Choice Gradation Adjustment This menu is unavailable when the key counter is not inserted while Key Counter Only is set by Service Mode Billing Setting Management Function Choice Before executing Gradation adjust be sure to perform Image Stabilization Scanner Area It will be displayed w...

Page 197: ... Memory Storage Adjustment Format Make sure to configure the following settings after formatting the storage Installing the firmware Reinstall movie data voice data OCR dictionary data and PDF A fonts from Service Mode System 2 Install Data Make sure to install the firmware after the format Otherwise a trouble code C D012 Mount error due to storage being unformatted will appear Encrypt Settings Us...

Page 198: ...on Version IPv4 Address IPv6 Address Serial Number Contact Telephone Number Auth function list display QR Code Display It will be displayed when Administrator System Settings System Connection Setting Mobile Connection Settings QR Code Display Setting is set to ON Contact Fax Number Version Information Service Manual Y119930 3 ...

Page 199: ...DE 10 Remote Panel H 31 10 Remote Panel Function Name Function Precondition Remote Panel Operation It will be displayed when Administrator Network Remote Panel Settings Remote Panel Client Settings is set to ON Y119930 3 Service Manual ...

Page 200: ...tion H 32 11 Card Authentication Function Name Function Precondition IC Card type setting It will be displayed when Service Mode Billing Setting Authentication Device2 is set to Card Operation Settings Authentication Card ID Number Service Manual Y119930 3 ...

Page 201: ...Code 1 Touch Token Code 2 Touch one of the Token Codes 1 to 10 3 Enter the Token Code 4 Touch OK 5 Touch Install 6 Confirm the message select Yes and touch OK 7 Turn OFF and ON the main power switch List of Enabled Functions To display currently activated functions 12 1 2 External Memory Backup NOTE It will be displayed when Service Mode System 2 Software Switch Setting shows that switch No 72 is ...

Page 202: ... authentication SNMP authentication WebDAV Server authentication Remote Panel authentication Setting item Contents Default setting Mode 1 When failed to authenticate authentication operation entering the password will be prohibited for a certain period of time Mode 2 When failed to authenticate authentication operation entering the password will be prohibited for a certain period of time The numbe...

Page 203: ...es is set The number of times can be changed to once twice or three times It is twice four or six times for WebDAV server password Confidential Document Access Method To display the status of the Authentication system on the control panel for the Security document access Mode 1 Mode 2 not to be changed In association with ProhibitFunctions the method is changed from Security using Secure Document ...

Page 204: ...firmware upgrading by Internet ISW and enable or disable various settings OFF OFF not to be changed operation Ban release time CE Authentication To set the period of time to be elapsed before the access lock state is released in CE password authentication 5 min The setting value should be 5 min or more no value less than 5 can be set E mail RX Print To print an E mail attachment send an E mail to ...

Page 205: ...ut image data to the server using whenever machine inputs or outputs image data Makes the settings of the WebDAV Server the FTP Server or the SMB Server where image data are transferred Use this settings to keep logs of input and output image data for Security purpose Setting item Default setting ON OFF Procedure When selecting ON configure the following settings Select Forwarding Destination and ...

Page 206: ...ther to enable to print files from a USB connected computer Allow Restrict 1 This function is available when ON is selected in Administrator Security USB Connection Permission setting Detail Setting External Memory User 2 This function is available when ON is selected in Administrator Security USB Connection Permission setting Detail Setting PC Connect Password Rules To apply the password rule to ...

Page 207: ... 1 2 3 FFFF FFFF FFFF FFFF If the Prefix has not been set filtering runs in the same way as that the Prefix is set to 64 bit No Filtering For both IPv4 address and IPv6 address no filtering is performed Web Conn setting To set whether to use the Web Connection NOTE To use the Web Connection enable JavaScript and Cookie of the Web browser If the MFP is connected to the internet via a proxy server r...

Page 208: ...specified by default Vendor ID and Product ID are identification information to specify USB devices Procedure Select either one of the authentication devices and press the corresponding key to go to the individual operation setting screen The screen displays the authentication device that is selected in Service Mode Billing Setting Authentication Device 2 When using SSFC Shared Security Formats Co...

Page 209: ...pplications 4 Select whether to notify you of the user name and password of the user who is using this machine when the IWS application on this machine operates that of a different device in Login Information Notification Settings 5 The following settings are available when the IWS application has been registered Print Data Conversion Setting Select a print data conversion application Authenticati...

Page 210: ...ts Port No To set the port number Connection Timeout To set the time out time Server Address Enter the address of the server where the dedicated software was installed Certificate Verification Level Settings Expiration Date Select whether to check that the server certificate is within the validity period Key Usage Select whether to check that the server certificate is used according to the purpose...

Page 211: ...ess LAN access point connected to the machine using up to 32 characters Authentication Encryption Algorithm Select the algorithm used for authentication or encryption If WEP is selected specify Key Input Method and WEP Key To specify multiple WEP keys select the required WEP keys in Use key settings If an algorithm other than WEP is selected specify Key Input Method and Passphrase Connection Statu...

Page 212: ...ers To download and update the firmware When you wish to update the firmware at the specified time after downloading it in the way described here you can specify the time in Update Firmware at Specified Time This is displayed when Open Mode Settings is set to Set in Service Mode Machine Update Setting Internet ISW Internet ISW Set Procedure 1 Touch Firmware Download in Administrator Network Machin...

Page 213: ...t the timeout period for connecting to the server Update Time Touch Clear to set the time to update the machine Polling Settings Set the polling period for obtaining the update list Retry Interval Set the period for retrying when failed to obtain 2 Relay Server Function Settings Obtain an update relay data and configure settings for the relay server function which enables the file to be shared wit...

Page 214: ... Update File Download Log Save the log related to update relay data download for the relay server and send it to the specified location Setting item Default setting ON OFF Procedure When ON is selected configure the settings for transmission protocol For SMB Setting item Contents Host Name Set the host name for the SMB server File Path Set the file path used in the SMB server communication User Na...

Page 215: ...figuration file s 12 6 3 HTTP Proxy Settings To select whether to connect via a proxy server to access the http server To configure the settings of the server related to connection via a proxy server Setting item Default setting ON OFF Procedure If ON is selected configure the following settings 1 Touch Host Address in Proxy Server Address to set the host address of the proxy server 2 Set the port...

Page 216: ...This page is intentionally left blank ...

Page 217: ...he service code entered is displayed as 6 The Service Mode menu will appear NOTE Be sure to change the CE password from its default value For the procedure to change the CE password see Enhanced Security CE Password NEVER forget the CE password Setting procedure 1 Press the key corresponding to the function you would like to change the setting for Keys or setting screens will appear for each funct...

Page 218: ... procedure NOTE The specific function may be set either via the Service Mode or the Setup Wizard The setting made last is the valid setting Starting procedure 1 Call the initial screen of Service Mode 2 Press the following keys in this order Stop 3 3 Touch the Prev key or Next key to select the mode e g Exiting procedure 1 Touch Service The home Service Mode screen reappears 2 Touch Exit 3 Turn OF...

Page 219: ...ropean countries 08 00 China Taiwan western part of Australia 09 00 Japan Korea Date Time Setting Enter the time from the 10 key pad to set the time of day Before making any entry first press Clear After the time has been set touch Entry and then Apply Procedure 1 Call the initial screen of Service Mode 2 Press the following keys in this order Stop 1 1 4 4 Clear 3 Enter time zone year month day ho...

Page 220: ...can display the function screen from the search results Procedure 1 Touch Search at the initial screen of Service Mode 2 Enter the desired search keyword 3 Touch END 4 Select the desired function from the displayed search results and touch Start 5 The screen for the selected function displays Service Manual Y119930 3 ...

Page 221: ... Transport Speed To adjust the speed of the fusing motor so as to match the fusing speed with transport speed Brush effect or blurred image is evident as a result of changes in environmental conditions or degraded durability Setting item Supported paper Setting range Default setting Full speed paper type Plain paper Plain paper Recycled paper Letterhead 2 0 to 2 0 Step 1 0 Half speed paper type Th...

Page 222: ...k the dimension of width A on the test pattern A 6 If width A falls outside the target change the setting using the key If width A is longer than the target make the setting value smaller than the current one If width A is shorter than the target make the setting value greater than the current one 7 Press the Start key to let the machine produce a test pattern 8 Check the dimension of width A on t...

Page 223: ...n the backside of the test pattern Backside A 6 If width A falls outside the target change the setting using the key If width A is longer than the target make the setting value smaller than the current one If width A is shorter than the target make the setting value greater than the current one 7 Press the Start key to let the machine produce a test pattern 8 Check the dimension of width A on the ...

Page 224: ...ting value smaller than the current one If width A is shorter than the target make the setting value greater than the current one 5 Press the Start key to let the machine produce a test pattern 6 Check the dimension of width A on the test pattern 7 If width A is outside the target change the setting again and make a check again 8 If width A falls within the target touch END 5 4 Scan Area 5 4 1 Tes...

Page 225: ...he following target shown below An adjustment must have been completed correctly of Printer Image Centering Side 1 of Printer Area Target Setting range Default Width B 1 0 mm 1 7 to 1 7 mm 1 step 0 1 mm 0 0 mm Procedure 1 Position the test chart correctly so that the original reference point is aligned with the scale 2 Press the Start key to make a copy 3 Check point B on the test pattern Enlarged...

Page 226: ...ed with the scale 2 Press the Start key to make a copy 3 Check point D on the output test pattern Enlarged view of the test chart COLOR CHART Y M C C M C Y Y M Color is hue lightness is value saturation is chroma this is the world of color Hue P2 P2 The quality of color which can be described by words such as red yellow blue etc Value The quality of color which can be described by words such as li...

Page 227: ...cross deviates in the direction of B increase the setting Direction of A Direction of B 5 6 Main Scanning Direction Zoom To make the zoom adjustment in the main scanning direction Use the function when the PH unit has been replaced with a new one This adjustment is necessary when the adjustment value is cleared such as when the backup board is replaced with a new one Target Setting range Default s...

Page 228: ... emitting time of the laser that is scanned by the polygon motor Use when the reproducibility of thin line is reduced NOTE Adjustment value of this setting will be reflected by the image stabilization control Setting range Default setting 0 to 6 Step 1 6 Procedure 1 Enter the new setting from the keys Increase the adjust value Light emitting time will be lengthened Decrease the value Light emittin...

Page 229: ... scratch or stain exists on the original glass 2 Check the verification results Verification results Contents OK Works properly NG1 Works properly However data that may interfere with the non image area erase function was found This function may not work well with dark original NG2 Data that may interfere with the non image area erase function was found NOTE If the check result is NG1 or NG2 reins...

Page 230: ...SERVICE MODE 6 Firmware Version I 14 6 Firmware Version To check the firmware version Use when the firmware is upgraded Procedure 1 Touch Firmware Version 2 Touch the key to check the firmware version Service Manual Y119930 3 ...

Page 231: ...edure NOTE When executing the gradation adjustment make sure to use the white paper for color copy 1 Touch Stabilizer and the Start key to perform image stabilization NOTE Before executing Gradation adjust be sure to perform Stabilizer 2 Select a gradation adjustment item 3 Press the Start key to let the machine produce a test pattern NOTE When the image stabilization performed in step 3 is NG the...

Page 232: ...e has been changed be sure to perform Imaging Process Adjustment Stabilizer Stabilization Only 7 4 Image Background Adj To adjust the highlight portion fog level to the target reproduction level by making an auxiliary manual fine adjustment of γ of each color after gradation adjust Use when a foggy background occurs due to a printer problem Setting item Setting value Default setting Cyan Magenta Y...

Page 233: ... pattern or the color chart when adjusting 7 7 2 2nd Transfer Adj Adjust the 2nd image transfer output ATVC on the 1st page and the 2nd page for each paper type To use when the transfer failure occurs Setting current control to ON activates the 2nd image transfer amperage upper and lower limit control In this case the machine uses the voltage determined by the auto transfer voltage control and the...

Page 234: ...er key 3 Touch END to validate the setting value 7 10 Grad Dev AC Bias V Selection Changes the developing AC voltage charging AC voltage and 1st image transfer current settings Turn ON to lower the above mentioned voltages and prevent white spots caused by leakage Used when fine white spots occur on the entire image in the environment of low atmospheric pressure such as a highland Also used when v...

Page 235: ...or the modem For fax line E mail Bilateral Unilateral communication http Bilateral Unilateral communication Disconnect the telephone line modem 3 Touch Maintenance Default Settings ID Code to input the seven digits ID of the service person If the ID of the service person is already registered it will be displayed 4 Touch Maintenance Default Settings System Setting to select the system to be used o...

Page 236: ...ll be carried out and the E mail address of the center will be stored in the copier When the initial registration is complete the E mail address of the center will be displayed by selecting Service Mode CS Remote Care Maintenance Default Settings Detail Setting Basic Setting E Mail address 8 1 3 Setup confirmation Follow the steps below to make sure that CS Remote Care has been properly set up Pro...

Page 237: ...Setting value Default setting Center ID Set the center ID When all setup procedures are completed the center ID is displayed 5 digit alphanumeric characters 00000 Device ID Display the device ID It can only be displayed but not be changed 13 digit alphanumeric characters E mail Address Set the center E mail address When all setup procedures are completed the center E mail address is displayed Alph...

Page 238: ...s selected in System Setting To make Heart Beat related settings Heart Beat is a feature that uploads a Heart Beat file to the registered web server at a specified interval to report that the device is operating Heart Beat files include total counter and status information Setting item Contents Setting value Default setting Communication To set whether or not to enable Heart Beat communication Yes...

Page 239: ...tware Switch Setting 2 Touch Switch No and input the software switch number two digits using the 10 key pad 3 Touch Bit Assignment and select software switch bit number using the arrow keys and input 0 or 1 using the 10 key pad For setting by hexadecimal numbers touch HEX Assignment key and input using the 10 key pad or A to F keys Refer to I 8 2 Software SW setting for Remote Care for the setting...

Page 240: ...eric characters and symbols up to 64 characters POP3 password To set the logon password for the POP3 server used for the CS Remote Care Alphanumeric characters and symbols up to 15 characters POP3 Port Number To set the POP3 port number used for the CS Remote Care 1 to 65535 110 Receive Setting item Contents Setting value Default setting E Mail Address To set the e mail address used for the CS Rem...

Page 241: ...ission and reception test 2 The test procedure and result will be displayed on the screen Data Initialization To initialize the contents for the sever setting Setting value Default setting Yes No 2 http1 or http2 is selected HTTP Server Settings Setting item Contents Setting value Default setting URL To set an address of the http server that is used in CS Remote Care It can be set by the IP addres...

Page 242: ...hanced Security Mode is set to ON 1 Connect the USB flash drive where the certificate obtained from LMS License Management System is stored to the USB port of MFP 2 Touch Register Manually USB 3 Touch Start to install the certificate 4 Check that the Install OK message appears 8 1 10 Import Export Settings WebDAV Setting To configure WebDAV server settings used to remotely export or import MFP dat...

Page 243: ...ion times on E Mail http delivery error I 8 2 10 SW No 09 10 Time zone settings I 8 2 11 SW No 10 11 Timer 1 RING reception CONNECT reception I 8 2 12 SW No 11 12 Timer 2 Dial request completed CONNECT reception I 8 2 13 SW No 12 13 Reservation 14 Timer 4 Line connection Start request telegram delivery I 8 2 14 SW No 14 15 Timer 5 Wait time for other side s response I 8 2 15 SW No 15 16 Reservatio...

Page 244: ...mission Disable Enable 8 2 4 SW No 03 Default Setting value Bit 7 6 5 4 3 2 1 0 Bit Assignment 0 0 0 0 1 0 1 0 HEX Assignment 0A Functions Bit Functions Setting value Description 0 1 7 Reservation 6 5 4 3 Auto call on the waste toner bottle full Disable Enable 2 Reservation 1 Auto call on the toner empty Disable Enable 0 Trouble Display setting When the CSRC is not connected When the CSRC is conne...

Page 245: ...e 8 2 6 SW No 05 Default Setting value Bit 7 6 5 4 3 2 1 0 Bit Assignment 0 0 0 0 0 0 1 1 HEX Assignment 03 Functions Bit Functions Setting Description 0 1 7 Reservation 6 5 4 Modem redial interval 00001 1 minute 3 00010 2 minutes 2 00011 3 minutes 1 00100 4 minutes 0 00101 5 minutes 00110 6 minutes 00111 7 minutes 01000 8 minutes 01001 9 minutes 01010 10 minutes Others Not available 8 2 7 SW No 0...

Page 246: ...iption 0 1 7 Redial for response time out 0000 0000 0 times 6 0000 0001 1 time 5 Others Not available 4 3 2 1 0 8 2 9 SW No 08 Default Setting value Bit 7 6 5 4 3 2 1 0 Bit Assignment 0 0 0 0 0 1 1 0 HEX Assignment 06 Functions Bit Functions Setting Description 0 1 7 Retransmission interval on E Mail http delivery error 0000 0000 0 minutes 6 0000 0001 10 minutes 5 4 0000 0110 60 minutes 3 2 0000 1...

Page 247: ...ions Bit Functions Setting value Description 0 1 7 Time zone settings 0000 0000 0 6 0000 0001 1 5 4 0000 1100 12 3 1111 0100 12 2 1 1111 1111 1 0 Others Not available 8 2 12 SW No 11 Default Setting value Bit 7 6 5 4 3 2 1 0 Bit Assignment 0 0 1 0 0 0 0 0 HEX Assignment 20 Functions Bit Functions Setting value Description 0 1 7 Timer 1 RING reception CONNECT reception 0000 0000 0 sec 6 0000 0001 1...

Page 248: ... 0 1 7 Timer 4 Line connection Start request telegram delivery 0000 0000 0 msec 6 0000 0001 100 msec 5 4 0010 0000 3 200 msec 3 2 1111 1110 25 400 msec 1 1111 1111 25 500 msec 0 8 2 15 SW No 15 Default Setting value Bit 7 6 5 4 3 2 1 0 Bit Assignment 0 0 0 1 1 1 1 0 HEX Assignment 1E Functions Bit Functions Setting value Description 0 1 7 Timer 5 Wait time for other side s response 0000 0000 0 sec...

Page 249: ... transmission of misfeed frequent occurrence warning OFF ON 1 Transmission of original based misfeed frequent occurrence warning OFF ON If the number of jams exceeds the threshold specified per day 0 00 to 23 59 Jam Frequent Occurrence Warning is sent At 12 a m of the next day the counter is reset 0 Transmission of paper based misfeed frequent occurrence warning OFF ON 8 2 18 SW No 22 Default Sett...

Page 250: ...tion server 9 Data destination server 10 CSRA Conducting CSRA settings 1 The command server notifies the MFP of information related to pre check server settings and schedule and conducts CSRA settings remotely Alternately inputs setting details through the control panel 2 Connection with the pre check server is checked from Function Setting Check Connection Communication flow of analysis data 1 Fo...

Page 251: ...ion To check the connection with the pre check server To display the connection server To notify of communication status during connecting To notify of details when an error occurs 8 3 3 Send Upd Schedule To set whether or not to permit overwriting from server Setting item Setting value Default setting Overwrite from Server Permit Prohibit Schedule Set To set the frequency of data sending Setting ...

Page 252: ...o the copy job currently performing When informing the host that it cannot be modified due to the copy job currently performing Ask the host to send another instruction file for modifying 1080 Data length problem LEN value of TEXT data and actual data length are not consistent Ask the host to send another instruction file for modifying 1081 Frame No error The last frame has not been received There...

Page 253: ...ver failed 3012 http request result problem The proxy server refused CONNECT request 3013 http request result problem The proxy server was set to enabled but the proxy server host was not set 3014 http request result problem Proxy server authentication failed 3015 http request result problem Other error was returned from the proxy server 3016 http request result problem Internal error occurred 301...

Page 254: ...English Language Selection Selectable language Japanese English French Italian German Spanish Simplified Chinese Traditional Chinese Hangul English French Italian German Spanish Japanese Simplified Chinese Traditional Chinese Hangul English French Italian German Spanish Japanese Simplified Chinese Traditional Chinese Hangul English French Italian German Spanish Japanese Simplified Chinese Traditio...

Page 255: ...reen Prohibit No to display OFF in the sleep mode setting screen 9 5 Foolscap Size Setting To set the size for foolscap paper Upon setup Setting item Default setting 81 2 x 131 2 81 2 x 13 81 4 x 13 81 8 x 131 4 8 x 13 NOTE 81 8 x 131 4 and 81 2 x 131 2 setting is corresponding to paper fed from the manual bypass tray only 9 6 Install Date To register the date the main body was installed Upon setu...

Page 256: ...d turn off the main power switch and turn it on again more than 10 seconds after System Error Clear To reset the trouble data Use to clear the Jam Trouble Error displays and other improper displays For details on items to be cleared see List of Contents to be cleared Procedure 1 Touch System Error Clear 2 Press the Start key 3 When OK is displayed turn off the main power switch and turn it on agai...

Page 257: ... specified value Mode 3 To prevent curling of the paper immediately after the warm up printing productivity is decreased by PPM control The warm up time for both black and color will be as specified value Mode 4 By having a longer warm up time and warming up the fusing unit curling of the paper immediately after the warm up can be prevented Fusing operation mode Warm up related control can be chan...

Page 258: ...etting Type 1 Type 2 Warning Status Attention Toner supply door open Toner cartridge install failure Toner Empty Blinking Blinking Near life Toner Near Empty Blinking Blinking Malfunction code Blinking Blinking Problem Unit Isolation Blinking Blinking Fatal error Trouble code Jam Door opened Life stop Toner Empty Stop Lit Lit Paper Remainder Not used 9 11 TP Level To adjust the selectivity of the ...

Page 259: ... User is selected Printing is inhibited When Service is selected Life warning Setting item Setting Value Default setting Japan US Europe Toner Cartridge User Service Imaging Unit User Service Waste Toner Box User Service 10 4 2 Warning display Toner Near Empty To set whether to display a toner near empty warning Setting value Default setting Yes No Near Empty Display Time To change the timing of t...

Page 260: ...e warning replace display of the units 069 When printing using the manual bypass tray in a custom size allows for printing only with a printer driver settings 070 Setting for alarm sound and screen display for communication errors occurring due to CSRC causes 072 Import export function of the address book through the USB memory 121 When using the ADF and an original multi feed trouble is detected ...

Page 261: ...I SIPRNet Card3 choice is added in Service Mode Reference Service Mode Billing Settings Authentication Device 2 10 5 2 SW No 025 FW function version setting Bit Assignment HEX Assignment Details Default value Bit HEX 00000000 00 FW compatible with version 1 0 00010000 10 00010000 10 FW compatible with version 2 0 Reference Utility Device Information List 10 5 3 SW No 033 Renders some functions whi...

Page 262: ...Start printing with the paper settings specified by the printer driver as the manual bypass tray paper settings without giving a warning 10 5 7 SW No 070 Setting for alarm sound and screen display for communication errors occurring due to CSRC causes Bit Assignment HEX Assignment Details Default value Bit HEX 00000000 00 Communication error sound screen display enabled 00000000 00 00010000 10 Comm...

Page 263: ...Bit HEX 00000000 00 Stop immediately 00000010 02 00000010 02 Stop accordingly Stop immediately in the following cases as an exception 1 is set at bit4 for the Switch No 145 For jobs where center stapling half folding tri folding and Z folding are set with a finisher equipped HEX 04 Displaying message when the paper size in manual bypass tray is mismatched with the paper size specified on the contr...

Page 264: ...on of the debug setting of the log Bit Assignment HEX Assignment Details Default value Bit HEX 00000000 00 Debug setting is disabled 00000000 00 00000001 01 Debug setting is enabled Reference Service Mode Debug Settings Basic mode 10 5 19 SW No 157 Change the upper limit of the time for switching to power save mode Bit Assignment HEX Assignment Details Default value Bit HEX 00000000 00 Do not chan...

Page 265: ...x mis sending HEX 80 Setting for allowing prohibiting use of functions to allow administrator to change PBX function settings when an external line button is added for direct input of an address with the PBX function enabled Bit Assignment HEX Assignment Details Default value Bit HEX 00000000 00 Do not use the functions 10000000 80 10000000 80 Use the functions 10 5 26 SW No 227 Setting for the di...

Page 266: ...ob data NOTE The following conditions are necessary for this function Allow must be set when selecting Administrator Security Security Details Print Data Capture The MFP storage must be installed ON must be set when selecting Administrator Network FTP Setting FTP Server Setting This function also allows print job data stored in the MFP storage to be obtained from Debug Settings Debug Log Output Fo...

Page 267: ...P storage When Storage Format or Overwrite Temporary Data is performed job data is deleted 10 8 Network Fax Settings To set whether or not to use network fax function To set when using network fax function Selection will be available when each network fax function is set to ON in Administrator Network Network Fax Setting Network Fax Setting Setting item Setting value Default setting IP Address Fax...

Page 268: ... that includes a different basic weight fusing temperature 2nd image transfer fine adjustment value User Paper Settings is also available from Utility Expert Adjustment To register a paper type that is suitable for individual customer s intended use and use environment Registered Key Paper Type Basic weight Fusing Temperature 2nd Transfer Adj Setting range Setting item Setting range Setting item S...

Page 269: ... a data as a zip format file compress the bin file of the same name image data and the Version txt file version information in one zip file NOTE Character type usable in version information is limited to ASCII 7 bit ASCII Text strings of up to 21 characters can be used 3 Save the created data in the root directory of the USB memory NOTE Be careful that the machine is unable to recognize data saved...

Page 270: ...Check result OK is displayed 6 Turn OFF and ON the main power switch NOTE The new data will overwrite any existing authentication customization data To delete registered data touch Delete and make sure that OK appears 10 17 Install Data To install voice data movie data OCR dictionary data PDF A font or IPFAX SIP data into the main body Selection of OEM makes customization of driver name etc possib...

Page 271: ...ber of retries is up to 2 times 10 21 Acquiring Settings To count frequency of use by each function and collect machine configuration information This setting allows us to understand the trend in the market and the usage of MFP by collecting and counting frequency of use by each function The collected information can be obtained only via CSRC and cannot be displayed on the control panel or printed...

Page 272: ... in Model 4 Select a preset pattern or marketing area in Preset The number of functions displayed in the Function list below decreases in the order of Full Standard Basic 5 Select whether items should be displayed ticked or hidden unticked in Function Make this setting both in the Copy tab and the Scan Fax tab 6 Save the setting file CPD file with one byte alphanumerics and symbols in Save as Edit...

Page 273: ...elt deformation Setting value Detail Default setting OFF Mode 1 Rotates the fusing roller for a certain distance when the machine has been in standby mode for over 6 hours Rotates the fusing roller for a certain distance when the machine has been in energy save mode for over 13 days Energy save mode in this case does not include sub power OFF mode and ErP Auto Power OFF mode Mode 2 Rotates the fus...

Page 274: ...codes to be activated 2 Touch Activation 3 Confirm that USB is selected NOTE USB is only displayed when a USB device that contains functions codes to be activated is connected 4 Confirm the instructions on screen and touch Apply List To display a list of currently activated functions Service Manual Y119930 3 ...

Page 275: ...nit center reaches the predetermined temperature Fusing unit CD width of max mileage Counts the total paper feeding distance by each paper width and shows paper width with the longest total paper feeding distance Fusing unit max mileage from each CD width Counts the total paper feeding distance by each paper width and shows the longest total paper feeding distance Fusing Unit Rotation Time Counts ...

Page 276: ...ow many times trouble has occurred NOTE In the service call counter list Reboot shows how many times abort code C FXXX has occurred 11 4 Section Service Call To count and display how many times trouble has been detected during a certain period i e an interval between service visits on a trouble type basis Use this feature to check how many times trouble has occurred in a certain period i e an inte...

Page 277: ... jam location basis 11 13 Section JAM To count and display how many times jam has been detected in a certain period i e an interval between service visits on a jam location basis Use this feature to check how many times jam has occurred in a certain period i e an interval between service visits By clearing the jam counter at the time of visit to your customer site i e service visit you can check h...

Page 278: ...1 2 x 11 plain paper to a paper source 2 Select the List item to be output 3 Select 1 Sided or 2 Sided 4 Press the Start key which will let the machine produce the list NOTE If no item is selected the Start key has no response 12 2 Batch list CSV output This setting only appears when the following conditions are satisfied Detail Settings is selected under Administrator Security USB Connection Perm...

Page 279: ...d Color MF4003 MF3303 I SERVICE MODE 12 List Output I 63 4 Confirm that OK is displayed as the result of data saving Y119930 3 Service Manual ...

Page 280: ...Set Sensor Set Out of position Paper empty Tray 3 paper empty sensor PS1 3 Paper not present Paper present Vertical transport Tray 3 transport sensor PS6 3 Paper present Paper not present Paper feed Tray 3 paper feed sensor PS3 3 Paper present Paper not present Upper Limit of Lift up Tray 3 upper limit sensor PS2 3 Upper position Other than upper position Manual Paper empty Bypass tray paper empty...

Page 281: ...t edge temperature Displays the latest detected temperature of the heating roller thermistor Edg Reading taken last means Density of toner of the latest image When a test pattern is produced by pressing the Start key while level history 1 is being displayed 13 4 Level History 2 IDC Sensor Transfer belt bare surface level as adjusted through the image stabilization sequence and ATVC value Used for ...

Page 282: ...y and the written data is thereafter read This sequence is performed for all memories which forms one cycle of the check sequence When one cycle of the check sequence is completed the write value is changed automatically and a new check cycle is performed This sequence is repeated with the write value changed for each sequence Unlike the rough check the detail check is not automatically terminated...

Page 283: ... To check to see if the MFP storage is connected properly and if read write operation of the storage is correctly performed Procedure 1 Touch Storage R W Check 2 Press the Start key to start the check procedure 3 The check result will be displayed 13 7 7 Format Clear the data from the MFP storage NOTE Data stored in the firmware space and backup space are not cleared And after setting the HDD encr...

Page 284: ...n off and on the main power switch At the point when you display Service Mode State Confirmation Load Check MFP enters into load check mode Regardless of whether load check is actually performed or not the main power switch must be turned off and on to exit from load check mode 13 10 1 Load check list Check code Multi code Symbol Load name Operation outline Note 20 1 CL3 Tray 1 paper feed clutch D...

Page 285: ...rouble code is output or a trouble such as main body activation failure occurs and identifies the parts need to be replaced The self diagnostic function is divided into two functions the Self diag Full function and the Self diag Individual function Self diag Full diagnoses all items together those are diagnosed individually with Self diag Individual and identifies the area where trouble occurred a...

Page 286: ...des Diagnosis procedure 1 Display the Self diag Full screen Display by selecting Service Mode State Confirmation Self diag Full Turn the main power switch on while pressing the power key After a short beep sound is made once release the power key and wait to display the Self diag Full screen 2 Press the Start key to start the check procedure 3 The result of the diagnosis is displayed for every ite...

Page 287: ...or Code and turn OFF the main power switch 4 Refer to TROUBLESHOOTING Error code list and preform the troubleshooting against each error code 13 12 3 Self diag Individual 1 I2C Check To check each item of the I2C individually Diagnosis item Relevant electrical parts TPM TPM board TPMB CPU board CPUB Base board BASEB AUDIO Control CPU board CPUB Base board BASEB PS CPU CPU board CPUB Base board BAS...

Page 288: ...uch he LAN IF Ping Test key 2 Select the input method according to the IP address of the destination 3 Input IPv4 Address Input IPv6 Address 4 Input IP address of destination with the numeric keypad or the alphabet key 5 Press the Start key to start the check procedure 6 When the self diagnosis procedure is completed the result will be displayed OK NG 7 If OK is displayed touch END 8 If NG is disp...

Page 289: ...ack 1PC Cyan Magenta Yellow Black 4PC CMYK 8 Color 4 Color NOTE Front Half is selectable only for 8 color one side printing When 24 Gradations or 256 Gradations is selected 8 Color or 4 Color is not selectable in color mode Sample SINGLE HYPER Gradation Full Bleed Cyan 14 1 2 Halftone Pattern To produce a solid halftone pattern Used for checking uneven density and pitch noise Setting item Setting ...

Page 290: ... To produce a solid pattern Used for checking reproducibility of image density Setting item Setting value Output operation mode SINGLE Copies 1 to 999 MULTI Screen pattern setting FEET HYPER Gradation Resolution Error diffusion 1 Sided 2 sided print mode 1 sided Density 0 255 Sample Y C K M SINGLE HYPER Gradation Density 255 14 1 5 Color Sample To produce a color sample Produce 12 gradation level ...

Page 291: ...alue Copies 1 always Screen pattern setting Error diffusion Gradation Resolution Angle 0 degrees 90 degrees 180 degrees 270 degrees Sample Error diffusion Angle 270 degrees 14 2 Paper Passage Test To test the printing operation in paper passage test Use to check the printing operation in paper passage test from each paper source Setting item Setting value Pattern Printing Yes No Select Tray Tray 1...

Page 292: ...Pseudo Ring Procedure 1 Touch Fax Line Test 2 Select the Line and touch the Signal Send Test 3 Select a test item 4 Select the parameter you would like to test 5 Press the Start key In order to move to another test select the next test item after pressing the Stop key NOTICE Signal is output from pressing Start to pressing Stop To check Line 1 Administrator Fax Settings Line Parameter Setting Line...

Page 293: ...s of tests are shown in the title line as follows RCV Waiting signals OK NG Results of signal reception NCU Test To check the operation of NCU Contents of test Device to be tested CML Relay IC201 IC202 CTL Relay RL201 TEL Relay RL501 DC LOOP Detect Speaker Outside Ring Send Audio Response Send RL501 mounts only the Japan Procedure 1 Touch Fax Line Test 2 Select the Line and touch the NCU Test 3 Se...

Page 294: ...he target touch END Sub Scanning Direction 2 Side Target Setting range Default setting 0 0 2 0 mm 5 0 to 5 0 mm 1 step 0 1 mm 0 0 mm NOTE Before performing this adjustment the feed zoom adjustment and the FD Mag Adj B adjustment need to be complete Procedure 1 Place the chart in the document feed tray DF reading chart for Duplex with the front side facing up 2 Make a full size copy of the chart 3 ...

Page 295: ...chart again 7 Check the difference in the width A between the chart and the discharged copy sample 8 If width A is outside the target change the setting again and make a check again 9 If width A falls within the target touch END 15 2 Registration Loop Adj To adjust the length of the loop to be formed in paper before the registration rollers When an original misfeed or skew occurs Setting item Sett...

Page 296: ...locked 15 5 Read Pos Adj To adjust the original read position When the scanner home sensor have been replaced Read Pos Adj Setting range Default setting 27 through 29 Intrinsic values adjusted at the factory Procedure 1 Touch Read Pos Adj 2 Touch C 3 Enter the value using the keys Set the setting value to a positive number to move the stop position of the LED exposure unit to the right when viewed...

Page 297: ...d Green or Blue 2 Press the value using the key Increasing the setting value to lighten the selected color Thinner Decreasing the setting value to deepen the selected color Thicker NOTE It is recommended that the scanning light adjustment should be made by the same steps for all the three colors of red green and blue 3 Touch END 15 8 FD Mag Adj B To adjust the feed zoom in the back side feeding di...

Page 298: ...to prevent white lines from occurring in the image due to paper dust Adjustment item Contents Setting range Default setting Usage Setting To set OFF ON of the shading repair function ON OFF Error Detection To set the level of error detection at retrieving the initial shading data None Level 1 Level 2 Level 3 Moving Avg Value To use the range for averaging the moving level of shading repair None 10...

Page 299: ...e FAX circuit 1 is Set in Service Mode System 2 Option Board Status To configure settings for each selected fax line when multiple fax lines are Set in Service Mode System 2 Option Board Status The following setting items are displayed only when Line1 is selected System Fax File Format List Output Function Parameter NOTE Fax lines that can be set may vary by different MFPs For details see PRODUCT ...

Page 300: ...and sends an external number Make settings in Network Settings4 to properly detect the PBX dial tone signal 4 When the external number is received the PBX connects to the public line 5 From the public line the 1st dial tone signal is sent to the fax source which informs that connection is established 6 The fax source detects the 1st dial tone signal and sends a fax destination number To properly d...

Page 301: ...d To set the max speed for transmission V17 14400 bps V17 12000bps V17 9600bps V17 7200bps V29 9600bps V29 7200bps V27 4800bps V27 2400bps RX Max Speed To set the max speed for reception V17 14400 bps V29 9600bps V27 4800bps TxATT Setting item Contents Procedure PIX TxATT To set the output level of PIX TxATT Directly sets modem There are no external attenuator The setting value are different depen...

Page 302: ... compliant to standards in other countries In Japan set this parameter to OFF ON OFF min RING OFF Time Minimum time to recognize ringer interval 0 to 1000 ms Step 100 ms 200 ms JP 0 ms US EU Response Waiting Time To set the response waiting time Response waiting timer 55 sec Calling Starts after dialing Until CED is received 35 to 115 s Step 1 s 55 s Pause Time The pause time for one pause key pau...

Page 303: ...To set the number of times of tone detection 1 to 10 count Step 1 count 3 count Wait Time To set the dial tone waiting time 1 to 10 s Step 1 s 3 s Tone Det Frequency To set the dial tone detection frequency pattern 1 to 23 Step 1 8 When OFF is selected in Tone Det Set Setting item Contents Setting range Default setting Pre PauseTime To set the pre pause time 1 to 10 s Step 1 s 3 s Tone Det Frequen...

Page 304: ...nes from appearing Effective in the book transmission 5 mm 10 mm 15 mm System Function Setting item Contents Setting value Default setting Fax Board Watchdog To set whether or not to enable watchdog by the fax board CPU ON Reset when hung up OFF Keeps being hung up ON OFF Fax BOOT Rewrite on ISW Required when a BOOT BLOCK program is upgraded or a hardware is changed ON OFF Error Code Display Time ...

Page 305: ...mploys the number of DIS waiting times ON OFF No of DIS Waiting Times at Foreign Communication To set the number of DIS waiting times 1 2 V34 Speed To set the V 34 international communication mode speed 16800 to 33600 bps Step 2400 bps 28800 bps V17 Speed To set the V 17 international communication mode speed 7200 to 14400 bps Step 2400 bps 7200 bps V29 Speed To set the V 29 international communic...

Page 306: ...sending and reception MH MH MR MH MR MMR MH MR MMR JBIG 16 7 List Output NOTE This setting is displayed only for Line1 Report Addition Information To set whether or not to add the diagnosis code or dial number to the communication journal Setting value Contents Default setting Diagnosis Code The diagnosis code is printed on the communication journal Dial Number The dial number is printed on the co...

Page 307: ...USY TONE Detection No of Times of Busy Tone Detection Fax Line Std Setting 2 Dial Tone Detection Pause Time Response Waiting Time Fax Line Std Setting 3 Error Page Resen Number of Redial If the following settings are changed the settings from Administrator Fax Settings Line Parameter Setting is also changed Fax Line Std Setting 1 Number of RX Call Rings Receive Time Interval Set Fax Line Std Setti...

Page 308: ...005 7 00000000 6 Two sided recording of FAX 0 Possible 1 Impossible Possible 5 4 3 2 Default setting of forward TX 00 Not specified 01 Line 1 10 Line 2 Not specified 1 0 Forward TX 00 No forwarding 01 Forwarding Always print 10 Forwarding Only when not delivered print No forwarding FAX reception automatic output setting 000B0006 7 Two sided recording 00000001 6 5 Inched recording paper selection 4...

Page 309: ...Received image reduction rate at APS A3 B4 width 96 01100000 Incomplete TX hold 000B000F 7 Debug mode 0 OFF 1 ON 3 min OFF 00000000 6 4 3 0 File holding time 0000 12 hours 0001 24 hours 0010 48 hours 0011 72 hours 12 hours Inter station timer 000B0010 7 0 Inter station timer unit sec 00000000 to 11111111 255 sec 00000000 means 3 sec 3 sec 00000011 PC FAX reception 000B0016 7 TSI routing function 0...

Page 310: ...2 RTI setting 0 ON 1 OFF ON 1 TTI setting 0 ON 1 OFF ON 0 Stamp default value setting 0 OFF 1 ON OFF Communication function 000B0039 7 Interception of 1 address transmission in broadcasting transmission 0 Permitted 1 Inhibited Permitted 01000100 6 TTI printing unit ID preference function 0 Not preferred 1 Preferred Preferred 5 Abandoning error pages during transmission 0 Not abandoned 1 Abandoned ...

Page 311: ...nes very good 000E0001 7 0 No of lines very good No of error lines VeryGoodErrorNum MCF is transmitted 16 00010000 No of error lines good 000E0002 7 0 No of error lines good VeryGoodErrorNum No of error lines GoodErrorNum RTP is transmitted 64 JP US 128 EU 01000000 JP US 10000000 EU No of error lines bad 000E0003 7 0 No of error lines bad GoodErrorNum No of error lines BadErrorNum RTN is transmitt...

Page 312: ...r 000E000C 7 TSI transmission 0 No 1 Always Always 11100000 6 CSI transmission 0 No 1 Always Always 5 CIG transmission 0 No 1 Always Always 4 1 0 Character ID is put on CSI 0 G3 mode error 000E000D 7 Ph C8 min limit timer at Non ECM 0 No 1 Yes No 00000000 JP US 01000100 EU 6 Selection of at dial top 0 OFF 1 ON OFF JP US ON EU 5 RTN reception 0 step down 1 Line disconnect step down 4 Remote recepti...

Page 313: ...1B 7 3 00000001 2 0 The EOL counter judged to be RTC 000 EOL 2 001 EOL 3 010 EOL 4 011 EOL 5 100 EOL 6 EOL 3 Closed area communication 000E001C 7 3 00000000 2 Polling TX 1 Polling RX 0 Machine password 20 000E001D 000E0030 7 0 ASCII 20 When ID is less than 20 digits justify to the left and insert space at the top No NULL terminator 0x20 00100000 CSRC password 20 000E0031 000E0044 7 0 ASCII 20 When...

Page 314: ...g timeout 000E004E 7 0 Waiting event from modem Response waiting timeout time x10 sec 00000000 counted as 90 sec 90 sec 00000000 Continuous CRP reception frequency resulting in an error 000E004F 7 0 Sequential CRP reception frequency resulting in error unit No of time 00000000 counted as 3 times 3 times 00000000 1300 Hz line seizure parameter detection time 000E0050 7 0 1300 Hz tone detection time...

Page 315: ...ter V 21 judgment at high low speed judgment unit 10 ms Translated to 2000 ms when the value is 00000000 2000 ms 00000000 Image data signal CD OFF judgment time 000E005F 7 0 Image data signal CD OFF judgment time unit 10 ms Translated to 2000 ms when the value is 00000000 2000 ms 00000000 V 21 send time after V 21 RX 000E0060 7 0 V 21 send time after V 21 reception unit 1 ms Translated to 75 ms wh...

Page 316: ...t 0 Daily difference not limited 1 Daily difference limited Daily difference not limited 00000000 6 5 Transmission result report selection screen 0 Not displayed 1 Displayed Not displayed 4 Broadcast result report output method 0 All destinations 1 Each destination All destinations 3 2 Output order of journal transmission result reservation report 0 From old one 1 From new one From old one 1 0 Inv...

Page 317: ... Error Report printing 0 ON 1 OFF ON 1 MDN Message printing 0 ON 1 OFF ON 0 DSN Message printing 0 ON 1 OFF OFF FAX report setting 0012000D 7 2 00000000 1 PC Fax Error report output 0 No 1 Yes No 0 Relay print 0 No 1 Yes No 16 11 4 Panel settings Items Address Data Default Bit Contents Setting Data FAX scan HP2 00130001 7 6 Frame erasure HP 01 5mm 10 10mm 11 15mm 5mm 01000001 5 0 FAX scan HP3 0013...

Page 318: ... mode display setting 2 00130036 7 4 00000101 JP 00001111 US 00000111 EU 3 OFF display of header position 0 Yes 1 No Yes JP EU No US 2 1 Receive reject display 0 Yes 1 No Yes JP No US EU 0 Destination default screen setting 00130038 7 0 00000000 Group 00000001 FAX 00000010 E mail 00000011 BOX 00000100 I Fax 00000101 IP address FAX 00000110 SMB 00000111 FTP 00001000 WebDAV Group 00000000 Destinatio...

Page 319: ...0 Lower limit for redial interval setting range unit min 15 min 00001111 Telephone related function setting menu display 1 00130070 7 01111111 JP 00000000 US EU 6 Remote reception 0 OFF 1 ON ON JP OFF US EU 5 Dial In 0 OFF 1 ON ON JP OFF US EU 4 Number display 0 OFF 1 ON ON JP OFF US EU 3 Pesudo RBT form 0 OFF 1 ON ON JP OFF US EU 2 Pesudo RBT transmission level 0 OFF 1 ON ON JP OFF US EU 1 Connec...

Page 320: ... display setting 00130080 7 0 0 Do not display 1 Display Do not display 00000000 00130081 00000000 00130082 00000000 00130083 00000001 No of destination display characters setting 00130084 7 0 00001110 14 characters 00011000 24 characters 14 characters 00001110 Lower limit of receive time interval setting 00980000 7 0 Lower limit of receive time interval setting unit sec 0 sec 00000000 Upper limit...

Page 321: ...e details 0 Voice response RBT transmission 1 RBT transmission only Voice response RBT transmission 2 0 Ring Back Tone parameter For Line 1 and Japan model only 000E0096 000E01A6 000E02B6 000E03C6 7 5 RBT form 000 None 001 JP 010 US 011 GB 100 GE 101 to 111 Others JP JP US US GB EU 00101010 JP 01001010 US 01101000 EU 4 CED transmitted upon TEL FAX switching 3 0 RBT transmission level dBm 0000 0 dB...

Page 322: ...E03D0 7 0 Timer value after V 34 reception error used to reset V34 off reception unit min Valid only when transmission side cannot be specified 10 min 00001010 V34 off Rx V17 OK Rx times to reset V34 off Rx 000E00A1 000E01B1 000E02C1 000E03D1 7 0 No of continuous success of V17 receptions used to reset V34 off reception after V 34 reception error unit No of times Valid only when transmission side ...

Page 323: ...3DC 7 0 PBX dial tone ON time min value unit 20 ms 100 ms 00000101 PBX dial tone OFF time max value 000E00AD 000E01BD 000E02CD 000E03DD 7 0 PBX dial tone OFF time max value unit 20 ms 400 ms 00010100 PBX dial tone OFF time min value 000E00AE 000E01BE 000E02CE 000E03DE 7 0 PBX dial tone OFF time min value unit 20 ms 100 ms 00000101 PBX dial tone waiting time 000E00AF 000E01BF 000E02CF 000E03DF 7 0 ...

Page 324: ... US EU 2nd dial tone OFF time min value 000E00BC 000E01CC 000E02DC 000E03EC 7 0 2nd dial tone OFF time min value unit 20 ms 80 ms JP 0 ms US EU 00000100 JP 00000000 US EU 2nd dial tone waiting time 000E00BD 000E01CD 000E02DD 000E03ED 7 0 2nd dial tone waiting time or pre pause time unit 1 sec 3 sec 00000011 2nd dial tone instantaneous break detection time 000E00BE 000E01CE 000E02DE 000E03EE 7 0 In...

Page 325: ...0 150Hz 1 0 0 0 1 425 150Hz 1 0 0 1 0 440 150Hz 1 0 0 1 1 465 205Hz 1 0 1 0 0 350 25Hz Dual 1 0 1 0 1 620 25Hz Dual 1 0 1 1 0 400 75Hz Dual 1 0 1 1 1 550 100Hz Dual 16 12 3 Function setting 3 Items Address Data Default Line 1 Line 2 Line 3 Line 4 Bit Contents Setting Data Ringer detection pattern 000E00C5 000E01D5 000E02E5 000E03F5 7 Custom mode 0 OFF in accordance with bits 3 0 1 ON in accordance...

Page 326: ...E0 000E02F0 000E0400 7 0 DRPD max adjustment value for max OFF time unit 100 ms 500 ms 00000101 DRPD min adjustment value for max OFF time 000E00D1 000E01E1 000E02F1 000E0401 7 0 DRPD ringer min adjustment value for max OFF time unit 100 ms 500 ms 00000101 DRPD single ring stop detection time 000E00D2 000E01E2 000E02F2 000E0402 7 0 DRPD single ring stop detection time unit 100 ms 8000 ms 01010000 ...

Page 327: ... DRPD standard time 㻝 16 12 4 Function setting 4 Items Address Data Default Line 1 Line 2 Line 3 Line 4 Bit Contents Setting Data PB dial signal transmission time 000E00E1 000E01F1 000E0301 000E0411 7 0 PB dial signal transmission time unit 5 ms 105 ms JP EU 125 ms US 00010101 JP EU 00011001 US PB dial inter digit pause 000E00E2 000E01F2 000E0302 000E0412 7 0 PB dial inter digit pause time unit 5 ...

Page 328: ...CML ON 000E00EC 000E01FC 000E030C 000E041C 7 0 DC LOOP integration time at CML relay ON unit 5 ms Lower limit 20 ms 80 ms 00010000 Pause time 000E00ED 000E01FD 000E030D 000E041D 7 3 00000001 2 0 Pause time unit sec 1 sec DC LOOP check mode 000E00EE 000E01FE 000E030E 000E041E 7 DC LOOP check 0 No 1 Always No 00000000 6 1 0 T81 line disconnection check T80 if line disconnected 0 Yes 1 No Yes DC LOOP...

Page 329: ...calling unit sec 55 sec 00110111 Answering machine function 000E00F9 000E0209 000E0319 000E0429 7 5 Answering machine CNG detection time unit 10 sec 001 10 sec to 111 70 sec 30 sec 01100100 4 Answer mode 0 OFF 1 ON OFF 3 0 Answering machine DC LOOP detection time unit 5 sec 0001 5 sec to 1111 75 sec 20 sec Remote reception password Line 1 only available 000E00FA 000E020A 000E031A 000E042A 7 0 ASCI...

Page 330: ...signal detection waiting time when judged unit sec 3 sec JP 0 sec US EU Monitor speaker Transmission signal sound 000E0105 000E0215 000E0325 000E0435 7 PB tone monitoring at the time of offhook 00000011 6 5 Monitor speaker in communication 00 OFF 01 Up to DIS 10 Up to DIS RBT transmissions 11 ON OFF 4 0 Speaker volume 00000 0 to 01000 8 3 Numeric ID 20 000E0106 000E0119 000E0216 000E0229 000E0326 ...

Page 331: ...the size of a long original received that is regarded as an error The maximum length is a decimal value x 10 mm 00000000 is regarded as 1000 mm 1000 mm 01100100 Max size of long original received In the case of 600 dpi 000E0121 000E0231 000E0341 000E0451 7 0 When the resolution for reception is 600 dpi the size of a long original received that is regarded as an error The maximum length is a decima...

Page 332: ...available at polling transmission 00 3 0 s 01 3 5 s 10 4 0 s 11 4 5 s 3 0 s 00000000 5 4 Phase B re transmission interval at manual sending 00 3 0 s 01 3 5 s 10 4 0 s 11 4 5 s 3 0 s 3 2 Phase B re transmission interval at automatic receiving available at polling transmission 00 3 0 s 01 3 5 s 10 4 0 s 11 4 5 s 3 0 s 1 0 Phase B re transmission interval at automatic sending 00 3 0 s 01 3 5 s 10 4 0...

Page 333: ... for V 29 communication at V 17 RX error 0 For R06 error equivalent only 1 For all RX errors For R06 error equivalent only V 29 communication time at V 17 RX error 000E0135 000E0245 000E0355 000E0465 7 0 Time limited for V 29 communication from V 17 error occurrence unit min 0 min 00000000 16 12 6 Fax capacity setting Items Address Data Default Line 1 Line 2 Line 3 Line 4 Bit Contents Setting Data...

Page 334: ...00F0006 000F0026 000F0046 000F0066 7 01000110 6 Unlimited 5 Legal 4 Letter 3 2 B4 1 A4 0 A5 Reception speed ability 000F0007 000F0027 000F0047 000F0067 7 5 00011011 4 V 29 96 3 V 29 72 2 1 V 27 48 0 V 27 24 000F0008 000F0028 000F0048 000F0068 7 V 17 144 11110000 6 V 17 120 5 V 17 96 4 V 17 72 3 V 33 144 2 V 33 120 1 TCM 96 0 TCM 72 000F0009 000F0029 000F0049 000F0069 7 V 34 192 11111111 6 V 34 168...

Page 335: ... reception capability 0 OFF 1 ON ON Reception protocol ability 000F0010 000F0030 000F0050 000F0070 7 6 00111001 5 FAX CSRC Line 1 only 4 V 8 V 34 3 DIAG Line 1 only 2 1 0 G3S Reception option frame ability 000F0011 000F0031 000F0051 000F0071 7 5 00000111 4 BFT 3 BTM 2 PWD 1 SEP 0 SUB 16 12 7 HP setting Items Address Data Default Line 1 Line 2 Line 3 Line 4 Bit Contents Setting Data Transmission ma...

Page 336: ...ength instruction 00100006 00100026 00100046 00100066 7 01000110 6 Unlimited 5 Legal 4 Letter 3 2 B4 1 A4 0 A5 Transmission speed instruction 00100007 00100027 00100047 00100067 7 5 00011011 4 V 29 96 3 V 29 72 2 1 V 27 48 0 V 27 24 00100008 00100028 00100048 00100068 7 V 17 144 11110000 6 V 17 120 5 V 17 96 4 V 17 72 3 V 33 144 2 V 33 120 1 TCM 96 0 TCM 72 00100009 00100029 00100049 00100069 7 V ...

Page 337: ... 300 300 dpi ms 00000000 0 ms to 00101000 40 ms 5 ms 00000101 0010000E 0010002E 0010004E 0010006E 7 0 T15 4 or 400 400 dpi or 600 600 dpi ms 00000000 0 ms to 00101000 40 ms 5 ms 00000101 Transmission ECM instruction 0010000F 0010002F 0010004F 0010006F 7 2 00000001 1 ECM transmission frame size 0 256 1 64 256 0 ECM transmission instruction 0 OFF 1 ON ON Transmission protocol instruction 00100010 00...

Page 338: ...ia the LAN A job is received from the client via the wireless LAN access point and executed Wired Wireless Primary Mode Select this option to use this machine in both the wired LAN environment and wireless LAN environment The main body is used as a wireless LAN access point When starting up the main body perform wireless LAN communication between the main body and the mobile device Android device ...

Page 339: ...een Setting range Description Alphanumeric characters symbols space up to 64 characters Specify the operator name Setup To connect to the remote service server manually Touch Start to send the identification code and operator name to the remote service server 17 2 4 XMPP Settings Function setting To set whether to use sessions when communicating with the XMPP server NOTE When Disable is set initia...

Page 340: ... sure not to set the packet transmission interval shorter than the lower limit 1 to 3600 sec 30 sec 17 3 Port Settings To set the threshold value for determining the load state of the Raw port Setting range Default setting 1 to 60 minutes 3 minutes 17 4 MTU Param set Set the maximum value MTU of data that can be transmitted at once Set operations of Path MTU Discovery NOTICE Path MTU Discovery det...

Page 341: ...ore connecting ON OFF 18 1 4 Forwarding Access Setting Setting item Description Setting User ID To register the user ID for accessing the program server where firmware is to be stored Alphanumeric characters and symbols up to 64 characters Password To register the password for accessing the program server where firmware is to be stored Alphanumeric characters and symbols up to 64 characters URL To...

Page 342: ...irmware update is not performed If the main power switch is turned OFF during a firmware update the firmware is updated next time when the main power switch is turned ON If a job is in process when the specified time comes the firmware is updated after the completion of the job Procedure 1 Select Set for Update Firmware at Specified Time 2 Touch Hour and Min and set the firmware update start time ...

Page 343: ...t can be inserted between or and the line break code Parameter list Parameter Description Version Specify the version information of update data using a number including up to five digits NumberOfFiles Specify the number of update data to up to three digits Specify NumberOfFiles 0 not to include the data to update FilePath Specify a location to store the update data A relative path should be speci...

Page 344: ...umber as SoftwareDipSW csv and EngineDipSW csv Store the file to the directory described in C_UpdateList ini A sample of SoftwareDipSW csv Example Description A row Software switch number B row Set 1 on the bit to be overwritten bit7 to bit0 from left side C row Set 1 or 0 for new setting at selected bit s on B row bit7 to bit0 from left side A sample of EngineDipSW csv Example Description A row E...

Page 345: ... in which C_UpdateList ini is stored Alphanumeric characters and symbols up to 253 characters User Name Set the user name used to access the relay server by http protocol Up to 64 characters Password Set a password used to access the http server Alphanumeric characters and symbols up to 64 characters Proxy To set whether or not to use the proxy server If ON is selected set the proxy with Administr...

Page 346: ...ansmission log Update is received When using SMB protocol Error code Cause of error Solution N00107 Cannot access the SMB server Set the IP address of the server or the server name correctly Confirm that if the server runs normally N04096 N04097 Authentication error Set the ID and the password correctly N04098 N04105 SMB connection error Check the SMB connection setting again N04106 Cannot obtain ...

Page 347: ...fore executing the following procedures contact with the administrator to obtain an agreement Set the network parameter program server address as well as firewall address to the MFP main body Create one set of data used to the auto update function as the relay data and store it in the program server Create a data update information file S_UpdateList csv and store it in the program server for manag...

Page 348: ...e setting Relay Server Log Confirmation or viewed on the PC where the log which saves up to 100 records sent by using Transmission Server Log is received Error code Cause of error Countermeasure N00107 Cannot access the HTTP server Set the IP address of the server or the server name correctly Confirm that if the server runs normally N00401 Authentication error Set the ID and the password correctly...

Page 349: ...etting Transmission Server Log To set whether or not to use Transmission Server Log When ON is selected configure the settings for transmission protocol and server ON Disable Transmission protocol Configure settings for the transmission protocol SMB WebDAV SMB Settings Host Name Set the host name for the SMB server Alphanumeric characters and symbols up to 253 characters File Path Set the file pat...

Page 350: ...in dat Service Settings UsbExportData_Service dat Cloud Connection UsbExportData_Cloud dat Display Custom Settings 1 UsbExportData_Topmenu dat TopMenuGadget tar External Cert 1 UsbExportData_ExtCertificates tar Custom Settings 1 2 UsbExportData dat UserBox Config Information 1 UsbExportData_BackUpBoxConf dat Accessibility 1 UsbExportData_Universal dat Authentication customize data 2 AuthCustomMast...

Page 351: ...Password are required to access the folder User name CE Password CE password 18 2 10 Machine Update Password To set a password used to decrypt the update file of the machine Procedure 1 Current Password Enter the currently used decryption password only when the decryption password has been set 2 New Password Enter the new decryption password 3 Re input Password Enter the new decryption password ag...

Page 352: ...ystem Not including security features Possible to turn OFF security features A USB memory that is recognized by the computer as two or more drives cannot be used Use any write protected USB memory in the write enabled condition CSV file Appropriate the format of the CSV file and prepare a CSV file where the recipient MFP and network setting value to be delivered and set have been input Setting ite...

Page 353: ...SV file in the USB memory cannot be read E00003 The delivery result file cannot be created in the USB memory connected to the originating MFP E00004 The CSV file format is illegal E00005 Communication is not successful with an MFP having a serial number contained in the CSV file E00006 OFF is set in OpenAPI Setting Access Setting E00007 ON is set in OpenAPI Setting Authentication E00008 SSL Only o...

Page 354: ...This page is intentionally left blank ...

Page 355: ...ode 1 1 Sided Except for large size 1 count 0 count 0 count Large size 1 count 1 count 0 count 2 Sided Except for large size 2 count 0 count 1 count Large size 2 counts 2 counts 1 count Mode 2 1 Sided Except for large size 1 count 0 count 0 count Large size 2 counts 1 count 0 count 2 Sided Except for large size 2 counts 0 count 1 count Large size 4 counts 2 counts 1 count 1 2 2 Large Size Counter ...

Page 356: ...r authentication Password Only of account track Do Not Synchronize of user authentication and account track or ON of public user access has been set with Administrator User Auth Account Track Authentication Type Setting item Contents Mode 1 Use contact type device Logout with ID key is not allowed Mode 2 Use non contact type device Logout with ID key is allowed 2 Billing Line To be displayed only ...

Page 357: ...card information setting file and export it as a loadable driver IC card information setting file preparation tool 2 Using the Auth Device Tool Advanced for AU 201S prepare the IC card information setting file only and install the loadable driver in the MFP Then using the Data Administrator write the IC card information setting file in the MFP IC card information setting procedures E g Information...

Page 358: ...able driver in the MFP Then using the Data Administrator write the IC card information setting file in the MFP Reference D 2 1 2 IC card information setting procedures Note 3 If a YSoft card reader is used all types of card will be reported as HID Prox card to the authentication program To report the card type other than HID Prox to the authentication program choose the corresponding card type sho...

Page 359: ...activate i Option functions The functions can be activated by selecting the desired function and enter the appropriate license code and function code Administrators also can carry out the procedure No 14 or later step to activate i Option functions through Administrator Settings NOTE You need to access License Management System LMS to implement each function setting Before accessing the LMS CE are...

Page 360: ...J 6 6 Enter the serial number of the target MFP and click Next NOTE Make sure to enter alphabet letters of the serial number in all capital letters 7 Click Next 8 Enter the token number written in the token certification and select the product description 9 Click Add Service Manual Y119930 3 ...

Page 361: ...he registered items and click Next 11 Click Generate License Code 12 LMS issues license code and function code 13 Write down the serial number license code and function code When activating with an USB memory Click Download and save a fek file to the root directory of the USB memory Y119930 3 Service Manual ...

Page 362: ... next step 18 Select Service Mode Billing Setting License Management Function List and confirm that the activated function is displayed at the list 1 6 2 Deactivation To deactivate i Option functions To deactivate i Option functions due to registration error expiration of lease term change to other MFP or etc The functions can be deactivated by selecting the desired function and enter the appropri...

Page 363: ...cted to the Internet https lms olivetti com license OLI support aspx 3 Click CE Login 4 Enter E Mail Address and Password and click Login 5 Click Deactivate License Code 6 Enter the serial number of the target MFP and click Retrieve NOTE Make sure to enter alphabet letters of the serial number in all capital letters Y119930 3 Service Manual ...

Page 364: ... and click Registration 8 LMS issues deactivation code and function code 9 Write down the serial number deactivation code and function code When deactivating with an USB memory Click Download and save a fek file to the root directory of the USB memory 10 Select Service Mode Billing Setting License Management Service Manual Y119930 3 ...

Page 365: ...code NOTE When A4S or 8 1 2 x 11S is set to the paper feed tray the above mentioned serial number and deactivation complete code can be printed out by pressing the start key Serial number and deactivation complete code can be confirmed in List available from License Management 0123456789012 01234 56789 01234 56789 01234 56789 01234 Serial Number Deactivation Complete Code Restart 14 Touch Restart ...

Page 366: ...nagement information can be repaired by acquiring repair code with repair request code and entering the repair code NOTE You need to access License Management System LMS to implement each function setting Before accessing the LMS CE are required to register the E mail address and the password in the LMS To register click CE Initial Registration that is located in the upper right of CE Login screen...

Page 367: ...OTE When A4S or 8 1 2 x 11S is set to the paper feed tray the above mentioned serial number and repair request code can be printed out by pressing the start key Serial Number Repair Request Code 01234 56789 01234 56789 01234 56789 01234 Request Code 0123456789012 01234 56789 01234 56789 01234 56789 4 Access the following URL using the PC connected to the Internet https lms olivetti com license OLI...

Page 368: ...Login 7 Click Repair License Code 8 Enter the serial number repair request code and request code confirmed at step3 and click Registration NOTE Make sure to enter alphabet letters of the serial number in all capital letters 9 LMS issues repair permission code 10 Write down the serial number and repair permission code Service Manual Y119930 3 ...

Page 369: ...rvice Mode Billing Setting License Management 12 Select Repair Repair Code and enter the repair code confirmed at step10 Repair Repair Code Repair Request Code Repair Request 13 Touch Apply Repair Repair Code Repair Request Code Repair Request 12345 67890 12345 67890 12345 67890 12345 Y119930 3 Service Manual ...

Page 370: ...itialization follow the message appearing on the screen and turn OFF and ON the main power switch 1 6 5 Request Code To display and print request code and serial number To check the request code and serial number NOTE When the license management error is occurred it will not be displayed until the repair code is input Procedure 1 Set A4S or 8 1 2 x 11S paper to the tray 2 Press start key at reques...

Page 371: ...Set the file path used in the WebDAV server communication Up to 47 one byte alphameric characters and symbols User Name Set the user name used to access the WebDAV server Up to 64 one byte alphameric characters and symbols Password Set the password that is used to access the WebDAV server Up to 64 one byte alphameric characters and symbols Port Number Set the port number that is used to access the...

Page 372: ...the current administrator password with this The administrator password needs to be 8 to 64 one byte alphameric characters and symbols Default setting 1234567812345678 Procedure 1 New Password Enter the new administrator password 2 Re input Password Enter the new administrator password again NOTE When Password Rules of Administrator Security Security Details is set to ON new passwords cannot conta...

Page 373: ...re 1 Touch Memory Data Backup 2 Touch Start to start making a backup 3 Check the message Backup is completed and turn main power switch OFF Wait for ten seconds or more and turn main power switch back ON 2 8 operation Ban release time To set the period of time to be elapsed before the access lock state is released in CE password authentication Setting range Default setting 1 to 60 minutes 5 minute...

Page 374: ...sable mode 4 Choice of full speed print prohibited condition detected 5 Enabling high humidity WUP 6 Choice of toner empty recovery mode 7 Not used 8 Not used 9 Not used 10 Not used 11 Choice of fusing rotation while waiting 12 Choice not to conduct image stabilization 13 Choice of securing fusibility 14 Choice of unit simultaneous replacement promotion 15 Not used 16 Not used 17 Not used 18 Not u...

Page 375: ...o ON 4 Close the front door By closing the front door the New Release Disable mode takes effect Notes when using the New Release Disable mode Before starting the mode Output the list in Service Mode List Output to check the information on the wear out rate of each unit and keep the Dmax density adjustment value Replace units that have reached their part replacement time or that are near life with ...

Page 376: ...cted ON Full speed print prohibited condition detected NOTE To reflect the adjustment value after change make sure to exit from the Service Mode The adjustment value is not reflected when turning off the power without exiting from the Service Mode 3 Choice of high humidity circumstance Out of Fusing PPM control for preventing the paper from losing its fusibility high humidity circumstance mode whi...

Page 377: ...ing ON When the conditions are satisfied rotates the transfer belt when the machine is first powered on or while recovering from sleep mode NOTE To reflect the adjustment value after change make sure to exit from the Service Mode The adjustment value is not reflected when turning off the power without exiting from the Service Mode 11 Choice of ACS parameter It sets the black printing quantity thre...

Page 378: ...abling engine log via CTL Choice to disable an engine log via CTL Switch No 39 Contents Default OFF To enable an engine log via CNT ON To disable an engine log via CNT Terminal output NOTE To reflect the adjustment value after change make sure to exit from the Service Mode The adjustment value is not reflected when turning off the power without exiting from the Service Mode 19 Choice of increasing...

Page 379: ... Since the free space in the HDD for backup cannot be checked beforehand after starting the backup it will be terminated as an error at the time that no space remained in the HDD OLI Format Backup Save the settings of the machine as a XML data and save the image data in the box in internal format RAW data to the HDD connected with a USB A backup starts after making a if the storage is enough Resto...

Page 380: ...lect Backup Select the backup method Setting item Contents Disable Select not to use the backup Server Backup Select to make backup to the server as backup Set Setting when selecting backup to the server Server Backup 2 Select to make backup to the server as backup 2 Set Setting when selecting backup 2 to the server Setting when selecting backup to the server Backup setting Set the backup setting ...

Page 381: ... other than that related to network Backup result To make a confirmation of the date and time when the final backup is completed successfully Up to 100 backup logs can be displayed in the order from the latest backup Setting when selecting backup to the server 2 Format To select a format to backup Setting item Contents Generic format Select to backup of box documents by generic format OLI format S...

Page 382: ...from the server Restore from Server 2 Select to make restore from the server as restore 2 Set Setting when selecting restore from the server 2 Setting when selecting restore from the server Restore setting To specify a location from where restore data is to be downloaded Select a server and press Start to start restoring Setting item Contents Default setting Acquire from backup Execute restore fro...

Page 383: ...ore to 5000 or less 5001 or more 2 14 TPM Setting This is displayed only when the optional i Option LK 115 v2 is enabled Initialize To initialize the memory area installed on the TPM chip NOTE Be sure to perform it if the i Option LK 115 v2 is enabled Procedure 1 Touch Initialization 2 Press the Start key Status report To notify an error which is detected by the TPM chip self diagnosis and output ...

Page 384: ... USB memory is not connected to the USB port of MFP or Administrator Security Security Details Export Debug Log is set to Restrict output is unavailable Setting item Contents All Outputs available all logs Select File Specifies a desired file and outputs it Capable of narrowing file types from Normal Trouble or Print Data Select Time Specifies a desired period and outputs corresponding data Shared...

Page 385: ...sition Pt at the timing configured from Time Setting and polling If the command set successfully downloads logs and settings data is retrieved in accordance with the command set and the log files and settings data files are saved on the server configured from Remote Log Server Settings Log Save Destination Setting value Default setting ON OFF Time Setting Downloads the command set at the specified...

Page 386: ...he port number that is used to access the WebDAV server 1 65535 80 Proxy Set whether or not to connect to a proxy server ON OFF SSL Settings Select to use SSL communication ON OFF 3 6 Enable Core Dump To set whether to acquire a log of Core Dump Setting item Default setting Enable USB memory Remote Log Server Disable NOTE When Enable is selected select a saving location and press Fix When Remote L...

Page 387: ...at is saved in the folder 3 8 2 Panel Operation Playback A series of operations is stored in memory and automatically played back on the control panel NOTE To perform the playback be sure to go back to the first screen with which the capturing was started A playback operation starting with any screen not stored in memory results in faulty playback Preparations 1 Touch Other 2 Touch Panel Operation...

Page 388: ...This page is intentionally left blank ...

Page 389: ...es the main body access the program server periodically through the network to obtain a new firmware data then rewrites it automatically It is also possible to share the update data obtained from the network with other MFP and operate the MFP as a program server for the Auto Update function For details see I 18 2 2 Relay server setting Other data Activate all data such as the voice data and the lo...

Page 390: ...ake a folder with any folder name one byte alphameric characters maximum 40 characters under FWSelect folder and store the firmware data to the folder Directory configuration of USB memory FW FWSelect Folder1 Folder2 Folder3 Firmware Data Ver A Firmware Data Ver B Firmware Data Ver C Firmware Data Ver D 1 2 3 4 5 6 1 USB memory 2 Rewriting data folder Required 1 3 Storage folder for a plurality of...

Page 391: ... The firmware data in the update data folder FW0022 copied to the root directory of the USB memory is selected as the default data Procedure 1 Touch FW Data Select on the firmware update selection screen 2 After the data in the USB memory is checked a list of the available firmware data is displayed The default data is indicated by an asterisk 3 Select the firmware and touch OK Language Selection ...

Page 392: ...all pages and make sure that no item is under firmware updating Downloading 4 Turn OFF the main power switch 5 Remove the USB memory 6 Turn ON the main power switch 7 Check the firmware version in Service Mode 2 3 Action when data transfer fails If NG appears on the control panel indicating that rewriting has been unsuccessful in which case the Power key LED lights up red take the following steps ...

Page 393: ...A7PU bat 3 which is in the same folder NOTE For the folder name of the folder 2 and the file name of the file 3 refer to Table Folder name File name ROGHU PNWDUB EDW 1 2 3 3 Windows command prompt runs and file generation starts 4 The command prompt closes automatically when the processing completes 5 XXfw tar file is created in the same directory NOTE For file name refer to Table Folder name File...

Page 394: ...NOTE For detailed error information relating to CS Remote Care refer to I 8 1 Remote Care Web Connection 1 Access the Web Connection of the MFP 2 In the administrator mode use Internet ISW Set Firmware Update Parameters to issue the update instruction During updating 1 After pressing Start the MFP main body connects to the program server and starts the download 2 The message to indicate the status...

Page 395: ...e executing the following procedures contact with the administrator to obtain an agreement Convert the obtained firmware data to an appropriate format Refer to K 3 2 1 Making the firmware data Create the program update information file C_UpdateList ini Upload the firmware data and program update information file to the program server Configure the settings related to the automatic update function ...

Page 396: ...uitous Printing In the Standard firmware LK 115 v2 TPM Trusted Platform Module In the Standard firmware LK 116 Virus Scan In the Standard firmware 5 2 LK 107 LK 108 font data installation procedure 1 Prepare an USB memory 2 Copy the font data to the root directory of the USB memory OCR font download_OCRA 0 pdf Unicode font download_Andale_J 0 pdf download_Andale_K 0 pdf download_Andale_S 0 pdf dow...

Page 397: ... roll back the firmware select Service Mode Machine Update Settings Firmware Rollback Procedure 1 The firmware update selection screen is displayed when updating the firmware 2 Touch FW Backup on the firmware update selection screen 3 Select USB FW BACKUP and OTHER FW BACKUP in the firmware backup screen USB FW BACKUP Select to execute backup when updating the firmware on the USB flash memory OTHE...

Page 398: ...This page is intentionally left blank ...

Page 399: ...jam warning screen only when Service Mode System 2 JAM Code Display Setting is set to Display To change the initial display when jam occurred to the screen showing the jam occurring position set Paper jam release procedure display settings on the Utility Utility Customize Active screen setting to OFF When Paper jam release procedure display settings is set to OFF the screen showing jam clear proce...

Page 400: ...Does paper meet product specifications Replace paper Is the paper curled wavy or damp Replace paper Instruct user on proper paper storage Is a foreign object present along the paper path or is the paper path deformed or worn Clean the paper path or replace the part on the paper path if necessary Are rolls or rollers dirty deformed or worn Clean the defective roll or roller Replace the defective ro...

Page 401: ...M print control on the main body is not completed 99 07 Controller JAM main body not completing a job 1 4 JAM that do not display the JAM code JAM type JAM detection timing Ref page Misfeed at manual bypass paper feed section Paper jam of a sheet of paper left at the manual bypass paper feed section results if a sheet of paper is determined to exist at a position detected when the main power switc...

Page 402: ...sfeed at DF document feed section Paper jam of a sheet of paper left at the DF document feed section results if the after separate sensor PS16 is turned ON when the main power switch is turned ON a door is opened and closed or a misfeed or malfunction is reset L 1 8 1 66 02 Misfeed at DF document transport section Paper jam of a sheet of paper left at the DF document transport section results if t...

Page 403: ... paper 11 02 For paper fed from the tray 1 loop forming has not been complete before a sheet enters the registration roller because the rise timing of load to perform registration is earlier than the rise timing of load to form a loop 11 40 For paper fed from the tray 1 the image write start signal permit continues to be disabled for a predetermined period of time after the timing of the image wri...

Page 404: ...2 CN5 1 ON 15 P 5 M1 2 load check Check code 28 Multi code 1 2 PCCB 2 CN4 1 to 7 18 P 6 Replace PCCB 2 7 Replace BASEB 1 5 4 13 01 13 40 Contents JAM type Misfeed at tray 3 paper feed section When PF P20 or PF P21 is installed d Color MF4003 only JAM code 13 01 13 40 JAM detection timing 13 01 The leading edge of the paper is not turned ON unblocked the tray 3 transport sensor PS6 3 even after the...

Page 405: ...er the lapse of a given period of time after the tray 3 starts to feed paper d Color MF4003 only 20 26 The leading edge of the paper is not turned ON blocked the registration sensor PS9 even after the lapse of a given period of time after the tray 2 3 starts to feed paper Paper jam of a sheet of paper left at the vertical transport section results if a sheet of paper is determined to exist at a po...

Page 406: ...tep Action Control signal Location of electrical component 1 Initial check items 2 PS9 I O check sensor check BASEB CN22EA 13 ON 13 C 3 PS10 I O check sensor check BASEB CN23E 9 ON 9 K 4 PS13 I O check sensor check BASEB CN16E 3 ON 11 K 5 CL4 load check Check code 21 Multi code 3 BASEB CN22EA 3 ON 12 C 6 M1 load check Check code 40 Multi code 1 2 BASEB CN17E 1 to 5 1 C 7 M3 load check Check code 4...

Page 407: ...omponent 1 Initial check items 2 PS16 I O check sensor check DFCB CN3 2 ON 21 P 3 CL8 load check Check code 60 Multi code 145 DFCB CN4 2 ON 21 X 4 M8 load check Check code 60 Multi code 1 5 DFCB CN5 1 to 4 21 X 5 Replace DFCB 1 8 2 66 13 66 33 Contents JAM type Misfeed at DF document transport section JAM code 66 13 66 33 JAM detection timing 66 13 The document registration sensor PS17 is not turn...

Page 408: ...nning the back side of a document is not notified even after the lapse of a given period of time after the document before read sensor PS18 has turned ON The timing of end of scanning the back side of a document is not notified even after the lapse of a given period of time after the document before read sensor PS18 has turned OFF Paper jam of a sheet of paper left at the DF document reading resul...

Page 409: ...e start of the second side feed of paper in the duplex mode loop forming has not been complete before the second side of a sheet enters the registration roller because the rise timing of load to perform registration is earlier than the rise timing of load to form a loop 92 03 For the second side feed of paper in the duplex mode the image write start signal permit continues to be disabled for a pre...

Page 410: ... Relevant parts Main motor M1 Fusing motor M3 ADU transport clutch CL5 ADU forward rotation clutch CL6 ADU reverse rotation clutch CL7 ADU transport sensor PS11 Paper exit sensor PS13 Base board BASEB Procedure Step Action Control signal Location of electrical component 1 Initial check items 2 PS11 I O check sensor check BASEB CN23E 6 ON 9 K 3 PS13 I O check sensor check BASEB CN16E 3 ON 11 K 4 CL...

Page 411: ...eed processing location Relevant parts Procedure Step Action Control signal Location of electrical component 1 Initial check items 2 Open and close the front door of the main body 1 9 6 99 04 Contents JAM type Controller JAM a job reservation in the main body is not released JAM code 99 04 JAM detection timing 99 04 A job reservation is not released after a lapse of a given time after that a print...

Page 412: ...sing location Relevant parts Procedure Step Action Control signal Location of electrical component 1 Initial check items 2 Open and close the front door of the main body 1 9 9 99 07 Contents JAM type Controller JAM main body not completing a job JAM code 99 07 JAM detection timing 99 07 The engine does not stop after a lapse of a given time after that a print has finished Misfeed processing locati...

Page 413: ...ument before read sensor PS18 2 Document registration sensor PS17 3 After separate sensor PS16 4 Paper exit sensor PS13 5 Fusing loop sensor PS10 6 ADU transport sensor PS11 7 Registration sensor PS9 8 Tray 2 transport sensor PS6 2 9 Tray 3 transport sensor PS6 3 Only when PF P20 or PF P21 is installed Y119930 3 Service Manual ...

Page 414: ...pears Malfunction code Contents S 1 CCD gain adjustment failure P 5 IDC sensor failure P 6 Imaging unit C failure P 7 Imaging unit M failure P 8 Imaging unit Y failure P 9 Imaging unit K failure P 21 Color regist test pattern failure P 22 Color regist adjust failure P 33 LD malfunction 2 3 S 1 Contents Malfunction type CCD gain adjustment failure Malfunction code S 1 Malfunction detection timing I...

Page 415: ...aging unit M failure Imaging unit Y failure Imaging unit K failure Malfunction code P 6 P 7 P 8 P 9 Malfunction detection timing All density readings taken from the density pattern produced on the transfer belt are 1 0 g m2 IDC sensor photo receiver output or less during max density adjustment Vg Vdc adjustment Relevant parts Imaging unit Y M C K Transfer belt unit IDC sensor IDCS1 Base board BASE...

Page 416: ...DCS1 Base board BASEB Procedure 1 Slide out the imaging unit and reinstall it in position 2 Reinstall or reconnect IDCS1 connectors connecting between IDCS1 relay CN70 BASEB CN22E if any of the foregoing parts is installed or connected improperly 3 Check the vertical transport guide for installed position and correct as necessary 4 Replace BASEB 2 8 P 33 Contents Malfunction type LD malfunction Ma...

Page 417: ...the target of the self diagnosis execute the Self diag Full If NG is displayed as the result of the Self diag Full perform the troubleshooting against each item of Error code If it is not the target of the self diagnosis perform the troubleshooting against each item of Trouble code NOTE Only in the case that trouble cannot be resolved even after the troubleshooting against each item of Error code ...

Page 418: ... and make sure that the trouble has be resolved 5 After the troubleshooting against each trouble code execute the Self diag Full again and make sure that all troubles on each device have been resolved 3 3 Trouble resetting procedure Different malfunction resetting procedures apply depending on the rank of the trouble code List of malfunction resetting procedures Trouble code rank Resetting procedu...

Page 419: ...by remote operation Use Trouble can be cleared by remote operation using the applications or CS Remote Care system The combinations of the applications to be used and the ranks of trouble to be cleared are shown below Trouble code rank Application Rank A Rank B Rank C Web Connection Cannot be cleared Can be cleared Can be cleared OpenAPI Enterprise Suite Cannot be cleared Can be cleared Can be cle...

Page 420: ...eared Storage board Firmware space Not cleared Cleared Application space Not cleared Cleared Important data A 2 main Cleared Cleared Counter data not cleared Important data B 1 sub Not cleared Not cleared 1 DIP SW information TPM setting data etc 2 Counter data machine setting values optical setting values printer adjustment values etc 3 4 2 Start and execution procedure 1 Call the Service Mode to...

Page 421: ...d when trouble occurs This allows you to continue using the other units or functions that are not affected and reduce down time that continues until CE resolves the problem This function can be selected for the following units and options Tray 1 Tray 2 Tray 3 Scanner ADF Expansion Fun Storage If a problem occurs with the units where the trouble isolation function can be applied the control panel d...

Page 422: ... density detected black TCR sensor B C2558 Abnormally high toner density detected black TCR sensor B C2559 Cyan TCR sensor adjustment failure B C255A Magenta TCR sensor adjustment failure B C255B Yellow TCR sensor adjustment failure B C255C Black TCR sensor adjustment failure B C2561 Cyan TCR sensor failure B C2562 Magenta TCR sensor failure B C2563 Yellow TCR sensor failure B C2564 Black TCR sens...

Page 423: ...Target C6752 ASIC clock input error front side C Target C6753 ASIC clock input error back side C Target C6754 CIS clamp adjustment failure B Target C6755 CIS gain adjustment failure B Target C6756 CIS power supply voltage malfunction C Target C6902 Bus check NG1 1 C Target C6903 Bus check NG1 2 C Target C6912 Bus check NG2 1 C Target C6913 Bus check NG2 2 C Target C6F01 Scanner sequence trouble 1 ...

Page 424: ...005 No fax board is installed Mistake in installation Defective HW C Target CB006 USB connection is interrupted C Target CB110 Program control error instance acquisition error C Target CB112 Semaphore control error C Target CB113 I F error among tasks C Target CB114 Message queue generation error C Target CB115 I F error with fax I F error between main body and fax C Target CB120 Soft error C Targ...

Page 425: ...CB190 USB sending error C Target CB191 USB sending error C Target CB192 Error retry 5 sec T O No response or other errors C Target CB193 No response due to detach of USB C Target CB195 Attach not detected for 1 min after recovery from sleep when receiving C Target CB196 Detach not detected for 1 min after shift from sleep C Target CB197 USB I F error during formatting when main power switch ON C T...

Page 426: ... C Target CD202 Memory capacity discrepancy C Target CD203 Memory capacity discrepancy 2 C Target CD211 PCI SDRAM DMA operation failure C Target CD212 Compression extraction timeout detection C Target CD241 Encryption ASIC setting error C Target CD242 Encryption ASIC mounting error C Target CD261 USB hub board failure C Target CD262 Extension network adapter installation error C Target CD2D1 VLAN ...

Page 427: ...rror C Target CE301 Referring incorrect memory C Target CE302 Incorrect command C Target CE303 Finished due to error inside Qt library C Target CE304 Finished due to error outside Qt library C Target CE305 Program forced to stop C Target CED01 The authentication application information does not exist in the storage in the enhanced server authentication state C Target CEEE1 CPU board MSC malfunctio...

Page 428: ... 6 M1 3 load check Check code 28 Multi code 3 4 Control signal PCCB 3 CN4 1 to 7 Location of electrical component 18 P 7 Replace M1 3 8 PCCB 3 F1 and F2 conduction check 9 Replace PCCB 3 10 Replace CPUB 11 Replace BASEB 3 7 3 C0202 Contents Trouble type C0202 Tray 1 feeder up down abnormality Rank B Trouble detection condition The tray 1 upper limit sensor PS7 is not turned ON blocked even after t...

Page 429: ...CB 2 11 Replace CPUB 12 Replace BASEB 3 7 5 C0206 Contents Trouble type C0206 Tray 3 feeder up down abnormality When PF P20 or PF P21 is installed d Color MF4003 only Rank B Trouble detection condition The tray 3 upper limit sensor PS2 3 is not turned ON blocked even after the set period of time has elapsed after the paper lift up operation for the drawer began Trouble isolation Tray 3 Relevant el...

Page 430: ...the connector between SW4 BASEB CN18E for proper connection and correct as necessary 4 Check the connector between CL1 relay CN13 BASEB CN18E for proper connection and correct as necessary 5 Check CPUB for proper installation and correct as necessary 6 SW4 I O check sensor check Control signal BASEB CN18E 3 ON Location of electrical component 2 C 7 CL1 load check Check code 24 Multi code 1 Control...

Page 431: ...ASEB CN14E for proper connection and correct as necessary C2412 4 Check the connector between the imaging unit Y relay CN7 BASEB CN14E for proper connection and correct as necessary C2413 5 Check the connector between the imaging unit K relay CN6 BASEB CN14E for proper connection and correct as necessary C2414 6 Check CPUB for proper installation and correct as necessary 7 Replace the correspondin...

Page 432: ... as necessary C2556 5 Check the connector between the imaging unit K relay CN6 EXCB CN14E for proper connection and correct as necessary C2558 6 Check CPUB for proper installation and correct as necessary 7 Replace the corresponding imaging unit 8 Replace CPUB 9 Replace BASEB 3 8 7 C2559 C255A C255B C255C Contents Trouble type C2559 Cyan TCR sensor adjustment failure C255A Magenta TCR sensor adjus...

Page 433: ...lowing components with new ones When the transfer belt unit transfer roller and the fusing unit have been replaced with new ones perform Service Mode Counter Life New Release Imaging unit Transfer belt unit Fusing unit Transfer roller Feed roller pick up roller separation roller including options Separation pad Toner filter 3 Turn ON the main power switch and check to see that warm up is started M...

Page 434: ... standby state even after the lapse of a predetermined period of time after the completion of warm up Trouble isolation Relevant electrical parts Fusing unit Heating roller temperature sensor TEMS DC power supply DCPS CPU board CPUB Base board BASEB Procedure 1 Check the fusing unit for correct installation whether it is secured in position 2 Check the open close operation of the right door 3 Chec...

Page 435: ...ector between the fusing unit relay CN3 BASEB CN10E for proper connection and correct as necessary 4 Check the connector between the fusing unit relay CN2 DCPS CN2 for proper connection and correct as necessary 5 Check CPUB for proper installation and correct as necessary 6 Replace the fusing unit 7 Replace CPUB 8 Replace BASEB 9 Replace DCPS 3 9 5 C3825 C3826 Contents Trouble type C3825 Fusing ab...

Page 436: ... operation of the right door 3 Check the connector between the fusing unit relay CN3 BASEB CN10E for proper connection and correct as necessary 4 Check the connector between the fusing unit relay CN2 DCPS CN2 for proper connection and correct as necessary 5 Check CPUB for proper installation and correct as necessary 6 Replace the fusing unit 7 Replace CPUB 8 Replace BASEB 9 DCPS F102 or FU181 cond...

Page 437: ... Trouble type C4101 Polygon motor rotation trouble Rank B Trouble detection condition The polygon motor fails to turn stably even after the lapse of a given period of time after activating and changing rotation speed the polygon motor Motor lock signal detects HIGH for a given period time consecutively during the polygon motor is rotating Trouble isolation Relevant electrical parts PH unit CPU boa...

Page 438: ...ilure to turn Rank B Trouble detection condition The fan lock signal remains HIGH for a predetermined continuous period of time while the fan is turning Trouble isolation Relevant electrical parts Machine cooling fan FM1 CPU board CPUB Base board BASEB Procedure 1 Check the connector between FM1 relay CN23 BASEB CN19E for proper connection and correct as necessary 2 Check the fan for possible over...

Page 439: ...re failure of CPU on the CPU board was detected Trouble isolation Relevant electrical parts CPU cooling fan FM3 CPU board CPUB Base board BASEB Procedure 1 Check the connector between FM3 BASEB CN17 for proper connection and correct as necessary 2 Check the fan for possible overload and correct as necessary 3 Check CPUB for proper installation and correct as necessary 4 FM3 operation check Control...

Page 440: ...pe C5610 PH LD drive communication error Rank C Trouble detection condition LD drive write data and read data disagree with each other a predetermined number of consecutive times Different PH unit is installed Trouble isolation Relevant electrical parts PH unit CPU board CPUB Base board BASEB Procedure 1 Reboot the machine 2 Check the connector between the PH unit BASEB CN13 for proper connection ...

Page 441: ...led DF and replace it if it is a wrong one 2 Check to see the Service mode System 2 ADF Settings is correct It corrects when a model is different 3 Check the connector between DFCB CN9 BASEB CN6E for proper connection and correct as necessary 4 Check CPUB for proper installation and correct as necessary 5 Replace DFCB 6 Replace CPUB 7 Replace BASEB 3 12 2 C6002 Contents Trouble type C6002 DF relat...

Page 442: ...irmation Memory Storage Adjustment Memory Bus Check Scanner Memory and conduct the memory bus function 2 Check the connector between IR CIS BASEB CN6 for proper connection and correct as necessary 3 Check CPUB for proper installation and correct as necessary 4 Replace IR CIS 5 Replace CPUB 6 Replace BASEB 3 12 5 C6751 Contents Trouble type C6751 CCD clamp gain adjustment failure Rank B Trouble det...

Page 443: ... high or too low C6755 After the gain adjustment is performed at the start up the peak value of the output data is lower than a given value Trouble isolation Scanner Relevant electrical parts DF CIS module DF CIS CPU board CPUB Base board BASEB Procedure 1 Check the connector between DF CIS BASEB CN5 for proper connection and correct as necessary 2 Check CPUB for proper installation and correct as...

Page 444: ...ouble 7 C6F08 Scanner sequence trouble 8 C6F09 Scanner sequence trouble 9 C6F0A Scanner sequence trouble 10 C6FDC Scanner sequence trouble DC C6FDD Scanner sequence trouble DD Rank C6F01 to C6F0A C C6FDC C6FDD B Trouble detection condition The original transport interval becomes shorter than the predetermined value due to an original transport control error in original reading in DF Trouble isolat...

Page 445: ...eck the connector of M4 for proper drive coupling and correct as necessary 3 M4 conduction check Control signal BASEB CN13E 1 to 4 Location of electrical component 4 C 4 Replace M4 5 Replace BASEB 3 13 4 C7201 Contents Trouble type C7201 Tray 1 paper feed clutch failure Rank C Trouble detection condition After starting the clutch an error is detected for the malfunction detection signal Trouble is...

Page 446: ...ouble isolation Relevant electrical parts 1st transfer pressure clutch CL1 Base board BASEB Procedure 1 Check the connector between CL1 relay CN13 BASEB CN18E for proper connection and correct as necessary 2 Check the connector of CL1 for proper drive coupling and correct as necessary 3 CL1 conduction check Control signal BASEB CN18E 4 ON Location of electrical component 2 C 4 Replace the main dri...

Page 447: ...lace BASEB 3 13 11 C7243 Contents Trouble type C7243 Exit path switch solenoid failure Rank C Trouble detection condition After starting the solenoid an error is detected for the malfunction detection signal Trouble isolation Relevant electrical parts Exit path switch solenoid SD1 Base board BASEB Procedure 1 Check the connector between SD1 relay CN12 BASEB CN18E for proper connection and correct ...

Page 448: ... Trouble isolation Tray 1 Relevant electrical parts Tray 1 upper limit sensor PS7 Base board BASEB Procedure 1 Check the connector between PS7 BASEB CN22E for proper connection and correct as necessary 2 Replace PS7 3 Replace BASEB 3 13 15 C7601 Contents Trouble type C7601 Power line A1 error Rank C Trouble detection condition The fuse detection unit detected an error for a predetermined time Trou...

Page 449: ...ouble detection condition The fuse detection unit detected an error for a predetermined time Trouble isolation Relevant electrical parts 1st transfer pressure clutch CL1 Bypass tray paper feed clutch CL2 Tray 1 paper feed clutch CL3 Registration clutch CL4 ADU transport clutch CL5 ADU forward rotation clutch CL6 ADU reverse rotation clutch CL7 Exit path switch solenoid SD1 Base board BASEB Procedu...

Page 450: ...60A Power line A10 error Rank C Trouble detection condition The fuse detection unit detected an error for a predetermined time Trouble isolation Tray 2 Tray 3 Relevant electrical parts PC control board PCCB Base board BASEB Procedure 1 BASEB F8E conduction check 2 Check the connector between PCCB CN1 relay CN24 BASEB CN21E for proper connection and correct as necessary 3 Replace PCCB 4 Replace BAS...

Page 451: ...r YM M4 Toner supply motor CK M5 Base board BASEB Procedure 1 BASEB F5E conduction check 2 Check the connector between M4 BASEB CN13E for proper connection and correct as necessary 3 Check the connector between M5 BASEB CN13E for proper connection and correct as necessary 4 Replace M4 5 Replace M5 6 Replace BASEB 3 13 25 C7631 Contents Trouble type C7631 Supply power line 1 error Rank C Trouble de...

Page 452: ... necessary 5 Replace DCPS 6 Replace BASEB 3 14 C8 3 14 1 C8302 Contents Trouble type C8302 DF cooling fan trouble Rank B Trouble detection condition The lock signal continues to detect H during a given time while the DF cooling fan motor FM4 is spinning Trouble isolation DF Relevant electrical parts DF cooling fan motor FM4 DF control board DFCB Procedure 1 Check the connector between FM4 relay CN...

Page 453: ...ouble isolation Relevant electrical parts Storage board STRGB CPU board CPUB Base board BASEB Procedure 1 Select Service Mode ADF Shading Repair Init Data Input and perform the function 2 Check STRGB for proper installation and correct as necessary 3 Check CPUB for proper installation and correct as necessary 4 Replace STRGB 5 Replace CPUB 6 Replace BASEB 3 15 C9 3 15 1 C9401 C9402 Contents Troubl...

Page 454: ...1 Check the connector between IR CIS BASEB CN6 for proper connection and correct as necessary 2 Check CPUB for proper installation and correct as necessary 3 Replace the flat cable 4 Replace IR CIS 5 Replace CPUB 6 Replace BASEB 3 15 4 C9702 Contents Trouble type C9702 Back side reading device cable break detection Rank A Trouble detection condition The cable between the DF CIS module DF CIS and t...

Page 455: ... isolation Relevant electrical parts Backup board ERB CPU board CPUB Base board BASEB Procedure 1 Check the ROM version 2 Rewrite the firmware 3 Check the connector between ERB CN1 BASEB CN20E for proper connection and correct as necessary 4 Check CPUB for proper installation and correct as necessary 5 Replace ERB 1 Replace the current ERB with a new one 2 Replace the following components with new...

Page 456: ...rn OFF the main power switch and replace the current CPUB with a new one 2 Update the firmware 3 After completing the firmware update turn OFF and ON the main power switch and check to see that warm up is started 4 When the trouble cannot be solved reinstall the removed CPUB to the original board 3 Replace BASEB 4 If the above actions do not solve the problem contact OLI 3 17 6 CC164 Contents Trou...

Page 457: ... as necessary 3 Replace CPUB 4 Replace BASEB 5 If the above actions do not solve the problem contact OLI 3 17 8 CC190 Contents Trouble type CC190 Outline font load error Rank C Trouble detection condition An error occurred while loading the outline font Trouble isolation Relevant electrical parts Storage board STRGB CPU board CPUB Base board BASEB Procedure 1 Check STRGB for proper installation an...

Page 458: ...ion IC card advanced settings data is not correct when starting up the authentication device Authentication information data is not correct when starting up the authentication device IC card advanced settings data is not correct when setting the IC card advanced settings Authentication information data is not correct when setting the IC card advanced settings IC card advanced settings data is not ...

Page 459: ... electrical parts CPU board CPUB Base board BASEB Authentication unit Procedure 1 Check CPUB for proper installation and correct as necessary 2 Reinstall the authentication customize data 3 Rewrite the firmware 4 Replace CPUB 5 Replace BASEB 3 17 16 CC302 Contents Trouble type CC302 Authentication customize data version mismatch error Rank B Trouble detection condition The authentication customize...

Page 460: ...ty Trouble isolation Relevant electrical parts Storage board STRGB CPU board CPUB Base board BASEB Procedure 1 Check STRGB for proper installation and correct as necessary 2 Check CPUB for proper installation and correct as necessary 3 Replace STRGB 4 Replace CPUB 5 Replace BASEB 3 18 3 CD010 Contents Trouble type CD010 Storage unformat Rank C Trouble detection condition Unformatted storage is con...

Page 461: ...te Confirmation Memory Storage Adjustment Format Physical Format and perform the function 4 Replace STRGB 3 18 7 CD041 CD042 CD043 CD044 CD045 CD046 Contents Trouble type CD041 CD042 CD043 CD044 CD045 CD046 Storage command execution error Rank C Trouble detection condition The error occurred inside the storage Trouble isolation Relevant electrical parts Storage board STRGB Procedure 1 Check the st...

Page 462: ...ary 2 Rewrite the firmware 3 Replace UK 221 3 18 12 CD201 CD202 CD203 Contents Trouble type CD201 File memory mounting error CD202 Memory capacity discrepancy CD203 Memory capacity discrepancy 2 Rank C Trouble detection condition CD201 The file memory is not mounted The file has any abnormality CD202 File memory capacity on the CPU board CPUB is not enough File memory capacity necessary for duplex...

Page 463: ...ther USB device 2 Check USBHB for proper connection and correct as necessary 3 Replace USBHB 4 Replace CPUB 5 Replace BASEB 3 18 16 CD262 Contents Trouble type CD262 Extension network adapter installation error Rank C Trouble detection condition When the 2nd network card settings is set to Set but the upgrade kit UK 221 is not installed Upgrade Kit UK 221 is faulty Trouble isolation Relevant elect...

Page 464: ...ckup will be automatically performed every hour Backup can also be performed manually with the following setting Service Mode Enhanced Security Memory Data Backup 3 18 19 CD313 Contents Trouble type CD313 TPM key data error Rank C Trouble detection condition A fault occurs in the TPM key data Trouble isolation Relevant electrical parts Procedure 1 Touch Recover Data displayed at the lower right po...

Page 465: ...e CD391 Nonvolatile data save error Storage Rank Trouble detection condition Trouble isolation Relevant electrical parts Procedure NOTE Contact the responsible people of OLI before taking some countermeasures 3 18 23 CD392 Contents Trouble type CD392 Nonvolatile data save error EEPROM Rank C Trouble detection condition The backup board ERB is replaced with a new one Trouble isolation Relevant elec...

Page 466: ...pear on the control panel to restore backup data 3 18 26 CD401 CD402 CD403 CD404 CD405 CD406 CD407 CD411 CD412 CD413 Contents Trouble type CD401 NACK command incorrect CD402 ACK command incorrect CD403 Checksum error CD404 Receiving packet incorrect CD405 Receiving packet analysis error CD406 ACK receiving timeout CD407 Retransmission timeout CD411 Touch panel board error CD412 Touch panel type mi...

Page 467: ...Check CPUB for proper installation and correct as necessary 3 Rewrite the firmware 4 Replace CPUB 5 Replace BASEB 3 18 29 CDC Contents Trouble type CDC Trouble related to security Rank Trouble detection condition Trouble isolation Procedure NOTE Contact the responsible people of OLI before taking some countermeasures 3 18 30 CDF50 CDF70 CDFA0 Contents Trouble type CDF50 ASIC image version failure ...

Page 468: ...connection and correct as necessary 2 Replace CPUB 3 Replace BASEB 3 19 2 CE002 Contents Trouble type CE002 Message and method parameter failure Rank C Trouble detection condition CPU board CPUB is faulty Trouble isolation Relevant electrical parts Storage board STRGB CPU board CPUB Base board BASEB Procedure 1 Turn OFF the main power switch and turn it ON again and conduct the following setting S...

Page 469: ...rage failed it repeats retrial until transmission operation log is stored The trouble is detected when the retrial failed for predetermined number of times Trouble isolation Relevant electrical parts CPU board CPUB Base board BASEB Procedure 1 Check the connectors on BASEB for proper connection and correct as necessary 2 Replace CPUB 3 Replace BASEB 3 19 7 CE202 Contents Trouble type CE202 PDL int...

Page 470: ...1 Contents Trouble type CED01 The authentication application information does not exist in the storage in the enhanced server authentication state Rank C Trouble detection condition With Enhanced Server Authentication set no authentication application registration information is found in the storage Trouble isolation Relevant electrical parts Storage board STRGB CPU board CPUB Base board BASEB Pro...

Page 471: ...ry or PWB WORK0 CPU board CPUB LPDDR4 main memory ChA WORK1 CPU board CPUB LPDDR4 main memory ChB 6 Execute Service Mode State Confirmation Memory Storage Adjustment Storage R W Check and check that no abnormalities When NG is displayed replace STRGB 7 Replace CPUB 3 20 2 CFB0 CFB3 Contents Trouble type CFB0 CFB3 Abort code Rank C Trouble detection condition Trouble isolation Relevant electrical p...

Page 472: ... detection condition Trouble isolation Relevant electrical parts CPU board CPUB Procedure 1 Turn OFF the main power switch and unplug the power cord Connect the power cord after 15 sec or more and turn ON the main power switch 2 Check CPUB for proper installation and correct as necessary 3 Rewrite the firmware 4 Execute Service Mode State Confirmation Memory Storage Adjustment Memory Check Rough C...

Page 473: ...item OK NG 4 If OK is displayed for all items turn OFF the main power switch 5 If NG is included in the diagnosis result after completing the diagnosis for all items the Error Code key is displayed 6 Touch the Error Code key to display the Error Code 7 Check the displayed Error Code then turn OFF the main power switch and disconnect power cord from the outlet 8 Refer to the Service Manual Error Co...

Page 474: ... device HUB chip USB hub board Connection failure Parts defect USB hub board USBHB Base board BASEB E5 5 DAC IC Connection failure Parts defect USB hub board USBHB E5 7 FAX board line 1 Connection failure Parts defect FAX board FAXB Base board BASEB E5 11 Upgrade kit UK 221 Connection failure Parts defect Wireless LAN board WLANB Base board BASEB E5 12 Authentication unit Connection failure Parts ...

Page 475: ...rd Connect the power cord after 15 sec or more and turn ON the main power switch 2 Correct the mounting of STRGB if faulty 3 Replace STRGB 4 6 E1 3 Contents Error code E1 3 Target device NVMeSSD Diagnosis item S M A R T diag Reason of error STRGB error data failure Relevant electrical parts Storage board STRGB Corrective action procedure 1 Turn OFF the main power switch and unplug the power cord C...

Page 476: ...faulty 4 Correct the mounting of BASEB or the connection of connectors if faulty 5 Replace TPMB 6 Replace CPUB 7 Replace BASEB 4 10 E3 2 Contents Error code E3 2 Target device I2C Diagnosis item AUDIO control Reason of error Connection failure Parts defect Relevant electrical parts CPU board CPUB Base board BASEB Corrective action procedure 1 Turn OFF the main power switch and unplug the power cor...

Page 477: ...rts defect Relevant electrical parts CPU board CPUB Corrective action procedure 1 Turn OFF the main power switch and unplug the power cord Connect the power cord after 15 sec or more and turn ON the main power switch 2 Correct the mounting of CPUB if faulty 3 Replace CPUB 4 14 E5 2 Contents Error code E5 2 Target device Various USB devices Diagnosis item USB3 0 HUB chip base board Reason of error ...

Page 478: ...r switch and unplug the power cord Connect the power cord after 15 sec or more and turn ON the main power switch 2 Correct the mounting of USBHB or the connection of connectors if faulty 3 Replace USBHB 4 18 E5 7 Contents Error code E5 7 Target device Various USB devices Diagnosis item E5 7 FAX board line 1 Reason of error Connection failure Parts defect Relevant electrical parts FAX board FAXB Ba...

Page 479: ...lf diag Full forcibly Error code E6 1 E6 2 Target device CIS module Diagnosis item E6 1 I P image bus check front side E6 2 Line RAM comparison front side Reason of error E6 1 Image bus failure E6 2 CIS sensor failure Relevant electrical parts E6 1 CIS cable CIS module IR CIS CPU board CPUB Base board BASEB E6 2 CIS module IR CIS Corrective action procedure 1 Turn OFF the main power switch and unp...

Page 480: ...he connection of connectors if faulty 3 Correct the mounting of CPUB if faulty 4 Correct the mounting of BASEB or the connection of connectors if faulty 5 Correct the connection of the connection cable if faulty 6 Replace the connection cable 7 Replace DFCB 8 Replace CPUB 9 Replace BASEB 4 24 E11 1 E11 2 Contents Error code E11 1 E11 2 Target device CPU board Diagnosis item E11 1 Compress exp chec...

Page 481: ...f error PCIe device error Relevant electrical parts E12 3 Storage board STRGB CPU board CPUB Corrective action procedure 1 Turn OFF the main power switch and unplug the power cord Connect the power cord after 15 sec or more and turn ON the main power switch 2 Correct the mounting of STRGB if faulty 3 Correct the mounting of CPUB if faulty 4 Replace STRGB 5 Replace CPUB Y119930 3 Service Manual ...

Page 482: ...et 2 Correct the mounting of the keyboard if faulty 3 Correct the mounting of the USB hub board if faulty 4 Replace the keyboard 5 Replace the USB hub board 5 2 2 Troubleshooting when NG is displayed for USB Memory 1 Turn OFF the main power switch disconnect power cord from the outlet 2 Correct the mounting of the USB memory if faulty 3 Correct the mounting of the USB hub board if faulty 4 Replace...

Page 483: ...nment LAN cable s connection Check the status of Service Mode Machine Update Setting Internet ISW Forwarding Access Setting Check to see if the FTP server operates normally 0x00111001 Error concerning the network It cannot be connected to the server Check the User s network environment Check to see if the FTP server operates normally Check whether the URL of the data transfer server includes http ...

Page 484: ... PSWC etc Check if Service Mode Machine Update Setting Internet ISW Internet ISW Set is set to ON If the above process does not solve the problem inform the corresponding error code to the Olivetti 0x10000104 There is no space for firmware data to be downloaded 0x10000106 Check sum error 0x10000107 File access error The file downloaded has an error The header of the file which has been read has an...

Page 485: ...mands Firmware update command Command of reading and updating account track information Machine settings update command Command of reading and updating Internet ISW setting information 7 3 List of the CS Remote Care error code 7 3 1 When connecting by modem NOTE When a code other than the ones listed below is displayed contact OLI and inform the error code Error code Contents Solution 0001 The lin...

Page 486: ... Setting cannot be changed because the setting change is made during the machine is printing or starts printing Try again when the machine is not printing 001F Impossible to change Item where change is prohibited Host attempts to write data to the item of which current value has not been read Check the settings for CSRC application 0020 Timeout of telegram delivery At waiting mode of telegram deli...

Page 487: ... Network is down LAN cable on main body side is detached Check the connection between main body on the user s side and the network connector Check the network environment on the user s side 206B Communication from an MFP to the server is disabled due to problems on the server side LAN cable on the copier side is detached Check the connection between main body on the user s side and the network con...

Page 488: ...TP server and POP3 server on user side 7 3 3 When connecting by http NOTE When a code other than the ones listed below is displayed contact OLI and inform the error code 1 0 Error code Contents Solution 0 Transmission error http responding code hexadecimal For http responding code see RFC issued by IETF after converting hexadecimal number into decimal one Check the http server system settings Auth...

Page 489: ...ened client ID was specified Check the http server system settings Authentication setting for address of the destination where the server is connected Location indicated for a folder Connection ID Password 3003 http request result problem Receive time out occurred 3004 http request result problem Receive error occurred Or wrong request URL was specified 3005 http request result problem Content Len...

Page 490: ...cts error during a sending sequence Check the http server environment 8 7 Error code Contents Solution 7000 Acquisition of the certificate used in product authentication from a USB device or PSWC failed Acquire a new certificate within 6 days after the issue 7 3 4 When connecting by Fax modem Error code Contents Solution T50 Host terminal ID not correct Check the telephone number set for host R80 ...

Page 491: ...blem There isn t support of http version 2004 SOAP request result problem Failed to connect 2005 SOAP request result problem An error occurred while sending 2006 SOAP request result problem Time out occurred while sending 2007 SOAP request result problem An invalid request URL is specified 2008 SOAP request result problem Content Length or receive size exceeded the specified max transfer size 2009...

Page 492: ...due to the copy job currently performing When informing the host that it cannot be modified due to the copy job currently performing Ask the host to send another instruction file for modifying 1080 Data length problem LEN value of TEXT data and actual data length are not consistent Ask the host to send another instruction file for modifying 1081 Frame No error The last frame has not been received ...

Page 493: ...rver failed 3012 http request result problem The proxy server refused CONNECT request 3013 http request result problem The proxy server was set to enabled but the proxy server host was not set 3014 http request result problem Proxy server authentication failed 3015 http request result problem Other errors were sent from the proxy server 3016 http request result problem Internal error occurred 3017...

Page 494: ... storage from Service Mode Debug Settings Debug Log Output B006 USB I F error USB connection is interrupted Turn OFF and ON the main power switch Disconnect and then connect the connector of fax board to check its installation Check if the USB connector of the fax board falls off Replace the power code Use the latest FW Replace the fax board Acquire the data saved in the storage from Service Mode ...

Page 495: ...ameter B146 Fax soft error command response sequence error 9 7 B15 Error code Category Contents of error How to correct B150 MFP soft error Program control error instance acquisition error Turn OFF and ON the main power switch Acquire the data saved in the storage from Service Mode Debug Settings Debug Log Output Clear fax jobs by formatting the fax files Use the latest FW Disconnect and then conn...

Page 496: ...n the storage from Service Mode Debug Settings Debug Log Output B191 USB sending error B192 Error retry 5 sec T O No response or other errors B193 No response due to detach of USB B195 Attach not detected for 1 min after recovery from sleep when receiving B196 Detach not detected for 1 min after shift from sleep Turn OFF and ON the main power switch Use the latest FW Acquire the data saved in the ...

Page 497: ...tion may be unable to receive fax temporarily 2 It cannot be dissolved by settings so acquire a log since an error may occur on the DIS received from the remote station or altered by exchangers in midway Protocol trace list for errors including remote station Line information for both fax machine and remote station Machine management list CSV save activity report T06 A DCN is received when the rem...

Page 498: ...not receive fax temporarily 1 Place a sufficient time interval and redial 2 It cannot be dissolved by settings so acquire a log since an error may occur on the DIS received from the remote station or altered by exchangers in midway Protocol trace list for errors including remote station Line information for both fax machine and remote station Machine management list CSV save activity report 9 14 T...

Page 499: ...hine and remote station Machine management list CSV save activity report Data saved in the storage T42 Non ECM sendin g Ph D Large amount of error lines in image data on the remote station Example At time of Non ECM communication if the specified amount of error lines is exceeded PIP PIN may be received instead of the resending request 1 Check the ECM settings Communication Others ECM Function 2 I...

Page 500: ...eoccurs on the specific remote station it cannot be dissolved by settings so acquire a log Protocol trace list for errors including remote station Line information for both fax machine and remote station Machine management list CSV save activity report Data saved in the storage T58 Polling RX Calling by polling reception but the remote station does not have polling transmission documents Ask the r...

Page 501: ...led due to line noise The remote station is disconnected 1 Turn OFF V 34 For manual input turn OFF V 34 from Application For abbreviated registration turn OFF V 34 for corresponding abbreviated registration If this error occurs frequently turn OFF V 34 by service Communication Protocol V8 V34 Protocol 2 Check if an error has occurred on the machine on other end of line first T77 V 34 communication...

Page 502: ...5 Network Network Settings4 5 Tone Det Frequency 5 Verify the frequency of Dial Tone Play each type of sound search for the close one then change the detection frequency settings The hand set is more useful for check than the MFP monitor speaker 6 Check the length of the Dial Tone For intermittent sound check of the length regulation with the record is more effective you can also check with the re...

Page 503: ...Detection Mode to No of Times Network Network Setting 1 Receive Signal Detection Mode 2 Set the 1300Hz Detection setting to OFF if possible Fax destination Japan only Network Network Setting 2 1300Hz Detection 3 For 1300Hz Detection JP connect the ground for the MFP TA PBX Fax destination Japan only 4 Change the setting of 1300Hz detection frequency Fax destination Japan only Function Parameter 00...

Page 504: ... TxATT TONE Procedure Signal TxATT CED ANSam TxATT 2 Set the reception beginning speed to V 29 V 27ter Modem NCU V17 Send Max Speed RX Max Speed 3 Possibility of line defect example echo distortion R07 Recepti on Ph C Unable to detect image data Example The fax machine is disconnected or the image data cannot be identified due to a line defect 1 Change the lowest reception sensitivity to 43 dBm Ch...

Page 505: ...econds Example The fax machine is disconnected or the line of the fax machine or the remote station is disconnected 1 Enable communication with ECM ON If ECM has been already set to ON on your machine request the sending end to do it Communication Others ECM Function 2 Set the reception beginning speed to V 29 9600bps Modem NCU V17 Send Max Speed RX Max Speed R18 Recepti on Unable to receive fax d...

Page 506: ...ce continuing Example The time of timeout on the fax machine is too short 1 Set the coding method to MH MR MMR Communication Others Coding Ability 2 Change the lowest reception sensitivity to 43 dBm Change the signal transmission level to 15 dBm Modem NCU Level CD SED ON Level Modem NCU TxATT PIX TxATT TONE Procedure Signal TxATT CED ANSam TxATT 3 Set the reception beginning speed to V 29 9600bps ...

Page 507: ...ion while receiving image data 1 Check the fax machine for that if a job is canceled or a communication error occurred 2 Enable communication with ECM If ECM has been already set to ON on your machine request the sending end to do it Communication Others ECM Function 3 Set 000E000D bit7 to 0 to turn OFF the timer 4 Possibility of line defect due to wrong control of signal conversion by exchanger R...

Page 508: ...ave activity report Data saved in the storage R67 F code recepti on Ph B Although it has been declared with DIS that there is no SUB reception ability but a SUB instruction is received It cannot be dissolved by settings so acquire a log Protocol trace list for errors Machine management list CSV save activity report R69 Recepti on Received an end of retransmission EOR command from fax machine 1 It ...

Page 509: ...rors Machine management list CSV save activity report 9 30 R8 Error code Catego ry Contents of error How to correct Installation position Service Mode FAX Line R80 CSRC Mismatched serial number from the CSRC host Reset it from the initial transmission R81 Received an writing instruction from the CSRC host during machine running Acquire the data saved in the storage from Service Mode Debug Settings...

Page 510: ...reception notification is sent from the fax board to the machine 1 Set the Receive Signal Detection Mode to No of Times Network Network Setting 1 Receive Signal Detection Mode 2 Distribute and reduce other options of the MFP 9 32 Other Error code Category Contents of error How to correct Others When the main body recovers from the sleep mode while receiving a fax the ring tone is generated more th...

Page 511: ...idential Manual transmission Bulletin Line used line 1 to 4 6 H_RES specification 1 HR 400 dpi 300 dpi 200 dpi Not used 16 pels mm Not used 8 pels mm Not used 7 H_RES specification 2 HR Not used Not used Not used Not used Not used Not used Not used 600 dpi 8 V_RES specification 1 400 dpi 300 dpi 200 dpi 100 dpi 15 4 l mm Not used 7 7 l mm 3 85 l mm 9 V_RES specification 2 Not used Not used Not use...

Page 512: ...d Color MF4003 MF3303 L TROUBLESHOOTING 10 DIAGNOSTIC CODES L 114 Not used bit is set to 0 Service Manual Y119930 3 ...

Page 513: ...see if there occurs any abnormal condition with the network such as the disconnection of a cable After turning off and on the main power switch send it again N20 Memory error Memory overflow No The memory is full Check to see if there is any other job being handled With the number of transmission sheets reduced or the resolution for read reduced send it again N21 Storage error Storage error No Sto...

Page 514: ...r Corrective action N53 Decode File error Ask the sender to send it again in a correct file format as shown below Internet Fax TIFF IP Address Fax PDF or TIFF N54 Decode Decode error The data has been received in an incorrect format Ask the sender to send it again in a correct format Service Manual Y119930 3 ...

Page 515: ...Data indicator 3 Power key Boot diagnosis flowchart Light up in purple Data indicator Blinking period Blink with a long period Blink with a short period Light up Blink Nothing appears on the panel The start screen freezes Display power key Auto reboot Perform boot diagnosis 1 Perform boot diagnosis 2 Perform boot diagnosis 3 Perform boot diagnosis 4 Perform boot diagnosis 5 Light out Light out Thr...

Page 516: ...per installation Correct the mounting of control panel unit if faulty 3 Check the CPU board for proper installation Correct the mounting of control panel unit if faulty 4 Replace the cable for the base board 5 Replace the CPU board 6 Replace the base board 3 Light up in purple Blink long period Memory On board memory failure 1 Turn OFF the main power switch and unplug the power cord Connect the po...

Page 517: ...s DC24 V being output to CN4 6 on DCPS 9 S NO Replace DCPS 13 2 Fusing heaters do not operate Contents Trouble type Fusing heaters do not operate Rank Trouble detection condition Trouble isolation Relevant electrical parts Right door switch SW5 DC power supply DCPS Base board BASEB Fusing unit Procedure Step Check item Location of electrical component Result Action 1 Is a power voltage supplied ac...

Page 518: ...3 4 1 PF P20 PF P21 Contents Trouble type Power is not supplied to PF P20 PF P21 Rank Trouble detection condition Trouble isolation Relevant electrical parts DC power supply DCPS PF P20 PF P21 Procedure Step Check item Location of electrical component Result Action 1 Is DC24 V being output to CN1 3 4 on PCCB 18 S NO Malfunction in paper feed unit 2 Is DC24 V being output to CN4 5 on DCPS 9 S NO Ch...

Page 519: ...Perform the following steps if this malfunction occurs when the CPU board is replaced with a new one Prepare a USB flash drive in which firmware data is recorded 1 Call the firmware update selection screen to the display NOTICE K 2 USB memory 2 Touch Machine Type Select 3 Check the setting values of Machine and Type and enter the correct setting values For details see F 4 3 3 1 Entering the machin...

Page 520: ...ble occurs at either nonvolatile memory License Management Error is generated due to discordance of the figures 15 3 Error message 15 3 1 License management error When abnormal value is detected in the license management information that is stored to the CPU board or storage board or some values are detected cleared warning is issued to let the user know the abnormality The abnormality is detected...

Page 521: ...123 16 IMAGE QUALITY PROBLEM 16 1 How to read element data As part of troubleshooting procedures the numeric values set for State Confirmation available from Service Mode can be used to isolate the cause of the image problem 16 1 1 Table Number Y119930 3 Service Manual ...

Page 522: ...components Imaging unit high voltage unit HVPS LD Light Value C M Y K Shows the LD light value of each color of toner during print image formation Standard values around 1750 to 3500 For your information photoconductor durability tends to be aggravated and fine line width tends to be broader at higher values and characters tend to be faint at lower values Relevant components PH unit imaging unit C...

Page 523: ... IDC sensor transfer belt unit Middle heat temperature Medium Heating Temperature Heat edge temperature Shows the temperature of the fusing unit in 1 C increments Relevant components Fusing unit 16 1 3 Level History 2 IDC Sensor Adjust 1 Shows the IDC intensity adjustment value The proper range is 100 to 500 The value becomes greater as the transfer belt unit has been used more Relevant components...

Page 524: ...e use the image trouble that may be evident on the test pattern printed to determine whether the trouble is attributable to the scanner system or the printer system If no image trouble occurs on a test pattern produced following a print cycle the image trouble is determined to be attributable to the scanner system 1 2 3 4 5 6 7 3 9 8 10 1 Scanner system 2 Printer system 3 Document scan 4 CIS modul...

Page 525: ...images The arrow in the exemplary image troubles indicates the paper feeding direction A A A ABCDE ABCDE ABCDE ABCDE ABCDE 1 2 1 Skewed image 2 Image deviation 2 Troubleshooting procedure Flowchart for isolating the cause area The figure below is a flowchart for isolating the cause area of image deviation skewed image four main cause areas are covered After isolating the cause area according to th...

Page 526: ...iginal and document width guide and correct it if needed 2 Check the paper path and remove any paper pieces or foreign matters 3 Check each roller for dirt and wear and clean or replace it if needed 4 If there is looseness in the screw of the ADF hinge part fix it and perform the installation settings of ADF 5 Perform test printing scanning to check whether the problem has been resolved If it can ...

Page 527: ...Check the set position of paper or paper length guide paper width guide and correct it if needed For a paper tray that uses only a specific paper size it is possible to fix the paper width guide to a specific paper size position by attaching a screw to the screw hole on the paper width guide back side It is possible to prevent problems due to wrong paper setting but be careful as users will not be...

Page 528: ...hes on photoconductor YES Clean Replace the imaging unit 7 Photoconductor section Toner line or dirt on photoconductor improper cleaning YES Replace the imaging unit 8 Photoconductor section Faint lines evident on the entire surface as if the surface were brushed off YES Select Service Mode Counter Life and check the counter value of the Imaging Unit Replace the imaging unit having the greatest co...

Page 529: ...anner Image Side Edge and make the necessary adjustment and the image trouble is eliminated NO Go to the next step 8 Line occurring due to faulty shading Select Service Mode Machine Scan Area Image Position Leading Edge and make the necessary adjustment and the image trouble is eliminated NO Go to the next step 9 Parts along scanning path Light guide or lens array is dirty YES Clean NO Replace the...

Page 530: ...tatic charger application terminals and the high voltage unit connection terminals Y C4 M C3 C C2 K C1 NO Clean or correct the terminal 5 Developing section There is a positive contact between the developing bias application terminals and the high voltage unit connection terminals Y B4 M B3 C B2 K B1 NO Clean or correct the terminal 6 Photoconductor section Scratches on photoconductor YES Clean Re...

Page 531: ...ection Check item Result Action 1 Paper Setting The paper to be used for printing does not match the paper type and size of paper setting selected on the machine YES Make the paper setting again on the machine 2 IDC sensor IDC sensor is dirty YES Clean 3 Service Mode Stabilizer Select Service Mode Imaging Process Adjustment Stabilizer Stabilization Only and the image trouble is eliminated NO Go to...

Page 532: ... connection terminals T1 NO Clean or correct the terminal 5 Transfer belt unit Transfer belt rotates faultily YES Replace the transfer belt unit 6 2nd transfer section Dirt or foreign matter on the 2nd transfer roller YES Remove the foreign matter Replace the transfer roller unit 7 2nd transfer section Faulty pressure retraction operation of the 2nd transfer roller YES Correct Replace the transfer...

Page 533: ...and YES Replace the imaging unit NO Replace the PH unit Replace the high voltage unit 4 color troubleshooting procedure Step Section Check item Result Action 1 Paper path There is dirty or foreign matter on paper path YES Check and clean the paper path including the duplex section 2 Transfer belt unit Dirt scratches or foreign matter on the transfer belt YES Clean Replace the transfer belt unit 3 ...

Page 534: ...tion Foreign matter on charging roller YES Lightly wipe the surface clean of foreign matter using hydro wipe 65AA 99 Note Do not apply a strong force to the surface of the charging roller as doing so can damage the surface 3 Service Mode Table Number Select Service Mode State Confirmation Table Number The measured value is close to the standard value Developing bias Vdc C Vdc M Vdc Y Vdc K close t...

Page 535: ... Original Type and change the setting and the image trouble is eliminated YES Correct the setting 2 When original glass is being used Original glass or original pad is dirty YES Clean 3 Parts along scanning path Light guide or lens array is dirty YES Clean 4 When DF is being used 1st side Original reading glass is dirty YES Clean NO Replace the CIS module 5 When DF is being used 2nd side Shading c...

Page 536: ...nated YES Readjust NO Replace the imaging unit that is responsible for the abnormal image Replace the PH unit Replace the high voltage unit Replace the base board Scanner troubleshooting procedure Step Section Check item Result Action 1 When DF is being used 2nd side Shading correction surface of DF is dirty YES Clean NO Replace the DF CIS module assy 16 3 8 Color reproducibility error Typical fau...

Page 537: ...NO Replace the transfer belt unit Replace the high voltage unit Replace the base board 16 3 9 Incorrect color image registration Typical faulty images The arrow in the exemplary image troubles indicates the paper feeding direction AA AA Initial troubleshooting procedure Step Section Check item Result Action 1 Malfunction code The maintenance call mark is displayed on the panel YES Perform the rele...

Page 538: ... code The maintenance call mark is displayed on the panel YES Perform the relevant troubleshooting procedure corresponding to the malfunction code 2 Paper Setting The paper to be used for printing does not match the paper type and size of paper setting selected on the machine YES Make the paper setting again on the machine 3 Damp paper Paper is damp YES Change paper to one just unwrapped from its ...

Page 539: ...just and the image trouble is eliminated YES Readjust NO Replace the imaging unit Replace the PH unit Replace the high voltage unit 4 color troubleshooting procedure Step Section Check item Result Action 1 Transfer belt unit There is a positive contact between the transfer belt application terminals and the high voltage unit connection terminals T1 NO Clean or correct the terminal 2 2nd transfer s...

Page 540: ...crease the setting value for white dots NO Return the setting value to the original one and go to the next step 8 Service Mode 2nd transfer adj Select Service Mode Imaging Process Adjustment Transfer Voltage Fine Adj 2nd Transfer Adj and the image trouble is eliminated Increase or decrease the setting value to find a specific value at which the trouble is eliminated NO Return the setting value to ...

Page 541: ...on Check item Result Action 1 Transfer belt unit Dirt scratches or foreign matter on the transfer belt YES Clean Replace the transfer belt unit 2 2nd transfer section Dirt or foreign matter on the 2nd transfer roller YES Remove the foreign matter Replace the transfer roller unit 3 Paper path There is dirty or foreign matter on paper path YES Check and clean the paper path including the duplex sect...

Page 542: ...positive contact between the developing bias application terminals and the high voltage unit connection terminals Y B4 M B3 C B2 K B1 NO Clean or correct the terminal 6 Connector connection Faulty connector connection the high voltage unit CN1 and base board CN4E YES Reconnect the connector 7 Service Mode Initialize Image Stabilization Select Service Mode Imaging Process Adjustment Stabilizer Init...

Page 543: ...ubleshooting procedure Step Section Check item Result Action 1 Write section Dirt or foreign matter on the dust proof glass of the PH of the color which is responsible for the abnormal image YES Clean the PH window 2 Charging section Foreign matter on charging roller of the color which is responsible for the abnormal image YES Lightly wipe the surface clean of foreign matter using hydro wipe 65AA ...

Page 544: ...image trouble is eliminated NO Go to the next step 2 Image check Select Service Mode Test Mode Solid Pattern Select SINGLE HYPER Error diffusion and 1 Sided enter 120 for Density and load tray 2 with A4 paper This runs a print cycle of 4 colors on one sheet of paper Check the image after printing and the abnormal image is evident YES Go to engine troubleshooting procedure NO Go to scanner troubles...

Page 545: ...This eliminates the trouble YES Replace the connection cable 5 When original glass is being used When DF is being used 1st side Select Service Mode State Confirmation Self diag Full and perform the function Then NG appears YES Take relevant action corresponding to the check item in which NG has appeared NO Replace the CIS module Replace the base board 6 When DF is being used 2nd side Faulty connec...

Page 546: ...ging roller as doing so can damage the surface 5 Connector connection Faulty connector connection the high voltage unit CN1 and base board CN4E YES Reconnect the connector NO Replace the high voltage unit Replace the base board 4 color troubleshooting procedure Step Section Check item Result Action 1 Uneven pitch Dirt scratches or foreign matter on the transfer belt YES Clean Replace the transfer ...

Page 547: ...e Mode Test Mode Halftone Pattern Select SINGLE HYPER Error diffusion 1 Sided Black 1PC and Full Bleed enter 64 for Density and load tray 2 with A4 paper Press the start key This runs a print cycle Check the image after printing and the abnormal image is evident YES Go to the next step 3 Image check Poor fusing performance Select Service Mode System 2 Smart Fusing Control and select Prohibit Check...

Page 548: ...foreign matter on the transfer belt YES Clean Replace the transfer belt unit 7 2nd transfer section Dirt or foreign matter on the 2nd transfer roller YES Remove the foreign matter Replace the transfer roller unit 8 Service Mode Fusing Temperature Select Service Mode Machine Fusing Temperature and make the necessary adjustment and the image trouble is eliminated Increase or decrease the setting val...

Page 549: ...lean the PH window 2 Charging section Foreign matter on charging roller of the color which is responsible for the abnormal image YES Lightly wipe the surface clean of foreign matter using hydro wipe 65AA 99 Note Do not apply a strong force to the surface of the charging roller as doing so can damage the surface 3 Photoconductor section Dirt or foreign matter on the photoconductor of the PH of the ...

Page 550: ...Section Check item Result Action 1 When original glass is being used Sub Scan Zoom Adj Select Service Mode Machine Scan Area Sub Scan Zoom Adj and make the necessary adjustment and the image trouble is eliminated YES Readjust NO Replace the CIS module 2 When DF is being used 1st side Feed Zoom Select Service Mode ADF Feed Zoom and make the necessary adjustment and the image trouble is eliminated Y...

Page 551: ...bles indicates the paper feeding direction 1 2 ABCDE ABCDE ABCDE 1 Data on the previous page 2 Data on the next page Troubleshooting procedure Step Section Check item Result Action 1 When original glass is being used When DF is being used 1st side None of the terminal pins of the connection cable between the CIS module and the base board CN6 is bent and a positive connection is made NO Reconnect t...

Page 552: ...L3 Tray 1 paper feed clutch CL4 Registration clutch CL5 ADU transport clutch CL6 ADU forward rotation clutch CL7 ADU reverse rotation clutch SD1 Exit path switch solenoid F5E M4 Toner supply motor YM Power supply malfunction C5701 M5 Toner supply motor CK F6E HVPS High voltage unit Power line A5 error C7605 F8E PCCB PC control board Power line A10 error C760A F10E PS1 Front door sensor Front door ...

Page 553: ... power of the vendor display IC1E USBHB USB hub board Unable to detect USB memory 2 DC power supply a ICP ICP No Symbol Target part name When ICP trips Symptom in each load Trouble code and others F101 DC power supply circuit No operation FU101 F102 Heater circuit The heater does not light up C3425 C3825 C3826 C3922 C3925 C3926 C392B FU181 3 High voltage unit a ICP ICP No Symbol Target part name W...

Page 554: ... malfunction C0104 F2 PCCB PC control board Tray 3 drive motor malfunction C0104 Tray 3 feeder up down abnormality C0206 17 2 3 UK P19 1 Multi feed detection board TX a ICP ICP No Symbol Target part name When ICP trips Symptom in each load Trouble code and others ICP1 MFDB TX Multi feed detection board TX Multi feed detection board failure C8402 Service Manual Y119930 3 ...

Page 555: ...NG 1 1 d Color MF4003 MF3303 1 1 1 Scanner section 3 4 1 2 1 Angle sensor PS22 2 Scanner motor M9 3 Scanner home sensor PS21 4 CIS module IR CIS 1 1 2 Front side section 1 Board switch sensor others 6 5 12 7 10 11 8 9 13 14 15 16 17 18 1 2 4 3 1 Control panel unit 2 Machine condition monitor board Edg MCMB Edg Y119930 3 Service Manual ...

Page 556: ...SB hub board USBHB 1 9 NFC board NFCB 10 Main power switch SW1 11 Wireless LAN board WLANB 2 12 Waste toner bottle set sensor PS6 13 Waste toner near full sensor PS15 14 Fax speaker SP1 15 TCR sensor Y TCRS Y 16 TCR sensor M TCRS M 17 TCR sensor C TCRS C 18 TCR sensor K TCRS K 1 Option 2 Standard equipment only for North America models 2 Load 1 2 1 Toner supply motor YM M4 2 Toner supply motor CK ...

Page 557: ... CPU board CPUB 4 FAX board FAXB 5 DC power supply DCPS 6 TPM board TPMB 7 Storage board STRGB Standard equipment of d Color MF4003 only for Japan North America and Europe models 2 Load 2 1 3 4 5 6 1 Toner suction fan FM2 2 1st transfer pressure clutch CL1 3 CPU cooling fan FM3 4 Machine cooling fan FM1 5 Color motor M2 6 Main motor M1 Y119930 3 Service Manual ...

Page 558: ...DRAWING M 4 d Color MF4003 MF3303 1 1 4 Left side 1 2 1 High voltage unit HVPS 2 PH unit 1 1 5 Right side 1 2 3 4 1 Registration clutch CL4 2 IDC sensor IDCS1 3 Temperature humidity sensor TEM HUMS1 4 Registration sensor PS9 Service Manual Y119930 3 ...

Page 559: ...ay 1 2 1 Bypass tray paper feed clutch CL2 2 Bypass tray paper empty sensor PS4 1 1 7 Tray 1 1 3 4 5 6 2 1 Tray 1 paper feed clutch CL3 2 Tray 1 upper limit sensor PS7 3 Tray 1 paper feed sensor PS8 4 Tray 1 paper empty sensor PS5 5 Tray 1 lift up motor M6 6 Tray 1 set switch SW3 Y119930 3 Service Manual ...

Page 560: ... exit sensor PS13 4 Fusing heater lamp HL1 5 Fusing loop sensor PS10 6 Heating roller thermostat TS1 7 Heating roller temperature sensor TEMS 8 Heating roller thermistor Ctr TH2 9 Heating roller thermistor Edg TH1 1 1 9 Duplex section 1 2 3 4 1 ADU reverse rotation clutch CL7 2 ADU forward rotation clutch CL6 3 ADU transport clutch CL5 4 ADU transport sensor PS11 Service Manual Y119930 3 ...

Page 561: ...er separate sensor PS16 6 Document registration clutch CL9 7 Document registration sensor PS17 8 Document paper feed clutch CL8 9 Document empty sensor PS19 10 Upper door sensor PS20 11 Document main motor M8 1 2 PF P20 PF P21 1 2 3 4 5 6 7 1 PC control board assy PCCB 2 Paper size sensor PS5 3 Upper limit sensor PS2 4 Transport sensor PS6 5 Paper feed sensor PS3 6 Paper empty sensor PS1 7 Door se...

Page 562: ...NG 1 PARTS LAYOUT DRAWING M 8 1 2 3 4 1 Transport clutch CL2 2 Paper feed clutch CL1 3 Lift up motor M2 4 Drive motor M1 1 3 CU 202 1 2 3 4 1 Clean unit drive board CUDB 2 Exhaust fan 2 FM2 3 Exhaust fan 1 FM1 4 Exhaust fan 3 FM3 Service Manual Y119930 3 ...

Page 563: ... CN30E 8pin CN19E 9pin CN22E 26pin CN17 4pin CN10 12pin CN14 5pin CN1E 12pin CN3E 8pin CN20 10pin CN2E 4pin CN13 23pin CN16 4pin CN8 4pin CN15 14pin CN1 6pin CN18 12pin CN26E 5pin CN22 4pin CN21 24pin CN19 24pin CN7 5pin CN100 281pin CN18E 14pin CN16E 16pin CN10E 9pin CN11E 12pin CN31E 2pin CN24E 3pin CN15E 6pin CN11 4pin CN14E 20pin CN25E 6pin CN23E 13pin CN13E 8pin CN26 4pin 2 Storage board STRG...

Page 564: ... 2 CONNECTOR LAYOUT DRAWING M 10 4 Backup board ERB CN1 5pin 5 TPM board TPMB CN1 10pin 6 Machine condition monitor board Fr MCMB Fr CN3 2pin CN1 4pin 7 Machine condition monitor board Edg MCMB Edg CN1 2pin 8 High voltage unit HVPS Service Manual Y119930 3 ...

Page 565: ...003 MF3303 M PARTS CONNECTOR LAYOUT DRAWING 2 CONNECTOR LAYOUT DRAWING M 11 CN1 25pin 9 DC power supply DCPS CN2 3pin CN1 2pin CN4 8pin CN3 3pin CN5 4pin CN6 8pin 10 DF control board DFCB Y119930 3 Service Manual ...

Page 566: ...CN1 7pin CN4 7pin CN5 4pin CN3 3pin CN6 3pin CN2 9pin CN8 5pin CN9 10pin CN16 4pin CN17 6pin 11 FAX board FAXB CN602 CN601 CN101 5pin CN301 12pin 12 NFC board NFCB CN1 6pin 2 1 2 PF P20 PF P21 PC control board PCCB CN1 14pin CN4 11pin CN5 13pin CN2 15pin CN3 12pin Service Manual Y119930 3 ...

Page 567: ...8 USB hub board USBHB PJ05 2pin PJ10 4pin PJ14 4pin PJ11 8pin PJ06 5pin 2 1 4 EK P09 USB hub board USBHB PJ9 10pin PJ05 2pin PJ10 4pin PJ14 4pin PJ11 8pin PJ06 5pin 2 1 5 UK P19 Multi feed detection board TX MFDB TX CN111 3pin Multi feed detection board RX MFDB RX CN110 4pin Y119930 3 Service Manual ...

Page 568: ...RAWING 2 2 1 d Color MF4003 MF3303 1 Main body 7 6 5 10 9 8 11 12 13 4 3 2 1 No CN No Pin Location No CN No Pin Location 1 CN53 6 Pin 2 W 2 CN52 10 Pin 2 W 3 CN103 3 Pin 11 J 4 CN102 3 Pin 10 J 5 CN75 2 Pin 4 D 6 CN101 3 Pin 10 J 7 CN100 3 Pin 10 J 8 CN37 3 Pin 11 D 9 CN6 5 Pin 7 J 10 CN5 5 Pin 7 J 11 CN8 5 Pin 8 J 12 CN7 5 Pin 8 J 13 CN36 2 Pin 9 R Service Manual Y119930 3 ...

Page 569: ...1 W 3 CN115 4 Pin 22 W 4 CN114 3 Pin 23 W 5 CN112 3 Pin 22 W 6 CN10 3 Pin 3 D 7 CN12 2 Pin 3 D 8 CN39 2 Pin 3 D 9 CN13 2 Pin 2 D 10 CN11 2 Pin 2 D 11 CN35 6 Pin 28 I 12 CN24 14 Pin 13 J 13 CN23 3 Pin 9 D 14 CN2 3 Pin 5 D 15 CN47 2 Pin 9 J 16 CN71 3 Pin 8 J 17 CN46 2 Pin 9 J 18 CN44 2 Pin 12 D 19 CN76 3 Pin 9 J 20 CN70 4 Pin 14 D 21 CN45 2 Pin 12 D 22 CN3 9 Pin 5 D 23 CN72 3 Pin 11 J 24 CN26 5 Pin ...

Page 570: ...This page is intentionally left blank ...

Page 571: ... 1 Timing chart when the main power switch is turned ON Fusing motor M3 Polygon motor M7 Color motor M2 Charge bias DC Y M C Developing bias DC Y M C Main motor M1 Charge bias DC K Developing bias DC K Developing bias AC K 1nd transfer voltage output 2nd transfer voltage output TOD Y119930 3 Service Manual ...

Page 572: ...This page is intentionally left blank ...

Page 573: ... 14 5 4 3 2 1 d Color MF3303 d Color MF4003i COM NO M1 M2 1 2 2 1 Fax speaker SP1 CN75 SPK SPK CN31E 2 1 CN8E 1 2 3 4 5 6 7 GND PS21 ON NC DC5V PS22 ON GND DC5V Scanner motor M9 PS21 Scanner home board 3 2 1 PS22 Angle sensor 3 2 1 CN8E 1 2 3 4 5 6 7 GND PS21 ON NC DC5V PS22 ON GND DC5V PS21 Scanner home board 3 2 1 PS22 IR CIS DF CIS Angle sensor TPM board DF CIS module CIS module 3 2 1 DFCB DF c...

Page 574: ...This page is intentionally left blank ...

Page 575: ...03 MF3303 1 1 INTERFACE SECTION 1 1 1 Front side Right side 4 1 2 3 1 USB port Type A 2 Main power switch 3 Authentication unit built in 4 Control panel 10 1 inch TFT color LCD WSVGA Electrostatic touch panel 1 1 2 Rear side left side 1 2 3 4 5 1 USB port Type B 2 Line connector LINE Y119930 3 Service Manual ...

Page 576: ...ling fan motor FM4 2 DF CIS module DFCIS 3 Multi feed detection board 1 transmitter 4 Multi feed detection board 2 receiver 5 Document before read sensor PS18 6 After separate sensor PS16 7 Document registration clutch CL9 8 Document registration sensor PS17 9 Document paper feed clutch CL8 10 Document empty sensor PS19 11 Upper door sensor PS20 12 Document main motor M8 13 DF control board DFCB 1...

Page 577: ...or drives and the document pick up roller is pressed down via the document paper feed clutch The rotation of the document pick up roller and document feed roller feeds the original The pick up roller transports the original to the document feed roller The rotation of the pick up roller and the document feed roller drives the document main motor drive via the gear and the document paper feed clutch...

Page 578: ...nt side and back side is read at once in one pass of the original The front side of the 2 sided original is read by the scanner unit section of the main body after the leading edge of the original has moved past the document before reading roller The back side of the 2 sided original is read by the CIS module after the leading edge of the original has moved past the document after reading roller 1...

Page 579: ...ensor PS22 1 3 2 Drive 1 2 3 1 Scanner motor M9 2 Drive belt 3 CSI module IR CSI 1 3 3 Operation 1 When the power is ON 1 When the power is turned ON the CIS moves from the home position to the shading position 2 The LED of the CIS lights up 3 The gain value of the CIS output voltage to R G and B is adjusted 4 After adjusting the gain value a shading correction is performed 5 The CIS moves in the ...

Page 580: ...on while performing shading correction The exposure unit will start reading the original image from the leading edge The unit will finish reading the image at the trailing edge of the original 3 The LED will turn OFF when the reading is complete 4 The CIS module moves from the scan end position to the home position 1 2 4 3 5 6 7 1 Home position 2 Shading position 3 Scan start position 4 Scan end p...

Page 581: ...of each color enters the cylindrical lens via the synthetic mirror and return mirror 2 At the cylindrical lens each laser light is condensed in the vicinity of the polygon mirror 3 Since the angle of incidence for each color of laser light varies the laser light reflected by the polygon mirror is reflected in a different angle for each color 4 The condensing angle of each color of laser light is c...

Page 582: ... signal is output from the base board The laser ON signal triggers the firing of each laser light which illuminates the index board via the polygon mirror G1 lens index mirror K and Index lens This generates an Index signal This index signal has a function of keeping the same laser light emission timing per every one line in the main scanning direction The index signal is generated with the K lase...

Page 583: ...tion process Color shift may occur due to accuracy differences of parts in the print head unit The color registration control system automatically detects color shift and correct color shift in the main and sub scanning directions Color shift is misalignment of the images of three different colors yellow Y magenta M and cyan C with respect to the image of black K The color shift detection sequence...

Page 584: ...ion of the transfer belt 2 Transfer belt 3 Color shift 4 Black K 5 Magenta M 6 No color shift 7 Before correction 8 After correction c Correction of color shift in the sub scan direction If the image of each color Y M C is misaligned with respect to the image of black K in the sub scan direction changing the write start timing in the sub scan direction can correct the color shift Color shift corre...

Page 585: ...e temperature inside the PH unit is measured at intervals of 30 sec by the PH temperature sensor mounted in the PH unit The detected temperature data is recorded to form part of the environmental information data and used for controlling for example color registration 1st transfer output determination and transfer roller cleaning 8 Image processing The following image stabilization functions are a...

Page 586: ...m the main body The shutter is opened and closed in conjunction with the operation of the toner cartridge when being removed and reinstalled 2 1 1 1 Shutter 2 Toner replenishing port 2 Toner replenishing mechanism The toner is supplied from the toner cartridge to the imaging unit by rotating the toner supply motor The toner supply motor has two types available for YM toner and CK toner and the mot...

Page 587: ...oner replenishing time the amount of toner supplied during the toner replenishing control is determined based on the TC ratio detected by the TCR sensor noncontact magnetic type disposed at the developing section of the imaging unit for each color of toner and the amount of toner to be consumed estimated for the image to be printed If replenishing is interrupted by a paper misfeed the front door o...

Page 588: ...ner cartridge Agitate Imaging unit Detect T C measure Replenishing control Detect T C measure 1 End replenishing sequence Toner replenishing Agitating operation 2 Toner replenishing Agitating operation 2 Toner replenishing Agitating operation 2 Agitating operation 3 1 If a predetermined T C is not reached return to replenishing control a maximum of 5 times 2 Agitate imaging unit during replenishin...

Page 589: ...ion when the following conditions is detected after a toner near empty condition has been detected It then gives the message Toner has been depleted snip on the operation panel 1 The TCR sensor detects a TC ratio that is lower than a predetermined value b Toner empty display The screen mode to be displayed when a toner empty is detected can be selected by specifying the person who replaces the uni...

Page 590: ...screw 2 7 Toner supply screw 1 2 Operation a Imaging unit detection The imaging unit of each color of toner is provided with a TCR sensor The sensor detects different states of the corresponding imaging unit 1 1 TCR sensor NOTE Be sure to replace the imaging unit with a new one that has not been used A TCR sensor error trouble code 25 may occur if a used imaging unit is installed Service Manual Y1...

Page 591: ... imaging unit is correctly mounted in place Operation when the imaging unit is determined not to be new The new article detection control is terminated Operation when the imaging unit is determined to be new The TCR sensor automatic adjustment control calibration is performed The image stabilization control is performed The life counter of the imaging unit is reset to zero After the above controls...

Page 592: ...es a lower voltage and thus produces a smaller amount of ozone The main body is not therefore mounted with any ozone filter The charge roller is driven to follow the movement of the photoconductor Cleaning roller The cleaning roller removes toner stick to the charge roller The cleaning roller is driven to follow the movement of the charge roller b Charge corona control High voltage DC negative cha...

Page 593: ...Photoconductor 2 Electrostatic charger application terminal 1 6 3 Imaging unit photoconductor 1 Configuration 3 4 5 6 2 1 1 Transfer belt 2 Photoconductor 3 Toner collecting screw 4 Cleaning blade 5 Charging roller 6 Developing section 2 Drive 1 2 3 4 5 6 Y119930 3 Service Manual ...

Page 594: ...toconductor when the triangular prism shaped shaft is engaged with the mating coupling part 1 2 3 4 1 Photoconductor K 2 Photoconductor drive gear K 3 Main motor M1 4 Coupling Photoconductor Y M C drive mechanism The photoconductors Y M C are driven by the color PC motor Drive is transmitted to each of the photoconductors when the triangular prism shaped shaft is engaged with the mating coupling p...

Page 595: ...d off the surface of the photoconductor Toner conveyance collection mechanism The toner collecting screw is rotated by the driving force transmitted from the photoconductor The toner collecting screw rotates in time with the rotation of the photoconductor Rotation of the toner collecting screw conveys toner scraped off the surface of the photoconductor toward the front of the machine The toner con...

Page 596: ...a Developer flow 1 Toner replenished via the toner replenishing port located at the front side of the machine is fed to the toner supply screw 1 2 The developer is conveyed toward the rear of the unit while being agitated and electrically charged by the toner supply screw 1 3 The TCR sensor installed on the underside of the imaging unit detects toner to carrier T C ratio during this time If the T ...

Page 597: ...oping bias voltage supplied from the high voltage unit is applied to the developing roller of each color of toner via the conductive bearing 1 2 3 4 5 6 7 8 1 Developing bias voltage application terminal Y 2 Developing bias voltage application terminal M 3 Developing bias voltage application terminal C 4 Developing bias voltage application terminal K 5 Developing roller K 6 Developing roller C 7 D...

Page 598: ...Toner replenishing port e Toner density control The TCR sensor is mounted on the underside of each of the developing sections The TCR sensor for C M Y and K is a non contact magnetic type Each of these sensors detects toner to carrier ratio T C of the developer The reading is used for determining the amount of toner supplied Only when a new Imaging unit is installed in the machine an automatic adj...

Page 599: ...agitates developer 4 Photoconductor 5 Carrier 6 Toner Description The toner cartridge is filled with the toner and a small percentage of carrier The fresh carrier is supplied together with the toner to the developing unit When the developer toner carrier circulates in the developing chamber excessive developer in the developing unit is discharged to the waste toner bottle Replacement of the develo...

Page 600: ...sfer belt drive roller 2 Main motor M1 3 Transfer belt 4 Driven roller 5 1st transfer pressure switch SW4 6 1st transfer pressure clutch 7 Color motor M2 1 7 3 Operation 1 Transfer belt drive The transfer belt drive roller is rotated by the driving force of the main motor Rotation of the transfer belt causes the transfer belt driven roller to rotate The drive transmission gear located at the trans...

Page 601: ...essure position the pressure release detection lever rotates to turn OFF the 1st transfer pressure switch The cam will stop rotating and the siding plate will stop The 1st transfer roller Y M C will stay being pressed 1 2 3 4 5 1 Pressure cam 2 1st transfer roller drive arm Y M C 3 Color motor M2 4 1st transfer pressure switch SW4 5 1st transfer pressure clutch CL1 3 Pressure retraction control by...

Page 602: ...de is executed only when a copy is made with Auto Color selected from the operation panel It is not executed when Full Color Black 2 Color or Single Color is selected The control is executed for PC print only if the print cycle is run with Auto Color selected from the printer driver screen It is not executed when Full Color or Grayscale is selected The 1st transfer roller Y M C is in the pressed p...

Page 603: ...r s default position is changed to the black mode retracted position When the setting is 0 the default position of the 1st transfer roller Y M C is at the color mode pressed position For users who mainly produce black prints when 1 is selected the 1st transfer roller Y M C can be at the retracted position more frequently which helps to reduce the wearing out of photoconductors caused by unnecessar...

Page 604: ...ollecting screw conveys waste toner scraped off the surface of the transfer belt toward the front of the machine There is a caking of toner prevention blade installed It prevents waste toner from caking at the toner collecting screw section The waste toner is discharged through the toner collecting port into the waste toner bottle The waste toner is disposed of when a waste toner bottle which is d...

Page 605: ... with a new one therefore New Release must be performed in Counter Life of the Service Mode For detailed operating procedures see New Release 1 8 2ND TRANSFER SECTION 1 8 1 Configuration 1 2 3 1 Fusing loop sensor PS10 2 2nd transfer roller 3 IDC sensor IDCS 1 8 2 Drive 1 2 3 1 Transfer belt 2 Main motor M1 3 2nd transfer roller 1 8 3 Operation 1 2nd transfer control To transfer the toner image fo...

Page 606: ...p against each other at all times If a new 2nd transfer roller that has replaced an old one is left to stand idle for a long period of time a substance contained in the new roller sticks to the surface of the transfer belt which could result in noise in the print image To prevent the substance contained in the 2nd transfer roller from sticking to the transfer belt Y toner is applied to the surface...

Page 607: ...any new article detection mechanism If the transfer roller is replaced with a new one therefore New Release must be performed of the Transfer Roller Unit in Counter Life of the Service Mode 1 9 TONER COLLECTING SECTION 1 9 1 Configuration 1 2 3 4 5 1 Waste toner collecting screw Imaging unit Y M C K 2 Waste toner supply screw Imaging unit K 3 Waster toner bottle 4 Waste toner agitating blade 5 Was...

Page 608: ...ste developer that is collected from the imaging unit K developing section is conveyed to the waste toner bottle via the waste toner supply screw For details see Auto refining developing system 1 2 1 Waste toner supply screw developing unit 2 Waste toner agitating blade 3 Waste toner flow at transfer belt unit section 2nd transfer section 1 Toner scraped off by the cleaning blade provided in the t...

Page 609: ...sor PS6 2 Waste toner near full sensor PS15 5 Waste toner bottle full detection The waste toner near full sensor provided on the front side is used to determine the amount of waste toner accumulated in the waste toner bottle a Waste toner near full The toner collecting screw provided in the waste toner bottle conveys waste toner in the bottle onto the central portion of the bottle There is the det...

Page 610: ...ade by the waste toner near full sensor is used for detecting a new waste toner box When the waste toner full display appears the existing waste toner bottle is replaced with a new one When the waste toner near full sensor remains unblocked for a predetermined period of time or more the machine determines that the normal state is recovered the old waste toner box is replaced with a new one Determi...

Page 611: ...ss pick up roller 3 Manual bypass tray feed roller 4 Main motor M1 1 10 3 Operation 1 Paper feed control Rotation of the main motor is transmitted to the manual bypass tray feed roller via the manual paper feed clutch to rotates the roller The rotation shaft of the swing arm mounted on the same shaft as the manual bypass tray feed roller is rotated so that the bypass pick up roller is lowered to t...

Page 612: ...ick up roller 4 Manual bypass tray feed roller 5 Swing arm 2 Paper empty condition detection control A paper empty condition is detected when the empty sensor actuator blocks the paper empty sensor No mechanism is provided for detecting a paper near empty condition 1 2 1 Bypass tray paper empty sensor PS4 2 Actuator Service Manual Y119930 3 ...

Page 613: ...ation roller 6 Tray 1 paper feed sensor PS8 7 Tray 1 paper empty sensor PS5 8 Edge guide plate 9 Trailing edge guide plate 10 Paper lift plate 11 Tray 1 set switch SW3 12 Tray 1 lift up motor M6 13 Pick up roller 1 11 2 Drive 2 3 1 5 4 1 Main motor M1 2 Feed roller 3 Separation roller 4 Pick up roller 5 Tray 1 paper feed clutch CL3 1 11 3 Operation 1 Up down control Tray 1 and tray 2 are controlle...

Page 614: ... force of the tray 1 lift up motor is released from the lift up plate drive shaft the paper lift up plate starts lowering by its own weight 2 3 1 1 Paper lift up lever 2 Coupling 3 Tray 1 lift up motor M6 c Operation timing When the tray is slid in When the tray is slid into the machine the tray 1 set switch is blocked The machine then determines that the tray is slid into position The paper lift ...

Page 615: ...in the back of the machine presses the pick up roller up to the retract position When the pick up roller is in the retract position paper cannot be damaged as the pick up roller does not make contact with the stacked paper Closing the paper feed tray presses the retraction lever to move the pick up roller to the a position such that it can supply paper 1 2 1 Retraction lever 2 Pick up roller 3 Sep...

Page 616: ...it differs from the paper length specified using the operation panel it will be judged as a size error 6 Paper empty condition detection control At time that the paper empty sensor is unblocked a paper empty condition is detected No mechanism is provided for detecting a paper near empty condition 1 2 1 Empty sensor actuator 2 Tray 1 paper empty sensor PS5 7 Tray open close detection control The tr...

Page 617: ... 1 1 Tray 1 2 Tray 1 stopper a Releasing the paper tray stopper Press the stopper on its left side the stopper lock will be released b Locking the paper tray stopper Press the stopper on its right side the stopper lock will be locked NOTE A mechanism is provided to push and lock the stopper through closing the paper tray to its home position even if you forget to lock it Mechanism to prevent forge...

Page 618: ... against the gate makes the paper level and realizes the skew correction The paper fed in is synchronized with the image before paper conveyance is restarted 1 2 3 5 6 4 1 Registration gate 2 Paper 3 Point where paper contacting registration gate 4 Paper rotating operation 5 Paper feed direction 6 Registration roller a Paper detection control When the paper fed from the feed roller pushes up the a...

Page 619: ...ource Paper length detection sensor Starting point Ending point Manual bypass tray Registration sensor PS9 Registration clutch CL4 ON Registration sensor PS9 OFF Tray 1 Registration sensor PS9 Registration clutch CL4 ON Registration sensor PS9 OFF Tray 2 3 PF P20 P21 Tray 2 transport sensor PS6 2 Tray 3 transport sensor PS6 3 Tray 2 transport sensor PS6 2 ON Tray 3 transport sensor PS6 3 ON Tray 2...

Page 620: ...ined position before the fusing roller The fusing speed is decelerated so that a loop is formed in the paper between the 2nd transfer roller and the fusing roller When the paper loop amount is large the fusing loop sensor is unblocked and the fusing speed is increased When the paper loop amount is small the fusing loop sensor is blocked and the fusing speed is decreased The fusing speed is increas...

Page 621: ...lamp The heating roller contains a fusing heater lamp assy in it The fusing heater lamp turns ON to generate heat which heats the heating roller and fusing belt The fusing heater lamp assy consists of two heaters each having a unique heating range different from each other The fusing heater lamp 1 uniformly heats the entire area of the fusing roller The fusing heater lamp 2 heats only the central ...

Page 622: ...is performed at low temperatures at ordinary temperatures or under high humidity condition In the warm up mode under high humidity condition the warm up time is extended to prevent paper from curling and the difference in temperature between the fusing belt and fusing pressure roller is minimized When the temperature of the fusing belt reaches the warm up completion temperature control is passed o...

Page 623: ...he job The fusing temperature is measured during the print cycle and temperature control suitable for the print condition is performed accordingly Service Mode The machine has a fusing temperature adjustment function in order to prevent image fixability from being degraded depending on the type of paper and reduce such phenomena as paper curl uneven wax and offset The fusing temperature can be var...

Page 624: ...cle is less than 18 degrees To achieve the intended level of fixability under low temperature environment To prevent fixability from being degraded in a multi print cycle paper to paper distance is widened to thereby limit a decrease in the fusing temperature 100 90 80 70 default 60 5 0 High humidity environment mode 2 Environmental humidity at the start of the print cycle is a predetermined value...

Page 625: ...witch is turned ON with the front door and right door are closed The machine exits the sleep mode The front door or right door is opened and closed with the power switch in ON position Operation when it is detected that no units are mounted The message Fusing Unit Installation Error appears on the operation panel and the machine prohibits initial operation and any new print cycle The message Fusin...

Page 626: ...moved and detect paper misfeed or paper left in the duplex section 1 ADU reverse rotation clutch CL7 2 Fusing motor M3 3 ADU transport clutch CL5 4 Main motor M1 5 ADU transport sensor PS11 6 ADU transport roller 7 Switchback guide 8 Paper exit roller 9 Reverse roller 2 1 4 3 6 7 5 8 9 2 Loop formation To correct skew in the paper transported to the duplex section a loop is formed in the paper at ...

Page 627: ...back guide operates so as to transport the paper to the reverse section Immediately before the paper leaves the paper exit roller the direction of rotation of the reverse roller is reversed and the paper is transported toward and into the duplex section 3 While passing through the duplex section the paper stops temporarily at the re feeding position 4 The paper is subject to skew correction at the...

Page 628: ... in and the image of the second page of the original is printed 2 The switchback guide operates so as to transport the paper to the reverse section Immediately before the paper leaves the paper reverse roller the direction of rotation of the reverse roller is reversed and the paper is transported toward and into the duplex section 3 While passing through the duplex section the paper stops temporar...

Page 629: ...up and fed in 6 The image of the first page of the original is printed on the paper re fed from the duplex section 7 While the first sheet of paper is fed out the third sheet of paper is taken up and fed in and the image of the sixth page of the original is printed The second sheet of paper being transported through the duplex section is brought to a temporary stop at the re feeding position Steps...

Page 630: ...s controlled by switching the exit path switch solenoid ON OFF 1 Switchback guide operation Transport route Normal rotation roller Exit reverse roller Exit path switch solenoid Switchback guide A Normal rotation Stopping OFF CLOSE B Stopping Reverse rotation ON OPEN C Stopping Normal rotation OFF CLOSE B A C 2 6 1 5 3 4 Reverse rotation Normal rotation CLOSE mode OPEN mode 1 Exit path switch solen...

Page 631: ...verse section cooling The machine cooling fan motor cools the paper after fusing The machine cooling fan motor blows air around the paper exit section to cool the paper after the fusing process 2 1 1 Fusing section 2 Machine cooling fan motor FM2 1 16 IMAGE STABILIZATION CONTROL 1 16 1 Overview The machine provides the following image stabilization control to ensure stabilized print image Purpose ...

Page 632: ... in reproducibility of the thin line and the reverse outline which is resulting from the variations in electrostatic characteristics of the photoconductor developing characteristics and transfer characteristics in terms of individual difference environment and durability to make it the target level It produces detection patterns on the surface of the transfer belt with the given level of LD intens...

Page 633: ...art timing are determined through stabilization judgment image stabilization will be executed Displays the message Calibrating on the operation panel while executing the image stabilization Opening the front door right door during image stabilization occurrence of troubles or failure in adjustment for each sequence may stop image stabilization c Stabilization start timing Types of stabilization st...

Page 634: ... is reset Mode Image stabilization mode Operation condition Image stabilization setting Mode 1 Initialization and image stabilization A new imaging unit Y M C is detected A new transfer belt unit is detected The machine recovers from a toner empty condition While a warning code is being displayed Not specified Long image stabilization In the last image stabilization the value of IDC sensor detecti...

Page 635: ...ntrol is performed in order to reduce cost per print for users who have a low print volume and low color ratio 2 To shorten time between when the machine is turned ON and when it is ready for printing 3 To maintain convenience for users having a high color frequency Mode Control Standard Color stabilization is executed if image adjustments are necessary for color print or black print during predri...

Page 636: ... 1 Main power switch NOTE To turn OFF and ON the main power switch first turn OFF the main power switch and wait for 10 sec or more before turning it ON again If a setting value or values in the service mode are changed it takes 10 sec or more to incorporate the setting changes properly in the machine Service Manual Y119930 3 ...

Page 637: ...k start up function This function shortens the start up time A Quick start up data is generated the CPU operating power is powered between a certain time after the main power switch is turned OFF to maintain the On Board Memory in the storage board After the Quick start up data has been saved the CPU operating power turns OFF However partial power switches will remain powered for monitoring the op...

Page 638: ...wer mode 2 Sleep mode 2 Sub power OFF mode 1 Long time Sub power OFF mode ErP auto power off mode 1 1 Administrator Maintenance Timer Setting Power Settings Power Key Setting 2 Administrator Maintenance Timer Setting Power Settings Power Save Settings 2 Status in each mode 1 2 3 1 Power key LED 2 Power key 3 Control panel Mode State Power key LED Standby All functions are ready to accept and ready...

Page 639: ...ion to the lowest level Reset only by the power key or the weekly timer setting No jobs can be received 1 The system can also wake up when this machine is equipped with the optional wireless LAN kit Blinking in orange 1 In ErP auto power OFF mode this machine cannot receive data or faxes and also it cannot scan or print an original 2 Disable Enabled and High are selectable in Administrator Mainten...

Page 640: ...Full speed Full speed Stop When the door is opened In sleep state Half speed Stop Stop Stop When trouble occurs In standby state 1 Half speed Stop Stop Full speed Predrive operation During image stabilization During operation checking 1 Full speed Full speed Full speed Full speed During a 1 sided print cycle Full speed Full speed Full speed Full speed During a 2 sided print cycle Full speed Full s...

Page 641: ...lue During stand by Lit up blue During copying or printing Lit up blue Paper misfeed or trouble Lit up blue Low power mode Sleep mode Blinking in blue ErP auto power off mode Blinking in orange Sub power off mode Lit up orange 2 Warning status indicator section Status Warning status indicator section When machine stops Lit up orange When warning occurs Blinking in orange Other status Unlit 3 Data ...

Page 642: ...ay 2 lift up motor M2 2 14 Tray 2 PC control board PCCB 2 15 Tray 2 drive motor M1 2 16 Pick up roller 2 2 Drive 3 4 1 2 6 5 1 Tray 2 paper feed clutch CL1 2 2 Tray 2 transport clutch CL2 2 3 Feed roller 4 Separation roller 5 Pick up roller 6 Tray 2 drive motor M1 2 2 3 Operation 2 3 1 Up down control Tray 2 and tray 3 are controlled in the same control procedure 1 Up operation The paper lift up l...

Page 643: ... the paper lift up plate When the paper stack is raised to a predetermined height after the paper lift up plate up operation starts the tray 2 upper limit sensor is blocked Determining that the tray 2 upper limit sensor is blocked the machine stops the tray 2 lift up motor to complete the up operation of the paper lift up plate Control is provided to make sure that the up operation of the tray 2 i...

Page 644: ...ween rollers where the feed roller is pressing the separation roller paper will be left inside the machine through pulling out the paper feed tray If you insert the paper feed tray in that state the paper may get torn in pieces which may fall off and scatter inside the machine It prevents paper from being torn or falling off through retracting the separation roller The separation roller is pressed...

Page 645: ...held slide the edge guide plate to the front and back 1 2 3 4 1 Trailing edge guide plate 2 Trailing edge guide plate lock release button 3 Edge guide plate 4 Edge guide plate lock release lever 2 3 6 Paper size detection When the paper length guide of the drawer is moved the circular paper length detection plate located on the bottom of the drawer turns The paper length is detected by the lever t...

Page 646: ...etermines that there is a paper misfeed It then gives the message PAPER EMPTY TRAY 2 on the panel The paper misfeed display can be reset by opening and closing any of the doors Paper refeeding retry control is not performed from tray 2 even when a paper jam is resolved 2 3 10 Paper feed tray stopper release mechanism The paper feed tray is equipped with a stopper mechanism When paper is placed the...

Page 647: ...n its left side the stopper lock will be released 2 Locking the paper tray stopper Press the stopper on its right side the stopper lock will be locked NOTE A mechanism is provided to push and lock the stopper through closing the paper tray to its home position even if you forget to lock it Mechanism to prevent forgetting lock Y119930 3 Service Manual ...

Page 648: ...of paper and execute stapling NOTE Since the reflective sensor cannot detect the end of the paper with solid black image on the back side or the paper without border stapling may not be executed 4 1 3 2 1 Clincher 2 Staple 3 Paper 4 Reflective sensor 3 3 Safety switch When opening the finisher cover the safety switch turns off to shut off the power supply from the main body For safety reasons the ...

Page 649: ...y and cannot be visually recognized This makes vein patterns extremely difficult to forge or falsify The vein pattern authentication system can provide high security With ultra red LED radiation a finger vein pattern is captured by camera and its image is created The vein pattern image is registered and a person can be identified if the person s vein pattern matches the registered one at the time ...

Page 650: ...tion Red light or orange light is on Unit is experiencing an issue 5 3 Specifications Communication Type TypeA Mifare TypeB FeliCa Communication Speed 106 Kbps 106 kbps 212 kbps 424 kbps 212 kbps 424 kbps Authentication Function Mifare Crypt DES AES Compatible IC cards Non contact IC cards compliant with ISO14443 Type A Non contact IC cards compliant with TN2 SEE55R Non contact IC cards compliant ...

Page 651: ... 6 2 EK P09 6 2 1 Configuration 1 2 4 3 1 USB terminal extension 2 USB terminal standard 3 Local Interface Kit EK P09 4 Voice guidance output terminal 6 2 2 Operation The document can be printed directly from or saved in the USB memory Connecting the USB keyboard dealer option overseas market only will permit keyboard input The local interface kit is mounted when the voice guidance function and fu...

Page 652: ...d Color MF4003 MF3303 P THEORY OF OPERATION 6 EK P08 EK P09 P 78 1 2 1 Portable phone PDA 2 Local Interface Kit EK P09 Service Manual Y119930 3 ...

Page 653: ...tate in ErP Auto Power Off mode the main body can be started from a client to execute a job Basic concept of connection 1 5 12 10 11 6 2 3 7 4 8 9 1 LAN environment 2 Job received from a PC connected to the LAN environment 3 Job received via the wireless LAN access point 4 Wireless LAN access point connected to the LAN environment 5 Job received from a PC connected to the wireless LAN environment ...

Page 654: ...as a wireless LAN access point Primary Mode 5 Wired Wireless Wi Fi Direct Use when the main body is connected to both a LAN environment and a wireless LAN environment The main body is used as a wireless LAN access point With this mode a mobile device excluding iOS can be connected to Wi Fi Direct authentication devices easily 7 2 2 2nd network interface structure 1 Wired Only Use when the machine ...

Page 655: ...ecute a job received from a PC connected to the wireless LAN To execute a job received from an Android device or iOS device called mobile device hereafter connected to the wireless LAN To execute a job from a client via the wireless LAN access point To execute a job received from a PC connected to the LAN To execute a job received from a PC connected to the wireless LAN To execute a job received f...

Page 656: ...1 3 2 2 1 LAN environment 2 Job received from a PC 3 Job received from a mobile device 5 Wired Wireless Wi Fi Direct This mode performs same control as that with Wired Wireless Primary Mode When connected to devices supporting Wi Fi Direct authentication connection without settings of SSID and password is enabled 7 2 3 Operation on ErP Auto Power Off mode On ErP Auto Power Off mode the sub power s...

Page 657: ...Job received from a mobile device 3 Machine on startup 1 To execute a print job Wake On Lan setting is required to configure at Initial settings of a printer driver 3 After the machine starts up execute a job that is received from a client Execute a job received from a PC via the LAN Execute a job received from a PC via the wireless LAN communication Execute a job received from a mobile device via...

Page 658: ... of a printer driver 3 After starting up the main body execute a job received from a client Execute a job received from a PC via the LAN Execute a job received from a mobile device through a direct wireless LAN communication Diagram of operation after starting up the main body 1 1 2 3 1 Job received from a PC 2 Job received from a mobile device 3 Main body on startup After starting up the main bod...

Page 659: ...or MF4003 MF3303 P THEORY OF OPERATION 7 UK 221 P 85 2 Select the Initial settings tab and select Wake On Lan setting 3 Select the Awake before print from Power Saving Mode check box Y119930 3 Service Manual ...

Page 660: ...struction without ECM Becomes a FIF error when DCS shows an instruction which exceeds the ability of the machine FIF of DIS DTC is not sent if last octet is 0 DCS sends FIF whose length is the same as that of the machine When undefined signals are received they are received and ignored in consideration of the future expansion not an error 1 FIF data configuration list DIS DTC a Octet 4 bit Functio...

Page 661: ...ms d Octet 7 bit Function Contents Default 25 Reserved 0 26 Non compression mode 0 27 Error correction mode ECM ability 1 with ECM 0 without ECM 1 28 0 fixed 0 29 Reserved 0 30 Reserved 0 31 T 6 coding MMR ability 1 with MMR 0 without MMR 1 32 Expansion field 1 e Octet 8 bit Function Contents Default 33 Field not valid 0 34 Multi selective polling 1 Ability 0 No ability 0 35 Polled sub address 0 3...

Page 662: ... 1 Full duplex 0 Half duplex 0 68 JPEG coding ability 0 69 Full color mode 0 70 0 Fixed 0 71 12 bits pixel component 0 72 Expansion field 1 j Octet 13 bit Function Contents Default 73 No sub sampling 1 1 1 0 74 Custom illuminance 0 75 Custom gamut range 0 76 North America Letter 215 9 279 4 ability 0 77 North America Legal 215 9 355 6 ability 0 78 Single progression sequential coding T 85 basic ab...

Page 663: ...s Default 105 600 pels 25 4 mm x 600 lines 25 4 mm 1 106 1200 pels 25 4 mm x 1200 lines 25 4 mm 0 107 300 pels 25 4 mm x 600 lines 25 4 mm 0 108 400 pels 25 4 mm x 800 lines 25 4 mm 0 109 600 pels 25 4 mm x 1200 lines 25 4 mm 0 110 Color gray scale 600 pels 25 4 mm x 600 25 4 mm resolution 0 111 Color gray scale 1200 pels 25 4 mm x 1200 25 4 mm resolution 0 112 Expansion field 0 o Octet 18 bit Fun...

Page 664: ...lid 0 8 Reserved 0 b Octet 5 bit Function Contents Default 9 0 fixed 0 10 Reception command 1 11 Transmission speed instruction Refer to 1 12 13 14 15 R8 7 7 l mm or 200 200 pels 25 4 mm 1 7 7 l mm 0 3 85 l mm 16 Two dimensional coding instruction 1 MR 0 MH Changes to 0 or 1 according to a status of devices 1 Transmission speed appointment bit 11 12 13 and 14 11 12 13 14 Contents 0 0 0 0 24 V27 te...

Page 665: ... 0 30 Reserved 0 31 T 6 coding MMR instruction 1 with MMR 0 without MMR 32 Expansion field Changes to 0 or 1 according to a status of devices e Octet 8 bit Function Contents Default 33 Field not valid capability 0 34 0 fixed 0 35 0 fixed 0 36 T 43 Coding 0 37 Plain Interleave 0 38 32K ADPCM voice coding 0 39 Reserved 0 40 Expansion field Changes to 0 or 1 according to a status of devices f Octet 9...

Page 666: ...lor mode 0 70 Default Huffman table use 0 71 12 bits pixel component 0 72 Expansion field Changes to 0 or 1 according to a status of devices j Octet 13 bit Function Contents Default 73 No sub sampling 1 1 1 0 74 Custom illuminance 0 75 Custom gamut range 0 76 North America Letter 215 9 x 279 4 0 77 North America Legal 215 9 x 355 6 0 78 Single progression sequential coding T 85 basic 79 Single pro...

Page 667: ... to 0 or 1 according to a status of devices n Octet 17 bit Function Contents Default 105 600 pels 25 4 mm x 600 lines 25 4 mm 106 1200 pels 25 4 mm x 1200 lines 25 4 mm 0 107 300 pels 25 4 mm x 600 lines 25 4 mm 0 108 400 pels 25 4 mm x 800 lines 25 4 mm 0 109 600 pels 25 4 mm x 1200 lines 25 4 mm 0 110 Color gray scale 600 pels 25 4 mm x 600 25 4 mm resolution 0 111 Color gray scale 1200 pels 25 ...

Page 668: ...tically selected on the fly 8 1 3 V8 V34 sequence 1 V34 a Outline The 33 6kbps data transmission method and protocol including the V8 protocol As for each of full duplex and half duplex startup handshake until data transmission starts is divided into four phases phase1 to 4 and signals used in each phase are regulated b Features Full duplex echo canceler method Half duplex method are regulated for...

Page 669: ...Image Data Sh Flags Sh ALT E Sh Recipient Terminal Control channel re synchronization procedure Main channel re synchronization procedure c 2nd page transmission termination to communication termination Sh ALT E PPS EOP Flags 1 DCN MCF Flags Control channel re synchronization procedure Source Terminal Image Data Sh Flags Sh ALT E Sh Recipient Terminal Line Disconnect Line Disconnect Note Some term...

Page 670: ...rst information category is call function Protocols and GSTN access category are added when the calling side has ability and when needed to inform to a remote station CJ CM termination 300 bps V 21 L When CM is completed Comments START bit 0 and STOP bit 1 are added to 1 octet of all bit 0 Signal format 0 0 0 0 0 0 0 0 0 1 Start bit b0 Stop bit b1 b2 b3 b4 b5 b6 b7 JM Joint Menu Display of common ...

Page 671: ...V18 text phone 1 1 0 Video tex 0 0 1 FAX transmission from the calling terminal 1 0 1 FAX reception in the calling terminal 0 1 1 Data transmission reception 1 1 1 Expansion octet with call function represented by next octet Other than the above Reserved b Modulation mode 3 octets 1st octet b0 b1 b2 b3 b4 b5 b6 b7 Meaning Item No 1 0 1 0 0 Modulation mode category tag b4 0 is first octet 0 1 PCM m...

Page 672: ... Calling Called 1 70 5 ms INFO0c B B L1 L2 B 160 ms 10 ms 550 ms RTDEc or less INFO0a A A INFOh A 2 10 ms 50 ms or more 40 10 ms 670 ms or less 25 ms To Phase 3 A 2400 Hz tone signal output from the called side Level is a set value 1 dB 1800 Hz guard tone Level is a set value 7 dB is output simultaneously from the called side 2400 Hz tone signal output from the called side Phase inversion of A 180...

Page 673: ...ransmitted from the left side 12 14 0 to 7 Output reduction width demanded by the reception modem dB When the modem on the transmitting side can not reduce output at INFO 0 the value is set to 0 15 21 0 to 127 The length of TRN which the modem of the transmitting side send in the Phase 3 x 35 ms 22 0 1 High carrier is user for data mode Tx 23 26 0 to 10 Pre emphasis filer index No which is used fo...

Page 674: ...ameters of the modulation method when data is actually sent and received by using the main channel 1200 bps Both type 0 and type 1 type 0 pre recording coefficient must be received When type 0 is received pre recording coefficient is considered to be 0 and never functions E 1 binary of 20 bit which represents the beginning of user data transmission on the control channel b MPh type 0 bit assignmen...

Page 675: ... 0 Start bit 52 67 Pre coding coefficient h 1 Real 68 0 Start bit 69 84 Pre coding coefficient h 1 Imaginary 85 0 Start bit 86 101 Pre coding coefficient h 2 Real 102 0 Start bit 103 118 Pre coding coefficient h 2 Imaginary 119 0 Start bit 120 135 Pre coding coefficient h 3 Real 136 0 Start bit 137 152 Pre coding coefficient h 3 Imaginary 153 0 Start bit 154 169 Reserve 170 0 Start bit 171 186 CRC...

Page 676: ... 1 s S 128T Main channel 70 5 ms Control channel data To Control channel re synchronization Control channel startup procedure Data 8 Other a Minimum reception signal level RLSD half duplex mode only The reception circuit is turned to ON when the signal becomes 43 dBm or more When the signal becomes 48 dBm or less the reception circuit is turned OFF within 20 to 25 ms after it has exceeded the thre...

Page 677: ... switching parameter Time from reception to voice response transmission CNG detection waiting time 1 0x0e0095 bit6 0 2 sec 1 4 sec 0 5 Tel Fax switching parameter TEL FAX switching ON response details 0x0e0095 bit3 0 Voice response RBT transmission 1 RBT transmission only 0 Those with a Administrator Settings 8 2 2 F code F code is a function to realize confidential transmission bulletin board pol...

Page 678: ...ion Remote entry Print Confidential Box F code compliant machine Box No Box No F code compliant center machine S S S SU U U UB B B B S S S SI I I ID D D 2 1 3 4 1 The confidential box is registered in the center machine Registration of confidential box No and name Registration of communication password Registration of box password 2 Transmission operation on the transmitting side Specification of ...

Page 679: ...letin board No and name 2 Storing documents in the bulletin board 3 Operations for polling reception on the compliant machine Appointment of bulletin board No a BOX specifications Bulletin board box No Represented by a nine digit number Operationally between 1 and 999999999 You can not open the same box number as the confidential box which has been already opened Bulletin board password No Bulleti...

Page 680: ...egistration of group Registering final destinations in the group No 3 Transmission operation in the relay requesting station Instructs relay box no and relay password 4 Transmission to the final remote stations registered in the group 5 Possible to printed relayed documents on the relaying station depends on the parameter setting a BOX specifications Relay box Possible to register up to 5 Relay bo...

Page 681: ...ings Fax Settings TX RX Settings There are two parameters as follows Min Reduction for RX Print 96 95 94 87 a Print Separate Fax Pages ON OFF b The reception recording mode is determined by the above mentioned parameters a and b a Auto reduction reception mode a Don t care except 100 b OFF The received documents are automatically reduced in the range of 35 to 96 b Page division recording reception...

Page 682: ...t documents at reception in the FAX communications a Related settings Compulsory memory reception function Set in the Service Mode FAX System Display Setting When this setting is set to OFF display and actions related to the Compulsory memory reception are not performed In addition you can not perform operations If this setting is not set the following Compulsory memory reception function used is ...

Page 683: ...ion setting is required to be set to ON 4 Closed reception Junk FAX The closed reception function used only at the time of the reception by using the F code SID signal NOTE You can not use this function with the F code communications a Closed reception function Set in the Service Mode FAX System Display Setting b Closed reception function use Set in the Administrator Settings Fax Settings Function...

Page 684: ... internal configuration The clean unit consists of three exhaust fans a UFP filter and a drive board 1 2 4 5 3 1 UFP filter 2 Clean unit drive board CUDB 3 Exhaust fan 2 FM2 4 Exhaust fan 3 FM3 5 Exhaust fan 1 FM1 9 2 OPERATION 9 2 1 Airflow Air is exhausted from the fusing section paper exit section and power supply section of the main body and inside of the machine The clean unit takes the exhau...

Page 685: ...In standby In trouble Stop Stop Stop Initial operation During image stabilization At operation check function when the load check When printing 1 Sided 2 Sided During IU temperature lowering wait control Full speed Full speed Full speed 2 Lock detection The clean unit drive board detects the lock status of the exhaust fans Even when one of the exhaust fans in the clean unit is locked the clean uni...

Page 686: ...This page is intentionally left blank ...

Page 687: ...UPDATINGSTATUS DATE UPDATED PAGES PAGES CODE 2nd EDITION 688 Y119930 3 07 2019 1st EDITION 650 06 2020 ...

Page 688: ... changes to the product described in this manual at any moment and without giving prior warning No part of this document may be copied reproduced or transmitted in any form or by any means electronic or mechanical including photocopying recording or other without obtaining prior written authorisation from the publisher ...

Reviews: