background image

- 89 -

Printer Maintenance

30 

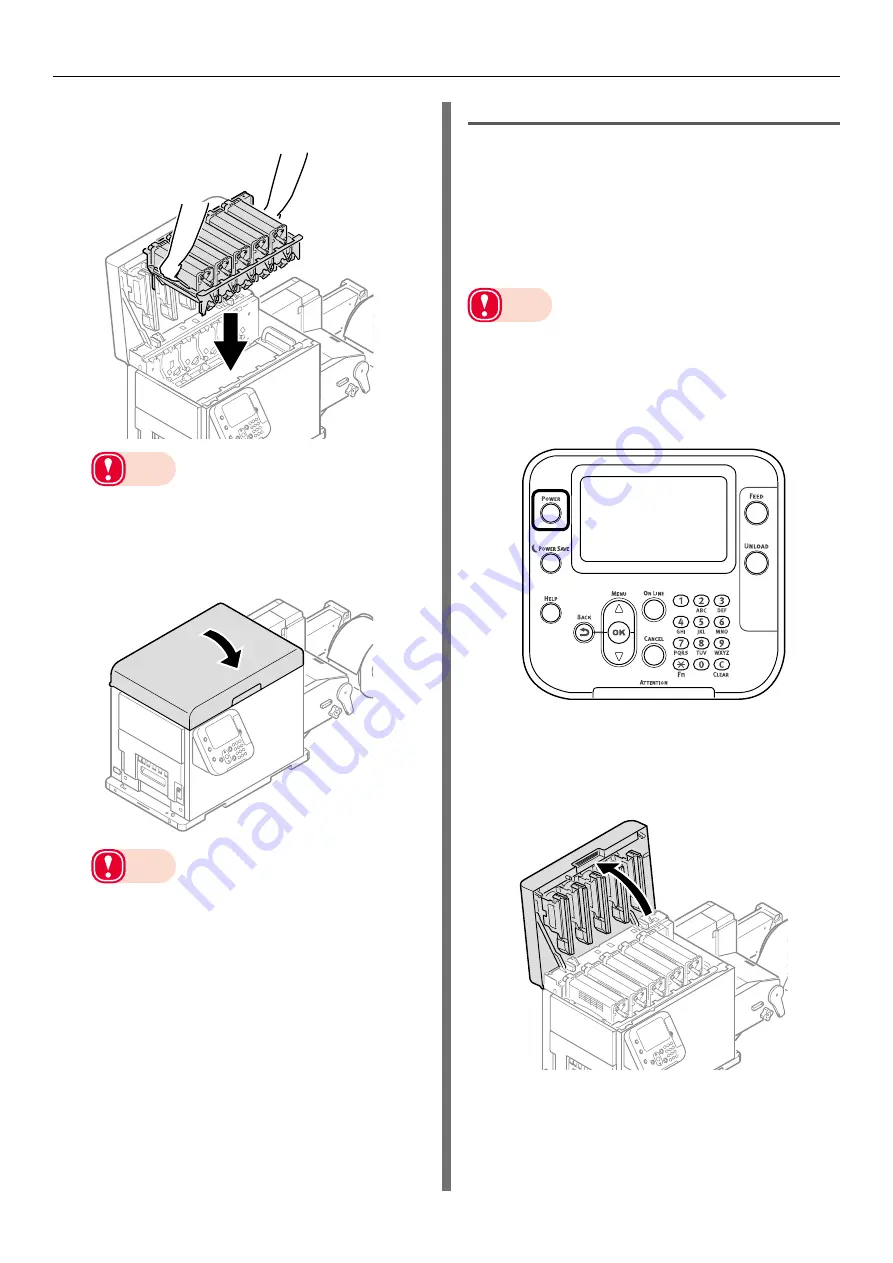
Put the print cartridge set back into the 

printer.

Note


z

There is a risk of pinching your fingers or hands 

when repositioning the print cartridge set. Hold the 

handle parts of the basket for this operation.

31 

Close the top cover.

Note


z

When closing the top cover, there is a risk of 

pinching your fingers or hands in the top cover or 

the top cover's support. Press on the top of the top 

cover to close it.


z

There is a risk of pinching your fingers or hands if 

you hold the LED head while closing the top cover. 

Press on the top of the top cover to close it.

Cleaning LED Heads

Clean the LED heads if the print results are 

blurry, white stripes appear, or if text is bleeding.

Clean the LED heads if the printed results show 

lengthwise white lines, if images are omitted 

lengthwise, or if there is bleeding around text. If 

the LED heads are dirty, it could cause a paper 

jam.

Note


z

Do not use methyl alcohol or thinner. Doing so could 

damage the LED heads.

Press and hold the <POWER> button 

for approximately 1 second to switch off 

the power supply.

Wait a moment, and the LED lamp on 

the <POWER> button will turn OFF.

Grasp the top cover open lever and 

open the top cover.

Summary of Contents for Pro1040

Page 1: ...Pro1040 Pro1050 Maintenance Guide...

Page 2: ...ct functions and operations z z Maintenance Guide This Manual This manual describes how to replace consumables and how to clean and maintain the product The latest versions of the manuals can be downl...

Page 3: ...andling due to ignoring this display may cause personal injury Keys Buttons and Symbols This chapter describes the following keys buttons and symbols Notation Description button key z z Indicates hard...

Page 4: ...roducts and screens Inscriptions The following inscriptions are used in this manual z z Microsoft Windows 10 64 bit Edition operating system Windows 10 64 bit version z z Microsoft Windows 10 operatin...

Page 5: ...roubles 31 Unable to Print 31 Printer Driver Malfunctions 35 Print Quality Is Poor 38 Paper Feed Is Poor 46 2 Maintenance 49 Checking Service Life and Remaining Amounts of Consumables 50 Replacing Con...

Page 6: ...6 Appendix 101 Specifications 102 Major Specifications 102 Network Interface Specifications 104 USB Interface Specifications 105 Roll Paper Specifications 106 Index 115...

Page 7: ...eshooting Solutions Procedure 8 Paper Jams 9 If Messages about Paper Are Displayed 24 If Replace Consumables Messages Are Displayed 25 If Other Messages Are Displayed 26 Printing Troubles 31 1 Trouble...

Page 8: ...cement schedule or service life of consumables appears refer to Page 53 to solve it If other errors appear refer to Page 24 to solve them If trouble occurs refer to the following pages for solutions z...

Page 9: ...inside the printer or when paper is remaining inside the printer even after removing it a message notifying paper jam will appear on the display screen of the control panel and the ATTENTION lamp will...

Page 10: ...age 12 Check Fuser and Exit Unit Paper Remain Please see HELP for details 639 Page 12 When paper is left inside the printer because an error occurred and the printer stopped Paper Detection Error SENS...

Page 11: ...HELP button The error code will appear and the condition of paper jam will be displayed 2 Press the scroll button The next page will appear and solution procedure for paper jam will be displayed Memo...

Page 12: ...e paper is passing through the printer from the unwinder cut it on the output side too 2 Lower the unwinder cover open lever to open the unwinder cover Note z z Securely open the unwinder cover so it...

Page 13: ...open lever and open the top cover 7 Prepare some newspaper or something to spread on a flat surface on which to place the print cartridge set as well as some paper so it is not exposed to light 8 Rem...

Page 14: ...se to release the lock Note z z Be careful not to touch the nearby terminals while turning the belt locking key 12Hold the belt unit handles blue on the left and right and remove the belt unit at an a...

Page 15: ...while removing the belt unit z z When removing the belt unit do not tilt it further than is needed to remove it 13Place the removed belt unit levelly Note z z Place the belt unit on a flat surface as...

Page 16: ...row z z There may be some unfused toner on the paper z z Be careful the fuser and exit unit is very hot immediately after printing 16If paper is being output from the printer use scissors to cut it be...

Page 17: ...ser and exit unit handle 19Hold the fuser and exit unit with both hands and remove it to a level spot Note z z Be careful the fuser and exit unit is very hot immediately after printing 20If there is a...

Page 18: ...exit feed cover Release lever blue Fuser and exit unit handle blue Exit feed cover 22Slowly pull out the paper that is left in the fuser and exit unit in the direction of the arrow Note z z Slowly pu...

Page 19: ...fuser and exit unit handle and firmly push it inside 26Lift up the fuser and exit unit locking lever 27Confirm that the blue levers in the unwinder are raised and then remove the cutter unit Sensor c...

Page 20: ...or any paper or paper dust that has accumulated in the cutter unit and remove any that has accumulated 29Remove any paper that is left in the paper feed path in the unwinder 30Raise the blue lever and...

Page 21: ...h Guide notch Paper guide s edge 32Firmly push the paper guide all the way in the direction of the arrow and then push on the A position to lock it A 33Tilt the belt unit and align the arrow labels re...

Page 22: ...he two belt locking keys clockwise to lock it Note z z Be careful not to touch the nearby terminals while turning the belt locking key 35Put the print cartridge set back into the printer Note z z Ther...

Page 23: ...ng your fingers or hands while closing the unwinder cover Press on the top of the unwinder cover to close it When paper jam occurs frequently Check the following when paper jam occurs very frequently...

Page 24: ...el printing press the CANCEL button If multiple errors occur you may not be able to cancel printing Press the HELP button and solve according to the guidance shown on the Help screen Empty Install pap...

Page 25: ...rtridges Install New COLOR Print Cartridge Print Cartridge Life Please see HELP for details 4100 4101 4102 4103 4104 4140 4141 4142 4143 4144 5600 5601 5602 5603 5604 6800 6801 6802 6803 6804 Blinking...

Page 26: ...ge Not Installed COLOR Please see HELP for details 6940 6941 6942 6943 6944 Blinking The print cartridge is not installed properly Press the HELP button and solve according to the guidance shown on th...

Page 27: ...ess OK Button Please see HELP for details 502 Blinking Printing can be resumed Press the OK button to print the rest of the pages To cancel printing press the CANCEL button Non Genuine Print Cartridge...

Page 28: ...he fuser and exit unit is disconnected Press the HELP button and solve according to the guidance shown on the Help screen Caution unknown Consumable detected Go to User Manual Trouble Shooting to rest...

Page 29: ...solve according to the guidance shown on the Help screen Check Belt Unit Please see HELP for details 330 Blinking The belt unit is not installed correctly Install the belt unit correctly Unnecessary P...

Page 30: ...R SENSOR_ERROR Detailed information of the error will be displayed 7381 Blinking The paper sensor cannot correctly detect paper Paper setting is incorrect or the sensors are not set adjusted Or the se...

Page 31: ...orrectly connected to the printer and the computer Cables are defective Replace with new cables Printer is offline Press the ON LINE button on the control panel Error message has appeared on the displ...

Page 32: ...n OKI LPR Utility z z Check that IP address is not the same as other devices z z Check that correct address is set in IP address Subnet mask and Gateway address User s Guide Duplicate IP address Set a...

Page 33: ...is not connected Firmly insert LAN Cable USB Cable Setup Guide LAN Cable USB Cable is defective Use another LAN Cable USB Cable LAN Cable USB Cable does not meet the standards z z Use a cable of USB...

Page 34: ...en print User s Guide 3 Print Function Settings Fine Quality Printing Slow printing Printing process is also done at the computer side User a computer with fast processing speed Complicated print data...

Page 35: ...me occurs if you switch from another printer to the Pro1050 PCL6 using the printer settings in an application These symptoms occur when there are many types of paper registered in the printer driver I...

Page 36: ...order and then generate print data for all of the copies to be printed When this type of data is being printed the printer cannot recognize that the printout is being collated so the indicator for co...

Page 37: ...ctly RGB color setting utility The User Account Control dialog appears When starting installer or utility the User Account Control dialog may appear Click Yes or Go and run installer or utility as adm...

Page 38: ...Shake the print cartridge up and down and left and right Page 55 Paper not suitable Check the roll paper specifications and then use paper that is described on the roll paper specifications User s Gui...

Page 39: ...belt unit Implement protection against foreign matter and do daily maintenance cleaning Page 57 Stripes in perpendicular direction Paper feed direction There are dents on the print cartridge Replace...

Page 40: ...the 2nd transfer roller is done together with the belt unit which is a consumable Page 57 Dirt has deposited on the paper transfer path Print a few pages as a test Or clean the transfer path Page 79...

Page 41: ...for a long time User s Guide Lateral stripe white dots appear at the solid printing portion Transfer Setting is not properly set If white dots appear in cyan transfer lower the setting value by select...

Page 42: ...er is moist Replace with a new paper Paper not suitable Check the roll paper specifications and then use paper that is described on the roll paper specifications User s Guide The surface of the feed r...

Page 43: ...xposed to high temperatures Change the paper thickness to a thinner setting If it does not improve change it to an even thinner setting The printout appears to have runny streaks Possibly occurs if th...

Page 44: ...to Specified Interval and set Cut Interval to 1 Then print 5 pages of your content on the media you are actually using and use them to measure the differences in the position you want to print and th...

Page 45: ...of solutions Select the solution procedure that suits the printing conditions 1 Use the printer driver to do fine adjustments to the print position 2 Use the control panel menus to compensate for the...

Page 46: ...results of the sensor calibration are registered Furthermore if several of the same model printer are connected to a single computer and if the same paper settings are specified on the printer driver...

Page 47: ...liner Calibrate the sensor User s Guide Paper is not fed The paper settings for the printer are different from the paper settings in the printer driver Check the message on the display screen and if...

Page 48: ...interval between labels is not from 3 to 10 mm A gap between labels from 3 to 10 mm can be used Do not use any others Page 106 The paper size specified in the printer driver is different from the pape...

Page 49: ...49 Checking Service Life and Remaining Amounts of Consumables 50 Replacing Consumables 51 Printer Maintenance 73 2 Maintenance...

Page 50: ...nd exit unit and waste toner box 1 Press the scroll button or 2 Select Configuration and press the OK button 3 Select Supplies Life and press the OK button 4 Select the consumables to check print cart...

Page 51: ...he belt unit which is a consumable z z Fuser and Exit Unit About 150 000 printings When printing 50 sheets of A6 size at the same time z z Waste Toner Box About 150 000 printings When printing three s...

Page 52: ...t Cartridge Only in the User s Guide See Printing using white toner only in the User s Guide for spot color printing 1 Print density is the proportion of area having toner on printable area of 1 page...

Page 53: ...Reference pages When the replacement period approaches When it is time for replacement Print cartridges COLOR 1 Print Cartridge Near End of Life Install New COLOR 1 Print Cartridge Print Cartridge Li...

Page 54: ...ur hands or skin carefully wash it off with soapy water z z If toner gets into your eyes flush them with large amount of water Follow the direction from a doctor if necessary z z Be careful to not get...

Page 55: ...position of the print cartridge to replace by the text and color of the label 3 Pull out the print cartridge 4 Remove the new print cartridge from the packing bag and then shake it vertically and hori...

Page 56: ...Memo z z If the Print Cartridge Life message does not disappear even though you have replaced the print cartridge the print cartridge may not be securely installed Install it correctly z z If Error709...

Page 57: ...tton to cut the roll paper The cut paper will be fed to the supply side and the feeding side 2 Grasp the top cover open lever and open the top cover 3 Prepare some newspaper or something to spread on...

Page 58: ...ockwise to release the lock Note z z Be careful not to touch the nearby terminals while turning the belt locking key 8 Hold the belt unit handles blue on the left and right and remove the belt unit at...

Page 59: ...ers between the handle and the machine while removing the belt unit z z When removing the belt unit do not tilt it further than is needed to remove it 9 Place the removed belt unit levelly Note z z Pl...

Page 60: ...and remove it 11 Remove the 2nd transfer roller from its packaging Note z z Do not touch the roller part sponge part of the 2nd transfer roller Touching it damages the surface of the roller which deg...

Page 61: ...placing Consumables Note z z Be careful the fuser and exit unit is very hot immediately after printing 13Remove the new belt unit from its packaging Note z z Do not touch the belt surface or damage th...

Page 62: ...n open the belt unit handles blue on the left and right Note z z Be careful to not pinch your hands or fingers between the handle and the machine while installing the belt unit Memo z z When the belt...

Page 63: ...of used belt units and 2nd transfer rollers Note z z You cannot clean the belt unit yourself To protect the equipment against dirt and foreign matter do daily maintenance cleaning as described in Pri...

Page 64: ...set as well as some paper so it is not exposed to light 3 Remove the print cartridge set 4 Place the removed print cartridge and cover it with paper so it is not exposed to light 5 Prepare some newsp...

Page 65: ...e belt surface or damage the belt Note z z Be careful not to spill waste toner while removing the belt unit z z Be careful to not pinch your hands or fingers between the handle and the machine while r...

Page 66: ...les Note z z Place the belt unit on a flat surface as shown in the diagram above Do not stand it on its side z z Do not touch the belt surface or damage the belt 9 Remove the waste toner box from the...

Page 67: ...Waste toner could leak out and stain your clothes or hands 10Remove the new waste toner box from its packaging 11 Insert the new waste toner box into the belt unit and firmly push it inside 12When fac...

Page 68: ...hen open the belt unit handles blue on the left and right Note z z Be careful to not pinch your hands or fingers between the handle and the machine while installing the belt unit 14Turn the two belt u...

Page 69: ...k of pinching your fingers or hands if you hold the LED head while closing the top cover Press on the top of the top cover to close it 17Please support recycling of the used waste toner boxes Note z z...

Page 70: ...dle when you lift it When it is hot wait until it cools down before starting the work 1 If roll paper has been fed through the printer press the UNLOAD button to cut the roll paper The cut paper will...

Page 71: ...old the fuser and exit unit with both hands to remove it 5 Remove the new fuser and exit unit from its packaging 6 Pull the fuser and exit unit locking lever on the new fuser and exit unit towards you...

Page 72: ...fuser and exit units Note z z Do not disassemble the fuser output unit and do not force it open Memo z z If you must dispose of the used fuser and exit unit put it in a plastic bag and be sure to dis...

Page 73: ...Roller F Unwinder Paper Guide Sheet Guide Roll Paper Guide F0 Roller Unit Sensor Cover Upper Sensor Cover Lower F1 Roller Unit Cutter Unit Printer Surface Paper Guide Feed Unit Sensor Cover Lower Sen...

Page 74: ...1 Press and hold the POWER button for approximately 1 second to switch off the power supply Wait a moment and the LED lamp on the POWER button will turn OFF 2 Take water or neutral washing agent on o...

Page 75: ...Remove the roll paper 6 Use Wiper moistened with cleaning fluid isopropyl alcohol to wipe any dirt off the sides of the flange and Side Guide 8Inch Side surface Flange Side surface Side Guide 8Inch 7...

Page 76: ...finish cleaning each side until the entire tension bar is clean 10While rotating the guide side roller F use Wiper moistened with cleaning fluid isopropyl alcohol to wipe any dirt off the sides and co...

Page 77: ...els on it use Wiper moistened with cleaning fluid isopropyl alcohol to wipe it off Roll paper guide adjustment knob Roll paper guide 16If there are scraps of paper or glue from labels on the ends of t...

Page 78: ...he F0 roller unit and fasten the two screws 23Use Wiper moistened with cleaning fluid isopropyl alcohol to wipe in one direction the dirt off the sensor cover upper 24Use Wiper moistened with cleaning...

Page 79: ...ment and the LED lamp on the POWER button will turn OFF 2 Take water or neutral washing agent on one piece of cotton cloth and wipe with thoroughly squeezed cloth Furthermore wipe off with another dry...

Page 80: ...it with paper so it is not exposed to light 6 Prepare some newspaper or something to spread on a flat surface on which to place the belt unit 7 Turn the two belt locking keys counterclockwise to rele...

Page 81: ...z Do not touch the belt surface or damage the belt Note z z Be careful not to spill waste toner while removing the belt unit z z Be careful to not pinch your hands or fingers between the handle and t...

Page 82: ...ove Do not stand it on its side z z Do not touch the belt surface or damage the belt 10Pull up the paper guide release lever Paper guide release lever 11 While the paper guide release lever is lifted...

Page 83: ...screen on the control panel as described in the User s Guide z z If the area around the 2nd transfer roller is dirty clean it carefully without touching the rollers z z Be careful not to touch the ter...

Page 84: ...tened with cleaning fluid isopropyl alcohol to wipe in one direction the dirt off the sensor cover lower and upper Sensor Cover Upper Sensor Cover Lower 17While pulling the fuser and exit unit locking...

Page 85: ...user and exit unit is very hot immediately after printing 20Lower the release lever and open the exit feed cover Release lever Exit feed cover Memo z z If you take your hand off the exit feed cover th...

Page 86: ...r side of fuser and exit unit Roller on outside of fuser and exit unit Vertical plastic part between exit 1 roller and exit 2 roller Exit 2 roller Feed surface 22Close the exit feed cover 23Lift the f...

Page 87: ...notch Guide notch Paper guide s edge 27Firmly push the paper guide all the way in the direction of the arrow and then push on the A position to lock it A 28Tilt the belt unit and align the arrow label...

Page 88: ...to not pinch your hands or fingers between the handle and the machine while installing the belt unit 29Turn the two belt locking keys clockwise to lock it Note z z Be careful not to touch the nearby t...

Page 89: ...ld the LED head while closing the top cover Press on the top of the top cover to close it Cleaning LED Heads Clean the LED heads if the print results are blurry white stripes appear or if text is blee...

Page 90: ...damage the LED heads 5 Confirm that the dirt has been removed from the LED heads 6 Close the top cover Note z z When closing the top cover there is a risk of pinching your fingers or hands in the top...

Page 91: ...t etc left along the width of the paper When you change the width of the roll paper check the conditions of the fuser unit and clean it and then restart printing Memo z z Cleaning requires special cle...

Page 92: ...92 Printer Maintenance You cannot reuse cleaning paper Dispose of the cleaning paper that you print After cleaning is finished remove the cleaning paper load new paper and start printing...

Page 93: ...blems occur clean the cutter s blades Note z z Always turn off the power to the printer and remove the power cord from the electric outlet before you start work z z Use the specified tools for cleanin...

Page 94: ...intervals Wait a moment and the machine s power automatically turns off and the LED lamp on the POWER button turns off 2 Remove the paper that is loaded in the unwinder 3 Remove the cutter unit 1 Low...

Page 95: ...nit cutter unit sensor cover upper Note z z Be careful that the cutter unit does not hit the sensor cover upper when removing it 4 Remove any paper left in the cutter unit If there is paper left insid...

Page 96: ...our hands There is a risk of injury 6 Remove any paper left inside the cutter unit If there is paper left inside the cutter unit after you have disassembled it use the tweezers to remove that paper Le...

Page 97: ...scraps or threads from the cloth left inside the blades of the cutter or the cutter unit If there are any left wipe the machine again z z After cleaning wipe the machine dry z z There are blades insid...

Page 98: ...of injury 1 Assemble the F1 roller unit F0 roller unit Cutter part Hold the F0 roller unit and insert it at an angle arrow direction Slide the F0 roller unit in the direction of the arrow 2 Use a fla...

Page 99: ...99 Printer Maintenance 2 Lower the cutter unit lock levers at both ends of the cutter unit 3 Close the unwinder cover The procedure to clean the cutter s blades is complete...

Page 100: ...100 Printer Maintenance...

Page 101: ...101 Specifications 102 Appendix...

Page 102: ...Full color dry type electrophotographic method using 4 consecutive digital LED heads Pro1050 Full color dry type electrophotographic method using 5 consecutive digital LED heads Printable width Paper...

Page 103: ...uivalent you may need to have parts replaced with designated parts paid by maintenance engineers 4 Recommended media Die cut labels on high quality paper 55PW8K Blue 4 x 6 inch produced by Lintec When...

Page 104: ...the control panel Admin Setup Input password Network Setup Gigabit Network Set Enable z z Cables Unshielded twisted pair cable with RJ 45 connector category 5e or better z z Connector pin layout z z...

Page 105: ...fication cable at 5 m or less 2 m or less recommended Use shielded cables z z Transmission modes Full speed maximum 12 Mbps 0 25 High speed maximum 480 Mbps 0 05 z z Power control Self powered device...

Page 106: ...r less Other W2 Paper width 25 4 to 130 mm 1 to 5 12 inches L2 Paper length 12 7 to 1320 8 mm 0 5 to 52 inches L4 Cut size when in cut mode 101 6 mm 4 inches or more However if the length of one label...

Page 107: ...inches or less Other W2 Paper width 25 4 to 130 mm 1 to 5 12 inches L2 Paper length 12 7 to 1320 8 mm 0 5 to 52 inches L4 Cut size when in cut mode 101 6 mm 4 inches or more However if the length of o...

Page 108: ...6 mm 4 inches or more However if the length of one label is less than 101 6 mm 4 inches then the shortest length is 101 6 mm 4 inches as multiple sheets are cut L5 Upper edge cutting margin 1 7 mm 0 0...

Page 109: ...2 to 25 4 mm 0 0787 to 1 inch L1 Label pitch 15 7 to 1330 8 mm 0 618 to 52 3937 inches L2 Label length 12 7 to 1320 8 mm 0 5 to 52 inches L3 Gap between labels 3 to 10 mm 0 12 to 0 3937 inches L4 Cut...

Page 110: ...12 7 to 1320 8 mm 0 5 to 52 inches L3 Gap between labels 3 to 10 mm 0 12 to 0 3937 inches L4 Cut size when in cut mode 101 6 mm 4 inches or more However if the length of one label is less than 101 6 m...

Page 111: ...to 4 9606 inches W5 Left liner area dry edge 2 to 25 4 mm 0 0787 to 1 inch W6 Right liner area dry edge 2 to 25 4 mm 0 0787 to 1 inch L2 Paper length 12 7 to 1320 8 mm 0 5 to 52 inches L4 Cut size whe...

Page 112: ...Label width 25 4 to 126 mm 1 to 4 9606 inches W5 Left liner area dry edge 2 to 25 4 mm 0 0787 to 1 inch W6 Right liner area dry edge 2 to 25 4 mm 0 0787 to 1 inch L2 Paper length 12 7 to 1320 8 mm 0 5...

Page 113: ...carbon L2 Paper length 12 7 to 1320 8 mm 0 5 to 52 inches L4 Cut size when in cut mode 101 6 mm 4 inches or more However if the length of one label is less than 101 6 mm 4 inches then the shortest le...

Page 114: ...114 Specifications...

Page 115: ...115 Index...

Page 116: ...Messages 9 24 25 26 Confirming 9 P Paper jam 9 Printing Troubles 31 Paper feed 46 Printer driver 35 Print quality 38 Unable to print 31 R Replacement schedule 53 Replacing 51 2nd Transfer Roller 57 Be...

Page 117: ...117...

Page 118: ...Oki Data Corporation 4 11 22 Shibaura Minato ku Tokyo 108 8551 Japan https www oki com printing May 2019 47232102EE Rev3...

Reviews: