background image

Getting started > 21

A

CTKEY


UTILITY

The Actkey utility enables the MFP to receive one key touch commands from a locally 

connected computer.
Installation of the Actkey utility is optional and can be found on the Driver/Utilities DVD 

under the Utilities folder.
Information on using the Actkey utility can be found in 

“Scan to local PC” on page 110

.

Setting up the Actkey utility

1.

Install the Actkey utility from the DVD:
Set-up will place an “Actkey” icon on your desktop.

2.

Double-click this icon to open the Actkey console.

3.

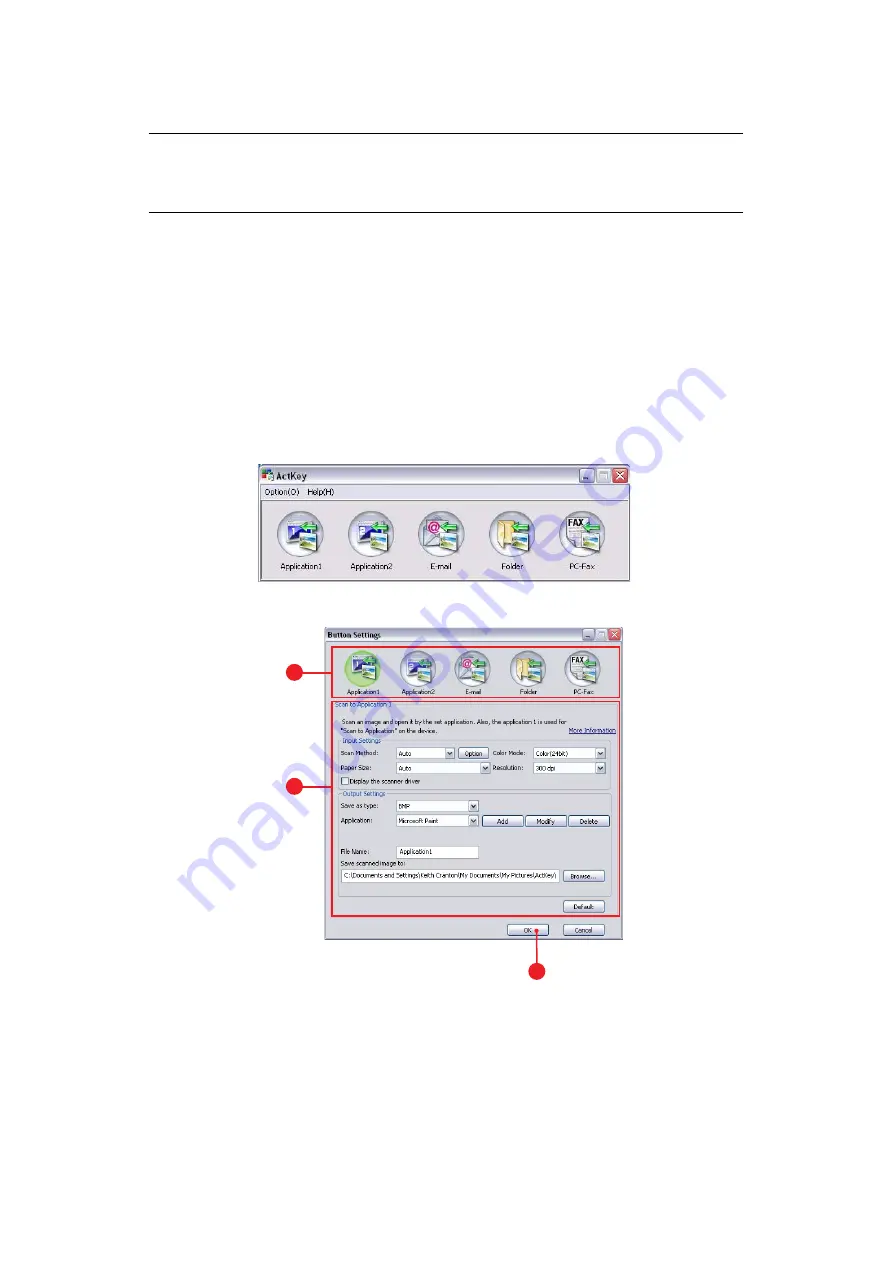
Select Options > Button Settings. The following screen displays.

4.

Select the function you want to set in section (1).

5.

Set the parameters for this function in section (2).

6.

When you have completed settings, press OK (3).
The Utility will return to the Actkey console.

NOTE
The Actkey utility only works via USB connections.

You must have the TWAIN driver installed.

3

2

1

Summary of Contents for MC851+

Page 1: ...MC851 MC861 ES8451 ES8461 ...

Page 2: ...eserved OKI is a registered trademark of Oki Electric Industry Co Ltd Oki Printing Solutions is a trademark of Oki Data Corporation Muratec the Muratec logo and all Muratec product names contained herein are trademarks of Murata Machinery Ltd Microsoft MS DOS and Windows are registered trademarks of Microsoft Corporation Apple Macintosh Mac and Mac OS are registered trademarks of Apple Inc Other p...

Page 3: ...rge amounts of water for at least 15 minutes keeping eyelids open Seek medical attention Spillages should be treated with cold water and soap to help reduce risk of staining skin or clothing MANUFACTURER Oki Data Corporation 4 11 22 Shibaura Minato ku Tokyo 108 8551 Japan IMPORTER TO THE EU AUTHORISED REPRESENTATIVE Oki Europe Limited Blays House Wick Road Egham Surrey TW20 0HJ United Kingdom For ...

Page 4: ...lities 18 Twain and printer drivers 18 Fax driver 19 Configuration tool 20 Actkey utility 21 Paper recommendations 23 Cassette trays 24 Multi purpose tray 24 Face down stacker 24 Face up stacker 25 Duplex unit 25 Loading paper 26 Cassette trays 26 Multi purpose tray 28 Configuring your machine 29 Minimum configuration requirements 29 Pre configuration information 29 General 29 Fax set up 29 Networ...

Page 5: ...stings 120 Maintenance 123 Replacing consumable items 123 Toner cartridge replacement 123 Image drum replacement 127 Transfer belt replacement 130 Fuser replacement 134 Cleaning 137 the unit casing 137 the ADF 137 the document glass 138 the touch screen display 139 the LED head 139 the paper feed rollers 140 Installing upgrades 143 Memory upgrade 143 Additional paper trays and storage cabinet 145 ...

Page 6: ...Contents 6 Moving your mfp 177 Transporting your mfp 179 Index 183 Oki contact details 184 ...

Page 7: ...as compatible and if it does work your product s performance and print quality may be degraded Use of non genuine products may invalidate your warranty Specifications subject to change without notice All trademarks acknowledged NOTE A note provides additional information to supplement the main text CAUTION A caution provides additional information which if ignored may result in equipment malfuncti...

Page 8: ... are guidelines for troubleshooting and maintenance to ensure that it performs at its best Additionally information is provided for adding optional accessories as your printing needs evolve Network Guide helps you become familiar with the functionality of the built in network interface card Printing Guide helps you become familiar with the many features of the driver software supplied with your pr...

Page 9: ...ick on the topic of interest to jump to the required topic If the bookmarks are not available use the Contents on page 4 In the list of bookmarks click on Index to jump to the Index If the bookmarks are not available use the Contents on page 4 Find the term of interest in the alphabetically arranged index and click on the associated page number to jump to the page containing the term PRINTING PAGE...

Page 10: ...anned documents to a server or a personal computer s file folder over an intranet with FTP File Transfer Protocol HTTP Hypertext Transfer Protocol CIFS Common Internet File System protocol The scan to filing feature removes the need for the mail server to handle large attachments Multiple Pages Sending With the Auto Document Feeder ADF the MFP allows a stack of up to 100 page document s to be cont...

Page 11: ...exact model you are using This is where you ll find all the advice assistance and support you could need to help you get the best possible results from your Oki printer The following optional features are available Additional memory to allow printing of more complex pages Additional paper tray s and storage cabinet for loading more media to minimise operator intervention or different paper stocks ...

Page 12: ...ds up to 100 sheets of 80g m paper 5 Paper tray Standard blank paper tray Holds up to 300 sheets of 80g m paper 6 Paper size dial Set to paper size loaded in tray 7 Scanner locks Unlock scanner before using 8 Automatic Document Feeder ADF cover release button Lift to open 9 ADF unit 10 ADF paper tray Holds up to 100 sheets of A4 size paper or 30 sheets of A3 size paper 11 Document cover 12 Control...

Page 13: ...LEDs 22 USB connection type B 23 Duplex unit Provides automatic two sided printing 24 Rear face up stacker This is mainly used for heavy print media When used in conjunction with the multi purpose feed tray the paper path through the MFP is essentially straight This avoids bending the paper around curves in the paper path and enables feeding of up to 200g m media Holds up to 100 sheets of 80g m pa...

Page 14: ...k It also allows you to arrange for a document to be scanned from a remote PC PRINT Pressing this button selects print mode on the touch screen This allows you to select and print out a stored job or an encrypted print job It also allows you to print out a job list of all recent prints or switch the machine to an offline state 4 RESET button Pressing this button returns all settings of a selected ...

Page 15: ...uch screen being black and the LED being illuminated you can return to normal mode by pressing the POWER SAVE button 11 JOB PROGRAMS Pressing this button allows you to program short cuts to your most used operations For example a fax number you send to every day can be programmed in and then allows you to perform that operation at the touch of a button Refer to Job Programs on page 118 12 REPORTS ...

Page 16: ...hook at the rear of the scanner for safe keeping 4 Fit plug 2 in the scanner lock locations as shown 5 Switch the MFP on and turn the mirror carriage mode off a After warming up the Mirror Carriage mode screen displays Touch the Unlock button on the display screen b At the prompt touch Yes to release the mirror carriage CAUTION Make sure the scanner is in the UNLOCKED position before operating 1 2...

Page 17: ...r initiate power saving mode press the Power Save button on the control panel SWITCHING OFF 1 Press the Setup button on the control panel 2 Press the ShutDown button 3 Press Yes to continue 4 At the prompt turn the power switch OFF CAUTION Do not turn off the power switch suddenly as this may damage your MFP Always follow the correct procedure to ensure that no HDD data is lost ...

Page 18: ...t plugging the printer in yet but running the Oki driver installer program from the DVD ROM This installs the TWAIN scanner driver and printer drivers Once the printer is switched on and plugged in the installation is complete Plug and play installation The MFP is a dual device Windows sees it as a scanner and a printer This means when the MFP is plugged into a PC using a USB cable you ll be promp...

Page 19: ...first 5 Next install the Printer driver FAX DRIVER The fax driver allows you to send faxes directly from your computer without printing the document first With the fax driver you are sending the fax data from your computer to the MFP and then the MFP automatically sends the document Installing the fax driver This is installed as part of the Oki driver installer wizard b c a d d b c a ...

Page 20: ...network connections This only detects MC851 MC861 ES8451 ES8461 devices 1 To search and install select Tools Register Device 2 Highlight the required search result and when prompted click Yes The Configuration tool allows you to set up and manage your MFP Refer to Pre configuration information on page 29 for detailed instructions NOTE Network settings such as LDAP configuration cannot be saved to ...

Page 21: ... 110 Setting up the Actkey utility 1 Install the Actkey utility from the DVD Set up will place an Actkey icon on your desktop 2 Double click this icon to open the Actkey console 3 Select Options Button Settings The following screen displays 4 Select the function you want to set in section 1 5 Set the parameters for this function in section 2 6 When you have completed settings press OK 3 The Utilit...

Page 22: ...ties d Select the Events tab e Choose an event from the Select an event drop down menu f In the Actions field click Start this program and choose ActKey from the drop down menu g Click Apply h Repeat steps e to g for each event e g Scan to Application E mail Folder and PC Fax i Click OK to confirm NOTE The following example uses Windows XP The steps may vary if you are using any other operating sy...

Page 23: ...peratures used in the printing process Continued use of pre printed stationery may cause the paper feed performance to degrade over time and paper jams may occur Clean the paper feed rollers as described on page 140 CAUTION Envelopes should be free from twist curl or other deformations They should also be of the rectangular peel and seal type with glue that remains intact when subjected to hot rol...

Page 24: ...all as 100mm and lengths up to 1200mm banner printing For paper lengths exceeding 431 8mm use paper stock up to 128g m and the face up rear paper stacker Use the multi purpose tray for printing on envelopes and transparencies Up to 50 sheets of transparencies or 10 envelopes can be loaded at one time subject to a maximum stacking depth of 10mm Transparencies should be loaded face up and top edge i...

Page 25: ...regardless of driver settings The face up stacker can hold up to 100 sheets of 80g m standard paper and can handle stocks up to 200g m Always use this stacker and the multi purpose feeder for paper stocks heavier than 128g m DUPLEX UNIT The duplex unit provides automatic two sided printing on the same range of paper sizes as tray 2 i e all cassette sizes except A6 using paper stocks from 64 105g m...

Page 26: ...erly separated then tap the edges of the stack on a flat surface to make it flush again 3 3 Load paper long edge feed LEF for letter headed paper load face down with top edge towards the right of the MFP 1 up to mark a 4 Adjust the rear stopper and paper guides 2 to the size of paper being used NOTE For A6 paper remove the rear stopper and re install in the A6 position 1 2 3 1 a 2 3 ...

Page 27: ...le above NOTE If you have two trays and you are printing from the 1st upper tray you can pull out the 2nd lower tray during printing to reload it However if printing from the 2nd tray do not pull out the 1st tray This will cause a paper jam For face down printing make sure the face up rear stacker is closed the paper exits from the top of the MFP Stacking capacity is approximately 250 sheets depen...

Page 28: ...For two sided duplex printing on headed paper load the paper with pre printed side down and the top edge away from the MFP Envelopes should be loaded face up with top edge to the left and short edge into the MFP Do not select duplex printing on envelopes Do not exceed the paper capacity of about 100 sheets or 10 envelopes Maximum stacking depth is 10mm 5 Press the tray latch button 4 inwards to re...

Page 29: ...N INFORMATION GENERAL Ensure that you have the relevant permission PIN numbers before commencing The factory set passwords PIN are FAX SET UP Your MFP has to be set up properly to allow faxing from the machine The following parameters must be set before using the fax function Time zone Date and time See Initial set up on page 70 for details Administrator aaaaaa PIN 000000 Network webpage user admi...

Page 30: ...rd 2 IP Address The Internet Protocol IP address assigned to your machine by your network administrator 3 Subnet Mask The net mask address assigned by your network administrator 4 Gateway IP The gateway IP address assigned by your network administrator 5 SMTP Server The IP address of your SMTP Mail Server assigned by your network administrator 6 SMTP Port The port number of your SMTP Mail Server 7...

Page 31: ...esses Filing destinations Defines the protocols and destinations to send your scanned document to FTP servers web or any personal computers on the network NOTE 1 DHCP server With DHCP Dynamic Host Configuration Protocol a host can automatically be given a unique IP address each time it connects to a network making IP address management an easier task for network administrators If the DHCP server i...

Page 32: ...hown are as accessed via the control panel FROM THE WEB PAGE Type the IP address of the MFP in the URL field of your browser and then press Enter The MFP web page displays For example http 192 168 1 94 NOTE 1 If the system administrator has chosen DHCP then the IP address of TCP IP gateway subnet mask and DNS server will be automatically given 2 When installing the MFP for the first time it is rec...

Page 33: ...ool as described in Configuration tool on page 20 FROM THE CONTROL PANEL Press the SETUP button on the control panel NOTE The Administrative Settings are blocked by a password Refer to Pre configuration information on page 29 NOTE The Admin Setup option is blocked by a password Refer to Pre configuration information on page 29 ...

Page 34: ... mail address before this number Note Inserting will change the listing number Group Select group number to edit Note max 32 groups Speed Dial Register Edit Use the on screen keyboard to enter and assign a speed dial number to the list Note max 500 speed dial entries Delete Select a speed dial number to delete from the list Delete and Sort Select a speed dial number to delete from the list Note Li...

Page 35: ...Letter Head Bond Recycled CardStock Rough Glossy Select the type of media loaded in this tray This will help the MFP to adjust its internal operating parameters such as engine speed and fusing temperature to better accommodate the media to be fed For example letterhead may benefit from a slightly lower fusing temperature to ensure that its ink does not offset Note Copying and fax reception will on...

Page 36: ...ra Heavy Select the media weight to be fed from the multi purpose tray Select Tray Fax Tray 1 2 and 3 OFF ON ON MPTray OFF ON ON Fax Set tray for received Fax Tray usage priority given to trays set to ON then ON If tray is set to OFF it will not be used Fax printing will only occur when the selected tray is defined as containing Plain or Recycled media type Copy Tray 1 OFF ON ON Tray 2 and 3 OFF O...

Page 37: ...elected Encode Communication defaults to None Target URL User defined Use the on screen keyboard to enter the required target URL Port No 00001 00445 65535 Use the arrow keys to select the desired port number Note port number is updated automatically when the protocol type is selected PASV Mode OFF ON Only available when using FTP protocol User Name User defined Use the on screen keyboard to enter...

Page 38: ...e appropriate resolution Remember the higher the resolution the bigger the file size Scan Size Auto A3 B4 A4 SEF A4 LEF B5 SEF B5 LEF A5 SEF A5 LEF Letter SEF Letter LEF Tabloid Legal 14 H LTR LEF Allows you to select the scan size Grayscale OFF ON Select ON to print in grayscale FileFormat Color PDF TIFF JPEG XPS Mono Grayscale PDF TIFF JPEG XPS Mono Binary PDF TIFF Select the appropriate file fo...

Page 39: ...ys the number of colour and mono A4 letter impressions Scan Displays the number of pages scanned from the flatbed and ADF Supplies Status Displays consumable status information System Displays system information 1 Serial No 2 Asset No 3 Lot No 4 CU Version 5 PU Version 6 SIP Version 7 Scanner Version 8 Total Memory 9 Flash Memory Network Displays network information 1 IPv4 addressa 2 Subnet Maska ...

Page 40: ...3 Adjust density Darker Enhance image sharpness and colour Lighter Reduce hue and colour Zoom Auto 100 Specify zoom option Sort OFF ON Specify how to output multiple page multiple copy jobs Margin OFF ON Adjust the top and left margin settings using the arrow buttons Front Back input range 25 0 25mm 1mm Step 1 0 0 1 0in 0 1in Step EdgeErase OFF ON Adjust the width settings using the arrow buttons ...

Page 41: ...just RGB contrast settings Fax Setup Default Settings Doc Type Normal Fine Ext Fine Photo Background Allows you to specify the type of images on the document Density Lightest Lighter Normal Darker Darkest Adjust density Darkest Enhance image sharpness and colour Lightest Reduce hue and colour Scan Size Auto A3 B4 A4 SEF A4 LEF B5 LEF A5 LEF Letter SEF Letter LEF Tabloid Legal 14 H LTR LEF Allows y...

Page 42: ...st four digits of the destination fax numbers with those registered in the target If ON the MFP will send only when they match Check broadcast dest OFF ON Fax number confirmation screen displays before sending the fax Confirm Dial OFF ON When ON you will be asked to re enter the destination fax number The fax will only be sent when the two numbers match Auto Print Journal Report Setting OFF ON Ena...

Page 43: ...uired The Minimum and default settings vary depending in individual countries Examples min 2 and default 2 for Australia min 3 and default 3 for New Zealand High Resolution 400dpi 600pdi Select the resolution Rx Reduc Rate Auto 100 Select the Rx reduction rate Reduc Margin 00 24 85 mm 0 0 0 9 3 3in Select the reduction margin Rotate Tx OFF ON Enable disable fax image rotation Condition only availa...

Page 44: ...Allows you to select the appropriate resolution Remember the higher the resolution the bigger the file size Scan Size Auto A3 B4 A4 SEF A4 LEF B5 SEF B5 LEF A5 SEF A5 LEF Letter SEF Letter LEF Tabloid Legal 14 H LTR LEF Allows you to select the paper size to match the document size Cont Scan OFF ON Allows you to continue scanning more documents Allows you to construct a single scan job from multip...

Page 45: ...trast settings E mail Setup File Name User defined Use the on screen keyboard to enter a file name Max 64 characters Template Edit Subject Enter standard e mail subject text Max 80 characters You can create up to 5 different e mail templates Edit Body Enter standard e mail body text Max 256 characters You can create up to 5 different e mail templates From Reply To From Enter the e mail sender addr...

Page 46: ...election switching Media Check Disable Enable Determines whether the machine checks the size of the media loaded matches that required for the document sent to print Print Setup Copies 001 999 copies Enter the number of copies of a document to be printed from 1 to 999 Duplex OFF ON Switches the duplex 2 sided function OFF ON Binding Long Edge Short Edge Sets the default binding to LEF or SEF Only ...

Page 47: ...e switches between colour and black and white printing However the 30 60 second cool down delay described for Mono 34PPM is avoided by limiting the mono speed to color speed This setting may be preferred for mostly black and white printing with some colour pages or where most print jobs are entirely colour or entirely black and white Color Speed The machine runs at color speed for all print jobs T...

Page 48: ...ecovery Disable Enable Specifies whether the machine should perform jam recovery after a paper jam occurred If enabled the printer will attempt to re print any pages lost due to a paper jam once the jam has been cleared Paper Black Setting 2 1 0 1 2 Used for micro adjustment when very visible faded print results or light specks or streaks result when printing in Plain Paper Black setting Decrease ...

Page 49: ...fore printing in order to reduce horizontal white lines This shortens image drum life Hex Dump OFF ON Prints out the data received from the host PC in hexidecimal code Color Menu Density Control Manual Auto If set to Auto image density will be automatically adjusted at power on when a new image drum or toner cartridge is installed and at intervals of 100 300 and 500 drum counts If a 500 drum count...

Page 50: ... of each colour cyan magenta yellow and black Normal setting is 0 Magenta Darkness 3 2 1 0 1 2 3 Yellow Darkness 3 2 1 0 1 2 3 Black Darkness 3 2 1 0 1 2 3 Adjust Registration Execute Press Yes to execute or No to cancel Performs automatic colour registration adjustment Normally this is done on power on and when the top cover is opened and then closed This process accurately aligns the cyan magent...

Page 51: ...uto When Manual non critical warnings such as requests for a different paper size can be cleared by pressing the STOP button When set to Auto they are cleared when the print job resumes Auto Continue OFF ON Determines whether or not the MFP will automatically recover from a memory overflow condition Error Report OFF ON If ON the MFP will print error details when a PostScript emulation error occurs...

Page 52: ...t OFF ON The thinnest line width in PCL a 1 dot line may look broken ON when the thinnest line width is specified line width is emphasized to look wider OFF the line appears as specified Tray ID Tray 2 01 05 59 Tray 3 01 20 59 MP Tray 01 04 59 Sets the number to specify Tray 2 Tray 3 and MP Tray for the paper feed destination command in PCL5e emulation IBM PPR Setup Character Pitch 10 CPI 12 CPI 1...

Page 53: ...cter SAME Regardless of CPI same height DIFF As CPI character heights vary Cont Paper Mode OFF ON If you have multiple feed trays installed in which the media is the same size and type you can enable continuous paper mode When one tray runs out of paper the MFP will switch to another tray EPSON FX Setup Character Pitch 10 CPI 12 CPI 17 CPI 20 CPI PROPORTIONAL Specifies character pitch in this emul...

Page 54: ...the paper Fit to Letter Disable Enable Sets the printing mode that can fit print data equivalent to 11 inches 66 lines in the LETTER size printable area Text Height Same Diff Sets the height of a character SAME Regardless of CPI same height DIFF As CPI character heights vary Cont Paper Mode OFF ON If you have multiple feed trays installed in which the media is the same size and type you can enable...

Page 55: ...Enable Enables or disables this network protocol EtherTalk Disable Enable Enables or disables this network protocol Frame Type Auto 802 2 802 3 ETHERNET II SNAP Selects the Ethernet MAC layer frame type Display condition Netware must be enabled IP Address Set Manual Auto Specifies whether IP address allocation is automatic DHCP or manually assigned Display condition TCP IP protocol must be enabled...

Page 56: ...protocol must be enabled IPSec Disable Enable Enable via the web page or Configuration Tool SNMP Disable Enable Enables or disables SNMP of FTP TCP IP or NetWare Display condition TCP IP protocol must be enabled Network Scale Small Normal Normal Can work effectively even when connected to a HUB that has a spanning tree feature However printer start up time gets longer when computers are connected ...

Page 57: ...ined Set a user ID for the SMTP server SMTP password User defined Set a password for the SMTP server POP User ID User defined Set a user ID for the POP3 server POP password User defined Set a password for the POP3 server LDAP Server Setting Server Setting LDAP Server user defined Set the host name for the LDAP server Port No 00001 00389 65535 Set the port number Timeout 010 030 120 Enter the LDAP ...

Page 58: ... Default Mode Copy Fax Scan Print Address Book Tab Settings Fax Do not register All Group01 Group32 Numeric List ABC DEF GHI JKL MNO PQRS TUV WXYZ Symbol Maximum of three destination tabs can be registered to display on the standby screen E mail Do not register All Group01 Group32 Numeric List ABC DEF GHI JKL MNO PQRS TUV WXYZ Symbol Maximum of three destination tabs can be registered to display o...

Page 59: ...t OPCompleteSou nd Copy Completed OFF TYPE1 TYPE2 TYPE3 Test Select sound option to acknowledge when a particular job type is completed Press Test to hear sound demo Transmission Completed OFF TYPE1 TYPE2 TYPE3 Test Rx Completed OFF TYPE1 TYPE2 TYPE3 Test Rx Print Completed OFF TYPE1 TYPE2 TYPE3 Test E mail sent Completed OFF TYPE1 TYPE2 TYPE3 Test Report Print Completed OFF TYPE1 TYPE2 TYPE3 Test...

Page 60: ...ming ACK In Busy ACK While Busy Specify acknowledgment timing I PRIME Disable 3 Micro Sec 50 Micro Sec Specify I PRIME setting Parallel PS Protocol ASCII Raw Select data format Offline Receive Disable Enable Enable disable offline receive System Setup Access Control PIN User Password Disable Enable access control to restrict usage to authorised user only User Auth Method Local LDAP Secure Protocol...

Page 61: ...Maint Setup Initial Lock must be set to Disable Format Partition PCL Common PS Making changes will automatically restart the system Press Yes to continue or No to cancel Condition for display Storage Maint Setup Initial Lock must be set to Disable Storage Maint Setup Check File System Execute Making changes will automatically restart the system Press Yes to continue or No to cancel Check All Secto...

Page 62: ...t cont Reset Settings Execute Continuing will automatically restart the system Press Yes to continue or No to cancel Job Log Clear Execute Continuing will clear the job logs Press Yes to continue or No to cancel FEATURE OPTION DESCRIPTION ...

Page 63: ... 2 Specify the monitor control setting TTI Register Edit TTI 1 TTI 2 TTI 3 Register Edit transmit terminal identification TTI settings Standard TTI TTI 1 TTI 2 TTI 3 Select default TTI from the registered list TTI Number Use the numeric keypad and on screen buttons to enter your fax number TTI calendar type yyyy mm dd mm dd yyyy dd mm yyyy Specify the TTI calendar date format Super G3 OFF ON OFF G...

Page 64: ... Web Page but cannot be switched on via the Operator panel Turn off and on the power of unit if this setting is switched FEATURE OPTION DESCRIPTION Register Use the on screen keyboard to enter and register a job program Note After registering the process press the Job Programs button on the control panel to save Refer to Job Programs on page 118 Delete Select the job program number you wish to del...

Page 65: ...e MFP ensuring that all files on the internal hard disk are closed before power is turned off Only power the MFP off when the display indicates that shutdown is complete Note If you are shutting down the MFP before moving it to another location refer to Appendix A Moving and transporting on page 177 for full instructions ...

Page 66: ...setting any text in the field of Login name and Password for the MFP On the other hand if the HTTP server does not allow an anonymous account for authentication of connection to the web page the user will be prompted to enter a user name and password first when connecting to the web site In this mode the file saving feature is available only when entering the user name and password permitted by th...

Page 67: ...nel 2 Select Default Web site and right click C Inetpub wwwroot X cabinet 3 Select Properties 4 In the X cabinet dialogue box select the Directory security tab and click Edit for Anonymous Access and Authentication Control Make sure Anonymous Access is selected in the Authentication Methods dialogue box ...

Page 68: ...mputer system in the username file has sufficient privilege to access the file system NOTE If the file management system on your server is NTFS in order to allow IIS to use an anonymous account to access the files in the directory of C Inetpub wwwroot X cabinet Files you have to make sure the anonymous account has the correct privileges You should make the following settings 1 Select C Inetpub www...

Page 69: ...s a file saving protocol generally used for resource sharing of a network in Microsoft Windows systems Set up the shared directory as per the network settings for sharing in MS Windows Under the User level mode of Windows 2000 use the account and password with the privilege of write as the login name and Password for the MFP folder NOTE 1 For security of the scanned files Everyone should not be al...

Page 70: ...the on screen arrows or keypad set the correct date and time 8 Press Enter to confirm ADVANCED SET UP Your machine offers a multitude of features which reduce the time required for manual operation and make fax communications more efficient Assigning fax numbers to the address book The machine can hold up to 500 speed dial numbers and 32 group settings in the address book To add a new number to th...

Page 71: ...ur screens to exit the menu From the Fax Ready screen To assign a fax destination number to a speed dial entry 1 Press the Fax button on the control panel to prompt the Fax Ready screen 2 On the Numeric List tab select the desired speed dial number 3 At the prompt select Yes to continue and register your destination fax number or select No to cancel the operation NOTE If the destination fax number...

Page 72: ...ed to route calls internally for example in a company When dialling a telephone number if a prefix access number is required to open an outside line the line is connected to a PBX If this MFP is going to be connected to a PBX please make the following changes to enable it to recognise the prefix digits in the telephone numbers used to obtain access to the outside line After dialling the prefix dig...

Page 73: ...ton 5 From the touch screen press the Other Settings button 6 From the touch screen press the Redial Tries button 7 Use the on screen arrow buttons and keypad to enter the required redial attempts between 0 and 15 then press Enter 8 From the touch screen press the Redial Interval button 9 Use the on screen arrow buttons and keypad to enter the required redial interval between 0 and 5 minutes then ...

Page 74: ...ng response 1 Press the Setup button on the control panel 2 From the touch screen press the Admin Setup button 3 Using the on screen keyboard enter the administrator password and press Enter 4 From the touch screen press the Fax Setup button 5 From the touch screen press the Other Settings button 6 From the touch screen press the Ring Response button 7 Using the arrow keys select the required resp...

Page 75: ...orward faxes to e mail can be configured through the web page or the Configuration Tool For illustration purposes only the configuration options shown are as accessed via the web page 1 Type the IP address of the MFP in the URL field of your browser and then press Enter The MFP web page displays For example http 172 31 42 56 2 Click Administrator Login NOTE The Administrative Settings are blocked ...

Page 76: ...mission Settings 1 5 To create a new Automated Delivery Setting click New 2 on the first available location 6 In the Automated Delivery field 3 type a description such as Forward faxes 7 In the Automated Deliver drop down menu 4 select ON MFP 1 1 1 1 2 MFP ...

Page 77: ...ss 7 and click Add 8 11 The address will display in the Address List 9 12 Click OK 10 13 In the Print drop down menu select ON or OFF 11 to determine if received faxes will print NOTE Multiple addresses can be added If there is an e mail address book that has already been configured addresses can also be pulled from that list by clicking Address Book 6 3 4 5 MFP 8 7 9 10 MFP ...

Page 78: ...ick Submit 12 The new delivery setting displays in the list With this particular example all incoming faxes will now be automatically forwarded to the e mail address that was added to the Address List and they will not print 12 11 MFP ...

Page 79: ...displayed on the touch screen press the PIN No field and use the numeric keys to enter your PIN then press Enter Press the Log in button If the User Password screen is displayed on the touch screen press the User Name field and use the on screen keyboard to enter your user name Press Enter to confirm Press the Password field and use the on screen keyboard to enter your password Press Enter to conf...

Page 80: ...g sheets at one time Up to 100 sheets of A4 paper of weight 80 g m2 Up to 50 sheets of A4 paper of weight 42 128 g m2 Up to 30 sheets of A3 paper of weight 42 128 g m2 The ADF can handle media up to 900mm in length operator assistance required If you need to scan copy send fax pages from books newspaper clippings or paper with wrinkles or curls place them on the glass PLACING DOCUMENT S IN THE ADF...

Page 81: ... with the text face UP in the ADF and make sure that the top of each page is fed in first 3 Adjust the Paper Guides 1 to centre the document in the ADF PLACING DOCUMENT S ON THE GLASS 1 Open the document cover 2 Place your document with the text face DOWN on the glass and align it to the upper left corner 3 Close the document cover 1 2 3 ...

Page 82: ...r of copies select the number of copies with the numeric keypad To increase the copy count 1 If required press the Copy button on the control panel to prompt the Copy Ready screen 2 Enter number of copies required using the numeric keypad The touch screen display will confirm the copy count selected NOTE Copying will only occur when the selected tray or one of the trays when Tray Selection is set ...

Page 83: ... page 118 Repeat OFF x2 x4 x8 Allows you to print multiple images of an original document on a single sheet Book Copy OFF Left Right Allows you to select how book copies are printed whether the left hand page or right hand page is printed first If enabled set your original document on the glass Note when book copy is enabled ensure that Zoom is set to Auto see page 86 Margin OFF ON Allows you to c...

Page 84: ...dth but different length in the ADF The following document sizes can be set concurrently A3 and A4 LEF B4 and B5 LEF A4SEF and A5 LEF When enabled the tray setting is automatic you cannot specify a tray manually Scan Size Auto A3 B4 A4 SEF A4 LEF B5 SEF B5 LEF A5 SEF A5 LEF Letter SEF Letter LEF Tabloid Legal 14 H LTR LEF Allows you to select the document size Cont Scan OFF ON Allows you to contin...

Page 85: ...5 High sTHR Allows you to block out the colour background of the image assuming document has a colour background such that the background colour is not printed Use Show Through when copying documents that are printed on both sides for example newspaper This function removes the reverse image and characters 3 Density 3 2 1 0 1 2 3 Adjust density Darker Keep colour intensity and darker image Lighter...

Page 86: ... and buttons Enlarge 141 A4 A3 B5 B4 122 A4 B4 A5 B5 115 B4 A3 B5 A4 Reduce 86 A3 B4 A4 B5 81 B4 A4 B5 A5 70 A3 A4 B4 B5 6 Sort OFF ON ON prints 1 entire copy set of the multiple copy document at a time e g pages 1 2 3 1 2 3 1 2 3 OFF batch prints the multiple copy document page by page e g pages 1 1 1 2 2 2 3 3 3 NO FEATURE OPTION DESCRIPTION 1 2 3 4 5 6 ...

Page 87: ...from the speed dial list Refer to Assigning fax numbers to the address book on page 70 for details pressing the Others button on the touch screen then pressing Group Tx and selecting from the group list 4 Using the touch screen 2 set your send properties as required Refer to Advanced operation on page 88 for details 5 Press the Mono button 3 to start sending your document s NOTE If you wish to can...

Page 88: ...o construct a single scan job from multiple individual sheets or originals Refer to Continuous scan mode on page 118 for details TTI OFF ON Prints TTI information on the header of the transmitted fax TTI Select user defined Select the user defined TTI header Note TTI must be ON MCF Report OFF ON Select ON to print a fax confirmation after transmission Delayed Tx user defined Delayed transmission a...

Page 89: ... to 20 F code boxes can be registered Up to 30 documents can be stored in one box Note Polling and FPolling must be OFF Memory Tx OFF ON Select OFF to enable real time transmission i e fax transmission synchronisation with scanning Dialling Options user defined Use the numeric keypad to enter the fax number Allows you to add a prefix pause tone etc for example if you are dialling an extension numb...

Page 90: ...d dial number 3 Doc Type Normal Fine Ext Fine Photo Background Allows you to specify the type of images on the document 4 Density Lightest Lighter Normal Darker Darkest Adjust density Dark Keep colour intensity and darker image Light Reduce colour intensity and gives lighter image 5 Redial Displays list of previously dialled numbers Select required number from the list then press the Start button ...

Page 91: ...c Type Selection options as above Density TTI TTI Select MCF Report PreFix Add dialling prefix to speed dial number Speed Dial 001 500 Enter the required speed dial number using the numeric keypad or the on screen arrows Volume OFF Low Middle High Alter the volume setting Tone Change dialling method for the region Redial Displays list of previously dialled numbers Select required number from the l...

Page 92: ...can be executed On the receiving side of the secure communication unless the specified ID code is entered a received document cannot be printed therefore this function is useful when sending a document that needs a security protection Refer to Transmission using a sub address F code transmission on page 96 Printing stored documents on page 98 F Code Bulletin Box Communication When the F code bulle...

Page 93: ...g an F code secure box 1 Press Secure Box a Enter a sub address using the numeric keypad b Press Enter 2 Register an ID Code number 4 digits using the numeric keypad 3 Press Enter 4 Enter a box name a Press Box name b Enter a box name using the on screen keyboard c Press Enter NOTE Make sure to register a sub address Register a password if necessary When a secret number is set only the specific pe...

Page 94: ...word b Using the numeric keypad enter a password c Press Enter NOTE Up to 20 digits of numbers and can be used for a password Registering a password is optional The same password can be registered in other boxes NOTE Retain period input range is between 0 and 31 days When 0 is set documents are retained for an indefinite period NOTE A sub address can be registered using up to 20 digits Numbers and...

Page 95: ... ID Code a Press I D Code b Enter an ID Code number 4 digits using the numeric keypad c Press Enter NOTE When Rx Protect is set to ON only polling transmission is available When Rx Protect is set to ON Auto Print and OverWrite features are disabled NOTE When Auto Print is set to ON a document received in the notice board is printed NOTE When OverWrite is set to ON the previous stored document is o...

Page 96: ...ent s with text face UP in the ADF or face DOWN on the glass 2 Press the Fax button on the control panel to prompt the Fax Ready screen 3 Press Others 4 Press F Code Tx 5 Using the numeric keypad enter the sub address that is registered in the recipient machine 6 Press Enter 7 Using the numeric keypad type in the password and press Enter 8 Press Close to return to the standby screen 9 Enter the fa...

Page 97: ...on the glass 2 Press the SETUP button on the control panel 3 Press Store Doc Setting 4 Press Store 5 Press Bulletin Box Doc 6 Select the F code box in which to store the document 7 If an ID code is set enter the number 4 digits using the numeric keypad 8 Select a method of storing documents Over Write replace a document in the box Add add a new document to the box 9 Press Yes to continue or No to ...

Page 98: ...c Setting 3 Press Delete 4 Press Bulletin Box Doc 5 Select the F code box storing the document you want to delete 6 If an ID code is set enter the number 4 digits using the numeric keypad 7 Select the file number of the document you want to delete 8 Press Yes to continue or No to cancel NOTE When a document is received into an F code box the F code receiving notice is printed Check the F code box ...

Page 99: ...receive faxes automatically if you wish to change this to manual receive refer to Auto Rx on page 89 for details Your MFP is set to fax ready reception mode if you wish to change this refer to Reception Mode on page 63 SENDING A FAX FROM YOUR PC 1 From your application s File menu select Print 2 In the Select Printer window highlight the fax driver option NOTE If the MFP is actively sending or rec...

Page 100: ...lity to Fine Normal or Fast c Set the orientation to Portrait or Landscape 5 On the Cover Sheet tab a Set the cover sheet usage settings as appropriate b Select a cover sheet format 6 On the Sender tab a Enter your name b Enter your fax number c Enter comments if required d If required select the Add an outside call number checkbox and enter the Outside call number as appropriate ...

Page 101: ...nt list e If you need to remove a number from the recipient list highlight the appropriate name and then press the Delete button f Once you have completed your list press the OK button to close the Select Recipients window 8 Press the OK button to close the fax driver window 9 Press OK to start sending your fax Adding fax numbers to the phone book To add a fax destination number to the phone book ...

Page 102: ...f required type in a Comment 9 Press the OK button to save Adding new groups to the phone book To add a new group to the phone book 1 From your application s File menu select Print 2 In the Select Printer window highlight the fax driver option 3 Press the Preferences button to display the fax driver window 4 Click the Phone book button The phone book screen displays 5 Select FAX number New Group 6...

Page 103: ... 7 select Start Devices and Printers 2 Right click your machine icon and select Printer Preferences 3 In the Setup tab click the Phone Book button 4 From the pull down menu click Tool Export 5 In the Export File screen enter a name for the file and click the Save button The phone book is saved 6 Import the saved phone book file to the other computer a In the fax driver installed on the computer th...

Page 104: ...l USB Memory Local PC Network PC Remote PC 4 Set your scanning options as required For further details refer to the following sections 5 Press Mono 2 to scan your document s in black and white or Colour 3 to scan your document s in colour NOTE Local PC select target application from the control panel on the MFP Remote PC select target application from utility on your PC NOTE If you wish to cancel ...

Page 105: ... mail subject and text templates Use the on screen keyboard to edit the subject text or touch the on screen button to select the subject text templates File Name User defined Use the on screen keyboard to enter an appropriate file name DuplexScan OFF Right Left Top Select the bound originals binding position Cont Scan OFF ON Allows you to continue scanning more documents Allows you to construct a ...

Page 106: ...t range 05 50mm 1mm Step 0 2 2 0in 0 1in Step EraseCentr OFF ON Adjust the width settings using the arrow buttons Input range 01 50mm 1mm Step 0 1 2 0in 0 1in Step Contrast 3 2 1 0 1 2 3 Adjust contrast setting High Enhance brightness Low Reduce brightness Hue R 3 2 1 0 1 2 3 G Adjust R G balance settings G Enhance green R Enhance red Saturation Low 3 2 1 0 1 2 3 High Adjust saturation setting Hig...

Page 107: ...pe Text Text Photo Photo Allows you to specify the type of images on the document Removal for Background Show Through sTHR Auto OFF 1 Low 2 3 4 5 High sTHR Allows you to block out the colour background of the image assuming document has a colour background such that the background colour is not printed Use Show Through when scanning documents that are printed on both sides for example newspaper Th...

Page 108: ... address Up to 80 characters can be entered in the Destination Reply to and the Subject Template fields If the administrator has set the SMTP or POP3 authentication after sending your scanned document to e mail addresses and if no more transmission is required select Others Logout to log out of the system This is to prevent misuse of the user s e mail account for sending e mails If there is no oth...

Page 109: ... screen press the USB Memory option 5 Using the options available on the touch screen you can enter a file name and alter the scan output to suit your needs 6 Press the Mono button to scan your document s in black and white or the Colour button to scan your document s in colour On completion the machine will beep and a confirmation message displays 7 Remove the USB memory from the machine NOTE If ...

Page 110: ...tility for Application 1 b Folder When the Folder function is selected the Actkey Utility executes PC Scan in accordance with your settings for Scan to Folder The scanned image data is saved in the specified folder c E mail When the E mail function is selected the Actkey Utility executes PC Scan in accordance with your settings for Scan to E mail The scanned image data is saved in the specified fo...

Page 111: ...nd Actkey interface Double click the Actkey Icon on your desktop The Actkey console below displays The functions below can now be controlled from the PC Scan to Application1 Scan to Application2 Scan to Email Scan to Folder Scan to PC Fax As the cursor passes over an icon the parameters set for that icon appear in a text box A single click will select that option Scan to Application2 works exactly...

Page 112: ...TION 1 Others SubFolder User defined Enter the subdirectory where the scanned document will be stored DuplexScan OFF Right Left Top Select the bound originals binding position Cont Scan OFF ON Allows you to continue scanning more documents Allows you to construct a single scan job from multiple individual sheets or originals Refer to Continuous scan mode on page 118 for details Direction Left Edge...

Page 113: ...ns Input range 01 50mm 1mm Step 0 1 2 0in 0 1in Step Contrast 3 2 1 0 1 2 3 Adjust contrast setting High Enhance brightness Low Reduce brightness Hue R 3 2 1 0 1 2 3 G Adjust R G balance settings G Enhance green R Enhance red Saturation Low 3 2 1 0 1 2 3 High Adjust saturation setting High Enhance image sharpness Low Reduce hue RGB R 3 2 1 0 1 2 3 G 3 2 1 0 1 2 3 B 3 2 1 0 1 2 3 Adjust RGB contras...

Page 114: ...newspaper This function removes the reverse image and characters 3 Density 3 2 1 0 1 2 3 Adjust density Darker Enhance image sharpness and colour Lighter Reduce hue and colour 4 Resolution 75dpi 100dpi 150dpi 200dpi 300dpi 400dpi 600dpi Allows you to select the appropriate resolution Remember the higher the resolution the bigger the file size 5 Scan Size Auto A3 B4 A4 SEF A4 LEF B5 SEF B5 LEF A5 S...

Page 115: ...rofile name 6 Press Enter to assign the name and proceed to the profile screen 7 Update the profile parameters as necessary refer to Profile on page 37 8 Press Enter to save the profile entry or press Cancel to exit without saving Deleting a network profile To delete a network profile 1 Press the Setup button on the control panel to prompt the Setup screen 2 On the touch screen press Profile From ...

Page 116: ...ess you want to choose another scanner 6 Select a profile Choose from a B W Document b Grayscale Document c Color Document d Color Photograph NOTE This feature is only available when you connect to your MFP via USB NOTE After Remote PC is selected user action is performed at your PC Pull Scan NOTE The instructions below use PaperPort 11 SE supplied with your machine as an example If you use an alt...

Page 117: ...tions 8 Press the required scan button 1 to start scanning 9 Press Quit to continue a Press Scan More Pages 2 to continue scanning further documents b Press Scan Other Side 3 to scan the reverse side of the original document c Press Done 4 to finish scanning 1 2 3 4 ...

Page 118: ...Once the current scanning operation is complete the screen will display Set next document If you have further documents to scan press the Scan next page button to continue scanning or press the Start sending button to start sending the fax JOB PROGRAMS If you have a routine copy fax or scan job that you perform on a regular basis you can program the steps into your MFP and create a short cut allow...

Page 119: ...een j Using the numerical keypad type in 20 5 Press the Job Programs button on the control panel 6 Using the on screen keypad type in an appropriate title for the program 7 Press the Enter button on screen to complete the registration Using To use a pre programmed short cut 1 Press the Job Program button on the control panel to prompt the Job Programs screen 2 Select the job number you wish to use...

Page 120: ...required key speed and press Enter 5 Press the Close button twice to exit the menu Editing the title To edit a Job Program title 1 Press the Setup button on the control panel to prompt the Setup screen 2 Press the Job Programs Setting button 3 Press the Edit Title button 4 Select the job number you wish to edit 5 Use the on screen keyboard to enter edit the job title REPORTS AND LISTINGS Press the...

Page 121: ...ration and return to the list of information reports Fax 1 Press the FAX button to display the fax report and listing options 2 Select required report or list Speed Dial List Group List Journal Report i Fax Transmit ii Fax Receive iii Fax Tx Rx iv Journal Daily Report F code Box List Block Junk Fax Store Doc List 3 At the prompt press Yes to print the report list or press No to cancel the operatio...

Page 122: ...eport and listing options 2 Select required report or list PCL Font List PSE Font List PPR Font List FX Font List Color Pattern Color Profile 3 At the prompt press Yes to print the report list or press No to cancel the operation and return to the list of print reports ...

Page 123: ...ce concerning waste recycling If you do spill any toner powder lightly brush it off If this is not enough use a cool damp cloth to remove any residue Do not use hot water and never use solvents of any kind They will make stains permanent 1 Pull the lever a firmly to release the lock and then gently raise the scanner b NOTE When the on screen display indicates that the toner is low or if print appe...

Page 124: ... that they go back in the same order 4 Pull the coloured toner release lever 1 on the cartridge to be replaced fully towards the front of the MFP WARNING If the MFP has been powered on the fuser may be hot This area is clearly labelled Do not touch 1 Cyan cartridge 3 Yellow cartridge 2 Magenta cartridge 4 Black cartridge b a 1 2 3 4 1 ...

Page 125: ...en and distribute the toner evenly inside the cartridge 9 Remove the wrapping material and peel off the adhesive tape from the underside of the cartridge 10 Holding the cartridge by its top centre with the coloured lever to the right lower it into the printer over the image drum unit from which the old cartridge was removed CAUTION The green image drum surface is very delicate and light sensitive ...

Page 126: ...of the cartridge down onto the image drum unit 12 Pressing gently down on the cartridge to ensure that it is firmly seated push the coloured lever 1 towards the rear of the MFP This will lock the cartridge into place and release toner into the image drum unit 13 Close the top cover and press down firmly so that the cover latches closed 14 Gently lower the scanner 2 1 1 ...

Page 127: ... 1 Pull the lever a firmly to release the lock and then gently raise the scanner b 2 Press the cover release a and open the top cover b fully CAUTION Static sensitive devices handle with care WARNING If the MFP has been powered on the fuser will be hot This area is clearly labelled Do not touch b a b a ...

Page 128: ...to the right pull the lever towards you This will release the bond between the toner cartridge and the image drum cartridge 1 Cyan cartridge 3 Yellow cartridge 2 Magenta cartridge 4 Black cartridge CAUTION The green image drum surface at the base of the cartridge is very delicate and light sensitive Do not touch it and do not expose it to normal room light for more than 5 minutes If the drum unit ...

Page 129: ...the same way round as the old unit Pack the old cartridge inside the packaging material for disposal 9 Place the toner cartridge onto the new image drum cartridge as shown Push the left end in first and then lower the right end in 10 Push the coloured release lever 1 away from you to lock the toner cartridge onto the new image drum unit and release toner into it 11 Holding the complete assembly by...

Page 130: ...t 10 minutes before opening the cover 2 Pull the lever a firmly to release the lock and then gently raise the scanner b NOTE If you need to return or transport this product for any reason please make sure you remove the image drum unit beforehand and place in the bag provided This is to avoid toner spillage Refer to Appendix A Moving and transporting on page 177 for details b a ...

Page 131: ...te the positions of the four cartridges It is essential that they go back in the same order WARNING If the MFP has been powered on the fuser will be hot This area is clearly labelled Do not touch 1 Cyan cartridge 3 Yellow cartridge 2 Magenta cartridge 4 Black cartridge b a 1 2 3 4 ...

Page 132: ...s 8 Pull the lifting bar 2 upwards so that belt tilts up towards the front and withdraw the belt unit from the MFP CAUTION The green image drum surface at the base of each cartridge is very delicate and light sensitive Do not touch it and do not expose it to normal room light for more than 5 minutes If the drum unit needs to be out of the MFP for longer than this please wrap the cartridge inside a...

Page 133: ...r the belt unit flat inside the MFP 10 Turn the two fasteners 1 90 to the right until they lock This will secure the belt unit in place 11 Replace the four image drums complete with their toner cartridges into the printer in the same sequence as they came out cyan nearest the rear magenta yellow and black nearest the front 12 Close the top cover and press down firmly so that the cover latches clos...

Page 134: ...rmly to release the lock and then gently raise the scanner b 3 Press the cover release a and open the top cover b fully 4 Identify the fuser handle 1 on the top of the fuser unit WARNING If the MFP has recently been powered on some fuser components will be very hot Handle the fuser with extreme care holding it only by its handle which will only be mildly warm to the touch A warning label clearly i...

Page 135: ...lace it on a flat surface which will not be damaged by heat 7 Remove the new fuser from its packaging and remove the transit material 8 Holding the new fuser by its handle make sure that it is the correct way round The retaining lever 2 should be fully upright 9 Lower the fuser into the MFP locating the two lugs 3 into their slots in the metal partition which separates the fuser area from the imag...

Page 136: ...ntenance 136 10 Push the retaining lever 2 towards the rear of the MFP to lock the fuser in place 11 Close the top cover and press down firmly so that the cover latches closed 12 Gently lower the scanner 2 ...

Page 137: ...feed rollers may become contaminated with ink toner particles or paper dust In this case the scan module may not feed documents smoothly If this occurs follow the cleaning procedure below 1 Carefully pull lever 1 and open the ADF front cover 2 2 Moisten a soft clean lint free cloth and wipe the feed rollers 3 by moving the cloth from side to side CAUTION Use a clean moist lint free cloth for clean...

Page 138: ...rs are clean 7 Close the ADF front cover THE DOCUMENT GLASS The document glass needs to be cleaned occasionally to ensure optimum image quality and performance Clean the glass as follows 1 Open the document cover 1 2 Moisten a soft clean lint free cloth and gently wipe the document glass 2 and the white sheet 3 on the under side of the document cover to remove dust or any toner particles 3 Close t...

Page 139: ...olutions THE LED HEAD Clean the LED head when printing does not come out clearly has white lines or when text is blurred There is no need to switch the MFP off to clean the lens 1 Pull the lever a firmly to release the lock and then gently raise the scanner b 2 Press the cover release a and open the top cover b fully CAUTION Be careful not to stress or damage the touch screen display b a b a ...

Page 140: ...he scanner THE PAPER FEED ROLLERS Clean the paper feed rollers if paper jams frequently occur 1 Remove items like a wrist watch or bracelet 2 Switch the machine off CAUTION Do not use methyl alcohol or other solvents on the LED head as damage to the lens surface will occur CAUTION Use a clean moist lint free cloth for cleaning Do not use benzine thinners or alcohol as a cleaning agent ...

Page 141: ...r 4 Gaining access through the gap left by paper tray wipe the paper feed rollers with a clean lint free cloth moistened with water 5 Wipe the pad 1 on the paper tray Wipe the feed roller 2 on optional tray 2 and 3 if installed 6 Replace the paper tray 1 2 ...

Page 142: ...Maintenance 142 7 Open the multi purpose tray 8 Wipe the feed roller on the multi purpose tray 9 Close the multi purpose tray ...

Page 143: ...ct procedure to ensure that no HDD data is lost 2 Pull open the access panel on the side of the machine 3 Carefully remove the new memory board from its wrapping Try to handle the board only by its short edges avoiding contact with any metal parts as far as possible In particular avoid touching the edge connector Notice that the memory board has a small cutout in the edge connector which is closer...

Page 144: ...ace the removed memory board into the antistatic bag which originally contained the new memory board 6 Hold the new memory board by its short edges so that the edge connector faces in towards the RAM expansion slot and the small cutout is closer to the bottom of the machine 7 Gently push the board into the RAM expansion slot until it latches in and will not go any further 8 Close the access panel ...

Page 145: ...op of the page above the horizontal line you will see the current MFP configuration This list contains the figure for total memory size This should indicate the total memory now installed ADDITIONAL PAPER TRAYS AND STORAGE CABINET Your machine can be upgraded with the following configurations One additional paper tray and a tall storage cabinet Two additional paper trays and a short storage cabine...

Page 146: ...CONTENT 1 Configuration A Model No N34234A One paper tray Tall storage cabinet 2 Configuration B Model No N34235A Two paper trays Short storage cabinet 3 Accessory pack Plate x 4 Screw x 24 Stabilising foot cover x 6 Rear stabilising foot x 2 Front stabilising foot x 2 Left side cover x 1 Right side cover x 1 NOTE For illustration purposes two additional trays and the short cabinet is shown The pr...

Page 147: ...n 3 Fit stabilising feet a Locate front stabilising foot 1 and secure in position using screws 3 as shown Repeat for opposite side b Locate rear stabilising foot 2 and secure in position using screws 3 as shown Repeat for opposite side 600mm 200mm 200mm 1000mm 845mm 1124mm 462mm 600mm 2 1 3 3 3 3 ...

Page 148: ...les for lifting and using locating guides place MFP on top of the tray cabinet assembly 5 Loosen eight screws 6 four on left side and four on right side WARNING This product is heavy a minimum of three people are required to lift it safely 5 4 6 6 ...

Page 149: ...en the eight screws 6 removed in Step 5 9 Position side panels as shown matching up the locating lugs and sockets and then push the panel firmly into place 10 Clip stabilising foot covers into position ensuring you align locating lugs and grooves as shown 11 Re connect the power cable and switch the MFP ON 8 7 A A B D D C C B B A A ...

Page 150: ...adjusted on each user s machine WINDOWS 1 Access the driver s Properties window a Open the Printers window called Printers and Faxes in Windows XP via the Start Menu or from the Windows Control Panel b Right click the icon for this machine and choose Properties from the pop up menu 2 Select the Device Options tab In the Windows XP PostScript driver the tab may be called Device Settings 3 Set the o...

Page 151: ...e Mac OS X Print Fax Preferences 2 Click Printing 3 Click Set Up Printers 4 Ensure your machine is selected and click Show Info 5 Click the menu and choose Installable Options 6 Select all hardware options appropriate to your machine and click Apply Changes ...

Page 152: ... on the control panel informs you of the event If the Paper Jam Alert feature is enabled then an alarm also sounds The touch screen displays a message giving the location of the jam If printing multiple pages or copies do not assume that having cleared an obvious sheet others will not also be stopped somewhere along the path These must also be removed in order to clear the jam fully and restore no...

Page 153: ...E PRINTER 1 Pull the lever a firmly to release the lock and then gently raise the scanner b 2 If a sheet is well advanced out of the top of the printer simply grip it and pull gently to draw it fully out If it does not remove easily do not use excessive force It can be removed from the rear later b a ...

Page 154: ...ce the paper and aid removal 5 Note the positions of the four cartridges It is essential that they go back in the same order WARNING If the MFP has been powered on the fuser may be hot This area is clearly labelled Do not touch NOTE If no paper is visible follow the next steps to remove it from the MFP 1 Cyan cartridge 3 Yellow cartridge 2 Magenta cartridge 4 Black cartridge b a 1 2 1 2 3 4 ...

Page 155: ... and to avoid damaging the green drum surface 8 Repeat this removal procedure for each of the remaining image drum units CAUTION The green image drum surface at the base of the cartridge is very delicate and light sensitive Do not touch it and do not expose it to normal room light for more than 5 minutes If the drum unit needs to be out of the MFP for longer than this please wrap the cartridge ins...

Page 156: ...t surface and withdraw the sheet c To remove a sheet just entering the fuser 3 separate the trailing edge of the sheet from the belt lift the fuser pressure release levers 4 up and press towards the rear to release the fuser s grip on the sheet and withdraw the sheet through the drum cavity area CAUTION Do not use any sharp or abrasive objects to separate sheets from the belt This may damage the b...

Page 157: ...ll protect the drums from excessive exposure to room lighting while you check the remaining areas for jammed sheets 12 Open the rear exit tray and check for a sheet of paper in the rear path area Pull out any sheets found in this area If the sheet is low down in this area and difficult to remove it is probably still gripped by the fuser In this case raise the top cover reach around and press down ...

Page 158: ... the cover 17 Pull out the paper tray and ensure that all paper is stacked properly is undamaged and that the paper guides are properly positioned against the edges of the paper stack When satisfied replace the tray 18 Close the top cover and press down firmly at both sides so that the cover latches closed NOTE If the paper is not advanced enough to grip pull the duplex unit 2 out of the machine a...

Page 159: ...leshooting 159 19 Gently lower the scanner When the jam has been cleared if Jam Recovery is set enabled in the Printer Adjust menu the MFP will attempt to reprint any pages lost due to paper jams see page 48 ...

Page 160: ...bute any remaining toner If symptoms persist replace the toner cartridge The paper is not suitable for the printer unit Use recommended paper Printing is light The toner cartridge is not properly seated Reinstall the toner cartridge The toner is low Open the top cover and tap the cartridge a few times to evenly distribute any remaining toner If symptoms persist replace the toner cartridge The pape...

Page 161: ...maged Replace the fuser unit The image drum cartridge has been exposed to light Replace the image drum cartridge if the problem is not resolved White area of paper is lightly stained Paper contains static Use paper stored in proper temperature and humidity conditions Too thick paper is used Use thinner paper The toner is low Open the top cover and tap the cartridge a few times to evenly distribute...

Page 162: ...heck the local MFP Faxing is possible but the image of the document printed by the remote machine is very poor If the faxed document has small type complex illustrations photos or is very light or very dark try changing the fax quality and density settings See Doc Type and Density on page 90 Copy the document on the machine to determine how it will transmit The problem may be caused by telephone l...

Page 163: ...der or longer than the paper loaded in the paper tray the machine automatically reduces the width or length of the document so that it will fit on the paper This type of problem could also be communication related INFORMATION AND ERROR MESSAGES NOTE 1 COLOR Y M C or K 2 TRAY Tray 1 Tray 2 Tray 3 or MP Tray 3 mmm the setup of paper size 4 ppp the setup of media type STATUS CODE MESSAGE MEANING ACTI...

Page 164: ...uine COLOR Toner Incorrect toner cartridge fitted Replace with genuine toner cartridge Warning Error Postscript An error has been detected The job has a grammatical error The page is complicated and VM was used up Warning COLOR Image Drum Near Life Indicates image drum is near the end of it s life Order replacement image drum s Warning Fuser Unit Near Life Indicates fuser is near the end of it s l...

Page 165: ...int permit 1 A job received from a user who is denied printing 2 A job received from a user who is denied PC faxing Contact your network administrator for help Warning Access limitation error Data was deleted due to the printing limitation Warning Access limitation error Monochrome printing was performed due to the colour printing limitation Indicates a job being printed by monochrome due to no co...

Page 166: ...PUFLASH Flash Error PUFLASH PU Tray 2 Tray 3 Duplex Warning Received invalid data Press Stop key A job has been deleted due to corrupt data being detected by the integrity verification in secure printing Warning Received invalid data Press Stop key An unsupported PDL command has been received or a spool command has been received without HDD Warning Remove the connected USB device Unsupported USB d...

Page 167: ...dia Mismatch On TRAY Please Set paper MEDIA_SIZE MEDIA_TYPE To cancel Select Cancel Message displayed for Fax Received Data Printing TRAY Media Mismatch On TRAY Paper type should be MEDIA_SIZE MEDIA_TYPE for fax printing Press Restart to continue printing from selected tray The media size or both media size and media type in the tray does not match the print data Load mmm ppp paper in tray TRAY 46...

Page 168: ...ng is changed Error 490 491 492 493 No Paper On TRAY Please set paper MEDIA_SIZE To cancel Select Cancel Printing request is issued to an empty tray TRAY 490 MPTray 491 Tray 1 492 Tray 2 493 Tray 3 Load media into tray to allow printing Error 440 441 TRAY Missing Please close TRAY To cancel Select Cancel Indicates removal of Tay 1 which is a paper path when printing from Tray 2 Reinstall Tray 1 to...

Page 169: ...R Toner not installed Toner cartridge is not fitted Install genuine toner cartridge Error 610 Y Error 611 M Error 612 C Error 613 K Error 540 541 542 543 Please check COLOR Toner cartridge ERRCODE If the code appears contact your dealer Error 540 Y Error 541 M Error 542 C Error 543 K Error 401 Paper size error Open check the flashing cover Inappropriate long paper was fed from a tray Check whether...

Page 170: ...the duplex cover remove the paper and close the cover Error 370 Duplex reversal Error 371 Duplex input Error 373 Multi feed into duplex duplex remain jam See Clearing paper jams If the code still appears contact your dealer Error 372 Paper jam Open check the flashing cover Misfeed from duplex Open the front cover remove the paper and close the cover See Clearing paper jams If the code still appear...

Page 171: ...Error 342 C Error 343 K Error 320 Please check Fuser Unit Fuser unit is not installed correctly Fit fuser unit Error 330 Please check Belt Unit Belt unit is not installed correctly Fit belt unit Error 321 Power Off and Wait for a while Motor driver IC overheat detected Error 310 311 Cover Open Close the flashing cover Close the cover Error 310 Top cover Error 311 Front cover If the code still appe...

Page 172: ...has occurred while your machine s network card firmware is being reprogrammed DLCODE 1 Memory allocation error 2 Download file error 3 Device allocation error 4 No device space 5 File writing failure 6 CU F W mismatch Error Shutdown screen Initializing screen Controller unit is rebooting CODE 0 Reboot due to a reason other than the following 1 Reboot due to PJLCommand 2 Reboot in accordance with a...

Page 173: ...s the Fax Job View Cancel button Error Communication Error Press Stop key Fax receiving has failed For details press the Fax Job View Cancel button Error Cannot store Fax job Maximum number of delayed fax registration has already been met Error File Transmission Error Press Stop key File sending has failed due to file server problems network cable disconnected or network trouble Error E mail Trans...

Page 174: ...ansfer Type Failed Press Stop key Indicates that the data transfer type is not supported in the FTP server Change the data transfer type in FTP server Error File Writing Failed Press Stop key Failed to save image file in file server during Scan to Network PC execution Error Storage Space Full Press Stop key File sending failed due to insufficient free space in storage device FTP Server Error Chang...

Page 175: ...ndensed into liquid droplets in the MFP Turn off the MFP and wait for a while If a fatal code still appears contact your dealer Fatal Power Off On ERRCODE Fatal Error If a fatal code appears contact your dealer Fatal Inspection is required ERRCODE Fatal Error If a fatal code appears contact your dealer Fatal Fatal Error ERRCODE Switch the power supply off and then back on If this fatal code appear...

Page 176: ...851 MC861 ES8451 ES8461 N34225B ITEM SPECIFICATION Dimensions 565 x 658 x 669mm W x D x H Weight 66 5kg approximately Power source Input 220 to 240VAC 50 to 60Hz Power consumption Operating 1300W max Normal operating 700W av 25oC Stand by 160W av 25o C Power save mode 25W max Environmental Noise Temperature Humidity 54dBA 10 C to 32 C 20 to 80 RH ...

Page 177: ...tup c Enter the administrator password and press Enter d Press User Install e Press the arrow symbol twice to view page 3 of the User Install screen f Press Mirror Carriage mode g At the prompt press Yes to confirm h If necessary remove plugs 1 from the scanner lock locations as shown NOTE Please retain all packaging material If this machine has to be transported for any reason re use the original...

Page 178: ... m On the touch screen press Yes to confirm shutdown 2 Turn off the MFP and disconnect or remove the following Power cord earth wire Printer cable Paper in the paper cassette 3 Move the MFP to the new location WARNING This product is heavy a minimum of three people are required to lift it safely NOTE Be sure to unlock the scanner before turning on the MFP after transportation and then disable the ...

Page 179: ... the User Install screen f Press Mirror Carriage mode g At the prompt press Yes to confirm h If necessary remove plugs 1 from the scanner lock locations as shown WARNING Your MFP is a precision machine and can be damaged during transportation if packaged incorrectly NOTE If your machine is equipped with the additional paper tray s and cabinet remove these before transporting Refer to Additional pa...

Page 180: ...er k Press the SETUP button on the control panel l On the touch screen press Shutdown m On the touch screen press Yes to confirm shutdown 2 Turn off the MFP and disconnect or remove the following Power cord earth wire Printer cable Paper in the paper cassette 3 Pull the lever a firmly to release the lock and then gently raise the scanner b 2 b a ...

Page 181: ... image drum units back into the MFP 8 Close the top cover and press down firmly so that the cover latches closed WARNING If the MFP has been powered on the fuser will be hot This area is clearly labelled Do not touch CAUTION The green image drum surface at the base of each cartridge is very delicate and light sensitive Do not touch it and do not expose it to normal room light for more than 5 minut...

Page 182: ... it in a box NOTE It is recommended that you use the original box and packaging if available WARNING This product is heavy a minimum of three people are required to lift it safely NOTE Be sure to unlock the scanner before turning on the MFP after transportation and then disable the mirror carriage transfer mode ...

Page 183: ...ol 20 Fax driver 19 Plug and play installation 18 Setting up the Actkey Utility 21 TWAIN and printer drivers 18 Internet Communication Fea tures 31 Scan to E mail 31 Scan to FTP 31 M Minimum Configuration Require ments 29 O Operation 80 Copying 82 Loading Document s for cop ying 80 Placing Document s on the Glass 81 Scan to PC server option 109 Scanning 104 Sending Document s via E mail 105 P PBX ...

Page 184: ...ss Park II 3rd Floor ul Domaniewska 42 02 672 Warsaw Poland Tel 48 22 448 65 00 Fax 48 22 448 65 01 Website www oki com pl E mail oki oki com pl Hotline 0800 120066 E mail tech oki com pl Oki Systems Ibérica S A Sucursal Portugal Edifício Prime Av Quinta Grande 53 7º C Alfragide 2614 521 Amadora Portugal Tel 351 21 470 4200 Fax 351 21 470 4201 Website www oki pt E mail oki oki pt Oki Service Servi...

Page 185: ... Återförsäljare i första hand för konsultation I andra hand kontakta Oki Systems Sweden AB Borgafjordsgatan 7 Box 1191 164 26 Kista Tel 46 0 8 634 37 00 e mail info oki se för allmänna frågor om Oki produkter support oki se för teknisk support gällandes Oki produkter Vardagar 08 30 12 00 13 00 16 00 Website www oki se Oki Systems Schweiz Baslerstrasse 15 CH 4310 Rheinfelden Support deutsch 41 61 8...

Page 186: ......

Reviews: