2.PRINTING FROM WINDOWS
Setting Up Print Options 69
2 PRINTING FROM WINDOWS
To register a custom paper size, either A (Length) or B (Width) should differ by more than 0.3 inches (7 mm) from
the standard paper size. If not, the created custom paper size is considered as the standard paper size.
You cannot create a custom paper size with A (Length) longer than B (Width). If you want to print such a document,
do so by selecting [landscape] for the [Orientation].
There are some precautions when you use paper larger than the standard sizes. For details, see the following
page:
P.111 “Printing on paper larger than standard sizes”
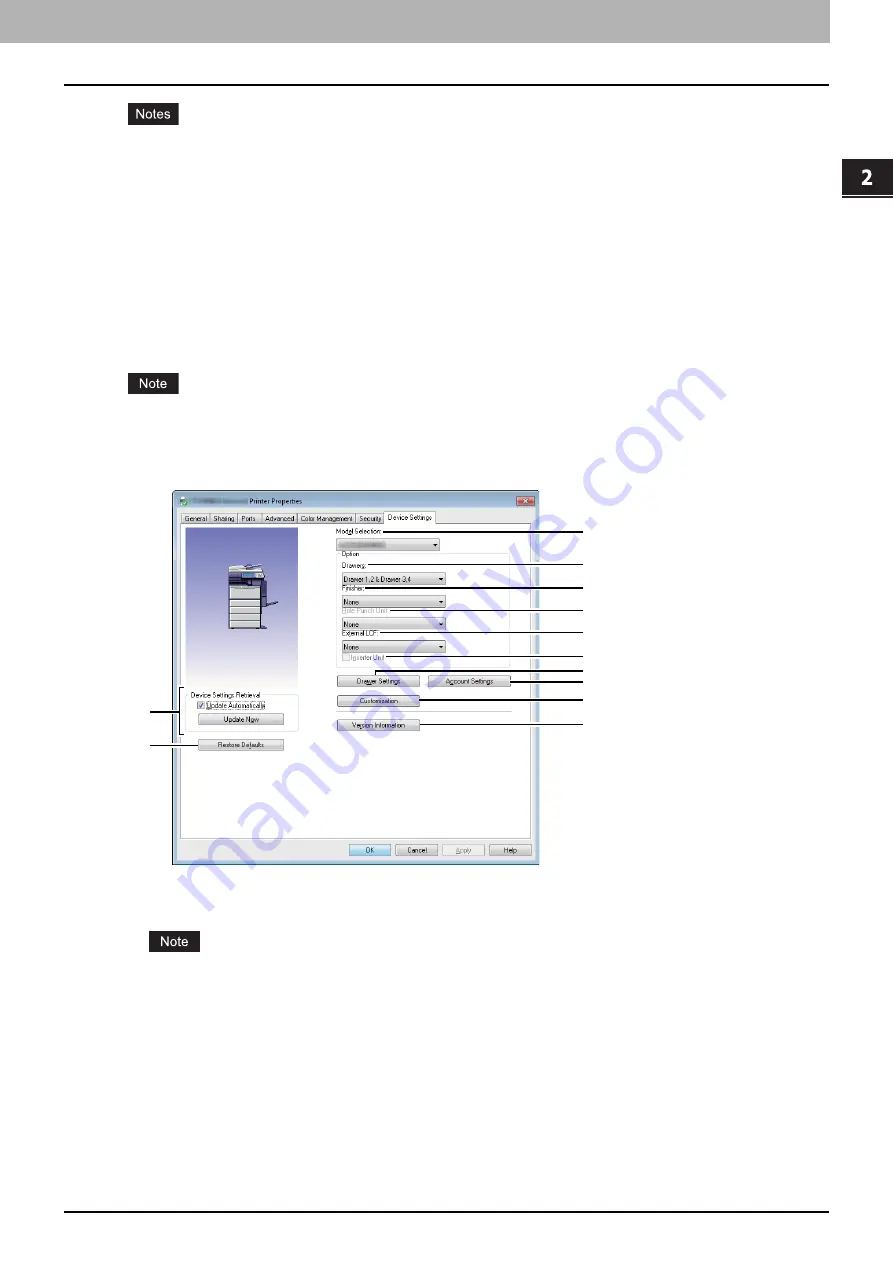
[Device Settings] tab
The [Device Settings] tab allows you to configure options. When any optional unit is installed in this equipment, set the
configuration of the machine on this tab. The [Device Settings] tab can be displayed only from the Printers folder (and not
when displaying the properties from the application’s print dialog box).
In order to set the [Device Settings] tab, you must access the printer driver properties from the [Devices and Printers]
folder (Windows Vista / Windows Server 2008: [Printer], Windows XP / Windows Server 2003: [Printers and Faxes]).
For detailed instructions on how to set the [Device Settings] tab, see the following page:
P.11 “Configuring options manually”
1) Model Selection
This sets the model type.
If you select [PCL], you can narrow down the setup items of the printer driver to those used commonly in all of the
entire OKI MFP series. It is convenient in such cases as when you are using a printer driver already installed to
other OKI MFP models.
2) Option
This option sets whether the following optional devices are installed.
Drawers
This sets the installation of drawers according to the configuration.
-
Drawer1
— Select this when only Drawer 1 is installed.
-
Drawer 1 & LCF
— Select this when Drawer 1 and the LCF (optional) are installed.
-
Drawer 1 & Drawer 3
— Select this when Drawers 1 and 3 are installed.
-
Drawer 1 & Drawer 3, 4
— Select this when Drawers 1, 3 and 4 are installed.
-
Drawer 1 & Drawer 2
— Select this when Drawers 1 and 2 are installed.
-
Drawer 1, 2 & Drawer 3
— Select this when Drawers 1, 2 and 3 are installed.
1
3
2
4
11
5
8
6
7
10
9
12
Summary of Contents for CX4545 MFP
Page 10: ......
Page 20: ...2 PRINTING FROM WINDOWS 18 Printing From Application 5 Click Print to print a document...
Page 220: ......
Page 228: ...226 INDEX...
Page 229: ...ES9160 MFP ES9170 MFP ES9460 MFP ES9470 MFP CX3535 MFP CX4545 MFP...


