background image

Setting up from TopAccess    155

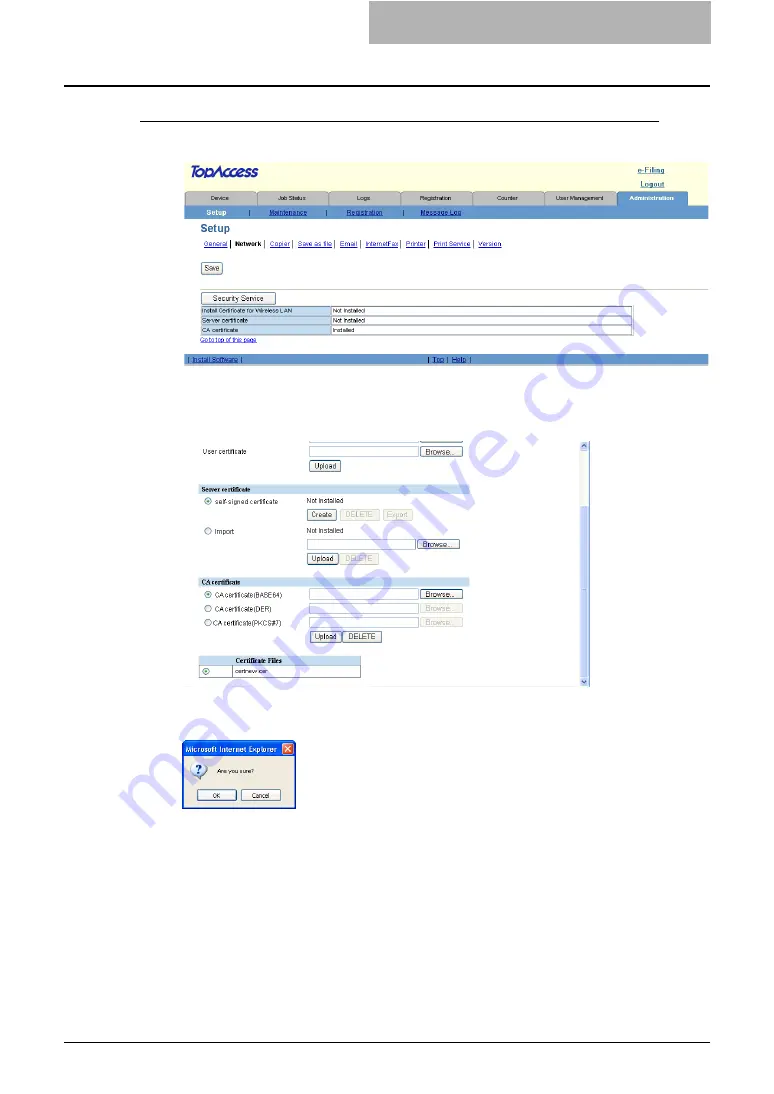
Deleting a CA certificate

1

Click [Security Service].

y

The Security Service page is displayed.

2

Select the CA certificate file that you want to delete in the “Certifi-
cate File” list, and click [DELETE].

y

The confirmation dialog box appears.

3

Click [OK].

y

The self-signed certificate is deleted.

Summary of Contents for CX 1145 MFP

Page 1: ......

Page 2: ...official name of Windows Server 2003 is Microsoft Windows Server 2003 Operating System y Microsoft Windows Windows NT and the brand names and product names of other Microsoft products are trademarks o...

Page 3: ...s an abbreviation of electronic filing Precautions in this manual To ensure correct and safe use of this equipment this operator s manual describes safety pre cautions according to the three levels sh...

Page 4: ...t Job 25 Releasing a Print Job 26 Managing Fax Internet Fax Jobs 27 Displaying Fax Internet Fax Jobs 27 Deleting a Fax Transmission Job 28 Managing Scan Jobs 29 Displaying Scan Jobs 29 Deleting a Scan...

Page 5: ...ss 112 Setting up Device Settings 112 Setting up Network Settings 118 Setting up Copier Settings 158 Setting up Fax Settings 161 Setting up Save as file Settings 166 Setting up Email Settings 172 Sett...

Page 6: ...Department Counters 246 Registering or modifying the Department Code 249 Deleting the Department Code 251 Setting up User Management 254 Enabling Department Management 254 Setting up User Management...

Page 7: ...6 TABLE OF CONTENTS...

Page 8: ...1 Overview This section describes overview of the TopAccess functions TopAccess Overview 8 Accessing TopAccess End User Mode 9 TopAccess Web Site 15...

Page 9: ...e End users can y Display general device information including the status drawer accessory configuration and paper supply information y Display and manage the status of print jobs fax internet fax tra...

Page 10: ...indows y Internet Explorer 5 5 Service Pack 2 or later Internet Explorer 7 0 or later when IPv6 is used y Firefox 1 5 0 4 or later Macintosh y Safari 2 0 or later y Firefox1 5 0 4 or later UNIX y Fire...

Page 11: ...ou can install the driver required for web services by your right clicking the icon and selecting Install For the driver required for web services see the Printing Guide y Before using the LLTD featur...

Page 12: ...Accessing TopAccess End User Mode 11 2 Click Network and Internet y The Network and Internet window appears 3 Click Network and Sharing Center y The Network and Sharing Center window appears...

Page 13: ...k Private of Location type and then click Next y The User Account Control dialog box appears y If the user account control is disabled the Set Network Location Successfully set network settings window...

Page 14: ...Accessing TopAccess End User Mode 13 7 Click Close 8 Click View full map in the Network and Sharing Center window y Mapping of devices connected on the network appears in the Network Map window...

Page 15: ...ment y The name IP address and MAC address of the devices appear as a result of your placing a pointer over each icon y If the equipment is with the Finisher its icon is displayed together with the Fi...

Page 16: ...TopAccess page contains following items 1 Function Tab This provides access to main pages of TopAccess for each function 2 Menu Bar This provides access to each menu page under the selected function...

Page 17: ...User Mode 5 Top link Click this to display the top of the page that is currently displayed 6 Help link Click this to display the Online Help The TopAccess Online Help cannot be displayed in the follo...

Page 18: ...2 Checking Device Status This section describe the Device tab page of TopAccess end user mode TopAccess Device Tab Page 18 Device Status Indicators 20...

Page 19: ...o store the Save as file documents Store to e Filing Space Available Displays the available size to store the e Filing documents Fax Transmission Space Available Displays the available size to send th...

Page 20: ...aper The Paper list shows the drawer status Drawer Lists the installed drawers Size Displays the paper size set in each drawer Type Displays the paper type set in each drawer Capacity Displays the max...

Page 21: ...ns You need to clear hole punches from Finisher For information on resolving the error con dition refer to EXAMINE STAPLER IN THE SADDLE STITCH UNIT in Operator s Manual for Basic Functions Non recomm...

Page 22: ...wing paper from a different drawer Refer to the TopAccess online Help for instructions on setting up Auto Select mode For information on resolving the error condition refer to PLACING PAPER IN THE DRA...

Page 23: ......

Page 24: ...scan jobs released by end users Managing Print Jobs 24 Displaying Print Jobs 24 Deleting a Print Job 25 Releasing a Print Job 26 Managing Fax Internet Fax Jobs 27 Displaying Fax Internet Fax Jobs 27 D...

Page 25: ...ed printing are displayed in the Log tab y To sort the print jobs list so that a particular job is easier to be found click the appro priate table heading The page refreshes to display the information...

Page 26: ...ator the Delete All Private Print Jobs button is additionally displayed at the next of the release button You can click Delete All Private Print Jobs button to delete all private jobs in the list It m...

Page 27: ...cannot be released from TopAccess Releasing a print job 1 Click the Job Status tab and click the Print menu y The Print menu page is displayed 2 Select an option button at the left of the print job th...

Page 28: ...the transmission are displayed in the Log tab y To sort the fax transmission jobs list so that a particular job is easier to be found click the appropriate table heading The page refreshes to display...

Page 29: ...x transmission job 1 Click the Job Status tab and click the Fax Internet Fax menu y The Fax Internet Fax menu page is displayed 2 Select an option button at the left of the fax transmission job that y...

Page 30: ...o be found click the appro priate table heading The page refreshes to display the information in the order you requested The Scan menu page displays following information for each scan job 1 To File N...

Page 31: ...job Deleting a scan job 1 Click the Job Status tab and click the Scan menu y The Scan menu page is displayed 2 Select an option button at the left of the scan job that you want to delete y You can se...

Page 32: ...pAccess end users can display print job logs transmission journals reception journals and scan job logs Displaying Print Job Logs 32 Displaying Transmission Journals 33 Displaying Reception Journals 3...

Page 33: ...ding The page refreshes to display the information in the order you requested The Print menu page displays following information for each print job log y User Name Displays the computer name that rele...

Page 34: ...e transmission journals list so that a particular transmission journal is easier to be found click the appropriate table heading The page refreshes to display the informa tion in the order you request...

Page 35: ...of the transmission y Line Displays the line used 2 digit alphabet code Commu nication Mode 1st numeric code bps 2nd numeric code Resolu tion 3rd numeric code Mode Subad dress 3 digit supplemen tal co...

Page 36: ...the reception journals list so that a particular reception journal is easier to be found click the appropriate table heading The page refreshes to display the information in the order you requested T...

Page 37: ...the reception y Line Displays the line used 2 digit alphabet code Commu nication Mode 1st numeric code bps 2nd numeric code Resolu tion 3rd numeric code Mode Subad dress 3 digit supplemen tal code N W...

Page 38: ...sted The Scan menu page displays following information for each scan job log y To File Name When the job performed the Scan to File or Scan to e Filing it displays the document name that was stored Wh...

Page 39: ...NetWare IPX SPX 6 USB 7 NetWare TCP IP 9 Remote Scan C This describes the resolution 0 100 dpi 1 150 dpi 2 200 dpi 3 300 dpi 4 400 dpi 5 600 dpi A 8x3 85 line mm 203x98 B 8x7 7 line mm 203x196 C 8x15...

Page 40: ...lboxes Managing Templates 40 Registering Private Template Groups 41 Registering Private Templates 49 Displaying Public Templates 80 Managing Address Book 82 Managing Contacts in the Address Book 82 Ma...

Page 41: ...mplates Templates in private template groups are based on particular group profiles Private groups can be assigned passwords You can also assign passwords to individual templates If it has no password...

Page 42: ...e Template menu y The Template menu page is displayed When the User Management Setting and Role Based Access Control are enabled the login page will be displayed When the Role Based Access Control is...

Page 43: ...know which private template group you want to define or edit click the number of the private template group in the Jump to links 3 When the Input Group Password page is displayed enter the 5 digit pa...

Page 44: ...he default email address where the notification will be sent The email address entered here will be displayed in the Panel Settings page and can be selected for the destination of the notifications wh...

Page 45: ...e to operate the registration can login to the Registration tab page 2 Click the group name link that you want to set or to modify the group password y If you select the private template group that is...

Page 46: ...enter the 5 digit password or administrator s password for the selected private template group and click OK y The Private Templates page is displayed 4 Click Change Password to set the password for th...

Page 47: ...git numbers for the password y You can also enter the administrator password in the Old Password field y If the password has not been set to the group leave the Old Password field blank y Leaving the...

Page 48: ...users that has the privilege to operate the registration can login to the Registration tab page 2 Click the group name link that you want to reset y If you select the private template group that is n...

Page 49: ...Password page is displayed enter the 5 digit password or administrator s password for the selected private template group and click OK y The Private Templates page is displayed 4 Click Reset y The co...

Page 50: ...nt y Scan template can be created with up to two agents in combination of the Save as file Email and Store to e Filing agents Registering or editing a private template 1 Click the Registration tab and...

Page 51: ...for the selected private template group and click OK y The Private Templates page is displayed 4 From the templates list click the Undefined icon to register a new template or click defined icon to ed...

Page 52: ...t View y If you know which private template you want to define or edit click the number of the private template in the Jump to links 5 When the Input Template Password page is displayed enter the 5 di...

Page 53: ...gent Scan Select this to create a scan template combined with the Email Save as file and Store to e Filing agents When you select this select the agent from Email Save as file or Store to e Filing You...

Page 54: ...to Email agent P 65 Email Setting Private Template Save as file Setting Click this to specify how the document will be stored in local hard disk or network folder This can be set only when creating t...

Page 55: ...e Touch Panel Display and the notification settings for the template 1 Picture This indicates the icon that will be displayed in the Touch Panel Display The icon is auto matically designated according...

Page 56: ...ator s mode For instructions on how to set up the Email settings refer to the Network Administration Guide Destination Setting Private Template In the Recipient List page you can specify the destinati...

Page 57: ...number of the recipient in the Desti nation field You can specify the fax number for the destination only when the optional Fax unit is installed 4 Click OK y Entered recipient is added in the Recipie...

Page 58: ...ers you want to add as the Fax recipients y When you are creating the Scan to Email template only the Email check boxes are displayed in the Address Book page y You can specify the fax number for the...

Page 59: ...destinations Selecting the groups from the address book By this method you can select groups from the address book 1 Click Destination Setting to open the Recipient List page 2 Click Address Group y T...

Page 60: ...contacts from the recipient list 5 Click Save y The contacts are added as the destinations Searching for recipients in the LDAP server By this method you can search for recipients in the registered L...

Page 61: ...that match the entries y Leaving the field blank allows wild card searching However you must specify one of them 4 Click Search y TopAccess will start searching for recipients in the LDAP server and...

Page 62: ...before submitting the destination settings P 61 Removing the contacts from the recipient list 7 Click Save y The contacts are added as the destinations Removing the contacts from the recipient list 1...

Page 63: ...tically insert the subject or enter the desired subject in the field 2 From Address Enter the email address of the sender When the recipient replies to received document the message will be sent to th...

Page 64: ...ion for originals with particularly small text or precision drawings 2 Original Mode Select the image quality mode for sending faxes Text Select the Text mode as the image quality mode appropriate for...

Page 65: ...mode This feature sends a document at a slower speed than normal so the transmission will be less affected by line conditions 8 SUB SEP Enter the SUB number or SEP number if you want to set the mailbo...

Page 66: ...vice Name Template Name Date Time to automatically apply the subject or enter the desired subject in the field 2 From Address Enter the email address of the sender When the recipient replies the messa...

Page 67: ...eck this if you want to encrypt PDF files User Password Enter a password for opening encrypted PDF files Master Password Enter a password for changing the Encrypt PDF setting y The user password is se...

Page 68: ...be named Select DocYYMMDD to name as it described or you can enter the desired file name in the field When you want to add the date and time in the file name check the Add the date and time to a file...

Page 69: ...ion Check this if you want to encrypt PDF files User Password Enter a password for opening encrypted PDF files Master Password Enter a password for changing the Encrypt PDF setting y The user password...

Page 70: ...1 1 user scanned FTP folder in the FTP server enter 192 168 1 1 in this field You can specify the directory at the Network Path field When you select NetWare IPX SPX as the protocol enter the NetWare...

Page 71: ...ned file will be named Select DocYYMMDD to name as it described or you can enter the desired file name in the field When you want to add the date and time in the file name check the Add the date and t...

Page 72: ...s to scan in black mode Gray Select this to scan in gray scale mode Full Color Select this to scan in full color mode Auto Color Select this to scan in auto color mode When Auto Color is selected you...

Page 73: ...the exposure manually 7 Background Select the exposure for scanning the background color This is useful to scan color paper originals Adjust the contrast manually in 9 stages This is not available whe...

Page 74: ...d only users that has the privilege to operate the registration can login to the Registration tab page 2 Click the group name link that contains the private template that you want to edit y If the sel...

Page 75: ...t or change the password y If the templates list is displayed in the List view click the template name that you want to set or modify the password y If the selected private template is protected by a...

Page 76: ...played enter the 5 digit password or administrator s password for selected private template and click OK y The Template Information page is displayed 6 Click Change Password to set the password for th...

Page 77: ...ype Password field blank releases the password protect for the template 8 Click Save y The confirmation dialog box appears 9 Click OK y The password is set or modified Resetting Private Templates User...

Page 78: ...rd page is displayed Go to the next step y You can display only defined private template groups by clicking on the Defined Groups link The page displays all 200 private template groups as default page...

Page 79: ...rivate template that is not protected by a password the Template Properties page is displayed Skip to step 6 y If you select the private template that is protected by a password the Input Template Pas...

Page 80: ...is displayed enter the 5 digit password or administrator s password for selected private template and click OK y The Template Properties page is displayed 6 Click Reset Template y The confirmation di...

Page 81: ...he public group 1 Click the Registration tab and the Template menu y The Template menu page is displayed When the User Management Setting and Role Based Access Control are enabled the login page will...

Page 82: ...list in the public group is displayed y You can change the template list view by clicking on either Panel View or List View y If you know which public template you want to view click the number of the...

Page 83: ...o manage contacts in the Address Book y Add edit or delete a contact manually P 82 Adding Editing or Deleting Contacts Manually y Add new contact searching for a recipient from the LDAP server P 86 Ad...

Page 84: ...recipient You can enter up to 32 characters Email Address Enter the email address of the recipient You can enter up to 192 characters Fax Number Enter the fax number of the recipient You can enter up...

Page 85: ...t to send originals to the mailbox in the recipient facsimile You can enter up to 20 characters including numbers and hyphenations SID Enter the password to input a fax into the mailbox in the recipie...

Page 86: ...irect TX mode If you want to clear the fax settings of the contact click Reset 6 In the Contact Properties page click Save to add new contact Deleting a contact 1 Click the Registration tab and the Ad...

Page 87: ...Delete y The contact is deleted from the Address Book Adding New Contact from the LDAP Server You can search for contacts in the LDAP server and add them to the Address Book To use the LDAP search fea...

Page 88: ...login to the Registration tab page 2 Click Search y The Search Contact page is displayed 3 Select the directory service name that you want to search in the Directory Service Name field and enter the s...

Page 89: ...groups that contain the multiple recipients This enables you to specify the groups for the destinations instead of specifying each recipient separately when operating Scan to Email or fax or Internet...

Page 90: ...ar the entered values in each field by clicking Reset y You can cancel adding or editing a group by clicking Cancel 5 Check the Email boxes of users to add the Internet Fax recipients and check the Fa...

Page 91: ...cess Control are enabled the login page will be displayed When the Role Based Access Control is enabled only users that has the privilege to operate the registration can login to the Registration tab...

Page 92: ...mailbox allows you to transmit a received fax to various destinations using the fol lowing agents y Internet Fax Relay agent When a document has been sent to a mailbox this equip ment can call up the...

Page 93: ...cess Control are enabled the login page will be displayed When the Role Based Access Control is enabled only users that has the privilege to operate the registration can login to the Registration tab...

Page 94: ...x of Internet Fax Relay agent This agent can be combined with the Save as file or Store to e Filing agent y Save as file Select this to create a Forward mailbox of the Save as file agent This agent ca...

Page 95: ...k this to specify how the document will be sent This can be set only when creating the Internet Fax Relay agent P 97 Internet Fax Setting Mailbox Relay End Terminal Report Click this to specify where...

Page 96: ...ting the Confi dential mailbox or Bulletin Board mailbox y Mailbox communication is disabled if the settings on this equipment and information regis tered for the destination do not match Check how th...

Page 97: ...enter up to 64 characters 4 Comment Enter the comment You can enter up to 64 characters 5 Notification This specifies how the notification message will be sent when an error occurs Send email when an...

Page 98: ...ing for the recipients in the LDAP server are not available if you are setting the destination for the Internet Fax Relay agent The instructions on how to setting up the destination setting for the ma...

Page 99: ...ting for the mailbox is same as setting up the Email setting for the private template P 65 Email Setting Private Template Save as file Setting Mailbox In the Save as file Setting page you can specify...

Page 100: ...are enabled the login page will be displayed When the Role Based Access Control is enabled only users that has the privilege to operate the registration can login to the Registration tab page 2 Click...

Page 101: ...5 Registering from TopAccess 100 Managing Mailboxes 4 Click Delete y The confirmation dialog box appears 5 Click OK y Selected mailbox is deleted...

Page 102: ...6 Managing Counters This section describes about the Counter tab page of TopAccess end user mode Viewing Counters 102 Displaying the Total Counter 102 Displaying the Department Counter 103...

Page 103: ...he Department Counter Neither an end user nor an administrator can reset counters from TopAccess However an administrator can reset the department counters from the Touch Panel Display See the User Fu...

Page 104: ...nter the department code Displaying the department counter 1 Click the Counters tab and the Department menu y The Department menu page is displayed 2 Enter a department code that you want to display t...

Page 105: ...6 Managing Counters 104 Viewing Counters 4 The Department Information page opens...

Page 106: ...ng up Save as file Settings 166 Setting up Email Settings 172 Setting up Internet Fax Settings 174 Setting up Printer Settings 177 Setting up Print Service Settings 182 Displaying Version Information...

Page 107: ...Log 243 Managing Department Code 244 Displaying the Department List and Counters 244 Clearing the Department Counters 246 Registering or modifying the Department Code 249 Deleting the Department Code...

Page 108: ...settings An administrator can configure the facsimile device settings such as terminal ID fax number line 2 number monitor volume completion tone volume reception mode dial type dial type line 2 line...

Page 109: ...elete data such as scan transmission and reception data in the hard disk Use this feature to delete data periodically for restoring the hard disk space if there is not enough disk space for operation...

Page 110: ...nistrator can collect the all received faxes by transmitting them to another internet fax device saving them as a file in the hard disk or network folders sending them to specific Email addresses or s...

Page 111: ...from a Windows Macintosh or UNIX operating system environment The following browsers are supported Windows y Internet Explorer 5 5 or later y Netscape Navigator 7 1 or later Macintosh y Safari 2 0 y...

Page 112: ...ot change a name in the User Name field It always must be Admin to login TopAccess in the administrator mode y The Setup page is displayed The default administrator password is 123456 if you have not...

Page 113: ...touch panel of the equipment For instructions on how to set the paper size for each drawer please refer to the Operator s Manual for Basic Functions Setting up Device Settings In the General submenu p...

Page 114: ...ion dialog box appears If you want to restore the current settings without saving the changes click Cancel Clicking Cancel cannot restore the defaults This can only clear the changes and restore the c...

Page 115: ...x Reception Space Available This displays the available size to receive the fax data This is displayed only when the fax unit is installed 7 Work Space Available This displays the percentages of avail...

Page 116: ...me of the department or site This is displayed in the Device tab page that appears first when accessing the TopAccess web site for users 14 Contact Information Enter the name or title of the contact p...

Page 117: ...remain inactive before entering the sleep mode or auto shut off mode Setting up the Time and Date You can set the date time time zone and date format 1 Date Time To adjust the date select year in the...

Page 118: ...ipment is turned off at the start or end date and time the equipment will shift the clock the next time it is turned on y After the clock shifts the daylight saving time will also apply to the weekly...

Page 119: ...pAccess Administrator Mode 2 Click the Setup menu and Network submenu y The Network submenu page is displayed 3 In the Network submenu page click link or scroll the page to find the setting table and...

Page 120: ...the current settings without saving the changes click Cancel Clicking Cancel cannot restore the defaults This can only clear the changes and restore the current settings before saving the changes 6 Cl...

Page 121: ...hernet speed that must be used select AUTO 2 Address Mode Select how to set the IP address Static IP Select this to assign the static IP address manually When this is selected enter the static IP addr...

Page 122: ...No AutoIP or Dynamic is selected in the Address Mode option When the DHCP server does not have a primary and secondary DNS server addresses the blank data is set to in the primary and secondary DNS se...

Page 123: ...ly using the DHCP server This setting will apply only when No AutoIP or Dynamic is selected in the Address Mode option When the DHCP server does not have a SNTP server address the blank data is set to...

Page 124: ...ble IPv6 setting when IPv6 is selected for the Internet Proto col Version of the SMB Session requires you to restart the equipment to reflect the change When Reboot the machine appears on the control...

Page 125: ...this equipment Keep Configuration If router setting is changed Select the method on how to han dle IPv6 address data when new IPv6 address is provided from the same router provid ing the current IPv6...

Page 126: ...server address in the DNS Session P 128 Setting up the DNS Session IP Address IPv6 addresses obtained from DHCPv6 Server is displayed y One IPv6 address can be obtained from the DHCPv6 server y When...

Page 127: ...vice name of the equipment that will be displayed in the AppleTalk network 3 Desired Zone Enter the zone name where the equipment will connect if required If you leave an aster isk in this field the e...

Page 128: ...ent P 144 Setting up the Security Service y If at least one of the registered LDAP directory services requires the SSL you must enable the Enable SSL option When the Enable SSL option is enabled this...

Page 129: ...primary DNS server when the DNS service is enabled 3 Secondary DNS Server Address Specify the IP address of the secondary DNS server when the DNS service is enabled as you require 4 Primary DNS Serve...

Page 130: ...DDNS and the IP address is assigned using DHCP enable 006 DNS Servers and 015 DNS Domain Name in the DHCP Server s Scope Options or Server Options y When using DDNS make sure the Allow dynamic update...

Page 131: ...rimary Login Name Enter the primary login name for the dynamic DNS service 5 Primary Password Enter the primary password for the dynamic DNS service 6 Secondary Login Name Enter the secondary login na...

Page 132: ...enabled or disabled Enable Select this to enable SMB Disable Select this to disable SMB Disable Print Share Select this to enable the file sharing service using SMB but dis able SMB printing Disable...

Page 133: ...main name can be obtained using the DHCP server P 120 Setting up the TCP IP IPv4 P 123 Setting up the IPv6 You can enter only alphanumeric characters and symbols except following characters for Workgr...

Page 134: ...Signing is enabled or disabled when a client accesses this equipment using SMB such as when a client accesses the shared folder in this equipment If client agrees digital signature is done for the com...

Page 135: ...B server the communication is not allowed y If you do not know whether the SMB Signing of SMB Server is enabled or disabled in the SMB servers it is recommended to select If server agrees digital sign...

Page 136: ...lient computers will be encrypted using a private key when operating TopAccess and e Filing web utility y To enable SSL you must create a self signed certificate or import a server certificate in Secu...

Page 137: ...cified SMTP server for transmission over the Internet 2 Enable SSL Select whether the SSL Secure Sockets Layer is enabled or disabled for SMTP transmis sion Disable Select this to disable the SSL for...

Page 138: ...r address can be obtained using the DHCP server P 120 Setting up the TCP IP IPv4 6 Authentication Select the type of the authentication to access the SMTP server Disable Select this to access the SMTP...

Page 139: ...nternet Faxes or Emails Generally 25 is used for the SMTP transmission 3 Email Address Enter the Email address of this equipment When this equipment works as an SMTP server it can receive all Internet...

Page 140: ...l certificates without CA Select this to enable the SSL without using imported CA certificate y When Verify with imported cert is selected you must import the CA certificate in this equipment P 144 Se...

Page 141: ...y encrypting the user name and password If it is not possible to Login to the mail server using Auto manually set the type of POP3 Login to either POP3 or APOP 6 Account Name Enter the account name fo...

Page 142: ...he secondary SNTP server as you require When the Obtain a SNTP Server Address automatically option is enabled in the TCP IP settings the SNTP server address can be obtained using the DHCP server P 120...

Page 143: ...is enabled or disabled for FTP server y To enable SSL you must create a self signed certificate or import a server certificate in Security Service If the self signed certificate is not created or a se...

Page 144: ...ssBook Viewer 2 Read Community Enter the SNMP read community name for the SNMP access y If you specify a community name other than public for the Read Community the appli cations that use MIB TWAIN dr...

Page 145: ...SNMP Traps will be sent Setting up the Security Service In Security Service you can install the certificate for the authentication with the RADIUS server in the Wireless LAN network create or install...

Page 146: ...urity Service y The Security Service page is displayed 2 Click Browse to select CA certificate and user certificate file as required Then click Upload y It start installing the certificates Please wai...

Page 147: ...nstall to the equipment and the client PC are as follows 1 In the HTTP Network Service FTP Server and IPP Print if you create a self signed certificate for the equipment you need to install the self s...

Page 148: ...ing Exporting a self signed certificate 1 Click Security Service y The Security Service page is displayed 2 Select self signed certificate below Server certificate and click Create y The Create self s...

Page 149: ...t name or organization unit name Common Name Enter your name or common name Email Address Enter your Email address For Common Name the FQDN or IP address of the equipment is recommended to enter 4 Cli...

Page 150: ...4 Setting up the IPP Print Deleting a self signed certificate 1 Click Security Service y The Security Service page is displayed 2 Click DELETE in the self signed certificate option y The confirmation...

Page 151: ...ick Previous to close the Security Service page Installing an imported server certificate 1 Click Security Service y The Security Service page is displayed 2 Click Browse to select server certificate...

Page 152: ...enabling SSL you must input the password for the imported server certificate from the touch panel of the equipment For instructions on how to input the password please refer to the following section i...

Page 153: ...rtificate 1 Click Security Service y The Security Service page is displayed 2 Click DELETE in the Import option y The confirmation dialog box appears If the server certificate has not been imported yo...

Page 154: ...Print you must install the CA certificate If you want to enable SSL for Web Service Print you need to install a server certificate in addi tion to the CA certificate P 150 Installing an imported serve...

Page 155: ...en click Upload y The CA certificate is installed 3 Click Previous to close the Security Service page 4 Then you can enable SSL by selecting to use the imported certifi cate in the following network s...

Page 156: ...Click Security Service y The Security Service page is displayed 2 Select the CA certificate file that you want to delete in the Certifi cate File list and click DELETE y The confirmation dialog box ap...

Page 157: ...rvice setting is available only when the Expansion Memory optional is installed When using add more memory to your computer first and then enable the Web Service setting 1 Friendly Name Assign the fri...

Page 158: ...6 Scanner Name Assign the scanner name for this equipment 7 Scanner Information Assign the scanner information for this equipment Setting up the LLTD Session Enable this setting for confirming the dev...

Page 159: ...e period Setting the copier settings 1 Access TopAccess in the administrator mode P 110 Accessing TopAccess Administrator Mode 2 Click the Setup menu and Copier submenu y The Copier submenu page is di...

Page 160: ...e for copying Only Black can be selected when the No Limit Black function is enabled 2 Original Mode for Color Select the default original mode for color originals 3 Original Mode for Black Select the...

Page 161: ...rt copy Open from left Select this to set to create a booklet that can be read from a left page Open from right Select this to set to create a booklet that can be read from a right page 9 2in1 4in1 Se...

Page 162: ...mode when originals are set in the Automatic Document Feeder 12 Sorter Mode Priority Select the default sort mode for copying Setting up Fax Settings In the Fax submenu page in the Setup menu an admin...

Page 163: ...out saving the changes click Cancel Clicking Cancel cannot restore the defaults This can only clear the changes and restore the current settings before saving the changes 5 Click OK to apply the chang...

Page 164: ...he fax number of this equipment This fax number will be printed at the leading edge of all documents transmitted from Line 1 3 Line 2 Number Enter the fax number for Line 2 of this equipment if instal...

Page 165: ...is regular size Fine Select this to set the Fine mode as the default resolution appropriate for the orig inals in which the text is small or a detailed drawing is contained Ultra Fine Select this to s...

Page 166: ...ansmission OFF Select this to not print a multi address transmission report Always Select this to print a multi address transmission report with all page images for each multi address transmission is...

Page 167: ...d by pressing the FUNCTION CLEAR button on the Control Panel or after an Auto Clear time period Setting the Save as file settings 1 Access TopAccess in the administrator mode P 110 Accessing TopAccess...

Page 168: ...settings have been changed in the equipment If this occurs click the Save as File submenu to confirm the current settings in each field Setting up the Local Storage Path You can see the folder path w...

Page 169: ...ation When this is selected users can only save a file in the local folder 2 Use Network Folder Destination When this is selected set the Remote 1 and Remote 2 settings to specify how users can select...

Page 170: ...he FTP server NetWare IPX SPX Select this to send a file to the NetWare file server using the IPX SPX protocol NetWare TCP IP Select this to send a file to the NetWare file server using the TCP IP pro...

Page 171: ...field blank 7 Password Enter the password to access a SMB server or an FTP server or NetWare file server if required The space can be entered 8 Retype Password Enter the same password again for a con...

Page 172: ...ver 3 Port Number Command Enter the port number to be used for controls if you select FTP as the protocol Generally is entered for the control port When is entered the port number that is set at FTP C...

Page 173: ...o the Touch Panel Display as soon as you save the settings The settings will be updated by pressing the FUNCTION CLEAR button on the Control Panel or after an Auto Clear time period Setting the Email...

Page 174: ...ings and click Save However the settings have been changed in the equipment In that case click the Email submenu then the page displays the current settings in each field Setting up the Email Settings...

Page 175: ...ils 6 Retry interval Enter the interval to retry sending scanned images when it fails When the Number of Retry and Retry interval options are changed the Number of Retry and Retry interval options in...

Page 176: ...ings as required y To set the Internet Fax Settings see the following P 176 Setting up the Internet Fax Settings 4 Click Save y The confirmation dialog box appears If you want to restore the current s...

Page 177: ...strings that apply to the Internet Faxes 1 From Address Enter the email address of this equipment You must enter the email address in the From Address field to enable the Internet Fax unless the From...

Page 178: ...an to Internet Fax from the Touch Panel Display This sets only the default body text so that it can be changed on each operation by users 8 Body Strings Transmission Select whether the body strings wi...

Page 179: ...f you want to restore the current settings without saving the changes click Cancel Clicking Cancel cannot restore the defaults This can only clear the changes and restore the current settings before s...

Page 180: ...uipment will prompt users for the correct paper size 3 Print Startup Page Select whether printing the startup page every time this equipment is powered on The star tup page is the NIC Configuration pa...

Page 181: ...ze Enter the font size when the selected font number represents a proportionally spaced scal able font The Font Size option allows you to determine the point size height of the default font 10 PCL Fon...

Page 182: ...raw job Raw jobs Default Stapling Select whether a raw job will be stapled Raw jobs Default Output Tray Select the default output tray that applies to a raw job A banner page that is created by NetWa...

Page 183: ...ct a radio button of a queue that you want to delete and click Delete y The confirmation dialog box appears 2 Click OK y The selected queue is deleted Setting up Print Service Settings In the Print Se...

Page 184: ...confirmation dialog box appears If you want to restore the current settings without saving the changes click Cancel Clicking Cancel cannot restore the defaults This can only clear the changes and rest...

Page 185: ...Raw bi directional Enable or disable Raw bi directional communication Setting up the LPD Print In LPD Print you can set the LPD print options to enable the LPD LPR print service 1 Enable LPD Enable or...

Page 186: ...t port using the SSL specify the following URL for the IPP print port https IP Address SSL Port Number Print y Not all operating systems support SSL for all protocols 6 SSL Port Number Enter the port...

Page 187: ...e 2 Port Number Enter the FTP port number for FTP printing Generally 21 is used 3 Print User Name Enter the user name who attempt FTP printing If you leave this field blank the default user name Print...

Page 188: ...r to print the report when an error occurs for Email printing 5 Enable Email Error Forward Select whether to send an error message to an administrative Email address when Email printing cannot be comp...

Page 189: ...pment The version information can be displayed from the Setup menu page Displaying the version information 1 Access TopAccess in the administrator mode P 110 Accessing TopAccess Administrator Mode 2 C...

Page 190: ...ystem software or hard disk replacement etc P 193 Backing up Data Restoring data from the backup files An administrator can restore the address book mailboxes and templates data from the backup files...

Page 191: ...218 Rebooting the Equipment Updating the Software You can upload client software to this equipment so end users can download the software to their computers from TopAccess You can upload the following...

Page 192: ...on 5 Click OK y The bottom section in the page will be changed for selected software 6 In each field displayed click Browse to locate the setup files to be uploaded At the left of each field the file...

Page 193: ...ded cannot be deleted However you can upload new printer drivers to overwrite them Removing the software from TopAccess 1 Access TopAccess in the administrator mode P 110 Accessing TopAccess Administr...

Page 194: ...ng up the data please confirm that there is no print job no scan job and no fax job The backup files cannot be created if there are any jobs that have been processed If backing up the data takes a lon...

Page 195: ...p or click Create New File in the Combined Backup section to create a backup file of all data y The backup file name and the file size will be displayed Creating the backup file may takes a few minute...

Page 196: ...using the backup files This maintenance feature is used to restore data from backup files after updating the sys tem software or hard disk replacement etc to recover the original environments Also you...

Page 197: ...tore submenu y The Restore submenu page is displayed 3 Click Browse in the data section that you want to restore or click Browse in the Combined Restore section to restore all data from a backup file...

Page 198: ...be displayed If the backup file name is not the name as shown below the equipment cannot restore the data from the backup files Address Book BACKUP_ADDR date tbf MailBoxes BACKUP_MBOX date enc Templa...

Page 199: ...inistrator can delete information such as scanned data transmission data and recep tion data that are stored in the local folder using the Save as file function It is recommended to delete the stored...

Page 200: ...the FILE_SHARE folder of this equipment that are stored by Save as file mailbox and Save as file Fax Received Forward or Internet Fax Received Forward Managing Directory Service You can use TopAccess...

Page 201: ...he LDAP server without SSL When the SSL is required generally 636 port is used to access the LDAP server Authentication Select the authentication type for SASL If you do not know the authentication ty...

Page 202: ...he DNS Session y When you configure the Active Directory in Windows server and Role Based Access Control will be enabled for the User Management Setting please specify the domain administrator or acco...

Page 203: ...onfigured correctly P 172 Setting up Email Settings Setting up the notifications of system errors and events 1 Access TopAccess in the administrator mode P 110 Accessing TopAccess Administrator Mode 2...

Page 204: ...e following events will be notified When Send email when an error occurs is enabled Failed to print or store the received fax or Internet Fax jobs When Error is enabled Failed to receive the Internet...

Page 205: ...to acquire resource Failed to delete files automatically by Storage Maintenance 7 In Scan Notification Events check the boxes for scanning status to be notified When these are enabled the following e...

Page 206: ...order to notify whether the e Filing operations are successfully performed please set the notification settings in the box properties using the e Filing web utility For instruc tions on how to set th...

Page 207: ...must be the comma delimited CSV file and created in the suitable format for the TopAccess address book The imported address book data will be added in the existing address book The format for the Top...

Page 208: ...here are any jobs that have been processed If importing the address book data takes a long time perform restoring the data after the equipment turns in a Sleep Auto Shut Off mode 1 Access TopAccess in...

Page 209: ...Click Import y The data is imported to the address book Exporting the Address Book Data You can export address information for use in another TopAccess address book or another address book program Exp...

Page 210: ...te New File in the Address Book area y The CSV file name will be displayed If you previously exported address book data the exported file link and information are displayed in the Address Book area Yo...

Page 211: ...file that has been exported from another device The imported department code data will be overwritten in the existing department code data The imported file must be the comma delimited CSV file and cr...

Page 212: ...ick the Maintenance menu and Import submenu y The Import submenu page is displayed 3 Click Browse in the Department Code area y The Choose File dialog box appears 4 Select the CSV file that contains d...

Page 213: ...Department Code Data You can export department code information for use in other equipment Exporting the department code data as a CSV file 1 Access TopAccess in the administrator mode P 110 Accessing...

Page 214: ...unter information click Create New File in the Department Code Export Department Information All Counters area y The CSV file name will be displayed If you previously exported department code data the...

Page 215: ...ocation Exporting the Logs Journals and Counters An administrator can export logs and journals in this equipment as CSV files Before clearing them you can save the logs journals and counters as files...

Page 216: ...gs and journals y Print Job Log y Fax Transmission Journal y Fax Reception Journal y Scan Log y Message Log y Department Code Small Large Counter y The CSV file name will be displayed If you previousl...

Page 217: ...the File Name link and select Save Target As y The Save As dialog box appears 5 Select the file location and select All Files or csv Document in the Save as type drop down box 6 Click Save y The CSV f...

Page 218: ...iodically to maintain the hard disk Clearing the logs and journals 1 Access TopAccess in the administrator mode P 110 Accessing TopAccess Administrator Mode 2 Click the Maintenance menu and Export Cle...

Page 219: ...Click the Maintenance menu and Reboot submenu y The Reboot submenu page is displayed 3 Click Reboot to reboot the equipment y The confirmation dialog box appears 4 Click OK y The equipment is restart...

Page 220: ...be registered only when the optional Fax unit is installed Registering Public Templates Administrators create and maintain public templates and manage the public template group Users can display and...

Page 221: ...the defined template name to edit the template y If you select the public template that has not been defined the Template Properties page to select agents is displayed Skip to step 5 y If you select...

Page 222: ...print copies as well as sending originals to other destinations This agent can also be combined with the Save as file agent or Store to e Filing agent Fax Internet Fax Select this to create a fax and...

Page 223: ...ent P 223 Destination Setting Public Template When Creating the Fax Internet Fax agent When Creating the Email agent Internet Fax Setting Click this to specify how the document will be sent This can b...

Page 224: ...te The instructions on how to setting up the Panel settings for the public template is same as set ting up the Panel settings for the private template P 54 Panel Setting Private Template Destination S...

Page 225: ...mplate is same as set ting up the Email settings for the private template P 65 Email Setting Private Template Save as file Setting Public Template In the Save as file Setting page you can specify how...

Page 226: ...public template 1 Access TopAccess in the administrator mode P 110 Accessing TopAccess Administrator Mode 2 Click the Registration menu and Public Template submenu y The Public Template submenu page...

Page 227: ...cted template is cleared Resetting All Public Templates To reset all public templates perform the following procedure Resetting all public templates 1 Access TopAccess in the administrator mode P 110...

Page 228: ...Internet Faxes received y The Fax Received Forward can be registered only when the optional Fax unit is installed y When the 2nd line board is installed the received faxes are forwarded to the specifi...

Page 229: ...ernet Fax Received Forward submenu the Internet Fax Received Forward submenu page is displayed 3 Check the Forward check box and select the desired agents and click Select Agent To disable the Fax Rec...

Page 230: ...by Save as file Email and Store to e Filing is different from the output of the received fax when it is printed 4 Select when the Fax or Internet Fax Received Forward document will be printed in the...

Page 231: ...Fax Setting Fax Internet Fax Received Forward Email Setting Click this to specify how the document will be sent This can be set only when registering the Email agent P 237 Email Setting Fax Internet...

Page 232: ...manually P 232 Selecting the recipients from the address book P 233 Selecting the groups from the address book P 234 Searching for recipients in the LDAP server P 236 Removing the contacts from the re...

Page 233: ...ook By this method you can select recipients from the address book 1 Click Destination Setting to open the Recipient List page 2 Click Address Book y The Address Book page is displayed 3 Check the Ema...

Page 234: ...settings P 236 Removing the contacts from the recipient list 5 Click Save y The contacts are added as the destinations Selecting the groups from the address book By this method you can select groups...

Page 235: ...list before saving the desti nation settings P 236 Removing the contacts from the recipient list 5 Click Save y The contacts are added as the destinations Searching for recipients in the LDAP server B...

Page 236: ...searching However you must specify one of them 4 Click Search y TopAccess will start searching for recipients in the LDAP server and the Search Address List page will display the results 5 Check the...

Page 237: ...st and click Delete y The selected contacts are removed from the recipient list Internet Fax Setting Fax Internet Fax Received Forward In the Internet Fax Setting page you can specify the content of t...

Page 238: ...y Enter the body message of the Email document You can enter up to 1000 characters including spaces 5 File Format Select the file format that the received document will be converted TIFF Multi Select...

Page 239: ...ority field noted below if they are not authorized to change the master password Ask the administrator for resetting these passwords y For the details of the encryption setting see the User Functions...

Page 240: ...Registering from TopAccess 239 Save as file Setting Fax Internet Fax Received Forward In the Save as file Setting page you can specify how and where a received document will be stored 1 2 3 4 6 5...

Page 241: ...ord is set 123456 at our factory Ask the administrator for resetting mas ter password y The passwords must be entered in one byte alphanumeric characters The minimum and maximum numbers of characters...

Page 242: ...le server name or Tree Context name when NDS is available When you select NetWare TCP IP as the protocol enter the IP address of the NetWare file server Port Number Command Enter the port number to be...

Page 243: ...layed when the number is registered in the address book Up to 999 files that are sent from the same sender can be stored in a same destination If 999 files that are sent from the same sender have alre...

Page 244: ...ogs such as job infor mation warnings and errors You can use this page to find out what happened and trouble shoot the problem Displaying the message logs 1 Access TopAccess in the administrator mode...

Page 245: ...tered as the default This department group is used to count the Invalid jobs You can view the counter of this department group but cannot modify or delete this default department group You can also ma...

Page 246: ...playing the department counters 1 Click the Counters tab and the Department menu y The Department menu page is displayed 2 Enter the administrator password in the Department Code field and click Enter...

Page 247: ...n administrator can clear the counters for all departments at one time or individually Clearing all department counters 1 Click the Counters tab and the Department menu y The Department menu page is d...

Page 248: ...partment counters for all departments are cleared Clearing the department counter for a department 1 Click the Counters tab and the Department menu y The Department menu page is displayed 2 Enter the...

Page 249: ...ent Code 3 Click the department name link whose counter you want to clear y The Department Information page opens 4 Click Reset Counters y The confirmation dialog box appears 5 Click OK y The departme...

Page 250: ...t code setting 1 Click the Counters tab and the Department menu y The Department menu page is displayed 2 Enter the administrator password in the Department Code field and click Enter y The Department...

Page 251: ...n the Set Limitation for Full Color option is enabled Set Limitation of Black Select whether enabling the limitation for black outputs for this department code When you select ON enter the maximum num...

Page 252: ...ll department code settings 1 Click the Counters tab and the Department menu y The Department menu page is displayed 2 Enter the administrator password in the Department Code field and click Enter y T...

Page 253: ...the Counters tab and the Department menu y The Department menu page is displayed 2 Enter the administrator password in the Department Code field and click Enter y The Department Management page is dis...

Page 254: ...Managing Department Code 253 4 Click Delete y The confirmation dialog box appears 5 Click OK y The selected department code is deleted...

Page 255: ...ement at least one department code must be registered Before enabling the department management register the department code that you require P 249 Registering or modifying the Department Code y When...

Page 256: ...ified are printed or stored in the invalid job list when the department code is enabled ON Select this to not print the invalid jobs and store them in the invalid job list Print Select this to print t...

Page 257: ...int jobs can be accepted only from the computer of which the login user name can be attested When the Windows Domain Authentication or LDAP Authentication is used the computer must also join the domai...

Page 258: ...user information P 269 Managing User Information When you enable the User Management Setting the department management will be enabled automatically However no department code has been registered you...

Page 259: ...ion and Counters P 281 Importing User Information Enabling Windows Domain Authentication To use the Windows Domain Authentication you must have Windows Domain Authentication system in your network Whe...

Page 260: ...print job whose user authentication has failed in the User Authentication Enforcement drop down box and then click Next y In the User Authentication Enforcement drop down box select whether invalid jo...

Page 261: ...least one domain name to enable the Windows Domain Authentication 8 Click NT Domain and Enter the following items Then click Next Domain Name The domain name entered in Step 7 is displayed PDC Enter...

Page 262: ...ication must be configured in the Direc tory Service submenu page in the Maintenance menu When you configure the Active Directory in Windows server please specify the domain administrator or account o...

Page 263: ...n the LDAP server that you specify in the LDAP Server drop down box and Attribute type of User Name field If the user name is found this equipment sets the From Address as the email address of the use...

Page 264: ...ation Ser vice in the Network Administration Guide y To enable LDAP with SSL please see the following section P 127 Setting up the LDAP Session Enabling LDAP Authentication 1 Click the User Management...

Page 265: ...whether invalid jobs which an authentication failed are printed or stored in the invalid job list ON Select this to not print the invalid jobs and store them in the invalid job list Print Select this...

Page 266: ...LDAP server that manages the Role Based Access Control y When you enable Role Based Access Control you must export the role based data setting file embedded in this equipment or another equipment of t...

Page 267: ...function Enable Fax Check this to enable the Fax function Enable Color Print Check this to enable color printing 10 Specify how the From Address is set for Scan to Email When the User Authentication...

Page 268: ...he user name in the Attribute type of User Name field and the domain name that is used when the user name is not found in the Mail Domain Name field From Address is acquired from Email setting Select...

Page 269: ...nvalid jobs are processed in the User Authentication Enforcement drop down box Then click Next y The MFP Local Authentication is enabled y In the User Authentication Enforcement drop down box select w...

Page 270: ...information P 273 Deleting all user information P 274 Resetting the counters for specific users P 276 Resetting the counters for all users P 278 Exporting User Information and Counters P 281 Importin...

Page 271: ...The User Information List submenu page is displayed y Users can also login using the user name domain name required only when Win dows Domain Authentication is enabled and password that has been set a...

Page 272: ...r this user When you select ON enter the maximum number of color outputs for this user in the Maximum reached for Full Color output field Maximum reached for Full Color output Enter the maximum number...

Page 273: ...User Information List submenu page is displayed y Users can also login using the user name domain name required only when Win dows Domain Authentication is enabled and password that has been set as t...

Page 274: ...d 1 Click the User Management tab y The login page is displayed 2 Enter Admin in the User Name field enter the administrator password in the Password field and click Login y The User Information List...

Page 275: ...ears 4 Click OK to delete all user information y The counters of selected users are cleared Resetting the counters for specific users When the user s jobs are in progress or the user currently log in...

Page 276: ...omain name required only when Win dows Domain Authentication is enabled and password that has been set as the Account Manager in the User Information y You do not have to select the Domain Name field...

Page 277: ...page is displayed 2 Enter Admin in the User Name field enter the administrator password in the Password field and click Login y The User Information List submenu page is displayed y Users can also log...

Page 278: ...Setting up User Management 277 3 Click Reset All Counters y The confirmation dialog box appears 4 Click OK to reset all counters y The counters of selected users are cleared...

Page 279: ...ministrator password in the Password field and click Login y The User Information List submenu page is displayed y Users can also login using the user name domain name required only when Win dows Doma...

Page 280: ...ion All Counter Click Create New File of this area to export the counter information and user information If you previously exported user information data the exported file link and information are di...

Page 281: ...or Mode 280 Setting up User Management 6 Select the file location and select All Files in the Save as type drop down box Then click Save y The CSV file that contains the user information data is saved...

Page 282: ...e CSV file The required items vary depending on the authentication type Yes Required No Not Required y When user sends a print job while importing the user information the alert message will be displa...

Page 283: ...y The User Information List submenu page is displayed y Users can also login using the user name domain name required only when Win dows Domain Authentication is enabled and password that has been set...

Page 284: ...he data is imported to the User Information list page Exporting Role Information Role information is stored in this equipment in the XML format The role information can be exported as a CSV file for u...

Page 285: ...tion List submenu page is displayed y Users can also login using the user name domain name required only when Win dows Domain Authentication is enabled and password that has been set as the Account Ma...

Page 286: ...6 Select the file location and select XML Document in the Save as type drop down box Then click Save y The XML file that contains the role information data is saved in a selected location Importing R...

Page 287: ...he Password field and click Login y The User Information List submenu page is displayed y Users can also login using the user name domain name required only when Win dows Domain Authentication is enab...

Page 288: ...Import link at the upper right of the page y The Export Import window appears 5 Click Import menu y The Import page appears 6 Click Browse y The Choose file dialog box appears 7 Select the XML file t...

Page 289: ...mation by login the User Confirm Create Modify page When the Role Based Access Control is enabled users can also confirm the functions to be allowed 1 Click the User Management tab y The login page is...

Page 290: ...FP Authentication is enabled not only an administrator or account managers but also each registered user can change the password himself 1 Click the User Management tab y The login page is displayed 2...

Page 291: ...ord y The Change Password window appears 4 Enter the following items and click Save Old Password Enter your login password New Password Enter a new login password You can enter up to 64 characters Ret...

Page 292: ...ntication When your network manages the network users using the LDAP this equipment can be managed using the LDAP Authentication When this is configured users must enter the user name and password tha...

Page 293: ...ernet Fax transmission check the Internet Fax Not Allowed check box When you check on this box users no longer perform the Internet Fax transmission y When you want to disable the User Authentication...

Page 294: ...ttribute type of User Name field If the user name is found this equipment sets the From Address as the email address of the user name registered in the LDAP server If the user name is not found in the...

Page 295: ...an to Email LDAP 1 Click the User Management tab and the Authentication menu y The login page is displayed 2 Enter the administrator password and click Login y The Authentication page is displayed 3 C...

Page 296: ...nt to disable the User Authentication for Scan to Email select Disable in the Method and click Next 5 Select the LDAP server to be used for the authentication and select the type of the LDAP server Th...

Page 297: ...down box and Attribute type of User Name field If the user name is found this equipment sets the From Address as the email address of the user name registered in the LDAP server If the user name is n...

Page 298: ...em persists after you have followed all of the steps make sure to note what you were trying to do and any error messages appear etc and then contact your service representative TopAccess Error Message...

Page 299: ...Send a print job with a 600 dpi setting 4030 Print enable error Please purchase the Printer Kit or Printer Scanner Kit if you want to use the printing function 4040 No authority to execute a job The...

Page 300: ...rd and your setup 00B0 00B5 00C0 00C4 00D0 00D2 Signal Error or Line Condition Error Retry communications Frequent failures may indicate a phone line problem If pos sible move the unit to another line...

Page 301: ...ck ON and perform the job again 1C40 Image conversion abnormality Turn the power OFF and then back ON Perform the job in error again If the error still occurs contact your service represen tative 1C60...

Page 302: ...ce represen tative 1C70 SMTP client OFF Ask your administrator to enable the SMTP Client and perform the job again 1C71 SMTP authentication error Confirm the login name and password are correct If SSL...

Page 303: ...2 Invalid character set Ask the sender to resend the Email in the ISO 8559 1 2 format 3B40 3B42 Email decode error Ask the sender to resend the Email 3C10 3C13 TIFF analysis error Ask the sender to re...

Page 304: ...ly 3E10 POP3 server communication error Ask your administrator that the POP3 server address is correctly set or the POP3 server works properly If SSL is enabled make sure that SSL port number is corre...

Page 305: ...r OFF and then back ON and perform the job again 2C40 Failed to convert image file format When this error occurs by converting the Slim PDF format retry the scan If the error still occurs specify the...

Page 306: ...are correct If SSL is enabled make sure that SSL port number is correctly set 2C72 POP Before SMTP error Confirm the POP Before SMTP settings and POP3 settings are correct 2C80 Failed to process recei...

Page 307: ...format When this error occurs by converting the Slim PDF format retry the scan If the error still occurs specify the general PDF format When this error occurs by converting other than the Slim PDF for...

Page 308: ...al error Turn the power OFF and then back ON Retry the scan 2A50 Job canceled Job was canceled 2A51 Power failure occurred Make sure that the power cable is con nected properly and it is inserted secu...

Page 309: ...ified Make sure that the password is correct and retry the scan or reset the password and retry the scan When this error occurs for the print of the data in the e Filing per form the print with the ad...

Page 310: ...then back ON Perform the job in error again If the error still occurs Contact your service represen tative 2504 Command parameter not implemented Check if the mail server is operating prop erly Turn t...

Page 311: ...er Tray Front Cover Open Please Close Cover Close the Lower Tray Front Cover Punch Unit Front Cover Open Please Close Cover Close the Punch Unit Front Cover Hole Punch Unit Open Please Close Cover Clo...

Page 312: ...your service representative Main Motor Error Please Contact Service Techni cian Contact your service representative Printer Output Error Please Contact Service Technician Contact your service represe...

Page 313: ...gin Error has been occurred in the received mail Make sure the correct login name and password is specified POP3 Login Error occurred in the received mail Make sure that the POP3 login type Auto POP3...

Page 314: ...et has expired and cannot be used for Authentication Please confirm the validity period of the ticket set by the Kerberos server Please retry again after the fresh ticket is issued Active Directory Do...

Page 315: ......

Page 316: ...9 Appendix This section describes the following contents Installing Certificates for a Client PC 316...

Page 317: ...Windows XP or Windows 2000 is used 1 Open the command prompt type mmc and press the Enter key 2 From the File or Console menu of the window that appears select Add Remove Snap in y The Add or Remove...

Page 318: ...nd click Next y The Select Computer dialog box appears 5 Select Local computer the computer this console is running on and click Finish y The Select Computer dialog box is closed 6 Make sure that Cert...

Page 319: ...n User Account Control On or Off uncheck the box for the Use User Account Control UAC to help protect your computer option and click OK 1 On the MMC select and right click on the appropriate folder to...

Page 320: ...he Certificate Import Wizard click Next y For importing a client certificate proceed to the next step Otherwise skip to the step 5 3 From Browse select the certificate to install and click Next 4 Ente...

Page 321: ...9 Appendix 320 Installing Certificates for a Client PC 5 Click Next Do not change the certificate store from Browse 6 Click Finish If the following security warning message appears click Yes...

Page 322: ...pfx to a Windows Vista PC proceed to the next step Otherwise the installation is complete If you need to install another certificate repeat the steps from the beginning 8 Double click the imported cl...

Page 323: ...g command netsh http add sslcert ipport 0 0 0 0 5358 certhash your 40 digit thumbprint appid 00112233 4455 6677 8899 AABBCCDDEEFF When inputting the thumbprint exclude the spaces When your client cert...

Reviews: