background image

C5550 MFP User’s Guide

A guide to printing > 221

S

EPARATING


QUEUED


PRINT


JOBS

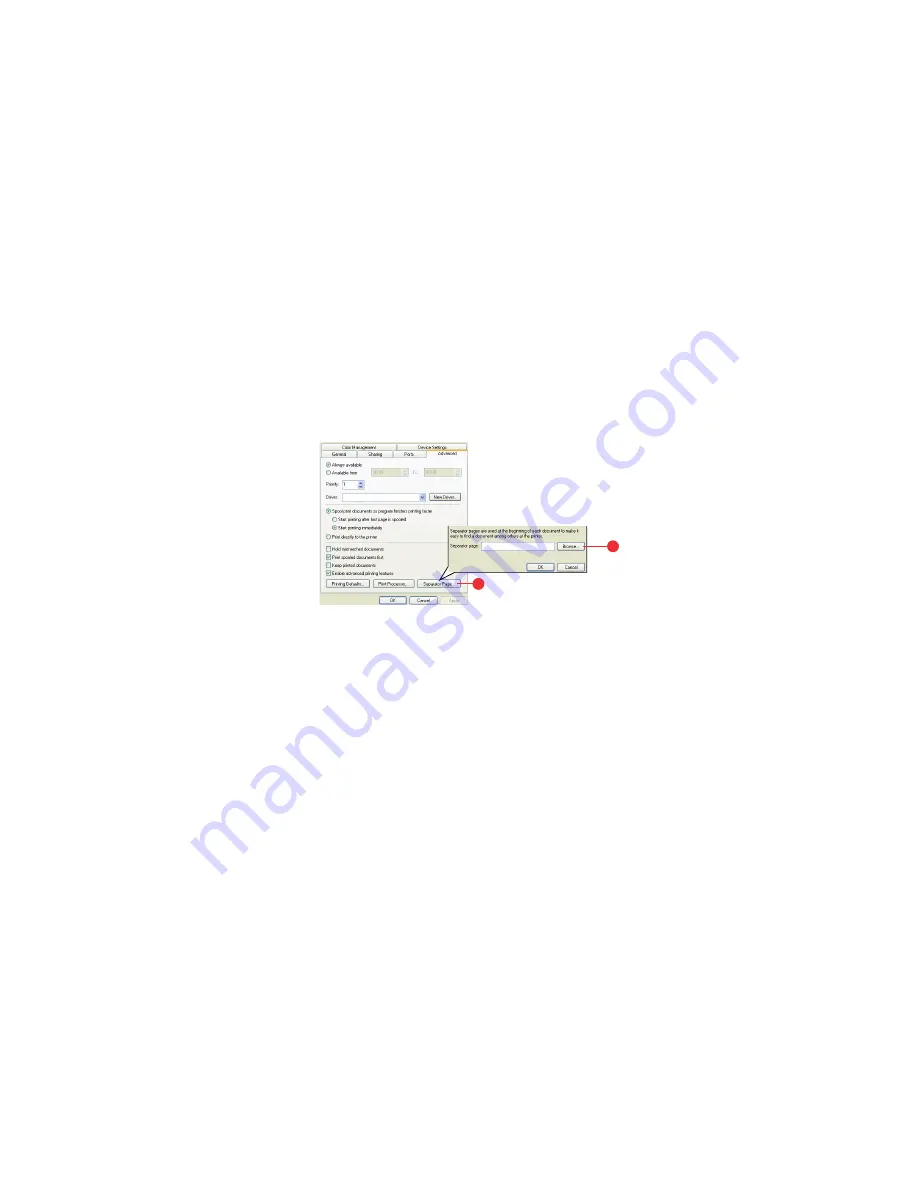
When you share an MFP with other users it can be useful to print 
a special page between print jobs to help locate each user’s job 
in a paper stack at the MFP. In Windows this page is called a 
“separator page”. 
The separator page is set from the printer driver’s default 
properties window. Access to this is directly from Windows, not 
from within your application program. See 

“Changing the driver 

defaults” on page 183.


Separator Page winxp.eps


1.

In the driver’s Advanced tab click the [Separator Page…] 
button (1).

2.

Click [Browse] (2) and navigate to a file containing an 
image of the separator page you wish to use, then click 
[OK].

Summary of Contents for C5550 MFP

Page 1: ...59391301_cvr jpg...

Page 2: ...essarily constitute endorsement by the manufacturer While all reasonable efforts have been made to make this document as accurate and helpful as possible we make no warranty of any kind expressed or i...

Page 3: ...Cassette tray 23 Multi purpose tray 23 Face down stacker 24 Face up stacker 24 Loading paper 25 Cassette tray 25 Multi purpose tray 28 Configuring your machine 30 Minimum configuration requirements 30...

Page 4: ...150 Fax problem checklist 161 LCD message list 164 A guide to printing 183 How to access the driver screens 183 Changing the driver defaults 183 Changing the application s driver settings 184 PCL save...

Page 5: ...GB source data 206 CMYK ink simulations CMYK source data 208 Rendering intents 211 Pure black text graphics 212 Color match precision 212 Printer driver settings for ICC profile creation or no color m...

Page 6: ...e Need Help Visit our Website 6 NEED HELP VISIT OUR WEBSITE For personalized web based support on the products you own including the latest up to the minute information visit your personal solutions c...

Page 7: ...Never attempt to induce vomiting if person is unconscious If inhaled move the person to an open area for fresh air Seek medical attention If it gets into the eyes flush with large amounts of water fo...

Page 8: ...mark Any other toner cartridge may not operate at all even if it is described as compatible and if it does work your product s performance and print quality may be degraded Specifications subject to c...

Page 9: ...c quality to your documents Up to 20 pages per minute in full color for fast printing of high impact color presentations and other documents Up to 10 copies per minute at 300 dpi in full color for fas...

Page 10: ...erver to handle large attachments Digital Copying An intuitive control panel makes digital copying fast and easy Network PC Printing When connected to a network the MFP is able to perform network or P...

Page 11: ...site www okiprintingsolutions com for the most up to date version for your MFP and forms part of the overall user support listed below Safety Warranty and Regulatory Information to provide informatio...

Page 12: ...ded to be read on screen using an Adobe Reader Use the navigation and viewing tools provided in Adobe Reader You can access specific information in two ways In the list of bookmarks down the left hand...

Page 13: ...cedure is 1 From the toolbar select File Print or press the Ctrl P keys 2 Choose which pages you wish to print a All pages 1 for the entire manual b Current page 2 for the page at which you are lookin...

Page 14: ...ator Panel with LCD display Status LEDs and operator buttons 4 Front Cover release lift 5 Paper tray Standard blank paper tray Holds up to 300 sheets of 20 lb 80g m paper 6 Multi purpose feeder shown...

Page 15: ...used in conjunction with the multi purpose feed tray the paper path through the MFP is essentially straight This avoids bending the paper around curves in the paper path and enables feeding of up to...

Page 16: ...hoice of scaling can be made from preset percentages 2 One touch keypad Provides one touch dialling of your most often used or favorite fax numbers 3 Keypad Alpha numerical keys used to enter copy qua...

Page 17: ...value 9 Up Down Left Right Keys Used to move the cursor in the LCD up down left right The up down keys are used to switch function indication 10 OK Used to select and confirm current setting selectio...

Page 18: ...the menu to set up the MFP 15 Reset Select to change the scanner to the factory default settings 16 Power save Press once to go to sleep mode continuous press is invalid 17 Power LEDs Power Alarm Slee...

Page 19: ...The CD ROM will auto launch on most systems However if your system does not support auto launching CD ROMs press the Start button choose RUN type d setup exe d the CD ROM drive in use and then click...

Page 20: ...te the setup tool installation The MFP network setup tool can discover C5550MFP devices over network connections MFP setup jpg 1 To search and install select File Search All Devices 2 Click Search MFP...

Page 21: ...xposed to the high fuser temperatures used in the printing process Envelopes should be free from twist curl or other deformations They should also be of the rectangular flap type with glue that remain...

Page 22: ...1 White Laser Label Letter size Avery 7162 7664 7666 White Laser Labels size A4 Banner Paper Oki 52206002 100 count 8 5 x 35 4 inches 215 90 x 899 16 mm Oki SynFlexTM Paper Oki 52205901 8 5 x 11 inche...

Page 23: ...Print Menu MULTI PURPOSE TRAY The multi purpose tray can handle the same media sizes as the cassette trays but in weights of 20 54 lb 75g m to 203g m For very heavy paper stock use the face up rear pa...

Page 24: ...er should be loaded print side up and top edge into the MFP FACE DOWN STACKER The face down stacker on the top of the MFP can hold up to 250 sheets of 20 lb 80g m standard paper and can handle paper s...

Page 25: ...1 Remove the paper tray from the MFP Pull out paper tray eps 2 Fan the paper to be loaded at the edges 1 and in the middle 2 to ensure that all sheets are properly separated then tap the edges of the...

Page 26: ...nd paper guides 2 to the size of paper being used To prevent paper jams Do not leave space between the paper and the guides and rear stopper Do not overfill the paper tray Capacity depends on the type...

Page 27: ...0 sheets depending on paper weight 6 For face up printing make sure the face up rear stacker 3 is open and the paper support 4 is extended Paper is stacked in reverse order and tray capacity is approx...

Page 28: ...up and top edge into the MFP Envelopes should be loaded face up with top edge to the left and short edge into the MFP Do not exceed the paper capacity of about 50 sheets or 10 envelopes Maximum stack...

Page 29: ...e Loading paper 29 Menu scanner menu settings See Configuration on page 35 for details NOTE You only need to update one menu the scanner and printer menus automatically synchronise to ensure the infor...

Page 30: ...Windows 2000 Windows XP HTTP or FTP server PRE CONFIGURATION INFORMATION GENERAL There are no factory default PIN or passwords these should be set initially by the system administrator FAX SET UP You...

Page 31: ...POP3 Port 110 Explanation 1 DHCP Enable Choose Yes to obtain IP subnet gateway addresses automatically from DHCP server After changing setting from Disable to Enable switch scanner module power OFF t...

Page 32: ...DNS server The IP address of DNS Server assigned by your network administrator 8 POP3 Server The IP address of your POP3 server 9 POP3 Port The port number of your POP3 Server Enter the DNS name or IP...

Page 33: ...ss consists of two parts one identifying the network and the one identifying your node The IP address is usually written as four numbers separated by periods Each number can be zero to 255 For example...

Page 34: ...ol or CIFS Common Internet File System The MFP allows you to save scanned documents directly to a designated server or a personal computer on the network in a standard PDF JPEG TIFF or MTIFF file form...

Page 35: ...control panel For illustration purposes only the configuration menu options shown are as accessed via the scanner control panel NOTE 1 If the system administrator has chosen DHCP then the IP address...

Page 36: ...n the URL field of your browser and then press Enter The MFP web page appears For example http 192 168 1 41 webpage jpg NOTE The Administrative Settings are blocked by a password It is recommended tha...

Page 37: ...lready done so install the MFP Network Setup Tool as described in MFP network setup tool on page 20 MFP setup jpg NOTE The Administrative Settings are blocked by a password It is recommended that the...

Page 38: ...tion or exit the menu item Control panel_oda jpg Information ITEM DESCRIPTION OR CHOICE Model Displays the model name Device name Displays the device name Scanner MAC address Displays the scanner MAC...

Page 39: ...m Heavy MP Media Weight Medium Heavy Ultra Heavy Tray 1 Media Type Plain LTRhead Bond Recycled Rough Tray 2 Media Type Plain LTRhead Transparency Bond Recycled CardStock Rough MP Media Type Plain Lett...

Page 40: ...o SMTP POP3 Login Name User s choice Password User s choice Def Subject Default text for the Subject field in e mail messages from the MFP Up to 64 characters are allowed The default subject is used o...

Page 41: ...SET UP FAX Station ID Fit to page Detect dial tone Detect busy tone Re dial Redial interval Ring response Dial prefix Manual receive ECM mode Speaker volume Id Enter MFP ID number Station Enter MFP te...

Page 42: ...trator create a new 4 to 6 digit PIN When the security feature is enabled the user will be prompted to enter the PIN ITEM DESCRIPTION OR CHOICE Date Time Enter the current date and time Password Enter...

Page 43: ...0 60 120 180 seconds Country Code Select the country in which the MFP is situated Choice United States Japan International Denmark Austria Italian Latin America Great Britain Germany Belgium Greece Me...

Page 44: ...the administrator create a new password to ensure security ITEM DESCRIPTION OR CHOICE Address Book Manager Set up a list of e mail addresses and groups to which to send your scanned images Profile Ma...

Page 45: ...LINE CANCEL BACK MENU ENTER 1 2 3 ITEM ACTION DESCRIPTION Print Menu Map Execute Prints complete menu listing with current MFP settings shown Print File List Execute Prints a list of overlays macros...

Page 46: ...ff to ensure that no hard disk data is lost ITEM ACTION DESCRIPTION Shutdown Start Execute Performs controlled shutdown of the MFP ensuring that all files on the internal hard disk are closed before p...

Page 47: ...ot enabled the MFP will stop and request the correct size of paper to be loaded Media Check ENABLE DISABLE Determines whether the MFP check the size of paper loaded matches that required for the docum...

Page 48: ...n the majority of print jobs are in color The MFP automatically switches between 20ppm for each color page and 32ppm for each black and white page When black and white pages are printed the 3 color dr...

Page 49: ...GAL14 LEGAL13 5 LEGAL13 LETTER EXECUTIVE CUSTOM Selects the size of paper loaded in Tray 1 upper tray if both trays installed For CUSTOM setting see X DIMENSION and Y DIMENSION later in this table Tra...

Page 50: ...0g m Heavy 24 47 lb 91 176g m Adjusts the MFP for the weight of paper stock loaded in this tray if installed MPT Papersize A4 A5 A6 B5 LEGAL14 LEGAL13 5 LEGAL13 LETTER EXECUTIVE CUSTOM COM 9 ENVELOPE...

Page 51: ...in the foregoing PAPER SIZE settings Note that media of up to 1200mm in length can be fed from the multi purpose tray for banner printing ITEM CHOICE DESCRIPTION ITEM CHOICE DESCRIPTION ColorDensity C...

Page 52: ...0 Ajst Registration EXECUTE Performs automatic color registration adjustment Normally this is done on power on and when the top cover is opened and then closed This process accurately aligns the cyan...

Page 53: ...rt Clrable Warning ONLINE JOB When ONLINE non critical warnings such as requests for a different paper size can be cleared by pressing the ON LINE button When set to JOB they are cleared when the prin...

Page 54: ...I 10 00 CPI 99 99 CPI Point size of selected default font Symbol Set PC 8 PCL symbol set If the font source and number are changed to one which does not support the selected symbol set this must be ch...

Page 55: ...de Character Set SET 1 SET 2 Specifies a character set Symbol Set IBM 437 Specifies a symbol set Letter 0 Style DISABLE ENABLE Specifies the style that replaces 9BH with letter o and 9DH with a zero Z...

Page 56: ...ter SAME Regardless of CPI same height DIFF As CPI character heights vary ITEM CHOICE DESCRIPTION ITEM CHOICE DESCRIPTION Character Pitch 10 CPI 12 CPI 17 CPI 20 CPI PROPORTIONAL Specifies character p...

Page 57: ...n fit print data equivalent to 11 inches 66 lines in the LETTER size printable area Text Height SAME DIFF Sets the height of a character SAME Regardless of CPI same height DIFF As CPI character height...

Page 58: ...Black Setting 2 0 2 As above but for mono printing on transparencies Transpr Color Setting 2 0 2 As above but for color printing on transparencies SMR Setting 3 0 3 BG Setting 3 0 3 ITEM DESCRIPTION...

Page 59: ...lt Port is usually 80 If you are not using the HTTP port to save files you must change the MFP HTTP Port to the port for the Web Server Generally speaking a Hyper Text Transfer Protocol HTTP Web Serve...

Page 60: ...ng HTTP for file saving If anonymous access mode is not allowed you must have a legal HTTP account and password Since this MFP will check whether the directory for file saving really exists before pro...

Page 61: ...n1 jpg 4 In the X cabinet dialog box select the Directory security tab and click Edit for Anonymous Access and Authentication Control Make sure Anonymous Access is selected in the Authentication Metho...

Page 62: ...tem on your server is NTFS in order to allow IIS to use an anonymous account to access the files in the directory of C Inetpub wwwroot X cabinet Files you have to make sure the anonymous account has t...

Page 63: ...pache documentation CIFS CIFS Windows Network Share is a file saving protocol generally used for resource sharing of a network in Microsoft Windows systems Set up the shared directory as per the netwo...

Page 64: ...1 Press the Menu button to prompt the menu settings screen 2 Using the UP arrow key navigate to Management and press OK 3 When prompted enter the password and press OK 4 Press OK to select Date Time 5...

Page 65: ...w speed dial number to the phone book 1 Press the Menu button on the control panel 2 Using the UP arrow key navigate to Fax Settings and press OK 3 Press OK to select Phone Book 4 Press OK to select E...

Page 66: ...to Edit Group Dial then press OK 5 Using the UP DOWN arrow keys navigate to the desired group dial entry location index number then press OK 6 Press OK enter the new group name using the alpha numeri...

Page 67: ...s will be marked with an 6 Press Return to finish selecting and return to the previous screen The LCD display will confirm the quantity of fax numbers selected 7 Press OK to confirm deletion or press...

Page 68: ...xchanges PBXs are private telephone systems used to route calls internally for example in a company When dialling a telephone number if a prefix access number is required to open an outside line the l...

Page 69: ...on to prompt the menu settings screen 2 Using the UP arrow key navigate to Fax Settings and press OK 3 Using the UP arrow key navigate to Setup Fax and press OK 4 Using the DOWN arrow key navigate to...

Page 70: ...y navigate to Fax Settings and press OK 3 Using the UP arrow key navigate to Setup Fax and press OK 4 Using the DOWN arrow key navigate to Manual Receive and press OK 5 Press Return to store the new c...

Page 71: ...2 Using the UP arrow key navigate to Fax Settings and press OK 3 Using the UP arrow key navigate to Setup Fax then press OK 4 Using the UP DOWN arrows keys navigate to Ring Response and press OK 5 Sel...

Page 72: ...e other for PostScript 3 emulation If you print mainly from general Office applications choose one of the PCL drivers For faster printing of PDF documents choose PostScript If you print mainly from pr...

Page 73: ...in numerical order If using the face up rear paper stacker reverse order would normally stack your pages in numerical order 4 You can specify how many pages to print on a sheet Pages will be scaled to...

Page 74: ...The setting for paper weight should match the type of paper on which you intend to print 3 A variety of document finishing options can be selected such as normal one page per sheet or N up where N ca...

Page 75: ...you delete it from the printer control panel or from your PC with the Storage Device Manager utility There are three parts in job spooling 1 Sending the document See Sending the document on page 75 2...

Page 76: ...e MFP when you come to print you will need a distinctive name to distinguish between each of your print jobs 6 If you would like a prompt at the MFP for the job name click the Request checkbox below t...

Page 77: ...ent a list appears in the display 4 Use the buttons to select the name of the print job you wish to print and press ENTER to select it 5 If necessary use the buttons to highlight the PRINT option 6 Pr...

Page 78: ...u change your mind about printing a stored document you can delete it from the MFP s hard disk without printing it first 1 Follow Steps 1 to 4 in the above procedure for printing the document 2 Use th...

Page 79: ...at one time If you need to scan copy send fax pages from books newspaper clippings or paper with wrinkles or curls place them on the glass PLACING DOCUMENT S IN THE ADF Before using the ADF please ma...

Page 80: ...to 50 pages at one time Fan Paper eps 2 Place the document with the text face UP in the ADF and make sure that the top of each page is fed in first 3 Adjust the Paper Guides 1 to center the document i...

Page 81: ...oc on glass eps 3 Close the document cover SENDING DOCUMENT S VIA E MAIL BASIC OPERATION Control menu sending_oda jpg 1 Place your document s with text face UP in the ADF or face DOWN on the glass as...

Page 82: ...Press the Mono button 6 to send your document s in black and white or the Color button 7 to send your document s in color ADVANCED OPERATION If you are not satisfied with the scanned image you can use...

Page 83: ...n be entered in the field Color output format Choose the output format for the document to be scanned in colors from PDF TIF JPEG and MTIF Also select the compression rate from Low Medium High B W out...

Page 84: ...to 64 characters can be entered in the Attachment To From CC BCC and the Def Subject field If you wish to scan a multi page document and convert it to a single image file choose your output file forma...

Page 85: ...d starting the Network Setup Tool on the CD ROM supplied Control menu profile_oda jpg 1 Place your document s with text face UP in the ADF or face DOWN on the glass 2 Press Send Mode 1 and FTP Address...

Page 86: ...F or face DOWN on the glass 2 If required press the Copy Mode button 1 on the control panel to prompt the Copy screen 3 Press Mono 2 to copy your document s in black and white or Color 3 to copy your...

Page 87: ...the Additional settings screen Control menu copyadv_oda jpg Below is the menu for the Additional Settings when all printer options are installed if there are any changes in the option condition the se...

Page 88: ...lways disabled Duplex Optional Off Short Edge Long Edge N Up Paper Save 1 in 1 4 in 1 Horizontal Edge erase 0 Margin shift R 0 Margin shift B 0 Paper supply A4 Letter Input tray Auto FUNCTION DEFAULT...

Page 89: ...48 0 9843 inches Margin Shift Right 0 6 13 19 25 mm 0 0 2362 0 5118 0 748 0 9843 inches Bottom 0 6 13 19 25 mm 0 0 2362 0 5118 0 748 0 9843 inches Paper Supply Legal Letter A4 A5 Input Tray Auto Tray...

Page 90: ...rol panel to prompt the Copy screen 2 Press the Select 4 button to choose a preset value from 100 25 50 70 141 200 and 98 fit to page 3 Alternatively continue to press the Select 4 button until the 25...

Page 91: ...chine is preset to the Normal level of density If your original document comes with a lighter or darker contrast you can improve the quality by using the Adjusting Density feature To change density 1...

Page 92: ...ric keypad The LCD display will confirm the copy count selected FAXING BASIC OPERATION Searching the phone book To search the contents of the phone book Control menu faxbasic_oda jpg 1 Press the Fax M...

Page 93: ...DOWN on the glass 2 Press the Fax Mode button 1 on the control panel to prompt the Fax screen 3 Enter the destination fax number by either typing in the number using the numeric keypad 4 pressing the...

Page 94: ...o receive faxes automatically if you wish to change this to manual receive refer to Manual receive on page 70 for details NOTE 1 Fax transmissions are sent in black and white only 2 If you make a mist...

Page 95: ...nu for the Additional Settings If there are any changes made the settings will return to the these factory default settings when you press the Reset button 3 NOTE For illustration purposes only the ad...

Page 96: ...al level of density If your original document comes with a lighter or darker contrast you can improve the quality by using the Adjusting Density feature To change density 1 Press the Fax Mode button o...

Page 97: ...nt s with text face UP in the ADF or face DOWN on the glass 2 Press the Fax Mode button on the control panel to prompt the Fax screen 3 Press the Additional Settings button 4 Using the DOWN arrow key...

Page 98: ...K to continue scanning or press Mono to continue sending the fax Polling receive Polling is a process in which documents are loaded into a machine and the machine is then set to wait for a call from a...

Page 99: ...exit the menu and return to the fax screen 7 Press Mono to start sending the document s Broadcasting You can send a fax to multiple locations at the same time 1 Place your document s with text face U...

Page 100: ...x Jobs and press OK 4 At the prompt enter the admin password and press OK 5 Using the UP DOWN arrow keys navigate through the list of fax jobs 6 Press OK to select the required job s for deletion The...

Page 101: ...ntrol panel to prompt the menu settings screen 2 Using the UP arrow key navigate to Fax Settings and press OK 3 Using the UP arrow key navigate to the Reports and press OK 4 Select required report and...

Page 102: ...with a list of scanning sources appears 3 Select C5550MFP You need to select the source only once unless you want to choose another scanner 4 Place the document face DOWN on the document glass or fac...

Page 103: ...type Choice Black White 8 Bit Gray 24 Bit Color Half tone 3 Resolution Choice 50 72 100 144 150 200 300 600 1200 2400 4800 dpi 4 Brightness Adjust the brightness level from 100 to 100 5 Contrast Adjus...

Page 104: ...e document from the automatic document feeder ADF Image type Scanner 3 eps 1 Choose B W if your original contains only B W text pencil or ink sketch 2 Halftones are the reproduction of an image that g...

Page 105: ...oom Enlarge your previewed image to the maximum of the preview window Inverting and selecting your image 1 Invert The invert command reverses the brightness and the color in the image For color images...

Page 106: ...found in printed matter 1 Before 2 After Moire pattern An undesirable pattern in a color printing resulting from incorrect screen angle of overprinting halftone Scanner 5 eps 2 Sharpen Sharpen the sca...

Page 107: ...shadow areas of the scanned image to optimize the following Using the advanced features Scanner 7 eps 1 Click the Switch button 1 to select the Advanced Settings bar 2 to 7 Advanced settings include H...

Page 108: ...ools together allows you to extend the range of color and reveal more details in a gray or color image Shadow 1 The darkest point of an image Gamma 2 The middle tones of the image Highlight 3 The ligh...

Page 109: ...peration 109 When the value of highlight and shadow change the image changes as shown below Scanner 10 eps 1 Highlight 255 Shadow 0 Normal 2 Highlight 210 Shadow 10 3 Highlight 200 Shadow 0 4 Highligh...

Page 110: ...or lighter Scanner 11 eps 4 Color hue saturation lightness Improve an image by changing the level of hue saturation lightness Scanner 12 eps a Hue Adjust the hue by moving the triangle to the right o...

Page 111: ...trol allows you to set optimal image color quality Scanner 13 eps You can either move the relevant pointer toward a color in the above example 63 green has been selected or if known enter the figure i...

Page 112: ...ng OCR software Scanner 14 eps 7 Using custom settings Click on the Custom Settings button to access a dialog box where you can save your scan and configuration settings There are two tabs Scan Settin...

Page 113: ...clicking the button you can change the measuring unit Choice Inch cm Pixel 2 Paper Size Choice Card 4 x 2 5 Photo 5 x 3 5 Photo 3 5 x 5 Photo 4 x 6 Photo 6 x 4 B5 A5 A4 Letter and Scanner Maximum 3 I...

Page 114: ...icates TONER LOW or if print appears faded first open the top cover and try tapping the cartridge a few times to evenly distribute the toner powder This will enable you to obtain the best yield from y...

Page 115: ...lations recommendations etc which may be in force concerning waste recycling If you do spill any toner powder lightly brush it off If this is not enough use a cool damp cloth to remove any residue Do...

Page 116: ...s top cover b fully Cover Release eps 3 Note the positions of the four cartridges ID Order eps b a WARNING If the MFP has been powered on the fuser may be hot This area is clearly labelled Do not touc...

Page 117: ...e cartridge to be replaced fully towards the front of the MFP Toner Release in Situ eps 4 Lift the right hand end of the cartridge and then draw the cartridge to the right to release the left hand end...

Page 118: ...e the new cartridge from end to end several times to loosen and distribute the toner evenly inside the cartridge Shake eps CAUTION The green image drum surface is very delicate and light sensitive Do...

Page 119: ...it into the printer over the image drum unit from which the old cartridge was removed 10 Insert the left end of the cartridge into the top of the image drum unit first pushing it against the spring on...

Page 120: ...P This will lock the cartridge into place and release toner into the image drum unit Toner Close in Situ eps 12 Close the top cover and press down firmly at both sides so that the cover latches closed...

Page 121: ...de Maintenance 121 IMAGE DRUM REPLACEMENT The MFP contains four image drums cyan magenta yellow and black 1 Gently raise the scanner Scanner up eps CAUTION Antistatic symbol eps Static sensitive devic...

Page 122: ...s top cover b fully Cover Release eps 3 Note the positions of the four cartridges ID Order eps b a WARNING If the MFP has been powered on the fuser will be hot This area is clearly labelled Do not tou...

Page 123: ...rniture and to avoid damaging the green drum surface CAUTION The green image drum surface at the base of the cartridge is very delicate and light sensitive Do not touch it and do not expose it to norm...

Page 124: ...thdraw the toner cartridge out of the image drum cartridge Place the cartridge on a piece of paper to avoid marking your furniture Toner Out Out eps 8 Take the new image drum cartridge out of its pack...

Page 125: ...Push the colored release lever 1 away from you to lock the toner cartridge onto the new image drum unit and release toner into it Toner Close Out eps 11 Holding the complete assembly by its top cente...

Page 126: ...y at both sides so that the cover latches closed 13 Gently lower the scanner Scanner down eps NOTE If you need to return or transport this product for any reason please make sure you remove the image...

Page 127: ...CEMENT The belt unit is located under the four image drums This unit requires replacement approximately every 60 000 pages Switch off the MFP and allow the fuser to cool for about 10 minutes before op...

Page 128: ...Release eps 3 Note the positions of the four cartridges It is essential that they go back in the same order ID Order eps b a WARNING If the MFP has been powered on the fuser will be hot This area is c...

Page 129: ...reen image drum surface at the base of each cartridge is very delicate and light sensitive Do not touch it and do not expose it to normal room light for more than 5 minutes If the drum unit needs to b...

Page 130: ...o place with the lifting bar at the front and the drive gear towards the rear of the MFP Locate the drive gear into the gear inside the printer by the rear left corner of the unit and lower the belt u...

Page 131: ...C5550 MFP User s Guide Maintenance 131 12 Gently lower the scanner Scanner down eps...

Page 132: ...d allow the fuser to cool for about 10 minutes before opening the cover 1 Gently raise the scanner Scanner up eps WARNING If the MFP has recently been powered on some fuser components will be very hot...

Page 133: ...andle 1 on the top of the fuser unit 4 Pull the two fuser retaining levers 2 towards the front of the printer so that they are fully upright Fuser Unlock eps 5 Holding the fuser by its handle 1 lift t...

Page 134: ...round The retaining levers 2 should be fully upright and the two locating lugs 3 should be towards you Fuser Alone eps 8 Lower the fuser into the MFP locating the two lugs 3 into their slots in the m...

Page 135: ...C5550 MFP User s Guide Maintenance 135 10 Close the top cover and press down firmly at both sides so that the cover latches closed 11 Gently lower the scanner Scanner down eps...

Page 136: ...procedure below 1 Moisten a cotton swab with isopropyl alcohol 95 2 Carefully pull open the ADF front cover ADF cover open eps 3 Wipe the feed roller 1 by moving the swab from side to side Cleaning A...

Page 137: ...m image quality and performance Clean the glass as follows 1 Open the document cover 1 Cleaning scanner eps 2 Moisten a soft clean cloth with isopropyl alcohol 95 3 Gently wipe the document glass 2 an...

Page 138: ...head when printing does not come out clearly has white lines or when text is blurred There is no need to switch the MFP off to clean the lens 1 Gently raise the scanner Scanner up eps 2 Press the cov...

Page 139: ...cleaner or soft tissue LED head clean eps 4 Close the top cover and press down firmly at both sides so that the cover latches closed 5 Gently lower the scanner Scanner down eps CAUTION Do not use met...

Page 140: ...It also enables booklet printing which uses even less paper and makes large documents even easier to handle The duplex unit slides straight into the rear of the MFP and requires no tools to install 1...

Page 141: ..._oda jpg a Press Menu 1 on the scanner control panel b Using the UP DOWN arrow keys 2 navigate to the Report Print menu and press OK 3 once for the menu map c Press OK 3 again to print the menu map d...

Page 142: ...onal memory board containing either 256MB or 512MB giving a total memory capacity of either 512MB or 768MB maximum 1 Switch the MFP off and disconnect the AC power cable 2 Pull open the access panel o...

Page 143: ...ector faces in towards the RAM expansion slot and the small cutout is closer to the bottom of the machine 7 Gently push the board into the RAM expansion slot until it latches in and will not go any fu...

Page 144: ...em 11 Examine the first page of the menu map Near the top of the page between the two horizontal lines you will see the current MFP configuration This list contains the figure for total memory size Th...

Page 145: ...on the side of the machine Side cover open eps 3 Locate the clip 1 on the top of the disk unit into the slot 2 in the printer 4 Plug the end of the connecting cable 3 into the disk unit connector 4 i...

Page 146: ...he MFP on 8 When the MFP is ready print a menu map as follows Control menu_oda jpg a Press Menu 1 on the scanner control panel b Using the UP DOWN arrow keys 2 navigate to the Report Print menu and pr...

Page 147: ...immediately See Adjusting windows printer drivers on page 148 ADDITIONAL PAPER TRAY 1 Switch the MFP off and disconnect the AC power cable 2 Place additional paper tray on desired location 3 Observin...

Page 148: ...r Windows versions may appear slightly different but the principles are the same PCL DRIVER If you have installed a memory upgrade it is not necessary to change the PCL printer driver and you can igno...

Page 149: ...s and Faxes in Windows XP via the Start Menu or from the Windows Control Panel 2 Right click the printer icon for this printer and choose Properties from the pop up menu 3 On the Device Settings tab l...

Page 150: ...s and the Alert LED on the status panel informs you of the event If printing multiple pages or copies do not assume that having cleared an obvious sheet others will not also be stopped somewhere along...

Page 151: ...the top of the printer simply grip it and pull gently to draw it fully out If it does not remove easily do not use excessive force It can be removed from the rear later 2 Raise the scanner gently Sca...

Page 152: ...s ID Order eps It will be necessary to remove the four image drums to gain access to the paper path WARNING If the MFP has been powered on the fuser will be hot This area is clearly labelled Do not to...

Page 153: ...ridge down gently onto a piece of paper to prevent toner from marking your furniture and to avoid damaging the green drum surface 7 Repeat this removal procedure for each of the remaining image drum u...

Page 154: ...he belt unit Jams 1 eps a To remove a sheet with its leading edge at the front of the belt 1 carefully lift the sheet from the belt and pull it forwards into the internal drum cavity and withdraw the...

Page 155: ...he trailing edge of the sheet from the belt push the fuser pressure release lever 4 towards the front and down to release the fuser s grip on the sheet and withdraw the sheet through the drum cavity a...

Page 156: ...rect order ID Order eps Holding the complete assembly by its top center lower it into place in the MFP locating the pegs at each end into their slots in the sides of the MFP cavity ID Lower In eps 10...

Page 157: ...ear path area 6 Rear paper jam eps Pull out any sheets found in this area If the sheet is low down in this area and difficult to remove it is probably still gripped by the fuser In this case raise the...

Page 158: ...MFP has a duplex unit installed press the cover release at the center of the unit open the cover and remove any sheets in this area then close the cover Duplex Jam eps 14 Lift the front cover release...

Page 159: ...e the cover Jams 4 eps 16 Pull out the paper tray and ensure that all paper is stacked properly is undamaged and that the paper guides are properly positioned against the edges of the paper stack When...

Page 160: ...Troubleshooting 160 18 Gently lower the scanner Scanner down eps When the jam has been cleared if Jam Recovery is set to ON in the System Configuration Menu the MFP will attempt to reprint any pages...

Page 161: ...ge 64 THE DISPLAY SHOWS A COMMUNICATIONS ERROR This indicates any of a number of problems The MFP may be incompatible with the remote machine or the remote machine may not be able to perform the funct...

Page 162: ...a document on the local machine to make sure it is working properly If there is still a problem contact the person sending the fax and ask them to change their fax quality and density settings Ask the...

Page 163: ...hine and make sure that they have loaded documents and that their machine is set to polling transmission mode MFP IS CONNECTED TO A PBX BUT IT IS NOT POSSIBLE TO DIAL OUT Be certain that the dial pref...

Page 164: ...DLCODE 1 Size error 2 Check SUM error 3 Printer model No error 4 DModule I F version error 5 FAT version error Restart the machine Turn it off and on again If the code still appears contact your deale...

Page 165: ...om a user who is denied color printing Contact your network administrator for help Normal Cancelling job Buffer full Indicates that a job is being cancelled because the printer area where the logs are...

Page 166: ...s a warning only Warning Belt life Notifies the life of the belt This is a warning only Warning color toner empty Toner empty Warning status takes effect at Cover Open Close Allows printing approx 50...

Page 167: ...print job has been cancelled Contact your network administrator for help Press the Online key to remove message from the LCD Warning job_cancel Log buffer full Job rejected Buffer is full job has been...

Page 168: ...10 Not directory 11 Not same volume 12 Read only 13 Root dir full 14 Dir not empty 15 Bad disk 16 No label 17 Invalid parameter 18 No contig space 19 Can not change root 20 FD obsolete 21 Deleted 22...

Page 169: ...Indicates that message data to be updated is being processed Error online Download message Writing Indicates that message data to be updated is being written Error online Download message Success Ind...

Page 170: ...allow printing Error 430 431 Install paper cassette ERRCODE TRAY missing Paper tray has been removed Reinstall tray to allow printing Error 420 Add more memory ERRCODE memory overflow Memory capacity...

Page 171: ...tribution channel group Replace with genuine toner cartridge Error 614 Y Error 615 M Error 616 C Error 617 K Error 620 621 622 623 Replace toner ERRCODE incompatible COLOR toner OEM mismatch Incompati...

Page 172: ...ose the cover to perform recovery printing and continue Error 400 Open front cover ERRCODE paper size error Inappropriate size paper was fed from a tray Check the paper in the tray or check for multi...

Page 173: ...ex cover remove the paper and close the cover Error 370 Duplex reversal Error 371 Duplex input Error 373 Multi feed into duplex duplex remain jam See Clearing paper jams If the code still appears cont...

Page 174: ...e and printing will stop Warning status takes effect at cover open close Replace transfer belt Error 348 Check fuser ERRCODE fuser missing Open the top cover check the fuser is installed correctly and...

Page 175: ...dealer Error 362 Wait a moment Data receive Your printer s network card firmware is being reprogrammed Error 362 Wait a moment Data received OK Your printer s network card firmware is being reprogramm...

Page 176: ...er s network card has an error Restart the machine turn it off and on again If the code still appears contact your dealer Error 364 Rebooting CODE Controller unit is rebooting CODE 0 Reboot due to a r...

Page 177: ...Address is invalid Check network settings Network is down Check network settings Network is unreachable Check network settings Connection aborted by server Check network settings Connection reset by...

Page 178: ...n authentication Contact network administrator Contact your Mail server administrator to turn on SMTP LOGIN option SMTP login error Check user name Check your login user name Mailbox unavailable Check...

Page 179: ...Email security or turn off the mail server s authentication and try again Action not taken Check To address Requested action not taken mailbox name not allowed Check To address User not local Check T...

Page 180: ...ata transfer type Contact server administrator Contact your server administrator for help Store file error Make sure privilege Make sure you have the privilege to store files in this position server d...

Page 181: ...ct authorization HTTP Forbidden This action is forbidden This action is forbidden in this server This is not unauthorized but forbidden Unpredicted error Turn on Log File option in ADMIN MANAGEMENT lo...

Page 182: ...server administrator for help HTTP no support That server does not support HTTP That server does not support HTTP version 1 1 contact your server administrator for help Resource not found Contact ser...

Page 183: ...u make will become the driver defaults This means they will remain active for all your applications unless you specifically change them from within the application s Print dialog 2 From your applicati...

Page 184: ...roperties PCL SAVED DRIVER SETTINGS This feature unique to the Windows PCL drivers allows you to save the printer driver settings and reuse them later This could be useful if you frequently print many...

Page 185: ...section explains how to ensure that your printer driver can utilize all of the hardware features installed in your MFP Accessories such as hard disk duplex unit two sided printing additional paper tr...

Page 186: ...efaults on page 183 2 Select the Device Options tab In the Windows XP PostScript driver the tab may be called Device Settings 3 Set the options for any devices you have installed including the correct...

Page 187: ...printing 100 percent black text over a background color Black Overprint may not be available with some software applications 1 On the Job Options tab click Advanced PCL Black Overprint_oda jpg 2 Chec...

Page 188: ...osite black This will sometimes give a glossier finish due to the increased amount of toner It can also sometimes appear as a slightly brownish black Use composite black when printing photographs TRUE...

Page 189: ...on Auto allow printer to choose the best method depending on page content True Black or Composite Black Graphic pro 1 On the driver s Color tab select Graphic Pro 1 and click the Options button PS Bla...

Page 190: ...e width With some software applications if this feature is turned ON the spaces in bar codes may become too narrow If this happens turn Adjust Ultra Fine Lines OFF 1 In the driver s Job Options tab cl...

Page 191: ...black toner Use Grayscale to speed up printing of proof copies or when you do not need to print a color document in color 1 If using the PCL driver in the driver s Setup tab choose any previously save...

Page 192: ...ntrast PS Greyscale_oda jpg Some applications will attempt to set the halftone screen information for the MFP If the option to use printer halftones is left at ON the MFP will set its own halftone scr...

Page 193: ...me graphics and desktop publishing programs such as Adobe Photoshop Adobe Illustrator and Quark Xpress have their own built in color management systems See Printer driver settings for ICC profile crea...

Page 194: ...ish to learn more about your application program or operating system color management please see the documentation that was supplied with your application software or computer NOTES 1 Only use one col...

Page 195: ...t experts in color but want good results when printing from programs such as Microsoft Office Graphic Pro 3b Graphic pro on page 200 This is a powerful color management system based on ICC color profi...

Page 196: ...e you the choice of RGB or CMYK color you should assume that it only supports RGB The RGB color model is based on the three primary colors of light Red Green and Blue This model is used by scanners di...

Page 197: ...YK data it is strongly recommended that you use the Graphic Pro options instead If you are printing CMYK data the Graphic Pro options provide more power and flexibility RGB OPTIONS CMYK OPTIONS POSTSC...

Page 198: ...ing graphics and text Monitor 6500K Perceptual Optimized for printing photographs Colors are printed with emphasis on saturation Monitor 6500K Vivid Optimized for printing photographs and for office g...

Page 199: ...UTILITY If the Office Color presets are not sufficient for your needs the Color Correct utility provides a means of further adjustment The Color Correct utility provides two methods for adjusting the...

Page 200: ...ing the ICC profiles of a scanner digital camera or monitor the MFP s color can be matched to the input device Printer simulation Your MFP can be used to simulate the color output of another printer e...

Page 201: ...device that was used to capture RGB data e g scanner or digital camera The RGB Input Profile may also be your monitor profile if you are trying to match to your screen CMYK Simulation CMYK input Thes...

Page 202: ...3 The main screen of Profile Assistant displays the profiles resident on the selected MFP s hard disk To download a new profile to the MFP a Click Add b Select an ICC profile from your computer s har...

Page 203: ...be able to add this to the printer as a CMYK Simulation or Printer output profile e Select a number from 1 to 12 This number is used to identify the profile in the printer driver Profile Assistant ep...

Page 204: ...using Profile Assistant See Step 2 Down loading ICC profiles to the hard disk on page 202 Once the profile s have been down loaded make the appropriate selections in the printer driver as described b...

Page 205: ...he device you are trying to match such as your monitor scanner or digital camera 3 Remember that the names RGB Source 1 RGB Source 2 and so on relate to the number assigned to the profile using Profil...

Page 206: ...or camera etc 5 Printer output profile 6 Leave on Auto or select your custom profile 1 2 5 6 3 4 NOTES 1 Be aware that if the device you are trying to simulate has different color capabilities from yo...

Page 207: ...e Printer Output Profile optional Once the profile s have been down loaded make the appropriate selections in the printer driver as described below If you are using a source RGB document simulate the...

Page 208: ...and gray colors that are printed using only black toner enable the Preserve Black option Although this produces a better quality print the black and gray colors will not be simulated accurately 8 Sel...

Page 209: ...commend that you use the Graphic Pro color matching system to perform CMYK ink simulations as this provides additional controls such as using the Preserve Black feature or specifying an alternative pr...

Page 210: ...profile 3 that corresponds to the device you are trying to match such as a SWOP or Euroscale Press If you have another CMYK Ink profile that you wish to use select it here as the appropriate CMYK Sou...

Page 211: ...he rendering intent that best suits the document you are printing PERCEPTUAL This option is recommended for printing photographs Typically perceptual rendering desaturates all the colors when printing...

Page 212: ...CMYK etc These calculations can take time to process The Color Match Precision option allows you to choose between higher quality color matching more time consuming or faster but less accurate color m...

Page 213: ...C5550 MFP User s Guide A guide to printing 213 3 if you wish to switch off all printer color management and use your application s color matching Profile Creation Win _oda jpg...

Page 214: ...rd and on which model you have your system can offer a number of choices For detailed information on these options see Booklet printing imposition on page 215 Collating on page 218 Color separation on...

Page 215: ...r 16 at a time This is called the signature and will avoid having too thick a stack of paper to fold to make your booklet Your document will then be printed in a series of booklets which can be stacke...

Page 216: ...choose Booklet from the Pages Per Sheet drop down list PS Booklets_oda jpg 2 Check that the duplex option is set to Flip on Short Edge NOTE If the Booklet choice is not shown check that the Duplex op...

Page 217: ...drop down list then click Options 3 In the Options window you can set the signature size the number of pages per side of paper and the binding margin if your document is going to be thick The graphic...

Page 218: ...collate Some application programs have a collate feature in their print options In this case the application performs the document collation and may send the job multiple times to the MFP Generally t...

Page 219: ...g MFP collate use the collate option in your application s print options instead 1 If using the PCL driver on the Setup tab first choose any saved driver settings that you wish to use See Recalling sa...

Page 220: ...proofing facility that indicates the relative densities of each of the four toner colors in your print document The darker an area appears the more of the corresponding toner color will be used when p...

Page 221: ...his page is called a separator page The separator page is set from the printer driver s default properties window Access to this is directly from Windows not from within your application program See C...

Page 222: ...tray This feature is not available in the Windows postScript drivers 1 In the Setup tab choose any saved driver settings you wish to use See Recalling saved driver settings on page 185 2 Click Paper...

Page 223: ...hes 76mm to 328mm and its length can be from 3 54 to 47 24 inches 90mm to 1200mm Actual limits vary slightly depending on which printer driver you use and your computer s operating system Some applica...

Page 224: ...ll have to feed it short edge first 4 You can also position the page image on the paper to avoid printing too close to the edge by choosing an Offset Offset relative to perpendicular direction adds to...

Page 225: ...PCL 1 In the driver s Setup tab select any previously saved settings you wish to use PCL Custom Paper Size_oda jpg 2 Click the Paper Feed Options button 3 In the Paper Feed Options window click Custo...

Page 226: ...he Name box and click Add to save it in the list 6 Click OK to accept your chosen size and close the Custom Size window 7 If this is the size of your document but you want to scale it to fit a standar...

Page 227: ...rd sized paper stock only e g A4 A3 Letter etc Load the paper print side up Ream wrappers are usually marked with an arrow indicating which is the print side Paper can be fed from standard paper trays...

Page 228: ...ingle sided Windows PCL 1 In the driver s Setup tab under 2 Sided Printing select the binding edge you want PCL Duplex_oda jpg For portrait tall page layout the usual choice is Long Edge For landscape...

Page 229: ...want to proof your page layout or distribute your document in a more compact format It saves paper bulk weight and cost If you have a duplex unit installed you can even combine this feature with duple...

Page 230: ...of pages N up you want to print on each sheet 1 up is normal 16 up is maximum PCL N up_oda jpg 2 Click Options to choose from the available options for this feature From here you can choose the page...

Page 231: ...int is only available with the Windows PCL printer drivers Poster Principle eps 1 In the driver s Setup tab under Finishing Mode choose Poster Print PCL Poster_oda jpg 2 Click Options to open the Opti...

Page 232: ...ne size page onto a different size page without modifying the print data This feature is only available with the Windows PCL drivers 1 In the driver s Setup tab click the Options button 2 Check the Fi...

Page 233: ...posed on a printed document This can used to indicate that the document is Draft or perhaps Confidential The illustration below shows the Windows PostScript driver The PCL driver is very similar The W...

Page 234: ...hoose a previously created watermark In the Watermarks window click the watermark in the list To edit an existing watermark 1 In the Watermarks window click the watermark s name in the list 2 Click Ed...

Page 235: ...1200W Normal operating 490W Stand by 110W Power save mode 27W Environmental Noise Temperature Humidity 70dBA 10 C to 32 C 50 F to 89 6 F 20 to 80 RH Scanning Image sensor Color CCD Light source Cold C...

Page 236: ...13 98 inches Document weight thickness 60 to 105 g m 16 to 28 lb Paper feed Face up Capacity 50 sheets of Xerox4024 DP 9 07Kg paper ADF life 240 000 scans or more or 5 years Recommended daily scans U...

Page 237: ...shift 0 to 25mm 0 to 0 98 inches Paper saving N up 1 in 1 4 in 1 Horizontal 4 in 1 Vertical Collate ON Off Job counting Copy Scan Print Fax Enable Disable Network Specification Connectivity Ethernet 1...

Page 238: ...lution Standard Fine Photo Extra fine 200 x 100dpi 200 x 200dpi 200 x 200dpi 200 x 400dpi Speed dials 200 One touch dial 10 Group dial 20 up to 50 entries per group Auto redial Yes Manual redial Yes B...

Page 239: ...plication Lotus Mail Server 5 0 MS Exchange Server 2000 RedHat 7 0 SendMail Supported LDAP server Windows 2000 Active Directory Windows NT 4 0 MS Exchange 5 5 Lotus Notes R5 Supported mail application...

Page 240: ...Auto consumable counter reset Memory 256MB standard upgradeable to 768MB max Paper capacity at 80g m 20 lb 300 sheets in main tray 100 sheets in multi purpose tray 530 sheets in optional 2nd tray Pape...

Page 241: ...oner life Black 6 000 pages at 5 coverage CMY 5 000 pages at 5 coverage Image drum life 20 000 pages 3 pages per job typical office usage Belt life 60 000 A4 Letter pages at 3 pages per job Fuser life...

Page 242: ...the Web Page 38 Cover page 221 Windows PCL 222 Custom page size Windows XP 2000 PCL 225 Windows XP 2000 PS 223 D Duplex selecting in Windows 73 74 E Envelopes loading 28 Explanation of filing protocol...

Page 243: ...esetting 57 saving current settings 57 System configuration menu 53 Usage menu 58 MFP overview 14 Minimum Configuration Re quirements 30 Multi purpose tray 23 how to use 28 paper metrics 23 O Operatio...

Page 244: ...down stacker 27 face up stacker 27 face up down stacker 73 Print quality adjusting 58 Print settings how to save 74 Problem checklist 161 Pure black text graphics 212 R Rendering intents 211 S Secure...

Reviews: