background image

65 • Reporting

Usage Report

Many devices from Oki Printing Solutions are capable of producing a Usage Report that is 

generated and printed directly from the device. The Usage report tracks black and color printed 

pages and displays page counts in Letter/A4 size page equivalents (which is generally required for 

pay-for-print scenarios).
PrintSuperVision provides remote access to the Usage Report. As an added convenience, supplies 

and consumable status is also displayed in the Usage Report generated from PrintSuperVision. 

Consumable Status includes the number of times a consumable has been replaced. 

As an alternative, an option is available in the Usage Report section of PrintSuperVision that 

enables “engine counts” to be displayed rather than page count data. Engine counts are used 

primarily for maintenance purposes and are referred to as “life counts” of the device.      
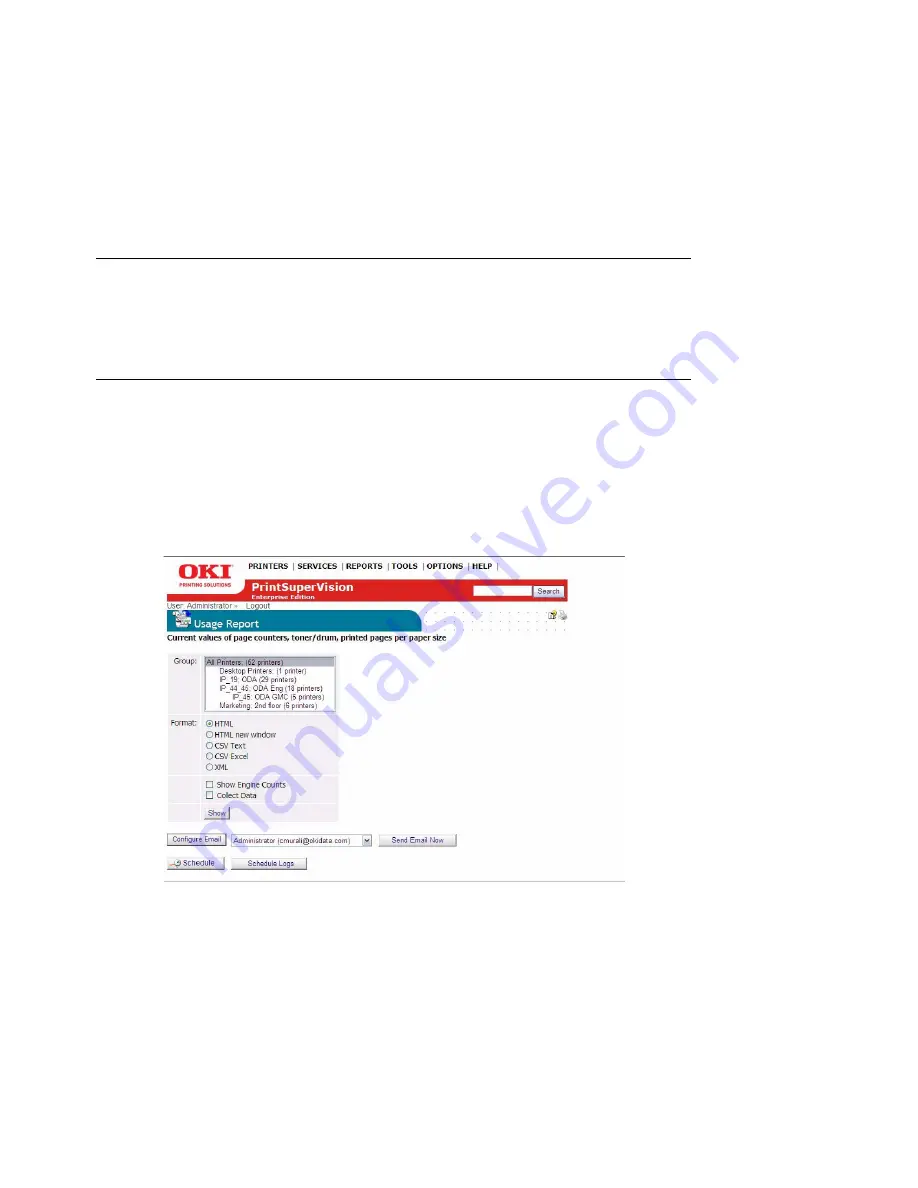
To generate a Usage Report

1.

Select 

Reports

 from the main menu.

2.

Select 

Usage Reports

 from the drop down box.

3.

Select a group of devices and indicate the file format of the Usage report.

Show Engine Counts

 is an option that displays life counter information but is not needed if 

the Usage Report option is enabled in the device and is reporting page count data to 

PrintSuperVision.

• The 

Collect Data

 option instructs PSV to obtain the latest information from the device 

before the usage report is generated.

4.

Click the 

Show

 button to generate a report.

Note

In most Oki devices, the Usage Report feature can be disabled 

from the operator panel on each device. If the Usage Report 

feature is disabled, PrintSuperVision will be unable to obtain the 

Usage Report page count information.

Summary of Contents for 43347501

Page 1: ...59318401 PrintSuperVision Configuration Guide...

Page 2: ...by the manufacturer While all reasonable efforts have been made to make this document as accurate and helpful as possible we make no warranty of any kind expressed or implied as to the accuracy or com...

Page 3: ...a List of Users 20 Creating User Groups 20 Changing Your Password 21 Creating Editing Groups of Devices 22 Create or Edit a Group 22 Adding Removing a Device 23 Adding Maps and Floor Plans to a Group...

Page 4: ...utes 57 Toner Changes Report 58 Generating a Toner Changes Report 58 Scheduling a Toner Changes Report 59 Schedule Log Report 60 Supplies Usage Report 61 Printed Pages Report 62 Color Mono Pages Repor...

Page 5: ...ll trademarks acknowledged Note A note provides additional information to supplement the main text CAUTION A caution provides additional information which if ignored may result in equipment malfunctio...

Page 6: ...major feature in the Professional Edition that does not exist in the Enterprise Edition is the single user Easy Configuration option The single user option can be installed in a non server configurat...

Page 7: ...dows laptop or desktop that is connected to the network The Enterprise Edition is designed to monitor and manage several thousand print copy devices within large organizations with features and functi...

Page 8: ...ramework The NET Framework or SQL Compact Edition 3 5 is not included in the PSV Professional Edition installer both of which can be downloaded from the web For PSV Enterprise edition select the desir...

Page 9: ...g a Default Location Language 1 The PSV setup tool displays the location language selection screen first 2 Select a default location language for all users 3 Click Apply and Next Each user can later c...

Page 10: ...tabase you would like to use with Print SuperVision Both editions of PrintSuperVision utilize a built in Microsoft Access database but you can choose other options as well If you do not wish to use th...

Page 11: ...ptions to a previously used database back up export erase copy trim data 1 Click the Data tab to view these options 2 From the Setup tab select the desired database from the dropdown menu and click Ap...

Page 12: ...se and copy existing data to the new database click Migrate Back at the main Database setup screen PSV Enterprise edition only even allows you to test the connection to the server by clicking the Test...

Page 13: ...into PSV Embedded Web Server As an alternative to using the IIS web server you may select the embedded web server that is included with PSV The embedded server provides the same functionality as IIS b...

Page 14: ...Click Next to go on to the next setup module Configuring Your e mail Server for Alerts In order for PSV to send out device related alerts via email you must first enter the necessary information such...

Page 15: ...ox if your organization uses these communication protocols 4 Enter the email address of the recipient in the Admin Email field 5 As an added convenience PSV allows you customize the header and subject...

Page 16: ...kept in strict confidence 1 Select the appropriate language location to register Use the Americas locations if you are located in North or South America Use the European locations if you are located...

Page 17: ...ink to go to http update microsoft com microsoftupdate v6 default aspx ln en us Or Click the IIS Lockdown Wizard link to go to http www microsoft com downloads details aspx FamilyID dde9efc0 bb30 47eb...

Page 18: ...ram Identifying Version Numbers The Program tab is provided as a means to quickly identify the version numbers of each major component in PrintSuperVision Click Run to complete the setup process and b...

Page 19: ...n every page User Access Levels One of the first things to decide is the level of access rights to assign to each user There are 3 ways a user can access the PSV application from any browser Without L...

Page 20: ...sted in the Add User section Fields cannot be left empty with the exception of Password If passwords are not supplied in the text file PSV will set it to the word password by default 1 Click Options U...

Page 21: ...ll Users button has been provided in the User Groups area to help identify if an individual has been assigned to a group Changing Your Password To change your password 1 Select Options from the main m...

Page 22: ...ice can also be a member of more than one group You can assign a subnet or a range of IP addresses for discovery purposes to a group and as an added convenience a link to the discovery screen is provi...

Page 23: ...to an existing Group 1 Click Printers from the main menu and Printer Groups Maps from the drop down menu to view a list of groups already created 2 Click Edit in the Edit Column 3 Click Add Printer 4...

Page 24: ...lick the Trash Can icon from the list of grouped devices displayed on the Edit Printer Group screen Adding Maps and Floor Plans to a Group Groups can also have images of maps floor plans etc assigned...

Page 25: ...d image has been located click Upload 3 Place a device icon on the map or floor plan 4 Click Printers Printer Groups from the main menu If you have successfully linked an image with a group you will s...

Page 26: ...ter is positioned To move the device icons at any time click the Place on Map button and drag and drop the icon to the desired location on the map Left click once more to activate Remember when viewin...

Page 27: ...the On Map button Note If you return to the map or floor plan from the Device Status Page by clicking the On Map button you will only see that device s icon on the image To see all devices on the map...

Page 28: ...ver all of the compatible devices on your network for large organizations see next section before starting the discovery process For Enterprises with several hundred or even several thousand devices i...

Page 29: ...to a specific SNMP community Enter an IP address select a group name from the Printer Group drop down menu and type the desired SNMP community Click Add to save your changes Similar to adding a single...

Page 30: ...to exclude a specific IP address or IP address range from the discovery process 1 Click the Exclude button and select either Exclude IP address or Exclude IP range Notice that PSV displays all IP Add...

Page 31: ...Save or for IP Range enter the range of IP addresses to exclude and click Save 3 To include an IP address or IP Address Range that was previously excluded return to the Discovery section click the Exc...

Page 32: ...g on Each device listed can be selectively saved to the discovery database 2 Click the check boxes to select the devices to add to the discovery database 3 click the Start Discovery button As an added...

Page 33: ...button to save the Discovery schedule Discovery Logs Button PSV records a log of all discoveries performed and several other system activities and indicates whether the discovery was successful or no...

Page 34: ...en an organization uses DHCP Start Discovery Start Discovery begins the discovery process for all subnets and IP address ranges selected Configure Timeouts The SNMP Get timeout value which controls th...

Page 35: ...lick Printers Import Printers Attributes 2 Click Browse to locate and add the desired file The text file should be formatted so that one device address is on each line of the file As an added feature...

Page 36: ...asy way to view device status with minimal mouse clicks 1 From the main menu select Printers My Printers from the drop down menu You will see a list of devices that have been added to the My Printers...

Page 37: ...or browser enabled device being used to access the PSV application and automatically includes those devices in the Near Me group From the main menu select Printers Near Me from the drop down menu Dev...

Page 38: ...et alerts for other users or user groups A non Admin user however may configure and view Alerts just for themselves PSV uses email to deliver alert conditions The email message can be sent to an indiv...

Page 39: ...for sending alerts in email click the Configure Email button from the Email Alerts page 2 Enter the following information and click Save Address of the email server Administrator s email address Send...

Page 40: ...rly PSV will process the alert and send an email message to the assigned recipient Configuring Status Events PrintSuperVision allows you to customize certain Events that trigger notification emails An...

Page 41: ...default events is displayed 2 You can click the name of the Event to see a list of conditions included in that event category 3 Click the Add Event button and enter a unique name to the customized eve...

Page 42: ...match that description with the text description the device generates during an Alert condition Customizing Status Codes PSV also allows you to customize the severity level of any of the status code c...

Page 43: ...ts main page and click the Status Codes button 2 Scroll through the list of conditions or type in a filter search word to narrow your choices 3 Click on the severity icon listed in the Edit Severity c...

Page 44: ...r browsers back button to return to the Email Alerts main page For convenience and quick navigation a Users button and Process Alerts Now button have been included on the Email Alerts page The User bu...

Page 45: ...utes for processing Alerts To set the data collection interval 1 Click Services Data Collection Services from the main menu 2 Indicate the desired data collection interval times and click Save To disp...

Page 46: ...ng feature copies the device configuration settings of one device and saves the same settings to a group of similar devices 1 Select Tools from the main menu and Cloning from the dropdown box 2 Locate...

Page 47: ...t 6 Select properties to be cloned and click the Start Cloning button PSV will apply the values of the selected properties to all destination devices indicated Note PrintSuperVision will not check to...

Page 48: ...based on availability To use Group Configuration 1 Click the Tools from the main menu and click Group Config from the drop down box 2 Select a template from the drop down menu and click Select Templat...

Page 49: ...49 Group Configuration The new password will be saved to each B6300 device in the selected group as well as in the PSV database for future use and reference...

Page 50: ...the URL for all on line ordering Edit PSV s database of supplies Disable on line ordering Search for a Supply Item To search for an item click the search radio button enter a description of a desired...

Page 51: ...f supply items 1 Enter a quantity of the item desired 2 Click the Next Print button at the bottom of the list to generate and print a list of selected items Customize order If on line ordering is not...

Page 52: ...gure the supplies list that is integrated into the PSV application You can Use the existing supplies list which obtains its information from http esales okidata com Edit and add to the existing suppli...

Page 53: ...he ability to order supplies on line Editing the Supplies List The default supplies ordering information list can also be customized Editing the Supplies List creates an additional XML file that conta...

Page 54: ...ld blank will still display a description and part number of the item in the supplies list but no image will be displayed 6 To edit the item s part number or SKU enter the new number in the Code field...

Page 55: ...ies either on line or by manually printing a supplies order page discussed earlier click the Disable Supplies Ordering button and click Save Editing the Supplies List Optional Link The Edit Supplies L...

Page 56: ...r favorite picture if desired and hang it on the wall 1 Click Tools from the main menu and Calendar from the drop down menu 2 Select the Picture radio button if you wish to display and or print an ima...

Page 57: ...PSV edition installed and user access rights Available Reports Toner Changes Report see page 58 Schedule Log Report see page 60 Supplied Usage Report see page 61 Printed Pages Report see page 62 Color...

Page 58: ...ws the dates of the last toner cartridge replacement for a group of devices and indicates if there was any toner remaining at the time of replacement This report is particularly helpful in identifying...

Page 59: ...te either HTML or Excel format and click Show to generate the report Additional details for toner replacement are available by clicking the toner type links highlighted in blue This presents a sub rep...

Page 60: ...d and sent indicate email recipients and click Save The toner changes report will be generated and sent to the recipient on the dates and times indicated Schedule Log Report The Schedule Log Report pr...

Page 61: ...lies Usage report helps you to plan your supply purchases by predicting when the consumables will run out 1 Select Reports from the main menu and select Supplies Usage 2 Select an individual device or...

Page 62: ...e prior to defining the parameters of the report to add additional information to the report 1 Select Reports from the main menu 2 Select Printed Pages Report from the drop down box 3 Select a single...

Page 63: ...he delivery frequency of the report 9 Click Schedule Logs for a running log of printed Pages Report events Color Mono Pages Report The color mono pages report displays the color and mono page counts a...

Page 64: ...h Counter Values and Counter Changes for both Additional formatting options are available under the Details button such as Averaging page counts over the number of days a device has been inactive Disp...

Page 65: ...splayed rather than page count data Engine counts are used primarily for maintenance purposes and are referred to as life counts of the device To generate a Usage Report 1 Select Reports from the main...

Page 66: ...no Pages Report events As an added convenience PrintSuperVison can enable the Usage Report option remotely on some devices by clicking on the Enable Usage Report Feature Select a group of devices and...

Page 67: ...the left margin to link to a print device s status page 4 Click the Attributes button 5 Click Edit 6 Enter data in any of the Attribute fields and click Save at bottom of the screen The user entered...

Page 68: ...en more configuration settings 1 From the main menu select Printers 2 Click Printers from the drop down menu to display a list of print devices 3 Click on the highlighted IP address of a device and en...

Page 69: ...tice after clicking Refresh a teal color moves from line to line indicating that the device status is being refreshed Notice too that the printer icons in the left margin are now color coded to quickl...

Page 70: ...may customize the device properties you wish to display on the Printers Page with the exception of IP address which is always displayed 1 Select Printers from the main menu 2 Select Printers from the...

Page 71: ...to display for each device Notice too that you may select the device attributes that have been entered manually such as the city state or postal code that pertains to the location of the device 5 Cli...

Page 72: ...desired model name or number Changing Languages The language displayed in PrintSuperVision can be changed at any time without the need to install language specific versions of the application To chan...

Page 73: ...te locate and download drivers from the appropriate Oki website 1 Select Tools from the main menu 2 Select Drivers from the drop down box 3 Select the model OS and Language of driver for which you are...

Page 74: ...2 Select Multi file Printing from the drop down box 3 Click Upload Print Files 4 Click Browse to locate any PDF PRN or TXT file 5 Click the Upload button The file is now ready to be distributed to on...

Page 75: ...ct Tools from the main menu 2 Select Maintenance Log from the drop down box The screen shown above is used for searching for specific supply items and service calls that have been previously entered A...

Page 76: ...vice call click the Maintenance Log button and you will return to the main Maintenance Log screen Click the Add Note button Select the appropriate device from the drop down list enter the date the ser...

Page 77: ...space you may choose to clear delete all report logs maintenance logs and login logs 4 Select Options from the main menu 5 Select Clear Logs from the drop down box 6 Enter the date range choose a spec...

Page 78: ...wn box Six samples test applications are provided and explained below Sample Test Applications AboutVersion Shows the PSV version number Address2 printers Provides the details of a specific device Get...

Reviews: