USB/MP3/CD/Radio/
Bluetooth Micro System
I N S T R U C T I O N M A N U A L
USB686PR-B
Page 1: ...USB MP3 CD Radio Bluetooth Micro System I N S T R U C T I O N M A N U A L USB686PR B ...
Page 2: ...e the sustainable reuse of material resources To return your used device please use the return and collection systems or contact the retailer where the product was purchased They can take this product for environmental safe recycling 7 No naked flame sources such as lighted candles should be placed on the apparatus 8 Attention should be drawn to environmental aspects of battery disposal 9 Use of t...
Page 3: ...at a specific component shall be replaced only by the component specified in that documentation for safety reason The following label has been affixed to the unit listing the proper procedure for working with the laser beam CLASS 1 LASER PRODUCT LABEL This label is attached to the place as illustrated to inform that the apparatus contains a laser component WARNING LABEL INFORMING OF RADIATION This...
Page 4: ...alked on or pinched by items placed upon or against them 10 POWER LINES An outdoor antenna should be located away from power lines 11 OBJECT and LIQUID ENTRY Care should be taken so that objects do not fall and liquids are not spilled into the enclosure through openings 12 ESD WARNING The display does not function properly or no reaction to operation of any the control may due to the electrostatic...
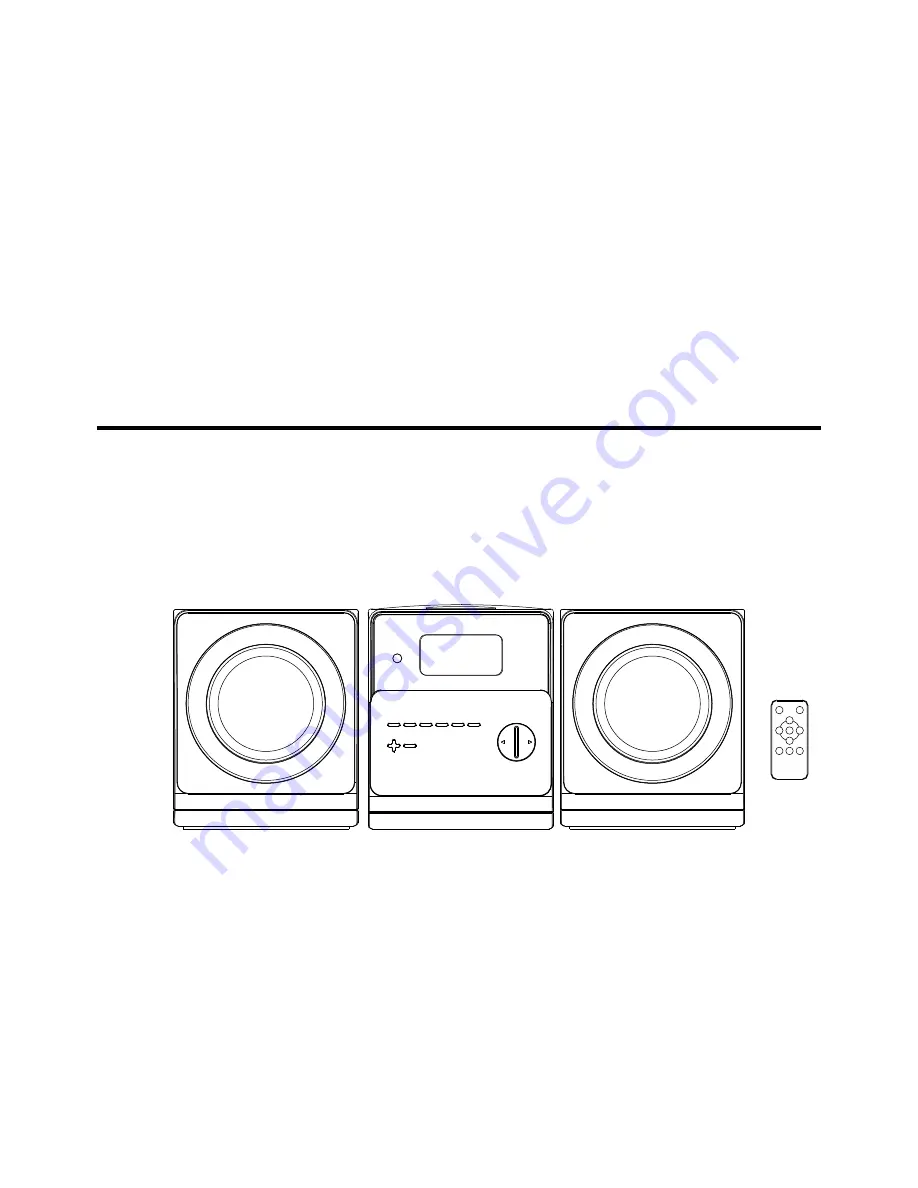
Page 5: ... the rated voltage of your appliance matches your local voltage POWER SOURCE LOCATION OF CONTROL 1 LCD DISPLAY 2 REMOTE SENSOR STANDBY FUNCTION 3 4 MODE CLOCK EQ 5 M SCAN STOP 10 SLEEP TUNING VOLUME VOLUME USB SLOT FM ANTENNA AUX IN SPEAKER JACK L R 6 7 8 9 10 11 12 13 14 15 AC POWER CORD 16 2 3 8 7 6 4 5 10 11 15 16 13 14 1 12 9 E 3 M ...
Page 6: ...for Remote Control to operate If the distance required between the remote control and the appliance decreases the batteries are exhausted In this case replace the batteries with new one SENSOR WINDOW OF THE RECEIVER Even if the remote control is operated within the effective range its operation may be impossible if there are any obstacies between the appliance and the remote control If the remote ...
Page 7: ...evious present station or press M button once to select the next preset station It is for selecting stations which cannot be tuned automatically manual selection To tune a channel manually 1 Press the FUNCTION button to select Radio FM mode 2 Press TUNING SKIP or SKIP button to select station 3 Each time the SKIP or SKIP button is pressed momentarily 0 5 second or less the frequency changes by a f...
Page 8: ...IP SKI P S 10 TOP P Press and hold 10 button 2 seconds then playback go up 10 ress to stop all CD MP3 operation PLAYBACK 1 Press the FUNCTION button to select CD mode 2 Open the CD door and place a CD MP3 disc with the label up in the CD compartment 3 Close the CD door 4 Focus search is performed if disc is inside For CD disc Total number of tracks is read and appears on the display For MP3 disc M...
Page 9: ...e program memory 5 When all the desired tracks have programmed press the PLAY PAUSE button to play the disc in the order you have programmed 6 Press the STOP button twice to terminate programmed playback Up to 20 tracks fo CD disc 99 tracks of MP3 disc can be programmed for disc play in any order E 7 Type ROCK JAZZ POP CLASSIC NORMAL Press and hold EQ button 2 seconds then choose ROCK Press and ho...
Page 10: ...ation PLAYBACK 1 Plug or slot in USB device to the port 1 Press the FUNCTION button to select BT mode 1 Turn on the Bluetooth function on your device and search for 686 2 Select 686 to start paring until a sound could be heard 3 The BT INDICATOR will stop flashing once connected 4 Start playback or select the desire music and volume by controlling the Bluetooth device Select desired volume level b...
Page 11: ...UX IN mode 3 Press Play on your device and enjoy Remark 3 5mm Aux in cable isn t included AUX IN E 9 1 Plug in the appliance at the mains 2 The display will show the clock 0 00 24H in standby mode 3 Press and hold the CLOCK button around 2 seconds 4 Press the CLOCK button again and then Press the SKIP and button to set the correct hour 5 Press the CLOCK button again and then Press the SKIP and but...