22
7. TUBES
7.4. The BIAS measurement system
The BIAS measurement facility makes it easy for you to check and adjust the idle current of the
output tubes. Getting the BIAS setting right for all four tubes is critical for both the sound of the power
amplifier section and for the service life of the tubes. This feature guarantees consistent sound quality
over the entire lifetime of the output tubes.
That is why we have built this BIAS measurement facility into the V 40 SE – to allow you, the user,
to carry out the adjustment yourself without the need for test equipment. The use of precision op
amps makes it possible for you to set the BIAS to an
accuracy
of 0.3 %, making it superior to any
other method.
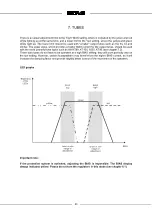
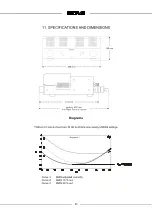
Using selected output tubes only makes sense if the idle current is adjusted accurately, as is clearly
shown in Fig. 1 Technical Data.
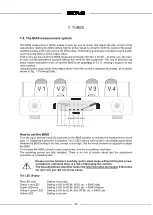
How to set the BIAS
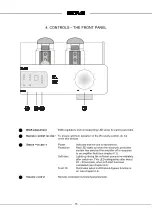
Turn the input selector knob [2] clockwise to the BIAS position to activate the measurement circuit
(pos. 5). Signal/input selection is disabled. The 3 LEDs above each screw in the display panel show
whether the BIAS setting is too low, correct, or too high. Use the small screwdriver supplied to adjust
the BIAS.
To increase the BIAS current to each output tube, turn the screwdriver clockwise.
The adjusting screws are fully insulated. There is no risk of electric shock and the adjustment
procedure is completely safe.
Please turn the trimmers carefully and in small steps without tilting the screw-
screwdriver, otherwise there is a risk of damaging the controls.
The bias adjustment should be made only when the tubes are heated. If the tubes
are still cold, you will set wrong values.
The LED display:
Red LED only
Setting is too high
Green + red LED
Setting is OK for KT88, 6550, etc. = BIAS High
Green LED only
Setting is OK for KT88, 6550, etc. = BIAS Medium
green LED
Setting is OK for EL34, 6L6, KT66, etc. = BIAS Low
Yellow LED
Setting is too low

