EXPLORE
E2
.
INSTALL & OPERATION MANUAL
14
5
Operation / Maintenance
5.1 SINGLE COLOUR STROBE
To enter strobe mode, with the light on, toggle the power off then quickly back on. They should now strobe in a random
pattern. The lights can be reset from strobe mode by simply turning off, waiting 10 seconds, then turn on again.
5.2 MAINTENANCE
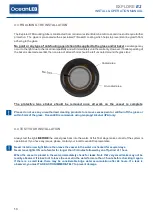
Marine growth can build up quickly on the light and can reduce the
light’s performance in just a few weeks.
To help prevent this, all OceanLED lights have been coated with a specialized Tritonium® coating which helps to
prevent marine growth from adhering to the glass. Lights should be cleaned with a boat brush or similar bi-weekly, or as
needed to keep the lens of the light clean.
Growth varies greatly around the world and maintenance is imperative to the proper operation and longevity of the
product. If heavy fouling occurs, growth can be removed from the lens using a plastic scraper and moderate pressure
under water. If cleaning the lens while the boat is out of the water, wet the lens before scraping. Never scrape or try to
remove barnacles from a dry lens.
Never use high pressure jet wash to clean the lens / bezel as this will damage the seals and void the warranty
5.3 LIGHT CARTRIDGE REMOVAL
Before proceeding with this operation, you MUST seek permission from either the manufacturer or your
OceanLED representative or you will void the warranty.
DO NOT remove the light cartridge from the mounting tube during installation. The light cartridge MUST stay
fitted inside the mounting tube throughout the installation process to avoid the introduction of potential
contaminants that may damage the product and void the warranty.
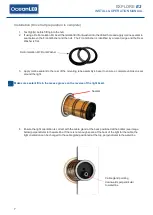
Additional items required not supplied by OceanLED:
•
M8 Bolt
•
13mm Spanner (for the M8 bolt)
1. If the vessel is in water check that the front glass is present and intact. Never remove a cartridge with the vessel
in water if damage to the glass lens is suspected.
2. Turn power off and disconnect the light cable connection from the electrical installation.
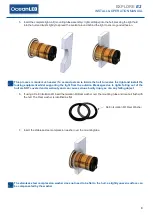
3. Remove the Locking Ring from the mounting tube.
4. To ease removal process; undo the cable gland nut to allow air to enter the unit and prevent a vacuum being
created when removing the light cartridge. Failure to do so could damage the light cartridge.
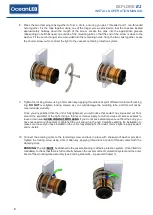
5. Fit the M8 bolt into M8 threaded hole on the rear of the light cartridge.
6. Remove the light cartridge from the mounting tube by pulling the M8 bolt.


