background image

2 0


4 .   V L A N   P A G E  

V L A N   >   V L A N   T o   P o r t  


N V T   P h y b r i d g e   C L E E R   S w i t c h   U s e r   G u i d e  


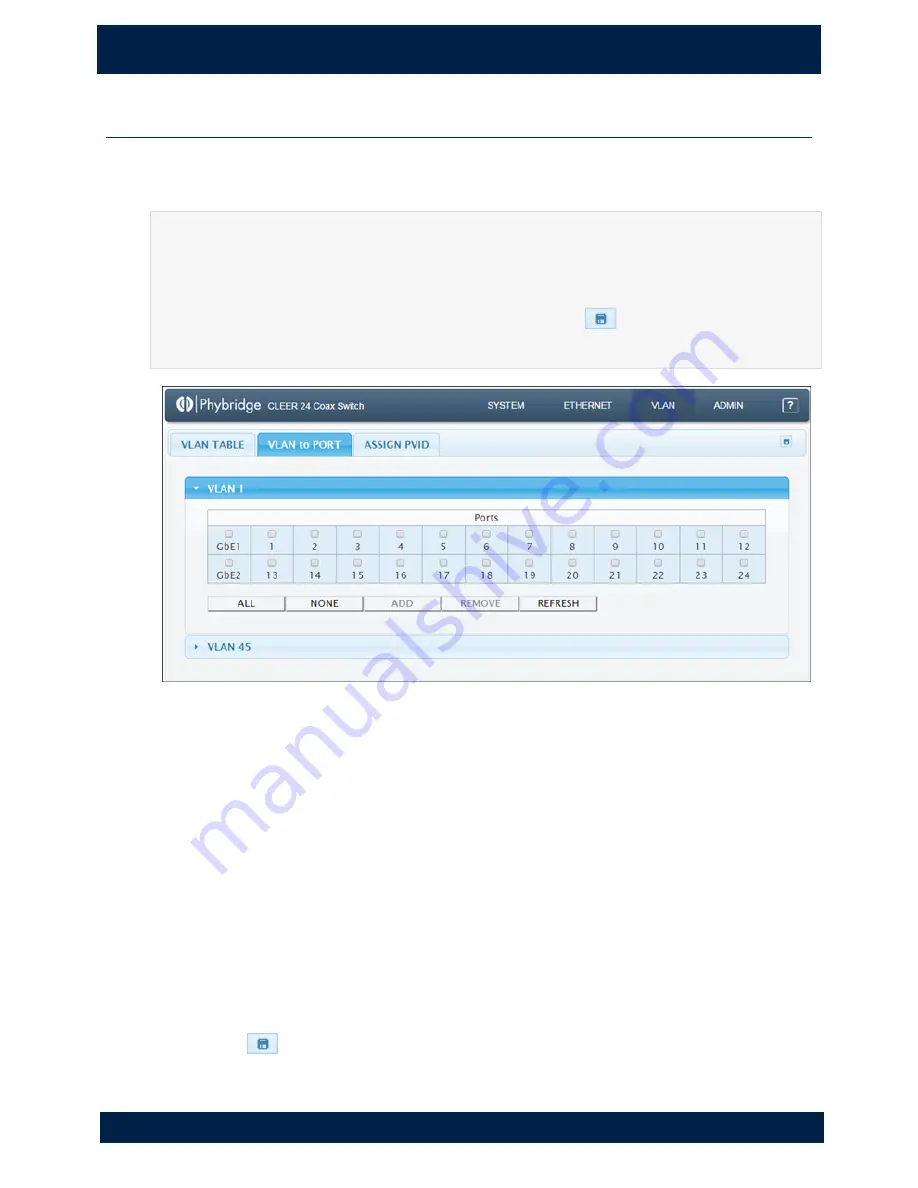
VLAN > VLAN To Port 

Use to assign ports to VLANs. You can add/remove individual ports from a VLAN or you 
can add/remove all ports at once. 

NOTE 
Use the VLAN Table tab to create and remove VLANs (see page 20). 

IMPORTANT 
Changes that you apply are temporary. If you do not click 

 to save changes, any 

changes made on this tab will be lost after a system reboot. 


Viewing VLAN port details 

Each VLAN is shown as a separate panel. 

1.


Click the panel header (the VLAN number) to expand the panel. 

2.


A table with all ports is shown. The ports that are members of the VLAN have a 
shaded background. Ports that are not members have a white background. 

Assigning ports to a VLAN 

1.


Click one or more ports in the VLAN panel. 

or 

Click 

ALL

 to select all ports. (Click 

NONE

 to clear all ports.) 

A checkmark is shown on selected ports. 

2.


Click 

ADD

. The added ports now have a shaded background. 

3.


Click 

 to save your changes. 

Summary of Contents for CLEER 24

Page 1: ...CLEER 24 Switch User Guide Version 5 3 0 ...

Page 2: ...ns and NVT Phybridge makes no warranties regarding the content of this document NVT Phybridge is not responsible for any loss or damages arising from the use or misuse of this document The information contained in this document as well as all product specifications are subject to change without notice Trademarks NVT Phybridge is a trademark of NVT Phybridge Inc All other trademarks registered trad...

Page 3: ...document is intended for the use of service technicians system administrators information technology experts and other personnel who are qualified to install configure and maintain the CLEER switch in the IP network environment The tasks and procedures described in this guide require a basic understanding of IP communications Ethernet LAN networks and the strategies and solutions currently practic...

Page 4: ...s A note or tip provides helpful information related to the topic of discussion Examples Note The power supply unit is a field replaceable part Tip Use the handle on the right side to pull the power supply unit out ...

Page 5: ...the number of events to display 10 Searching Log entries 10 Adding markers to the log 11 Downloading the log file 11 3 Ethernet Page 12 About the Ethernet Page 12 Ethernet Uplink Ports 12 Configure GbE Interface 13 Configure Management Port 13 Configure IP Route 14 Viewing Uplink Statistics 14 Ethernet Downlink Ports 15 Ports 1 24 15 Viewing adapter information 15 Viewing port information 16 Downl...

Page 6: ...ort Configuration 25 View the switch configuration 25 Export configuration from the switch 25 Import configuration to the switch 25 Admin Services 26 Services 26 Remote Log Server 27 Network Time Protocol 27 Spanning Tree Protocol 28 Simple Network Management Protocol 28 Admin Terminal 29 Using the Command Line Interface 29 Adding notes to the switch 30 6 Command Line Interface 31 Command Referenc...

Page 7: ...n be performed with a click of the mouse The Simple Network Manager also includes a command line interface for managing the switch The Simple Network Manager is divided into four main pages arranged in order of the frequency that you will typically access them System Provides a real time overview of the system and allows you to control downlink ports and view detailed log activities See About the ...

Page 8: ...6 and higher Software Version The current version of the switch software is 5 3 0 Logging into the Switch Managing Multiple Switches When managing multiple switches through the Simple Network Manager each switch is shown as a separate browser window or tab The window tab title contains the switch hostname allowing you to easily identify each switch Each tab title is composed of 1 Hostname of the s...

Page 9: ... System Page About the System Page The System page provides high level switch details allowing you to monitor the system in real time The data provided on the System page is helpful to troubleshoot most issues you may encounter The System page contains three tabs Overview Performance Log System Overview ...

Page 10: ...ory Current used and free memory Updated in real time Temperature Current temperature Updated in real time Host Name Current host name This field can be configured in Admin Setup see page 25 IP Address Current IP address This field can be configured in Ethernet Uplink Ports see page 14 MAC Address Current MAC address Subnet Mask Current subnet mask This field can be configured in Ethernet Uplink P...

Page 11: ...e downlink ports A downlink port summary above the port boxes indicates how many adapters are available and how many are connected to endpoints BNC Port number Description Description of the port for easy identification this is configured in Ethernet Downlink Ports see page 15 Days HH MM SS Length of uptime or downtime see Viewing port status below Mbps Megabits per second bandwidth received from ...

Page 12: ...ily identified by the colour and shading of the port box and number Colour Port Status White box Port is available with power nothing is attached to the port Grey shaded box Port power has been manually disabled Blue shaded box Adapter is attached to the port nothing is attached to the adapter Solid blue box Adapter is attached to the port an IP device is connected to the adapter You can lock the ...

Page 13: ...idge CLEER S w it c h U ser Gu ide System Performance All panels provide current values and the last two minutes of historical data values are updated in real time Below each panel is the defined threshold minimum or maximum and date of the last indicator reading ...

Page 14: ...be consistently above 1 0 Graph provides an overview of the historical CPU load Memory Megabytes Legend shows the current memory usage allowing you to visualize available memory Graph provides an overview of historical memory usage A flat line with few peaks and valleys is normal in a healthy system If memory usage keeps increasing this may cause system instability If this occurs note the used and...

Page 15: ...e switch and all devices connected to it Expect variations as activities on the switch change Peaks and valleys are normal as devices are added and removed Temperature Celsius Legend shows the current switch temperature Graph provides an overview of the historical switch temperature A flatline with few peaks and valleys is normal in a healthy system as long as the temperature remains below 55 If t...

Page 16: ... select the number of events to display on the Log tab You can enter a value or use the arrows to increase decrease the value in increments of 10 2 Click SUBMIT The Log tab is updated immediately Searching Log entries 1 You can enter multiple search terms in the Log entries containing window Search terms are case sensitive and spaces are significant 2 Click SEARCH The Log tab is updated immediatel...

Page 17: ...er the marker text 2 Click MARKER The marker is added to the log Downloading the log file Click DOWNLOAD LOG FILE to save a copy of the log file shown on the Log tab The filename for the exported file uses the convention hostname log example switch log This allows you to easily identify which switch the file was exported from NOTE You can continue using the Simple Network Manager while the file is...

Page 18: ...llows you to monitor the health of the network configure the switch network interface and manage uplink and downlink ports The Ethernet page contains three tabs Uplink Ports Downlink Ports PoE Ports Ethernet Uplink Ports IMPORTANT Changes that you apply are temporary If you do not click to save changes any changes made on this tab will be lost after a system reboot ...

Page 19: ... Net Mask Broadcast GbE1 Medium GbE2 Medium Notes If the IP address is changed the new IP address will be required to log back into the box The management port IP address and the uplink port IP address should never be on the same subnet This ensures the management port can still be reached if the data LAN experiences issues 2 Click APPLY Configure Management Port Use to configure the management po...

Page 20: ...d using the command line interface in Admin Terminal see page 31 2 Click APPLY Configure IP Route Use to configure the default gateway IP address and to select the interface to apply it to 1 Modify any of the fields Default Gateway Interface Notes The Default Gateway can be assigned to only one interface The interface can be either GbE or Mgmt If the IP address is changed the new IP address will b...

Page 21: ...anges any changes made on this tab will be lost after a system reboot Ports 1 24 Used to manage the downlink ports Viewing adapter information Adapter summary information is shown below the port details table and includes the number of adapters connected the number of endpoints connected to the adapters the total power being consumed and the temperature of the switch This information is updated in...

Page 22: ...the top right of the tab to turn all ports on or off Indicates the link status Dark blue linked light blue not linked Click to reset the port or Click at the top right of the tab to reset all ports at once Description Description of the port for easy identification on the System Overview page click on a description to edit it The Description is shown in blue text while editing NOTE Remember to hit...

Page 23: ...ts LD Number of link down events these occur when the adapter goes through a link transition A high number may indicate physical errors Double click to view link transition statistics for the port This historical information can help you to identify patterns of downtime e g frequency consistent time duration etc Downloading the MAC address table You can download a CSV file containing the MAC addre...

Page 24: ...GN PVID VLAN VLAN Table Use to add or delete a VLAN or to change the default VLAN For each VLAN the VLAN number type and ports are shown IMPORTANT Do not use VLAN 0 There is potential in the VLAN specification to interpret the standard for VLAN 0 in different ways which can lead to incompatibility between different vendor units IMPORTANT Changes that you apply are temporary If you do not click to ...

Page 25: ...N To Port on page 22 Editing a VLAN 1 Click a VLAN The selected VLAN will now be enclosed in a black border 2 Click EDIT The VLAN to PORT tab appears with the VLAN panel open You can now assign ports to the VLAN see VLAN VLAN To Port on page 22 Setting the default VLAN The default VLAN is used for ports not assigned to any other VLAN VLAN 1 is the system default however you can select a different ...

Page 26: ...ges made on this tab will be lost after a system reboot Viewing VLAN port details Each VLAN is shown as a separate panel 1 Click the panel header the VLAN number to expand the panel 2 A table with all ports is shown The ports that are members of the VLAN have a shaded background Ports that are not members have a white background Assigning ports to a VLAN 1 Click one or more ports in the VLAN panel...

Page 27: ...save your changes Refreshing VLAN information VLAN information on this tab is not updated in real time Click REFRESH to update the information for example to see any changes made by other users VLAN Assign PVID Use to assign the primary VLAN ID to ports VLANs created in the VLAN Table tab can be used for PVID tagging For details on adding and removing VLANs see VLAN VLAN Table on page 20 IMPORTANT...

Page 28: ...ground Ports that do not belong to the PVID have a white background Adding or modifying a port PVID IMPORTANT The switch may lose connectivity if you change the PVID of the GbE ports Use caution when considering making changes to these ports 1 Click one or more ports in the VLAN panel or Click ALL to select all ports with the exception of GbE1 and GbE2 Click NONE to clear all ports A checkmark is ...

Page 29: ...r idge CLEER S w it c h U ser Gu ide 5 Admin Page About the Admin Page The Admin page allows you to configure switch settings control services configure servers and use the command line interface The Admin page contains three tabs Setup Services Terminal Admin Setup ...

Page 30: ...tage for PoE Range from 48 56V use slider to adjust Click APPLY Admin Password Confirm Password Simple Network Manager password To change the password enter the new password in both of these fields then click APPLY NOTE You will be prompted to log back into the Simple Network Manager after changing the password Technical Support Technical Support contact information Reset Diagnostic Counters Reset...

Page 31: ... the switch 1 Click DOWNLOAD to save a copy of the current switch configuration The filename for the exported file uses the convention hostname cfg example switch cfg This allows you to easily identify which switch the file was exported from 2 When the file download is complete the file should be shown in the bottom left corner of your browser Chrome or in the Downloads window Firefox Double click...

Page 32: ...5 A DM I N P A GE Ad mi n Ser vi ces N V T P h y br idge CLEER S w it c h U ser Gu ide Admin Services Services Use to control all the services for the switch including TELNET HTTP LOG LLDP NTP STP and SNMP ...

Page 33: ...y lose connectivity to the Simple Network Manager Run Click to start or stop a service Note that the start or shutdown of services is not instantaneous and may take up to one minute Remote Log Server Use to set up a remote log server Changes are applied immediately 1 Enter the IP address of the remote log server and click APPLY 2 Optional Change the port number and click APPLY The default port num...

Page 34: ...ge the bridge priority use the up and down arrows to increase decrease the priority in increments of 4096 then click APPLY CAUTION Enabling STP in a live network will cause service disruptions to end users while the network is converging To avoid impacting users enabling of STP should be conducted outside of core hours or during a scheduled maintenance period Consult the MCD Resiliency Guidelines ...

Page 35: ...s You can also use this tab to add notes to the switch Using the Command Line Interface 1 Double click in the Command field to see a list of available commands or type the first few characters of a command to filter the list 2 Click a command in the list to select it 3 If necessary enter any options for the command NOTE See Command Reference on page 33 for a list of command options and syntax 4 Pr...

Page 36: ...d is complete the file should be shown in the bottom left corner of your browser Chrome or in the Downloads window Firefox Double click the file to open it The filename for the exported file uses the convention hostname_terminal_date_time txt This allows you to easily identify which switch the file was exported from Adding notes to the switch You can save notes on the switch These notes are seen b...

Page 37: ...y If you enter a command using incorrect syntax the correct syntax will be shown If you enter incorrect values for a command you will receive a message stating that the values are not within the acceptable range Command Purpose Usage Usage Notes pal Main interface for PAL pal help cmd short long configure examine persisten t pal conf edit Modify user persistent configuration pal conf edit show cle...

Page 38: ...g start stop restart pal service log remote syslog show pal service log remote syslog ip IP pal service log remote syslog port PORT IP is a single value entry of the IP address of the target syslog server PORT is a single value entry of the syslog port number on the remote syslog server The default is port 514 NOTE If you change the syslog remote IP you are required to restart the log service pal ...

Page 39: ...can be incremented by 4096 The default is 32768 pal service telnet Enable or disable telnet service on the switch pal service telnet start stop restart enable disable TACACS Enable or disable TACAS AAA service on the switch pal service security show tacacs pal service security tacacs show enable disable pal service security tacacs server1 IP_ADDR IP_ADDR PORT HOSTNAME HOS TNAME PORT pal service se...

Page 40: ...RT HOSTNAME HOS TNAME PORT pal service security radius secret1 STRING pal set bridged Switch between managed and unmanaged modes pal set bridged bridged outband disable Bridged Mode All network services disabled and no management via ethernet Outband Mode All network services on GbE disabled Management available via MGMT port Disabled Normal operation pal set contact Update the point of contact fo...

Page 41: ...ure pal set l2age Set the value for the L2 age timer pal set l2age SECONDS pal set port Enable or disable downlink ports 1 24 pal set port RANGE on off RANGE is a single value entry of the port you wish to configure This value ranges from 1 24 pal set port counters clear Clear port counters pal set port counters clear pal set snmp Set SNMP system values pal set snmp sysdescr STRING pal set snmp rd...

Page 42: ...alue entry of the port you wish to configure This value ranges from 1 24 VLANID is a single value entry of the VLAN ID you wish to configure pal set sys date Set the date and time on the switch The clock is a 24 hour clock pal set sys date YYYY MM DD YYYY MM DD is a range of dates where YYYY represents the year e g 1988 MM represents the month e g 02 for February and DD represents the day e g 19 p...

Page 43: ...set sys ip GbE IPADDRESS NETMASK BROADCAST pal set sys ip mgmt IPADDRESS NETMASK BROADCAST IPADDRESS NETMASK and BROADCAST are all single value entries for these addresses pal set sys passwd Change the user password pal set sys passwd USERNAME PASSWORD USERNAME is a single value entry of the username of the switch PASSWORD is a single value entry of the new password of the switch pal set sys ping ...

Page 44: ...ist will display timezone options then set using appropriate choice pal set vlan Create and delete VLANs on the switch pal set vlan create VLANID pal set vlan delete VLANID pal set vlan default VLANID pal set vlan clear VLANID is a single value entry of the VLAN ID you wish to configure pal set voltage Set the voltage of the downlink ports pal set voltage DECIVOLTS DECIVOLTS must be between 480 an...

Page 45: ...ort you wish to configure This value ranges from 1 24 pal show port counters Show port counters pal show port counters RANGE RANGE is a single value entry of a port you wish to configure This value ranges from 1 24 pal show port statistics Show port statistics pal show port statistics RANGE RANGE is a single value entry of a port you wish to configure This value ranges from 1 24 pal show port stat...

Page 46: ...artup all telnet http lldp ntp stp snmp pal show snmp Display the set SNMP system values pal show snmp sysdescr rdcommunity wrcommunity locatio n contact pal show staticmac Show port MAC lock status pal show staticmac 1 24 all pal show sys date Show the system date and time pal show sys date pal show sys gateway Get the gateway of the switch and which port it is bound to pal show sys gateway pal s...

Page 47: ...ow the default VLAN s configuration pal show vlan default 1 24 all system 1 24 and all are port defaults where system is the system default pal show voltage Show the downlink voltage in Decivolts pal show voltage pal version Show the version of the software on the switch pal version Upgrade Procedure IMPORTANT Exporting the switch configuration file is recommended before performing an upgrade For ...

Page 48: ...ame you wish to remove residing on your switch URI VERSION is a single value entry of the URL of the files residing on the server Notes Commands must be entered exactly as shown in the Usage column denote single value entries of a specific item as explained within the brackets denote a set or list or range of entries for a specific item Displaying the current installed version When performing an i...

Page 49: ...iewing port status on page 6 If the port number is in red text and there is a high number in the Link Down field there are likely physical errors with the port and or cable To further investigate a high Link Down number double click on the number to view link transition statistics for the port This historical information can help you to identify patterns of downtime e g frequency consistent time d...

Reviews: