background image

N V I D I A   C o r p o r a t i o n

126

N V I D I A   D i s p l a y   P r o p e r t i e s

U s e r ’ s  G u i d e
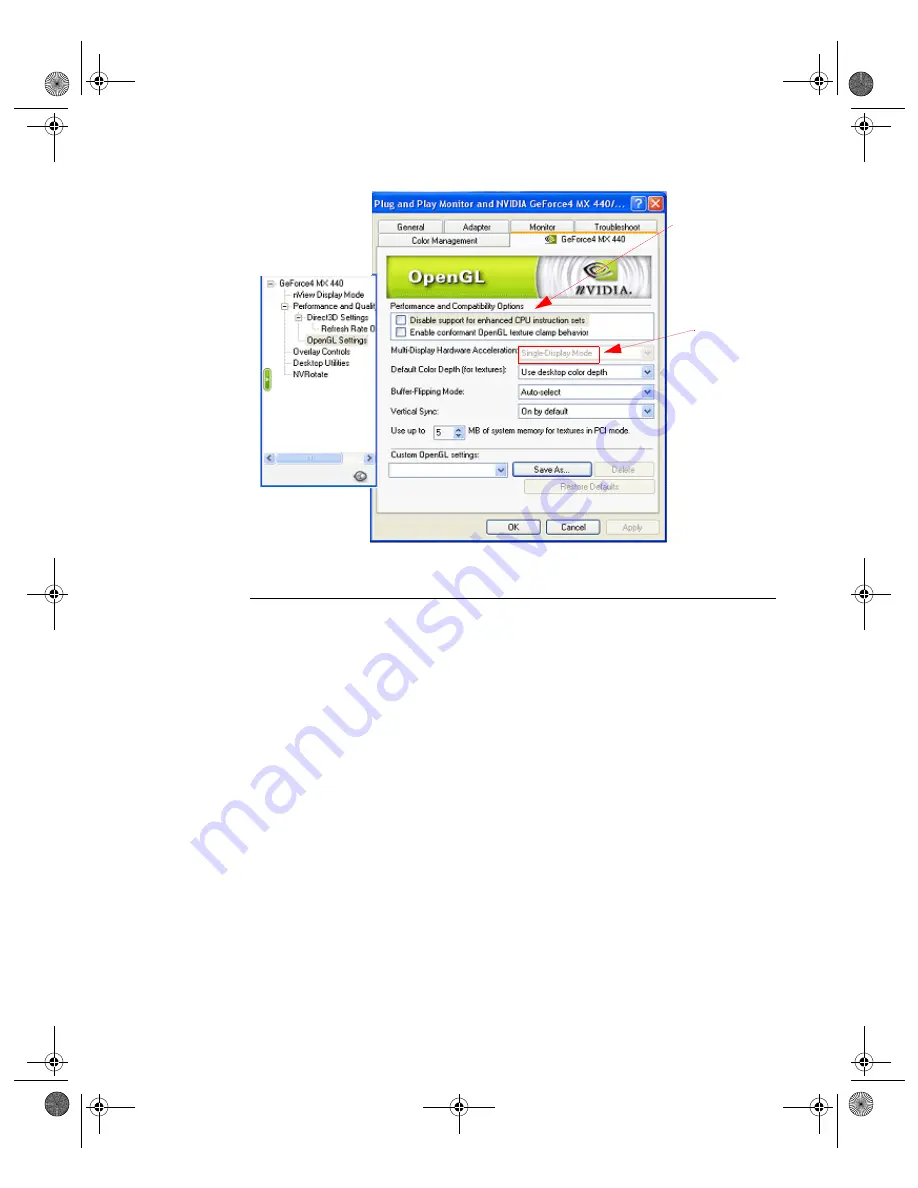
Figure 9.18

OpenGL Settings: Single-Display Hardware Acceleration

Performance and Compatibility Options

Disable support for enhanced CPU instruction


sets

: Enable this option to 

disable driver support for enhanced instructions used by certain CPUs. Some 

CPUs support additional 3D instructions that complement your NVIDIA 

graphics processor and improve performance in 3D games or applications. 

This option allows you to disable support for these additional 3D instructions 

in the drivers. This can be useful for performance comparisons or for 

troubleshooting.

Enable conformant OpenGL texture clamp behavior: 

“Texture clamping” 

refers to how texture coordinates are handled when they fall outside the body 

of the texture. Texture coordinates can be clamped to the edge or within the 

image.

Use unified back/depth buffer:

 Enabling this option allows the OpenGL 

driver to allocate one back buffer and one depth buffer at the same resolution 

of the display.

When the option is enabled

, OpenGL applications that create multiple 

windows use video memory more efficiently and show improved 

performance.

When the option is disabled

, the OpenGL driver allocates a back buffer 

and depth buffer for every window created by an OpenGL application.

Single-display

Mode

 option

for nView

Standard

mode

Default

Performance &

Compatibility

Options

nViewGuide_.book  Page 126  Monday, August 11, 2003  4:03 PM

Summary of Contents for Detonator FX Drivers

Page 1: ...Detonator FX Drivers NVIDIA Display Properties User s Guide Version 45 23 for Windows 5th Edition NVIDIA Corporation August 2003 nViewGuide_ book Page 1 Monday August 11 2003 4 03 PM...

Page 2: ...ge without notice NVIDIA Corporation products are not authorized for use as critical components in life support devices or systems without express written approval of NVIDIA Corporation NVIDIA the NVI...

Page 3: ...ures 12 OpenGL Enhancements 13 OpenGL 1 4 ICD with NVIDIA Extensions 13 Additional OpenGL Enhancements 13 2 System Requirements System Requirements and Support 17 Operating Systems 18 Minimum Hard Dis...

Page 4: ...75 Change Resolution Clone Mode Virtual Desktop 82 Horizontal Vertical Span Modes 84 Other Configuration Options 87 8 Device Selection And Configuration Switching Displays in nView Span Clone or Stand...

Page 5: ...tom OpenGL Settings 129 Save As 130 Delete 130 Restore Defaults 130 Custom OpenGL Application Settings 130 Overlay Controls Panel 130 Description of Overlay Settings 131 Full Screen Video Mirroring Op...

Page 6: ...Hard Disk Space Requirements English 18 Table 2 3 Hard Disk Space Requirements Non English Languages 18 Table 2 5 Supported NVIDIA GPU Based Products 19 Table 2 4 Hard Disk Space Requirements Full In...

Page 7: ...s 2000 Dualview 44 Figure 5 11 Windows 2000 Display Settings Dualview Mode Display 2 attached 45 Figure 5 12 Windows XP Display Settings in Dualview Mode 46 Figure 5 13 Windows XP Display Settings in...

Page 8: ...lone Mode Display 2 Analog Display Windows 2000 81 Figure 7 14 nView Clone Mode Menu Display 2 Digital Display Win 2000 XP 82 Figure 7 15 nView Clone Mode Device Configuration 83 Figure 7 16 nView Hor...

Page 9: ...112 Figure 9 9 Color Correction Settings Dualview Mode 113 Figure 9 10 Color Correction Settings nView Display Mode 114 Figure 9 11 Performance and Quality Settings Panel 116 Figure 9 12 Direct3D Sett...

Page 10: ...200 Tab 144 Figure A 4 NVIDIA GeForce4 Ti 4200 Menu 145 Figure A 5 NVIDIA GeForce4 Ti 4200 nView Span and Clone Modes are Accessible 145 Figure A 6 Display Properties Settings Display 2 CRT Dualview m...

Page 11: ...ased user interface accessible from the Windows Display Properties Settings Advanced option This guide focuses on the NVIDIA desktop products i e graphics cards based on NVIDIA desktop GPUs graphics p...

Page 12: ...click your mouse again to display the help nView vs NVIDIA Display Properties nView nView represents a collection of multi display technologies encompassing driver support multi display GPU architect...

Page 13: ...in general The terms CRT and analog display may be used interchangeably in this guide application An application or program can have any number of windows Some applications have only a single window s...

Page 14: ...state or mode of being able to work only in the dialog box You cannot move a modal dialog box it can be removed only by clicking its buttons modeless dialog box A dialog box that resembles a document...

Page 15: ...top of other windows New Features in this Driver Release This section provides a summary of the new features and enhancements pro vided with the NVIDIA Release 40 drivers for Windows In addition to o...

Page 16: ...specify how Vertical Sync is handled in Direct3D application For details see Other Direct3D Options on page 119 NVRotate NVRotate is a desktop rotation feature that lets you rotate the desktop by 90...

Page 17: ...y Properties Panel The NVIDIA display properties panels accessed through the Windows Display Properties Settings Advanced option have been redesigned to improve control over the display adapter settin...

Page 18: ...ualview is disabled as shown in Figure 1 2 In this case you can also access the Color Correction and Device Selection panels Device Selection This option appears when Dualview mode is enabled as shown...

Page 19: ...e s U s e r s G u i d e Figure 1 1 NVIDIA GPU Tab Figure 1 2 NVIDIA Display Properties Media Center Menu nView Display Mode Click this button to collapse the Media Center menu Media Center menu with n...

Page 20: ...Center Menu nView Dualview Mode Figure 1 4 NVIDIA GPU Panel with Media Center Menu Collapsed Click this button to collapse the Media Center menu Media Center in nView Dualview mode Click this button...

Page 21: ...u i d e Figure 1 5 nView Display Mode Panel with Media Center Menu Figure 1 6 nView Display Mode Panel with Media Center Menu Collapsed Click this button to collapse the Media Center menu Click this...

Page 22: ...in the new version of NVIDIA nView Desktop Manager Operating System Support includes Windows NT 4 0 Windows 98 Me and Windows 2000 XP Profile Feature Display Modes are now saved to and loaded from ea...

Page 23: ...ngs including a full set of application launch and disable settings OpenGL Enhancements OpenGL 1 4 ICD with NVIDIA Extensions New extension includes ARB_vertex_program which co exists with NV_vertex_p...

Page 24: ...page 17 Notes on Feature and Configuration Support on page 22 Examples in this Guide on page 23 System Requirements and Support This section contains the following topics Operating Systems on page 18...

Page 25: ...inimum Requirements Windows XP Home Professional or Media Center Edition Windows 2000 Windows NT 4 0 Service Pack 4 Windows Me Windows 98 Microsoft DirectX 5 Windows 95 OSR2 OEM Service Release 2 with...

Page 26: ...d supports Windows 98 16 0 MB Windows 95 16 0 MB Table 2 4 Hard Disk Space Requirements Full International Package Operating System Minimum Requirements Windows XP 37 8 MB Windows 2000 37 8 MB Windows...

Page 27: ...o4 750 XGL Quadro4 700 XGL 2 applies to all GPUs in this category GeForce3 GeForce3 Ti 500 GeForce3 Ti 200 Quadro DCC 1 applies to all GPUs in this category GeForce4 MX 440 GeForce4 MX 440 SE GeForce4...

Page 28: ...Vanta LT 1 applies to all GPUs in this category NVIDIA RIVA TNT 1 applies to all GPUs in this category English USA French Canada Portuguese Brazil English UK German Portuguese Euro Iberian Arabic Gree...

Page 29: ...NVIDIA GPU supports these features The options shown in the NVIDIA properties panels may vary depending on the specific NVIDIA GPU you are using For example one or more options that are available for...

Page 30: ...his guide feature NVIDIA GeForce4 based and the GeForce FX based GPUs You may be using a different NVIDIA GPU in which case you will see the exact name of the GPU you are using reflected in the NVIDIA...

Page 31: ...hancements on page 26 Release 10 Enhancements on page 27 Release 6 Enhancements on page 27 Release 5 Enhancements on page 29 Driver Release History Release 40 is the latest NVIDIA Display Driver softw...

Page 32: ...windows multi display usability For example NVKeystone can be set to compensate for keystoning effects on your windows display allowing you to fix distorted projection images This feature is primaril...

Page 33: ...proved DirectX Video Acceleration DXVA Special support for NVIDIA products in the GeForce4 family IDCT support for DirectX VA Improved antialiasing compatibility and performance Enhanced 3D Stereo fun...

Page 34: ...OpenGL NVIDIA Quincunx antialiasing option for enhanced image quality and performance AMD Athlon Processor and Intel Pentium 4 Processor optimizations Improved TwinView interface Release 6 Enhancemen...

Page 35: ...e that allows a video or DVD application to mirror its playback in full screen mode on any one of the connected display devices In other words Video Mirror allows video data that s displayed on a hard...

Page 36: ...ociated NVIDIA specific tabs from which the above mentioned features can be configured Release 5 Enhancements The Release 5 driver offered new features that were not found in previous releases of the...

Page 37: ...GP memory for better performance Large texture sets are handled more efficiently by the texture manager Vertex arrays with two sided lighting are faster Compiled vertex arrays are faster for primitive...

Page 38: ...h DirectX 6 material source capabilities The following Registry keys are useful for applications that do not blit correctly FLUSHAFTERBLITENABLE is a new Registry key that controls the wait after blit...

Page 39: ...rivers software for your Windows operating system must be installed on your computer If you do not have System Administrator access privileges it is assumed that the appropriate person with System Adm...

Page 40: ...e that the second display is not activated turned on by default You need to enable it For details on enabling Dualview mode see Using nView Multi Display Modes Dualview vs Span Clone on page 35 Under...

Page 41: ...ded that you follow the steps in this section to completely uninstall the NVIDIA Display Driver software before installing a new version of the software To uninstall the NVIDIA Display Driver software...

Page 42: ...and Clone Modes When using NVIDIA products that are multi display capable there are three ways to run multi display configurations under most operating system Dualview Span or Clone mode nView Dualvi...

Page 43: ...G u i d e Figure 5 1 NVIDIA Media Center Menu nView Display Mode Enabled Figure 5 2 NVIDIA Media Center Menu Dualview Mode Enabled nView Display Mode option appears when Dualview is disabled nView Di...

Page 44: ...Windows 9x or Windows XP using multiple displays Windows is pre configured for Dualview mode This is not the case for Windows 2000 NVIDIA provides a special feature to Enable Dualview in Windows 2000...

Page 45: ...n Clone Modes Windows XP on page 57 Enabling nView Clone Mode Windows 9x on page 59 nView Dualview Mode Key Features of nView Dualview Mode Dualview mode is sometimes called native mode as it is the n...

Page 46: ...can set different color depths per display You can arrange your multi display desktop to be any shape it does not have to be limited to rectangular as in Span modes When you run a DirectX or OpenGL a...

Page 47: ...a multi display NVIDIA GPU based graphics card or dual graphics cards properly installed in your computer and securely connected to your display devices 2 Ensure that you have more than one display d...

Page 48: ...p Utilities Panel Enabling Dualview in Windows 2000 Figure 5 6 Restart Now Message Enabling Dualview in Windows 2000 8 Click Restart Now When the system starts up you may see a series of Dualview inst...

Page 49: ...d Yes to follow through and then restart your computer as prompted After the system starts up if the NVIDIA nView Desktop Manager Setup Wizard appears run through the Wizard See the NVIDIA nView Deskt...

Page 50: ...Figure 5 9 13Click the NVIDIA GPU tab to display the associated panel and the Media Center menu as shown in Figure 5 10 Note The nView Display Mode option on the Media Center menu is replaced by the D...

Page 51: ...t i e s R e l e a s e 4 0 U s e r s G u i d e Figure 5 9 First Appearance of the NVIDIA GPU Tab Windows 2000 Figure 5 10 First Appearance of the Media Center Menu Windows 2000 Dualview NVIDIA GPU tab...

Page 52: ...wer steps as follows 1 Follow the basic steps in Enabling nView Dualview Mode for the First Time Windows 2000 on page 40 through step 9 2 After your computer restarts Dualview enabling is complete You...

Page 53: ...d the Settings tab You ll notice that two monitor images appear on the Settings panel indicating that you are in Dualview mode Figure 5 12 Windows XP Display Settings in Dualview Mode 6 Now right clic...

Page 54: ...n e 9 Click the NVIDIA GPU tab Notice that although you are in Dualview mode you can see the nView Display Mode option in the Media Center menu Figure 5 13 Windows XP Display Settings in Dualview Mode...

Page 55: ...n you start Windows 9x in multi display configuration Windows starts in Dualview mode You may only need to do an attach procedure to enable the secondary display device Follow these steps Notes Dualvi...

Page 56: ...right click to open the properties menu then click Properties and Settings tab You ll notice that at least two monitor images appear on the Settings panel Figure 5 16 This is Dualview mode Figure 5 16...

Page 57: ...If you get a Compatibility Warning message read the message carefully and then click OK Figure 5 17 Enabling Dualview 1 Windows 9x 7 Click Apply 8 Be sure to click the display image 1 so that it is th...

Page 58: ...g n V i e w M u l t i D i s p l a y M o d e s D u a l v i e w v s S p a n C l o n e Figure 5 18 Enabling Dualview 2 Windows 9x Figure 5 19 First Appearance of the NVIDIA GPU Tab Windows 9x NVIDIA GPU...

Page 59: ...pport Video Mirroring Key Features of nView Span Mode Span mode support and functionality include the following DirectX or OpenGL applications in Span mode are fully accelerated In nView Span mode you...

Page 60: ...t you cannot use different bit depths or resolutions per display Note This also results in Span mode being slightly faster than Dualview mode because Windows only has to manage one display device inst...

Page 61: ...A GPU tab and then the Desktop Utilities option from the Media Center menu 5 Click to uncheck the option Enable Dualview Treat multiple outputs 6 Click Apply and restart your computer After the system...

Page 62: ...s p l a y M o d e s D u a l v i e w v s S p a n C l o n e Figure 5 22 Windows 2000 Display Properties Settings in nView Span Clone Mode Dualview disabled Figure 5 23 First Appearance of the NVIDIA GPU...

Page 63: ...e 4 0 U s e r s G u i d e Figure 5 24 NVIDIA Media Center Menu Windows 2000 Figure 5 25 nView Clone Span Modes Available Windows 2000 Media Center menu nView Span Clone modes are available because nV...

Page 64: ...ke nView Span and Clone modes accessible follow these steps 1 Open the Windows Display Properties Settings panel 2 Right click the monitor image 2 and click Attached so that the option becomes uncheck...

Page 65: ...7 Click nView Display Mode to display the associated panel with the Span Clone mode options available Figure 5 29 Figure 5 27 First Appearance of the NVIDIA GPU tab Windows XP 2000 Figure 5 28 NVIDIA...

Page 66: ...To disable Dualview mode and therefore make nView Clone mode accessible follow these steps 1 Open the Windows Display Properties Settings panel 2 Right click on the monitor image number 2 and click En...

Page 67: ...s e r s G u i d e 6 From the Media Center menu click nView Display Mode to display the associated properties panel Figure 5 33 Figure 5 30 Disabling Dualview Windows 9x Figure 5 31 First Appearance o...

Page 68: ...p l a y M o d e s D u a l v i e w v s S p a n C l o n e Figure 5 32 NVIDIA Media Center Menu Windows 9x Figure 5 33 nView Clone Mode Available Windows 9x Media Center menu nView Clone mode is availab...

Page 69: ...ort hardware accelerated OpenGL nView Span Clone Modes Under Windows NT 4 0 Span mode allows you to use up to a maximum of two display devices If you want to enable more than two display devices under...

Page 70: ...one above the other Figure 5 35 To move items between monitors by dragging at an angle position the images diagonally Figure 5 36 The positions of the images don t have to correspond to the physical p...

Page 71: ...I A C o r p o r a t i o n 64 N V I D I A D i s p l a y P r o p e r t i e s R e l e a s e 4 0 U s e r s G u i d e Figure 5 35 Display Settings Vertical nViewGuide_ book Page 64 Monday August 11 2003 4...

Page 72: ...r p o r a t i o n C h a p t e r 5 U s i n g n V i e w M u l t i D i s p l a y M o d e s D u a l v i e w v s S p a n C l o n e Figure 5 36 Display Settings Diagonal nViewGuide_ book Page 65 Monday Augu...

Page 73: ...lay combinations Two RGB monitors with second RAMDAC digital to analog converter Two analog flat panels Two digital flat panels DFPs One digital flat panel and one analog flat panel One digital flat p...

Page 74: ...de supports the Video Mirror feature where you may want to dedicate an application to one of the two displays or run the application across both displays Examples include entertainment applications di...

Page 75: ...jected can be especially useful in mobile PCs Virtual Desktop a sub feature of nView Clone Mode is useful for flat panels and monitors with limited resolution and is used to set a larger than viewable...

Page 76: ...ut of the box With nView Clone mode game play can be sent to a big screen TV or even to a VCR Home theater systems can take advantage of the DVD capabilities of your PC Simply hook up a large screen t...

Page 77: ...guration Options on page 87 Notes Before You Begin To use nView features you need a graphics card based on a multi display NVIDIA GPU See Table 2 1 in Chapter 1 for NVIDIA GPU support information This...

Page 78: ...tings panel nView Standard mode disables the nView Span or Clone modes and features that depend on these modes However you can access specific features that are not multi display such as those describ...

Page 79: ...nView Clone and Span Modes To access the nView Clone and Span modes follow these steps 1 For multi display functionality be sure you have at least two display devices such as an analog display CRT and...

Page 80: ...le Figure 7 1 NVIDIA GPU Tab and Panel with Media Center Menu Standard Dualview Mode The Standard Dualview mode option in the nView Display Mode panel allows viewing in only one display Note If you ha...

Page 81: ...either a digital display or a TV display device or variations on this combination see Device Selection And Configuration on page 88 Figure 7 2 nView Standard Dualview Mode with Menu Windows 98 Figure...

Page 82: ...this option to select the display that contains the top left corner of the desktop The most obvious effect of this option is that it swaps the positions of the monitor images Note This option is also...

Page 83: ...CRT analog display in this example 5 From the menu click Select Output Device to open the Device Selection panel Figure 7 7 correctly shows analog display as the selected output device for display 1...

Page 84: ...w Clone Mode Menu Display 2 Digital Display Windows 98 Two monitor images appear in Clone mode when you have two display devices connected to your computer Select a monitor image and right click on it...

Page 85: ...D I A D i s p l a y P r o p e r i t e s U s e r s G u i d e Figure 7 6 nView Clone Mode Display 1 Analog Display Windows XP Figure 7 7 nView Device Selection Panel Display 1 Analog Display nViewGuide_...

Page 86: ...t e r 7 n V i e w D i s p l a y M o d e B a s i c s Figure 7 8 nView Clone Mode Menu Display 2 Digital Display Win 2000 XP Figure 7 9 nView Device Selection Panel Display 2 Digital Display nViewGuide...

Page 87: ...N V I D I A D i s p l a y P r o p e r i t e s U s e r s G u i d e Figure 7 10 nView Clone Mode Menu Display 2 TV Windows 2000 XP Figure 7 11 nView Device Selection Panel Display 2 TV nViewGuide_ book...

Page 88: ...p t e r 7 n V i e w D i s p l a y M o d e B a s i c s Figure 7 12 nView Clone Mode Display 1 Digital Display Windows XP Figure 7 13 nView Clone Mode Display 2 Analog Display Windows 2000 nViewGuide_...

Page 89: ...this example Note Notice that the Lock Pan Position option is enabled on this menu This is the same option as the Disable auto panning on the secondary device viewport lock check box at the bottom of...

Page 90: ...he primary display until the Change Resolution option becomes available from the display 2 pop up menu Figure 7 15 nView Clone Mode Device Configuration 2 Use the slider Figure 7 15 to set the Screen...

Page 91: ...ffer true multi monitor support for Span mode using one NVIDIA multi display graphics card 1 As a result the size of the actual desktop is limited to twice the smaller size of the two displays Note Th...

Page 92: ...ay 1 Analog Display Windows XP Figure 7 17 nView Horizontal Span Display 2 Digital Display Windows XP Two monitor images appear in Span mode when you have two display devices connected to your compute...

Page 93: ...s p l a y P r o p e r i t e s U s e r s G u i d e Figure 7 18 nView Clone Horizontal Span Modes Primary Displays Windows XP Figure 7 19 nView Vertical Span Mode Display 2 Digital Display Windows XP nV...

Page 94: ...c s Other Configuration Options For details on configuring display devices such as a TV see Device Selection And Configuration on page 88 For details on configuring additional features see Additional...

Page 95: ...dard Dualview Mode If you have the nView Display Mode Standard Dualview Span or Clone enabled and have multiple display devices connected to your computer you can easily switch between the displays by...

Page 96: ...Confirm Display Settings Message Switching Secondary to Primary Display nView Clone or Span Mode The examples in this section show a variety of changes to the monitor images in the nView Display Mode...

Page 97: ...I A D i s p l a y P r o p e r i t e s U s e r s G u i d e Figure 8 4 nView Clone Mode Display 1 Digital Display Windows XP Figure 8 5 nView Vertical Span Display 2 Analog Display Windows XP nViewGuide...

Page 98: ...e v i c e S e l e c t i o n A n d C o n f i g u r a t i o n Figure 8 6 nView Horizontal Span Clone Modes Primary Displays Windows XP Figure 8 7 nView Vertical Span Display 2 Digital Display Windows XP...

Page 99: ...I A D i s p l a y P r o p e r i t e s U s e r s G u i d e Figure 8 8 Device Selection Analog or Digital Display as Primary Display Figure 8 9 Device Selection nView Standard Dualview Mode 1 nViewGuide...

Page 100: ...Stands Clone or Span Mode you can use the following procedure to switch displays 1 Right click from your Windows desktop and click Properties and the Settings tab to display the Settings panel in Dual...

Page 101: ...ys if you want to detect all display devices connected to the output device analog display digital display or TV that is enabled on the Device Selection panel Figure 8 11 Display Settings Dualview Mod...

Page 102: ...shown in Figure 8 14 you would click TV to switch from Analog Display CRT to TV or based on the example in Figure 8 15 you would click Digital Display to switch from TV to Digital Display 7 When the D...

Page 103: ...i s p l a y P r o p e r i t e s U s e r s G u i d e Figure 8 14 Device Selection Analog Display and TV Dualview mode Figure 8 15 Device Selection Digital Display and TV Dualview mode Plug and Play nVi...

Page 104: ...creen Adjustment to display the Screen Adjustment panel Then go directly to step 4 below 1 Make sure you are in the Device Selection panel 2 Confirm that the Analog Display option is selected on the D...

Page 105: ...lay Timing panel and go directly to step 4 below 1 Make sure you are in the Device Selection panel 2 Confirm that the Analog Display option is selected on the Device Selection panel 3 Click Device Adj...

Page 106: ...steps to access the Flat Panel Display settings Note If you are in the nView Display Mode panel right click the Digital Flat Panel icon and select Screen Adjustment to display the Flat Panel Display s...

Page 107: ...play 3 You can use the options Use display adapter scaling and Centered Output to determine the placement of the image on your flat panel display when running at resolutions lower than the maximum sup...

Page 108: ...the Device Selection panel 2 Confirm that the Digital Flat Panel option is selected on the Device Selection panel 3 Click Device Adjustments to access the Flat Panel Display panel 4 Click Monitor Sett...

Page 109: ...the TV encoder that is used on your NVIDIA graphics card certain TV features on the nView Device Selection panel may be unavailable or vary from what is described in this chapter Accessing the TV Opt...

Page 110: ...ets you specify the type of output signal sent to the TV The default setting is Auto select If you want to select S Video Out or Composite Video Out click the down arrow on the Video Output Format fie...

Page 111: ...f your country is not in the list select the country closest to your location Device Adjustments TV Output From the Device Selection panel click Device Adjustments to open the TV Output panel Figure 8...

Page 112: ...position Then you can begin your adjustments again Once you have positioned the desktop where you want it click Table 8 1 TV Encoders and Supported TV Adjustment Features TV Encoders Supported TV Adju...

Page 113: ...t is recommended that you turn off the flicker filter completely for DVD movie playback from a hardware decoder Screen Size Note This feature is available on the following TV encoders Conexant 871 872...

Page 114: ...on page 125 Overlay Controls Panel on page 130 NVRotate Panel on page 134 Temperature Settings Panel on page 137 PowerMizer Settings Panel Mobile computers only on page 139 Desktop Utilities Panel Use...

Page 115: ...tab Advanced NVIDIA GPU tab and the Desktop Utilities option from the Media Center menu 3 To enable the nView Desktop Manager application click the Enable Desktop Manager check box and click Apply Fi...

Page 116: ...ew properties to open the nView Desktop Manager properties panel Figure 9 3 Figure 9 3 nView Desktop Manager Properties Panel 6 Also notice that the Desktop Manager Configuration button is activated F...

Page 117: ...access the following settings through the Media Center icon Accuview Antialiasing Custom OpenGL Custom Direct3D Custom Color Rotation nView Desktop Manager Windows Display Properties To enable the NV...

Page 118: ...n t s Figure 9 4 NVIDIA Media Center Icon Figure 9 5 NVIDIA Media Center Icon nView Desktop Manager Settings Figure 9 6 NVIDIA Media Center Icon 3D Antialiasing Settings Figure 9 7 NVIDIA Media Center...

Page 119: ...o insert a check mark in the check box as shown in Figure 9 8 Note Under Windows 9x and Windows XP this option does not apply and therefore is not available Figure 9 8 Desktop Utilities Enabling Dualv...

Page 120: ...r A setting of 256 colors will not enable the Color Correction panel Follow one of these methods to access the Color Correction panel Examples are shown in Figure 9 9 through Figure 9 10 In nView Dual...

Page 121: ...ion of an image so that all images including 2D 3D and video appear brighter and crisper even on flat panels in your applications Note DVC is supported by the GeForce2 MX and later series of NVIDIA GP...

Page 122: ...lows you to adjust the sharpness of the image quality by amplifying high frequency content Diagonal Line Curve Diagonal Line Curve shows a graphical representation of the color curve This curve will c...

Page 123: ...option from the Media Center menu to display the panel shown in Figure 9 11 Figure 9 11 Performance and Quality Settings Panel Image Settings Move the slider to select the performance and quality enha...

Page 124: ...sing mode but at nearly the performance of the faster 2x mode 4x enables antialiasing using the 4x mode This mode offers higher image quality at the expense of some performance in 3D applications 4x 9...

Page 125: ...y Texture Sharpening To improve image quality select this option to sharpen textures when running 3D applications with antialiasing enabled Direct3D Settings Panel To access the Direct3D Settings pane...

Page 126: ...rect3D applications are running Figure 9 12 Direct3D Settings Panel Other Direct3D Options Mipmap Detail Level Allows you to adjust the LOD Level of Detail bias for mipmaps A lower bias will provide b...

Page 127: ...d settings are then added to the adjacent list Once you have found the optimal settings for a particular Direct3D game saving the settings as a custom tweak lets you quickly configure Direct3D before...

Page 128: ...n appears only for certain older NVIDIA GPU based cards Changes the hardware texture addressing scheme for texels texture elements Changing these values will change where texel origin is defined The d...

Page 129: ...pplication requests the vertical sync mode to be enabled or disabled Always off This option disables vertical sync in Direct3D applications Always on This option enables vertical sync in Direct3D appl...

Page 130: ...nu 4 Click the Refresh Rate Overrides option to display the panel in Figure 9 15 Figure 9 15 Direct3D Refresh Rates Applications control refresh rates Applications control refresh rates When enabled t...

Page 131: ...rrides To override a refresh rate follow these steps 1 From the Refresh Rate column click the word Default on the line that contains the Resolution for which you want to change the refresh rate A list...

Page 132: ...ccess the OpenGL Settings panel follow these steps 1 Right click from the Windows desktop to open the pop up menu 2 Click Properties Settings tab Advanced and the NVIDIA GPU tab to display the Media C...

Page 133: ...r for troubleshooting Enable conformant OpenGL texture clamp behavior Texture clamping refers to how texture coordinates are handled when they fall outside the body of the texture Texture coordinates...

Page 134: ...nced rendering options when using multiple displays and or different classes of NVIDIA GPUs Single Display Mode If you have only one active display this is the default setting Figure 9 18 You can also...

Page 135: ...splay mode Multi Device Performance Mode This mode is available if you have two or more active display devices when running in nView Dualview mode or if you are using different classes of NVIDIA GPU b...

Page 136: ...lways disables vertical sync in OpenGL applications Off by default Keeps vertical sync disabled unless an application specifically requests that it be enabled On by default Keeps vertical sync enabled...

Page 137: ...ngs This option displays a list of preconfigured settings that correspond to OpenGL workstation applications Settings include AutoCAD CATIA 3D Paint 3D Studio Max Pro ENGINEER Lightwave CDRS Solidwork...

Page 138: ...y one of the connected display devices For sample combinations of display devices that are supported see relevant text in nView Applications on page 66 Note The Video Mirror features are supported onl...

Page 139: ...e in Windows 2000 XP and Windows 9x Auto select enables full screen device functionality which creates the full screen mirror on the display device on which there is no overlay This implies that if th...

Page 140: ...V Tuner Option Windows 98 Click any of arrows to select the corresponding area of the video screen you want to zoom Use the slider to zoom in on or out of the selected region of the video play back sc...

Page 141: ...the both the primary and the secondary display on which the video is rendered Note Video players that cannot detect the presence of Video Mirror may not update the zoom factor immediately while displa...

Page 142: ...Video Mirroring Options on page 131 Enabling NVRotate To enable NVRotate follow these steps 1 From your Windows desktop right click to display the pop up menu and then click Properties Settings Advan...

Page 143: ...i e s U s e r s G u i d e Figure 9 25 NVRotate Settings Panel Landscape Mode Figure 9 26 NVRotate Settings Panel Portrait Mode any of these arrow buttons to perform the rotation options You can click...

Page 144: ...splay devices are rotated In Dualview mode either of the display devices can be rotated provided there is enough memory to perform the rotation operation Only those 3D games and application that inclu...

Page 145: ...emperature of the selected NVIDIA GPU in your system Core Slowdown Threshold Click the up or down arrow to change the value at which the GPU will slow itself down to prevent overheating When this valu...

Page 146: ...ave been taken to prevent possible damage to any particular GPU s in your system PowerMizer Settings Panel Mobile computers only When using a mobile laptop computer the NVIDIA PowerMizer panel lets yo...

Page 147: ...owing Maximum Power Savings Balanced Maximum Performance example setting in Figure 9 29 AC Outlet Use the slider to adjust the power consumption from the AC power source relative to performance by set...

Page 148: ...iew Span Clone Mode on page 143 GeForce2 MX Panels Standard Dualview Mode on page 146 Viewing Multiple GPU Configurations From the Media Center Icon on page 148 Before You Begin This chapter contains...

Page 149: ...t time you see the Settings panel only the Display 1 monitor image will be attached The other displays will not be attached i e they will be turned off and will appear grayed 7 Click the down arrow in...

Page 150: ...r nView multi display functionality display 3 TV appears grayed because it is not turned on this is the reason if you click Identify the number 1 appears on both the digital display and TV If you enab...

Page 151: ...N V I D I A D i s p l a y P r o p e r i t e s U s e r s G u i d e Figure A 2 Display Properties Settings Display 3 TV in nView Span Clone Mode Figure A 3 NVIDIA GeForce4 Ti 4200 Tab nViewGuide_ book P...

Page 152: ...N V I D I A G P U B a s e d C a r d s Figure A 4 NVIDIA GeForce4 Ti 4200 Menu Figure A 5 NVIDIA GeForce4 Ti 4200 nView Span and Clone Modes are Accessible Span and Clone modes are accessible when Dual...

Page 153: ...p l a y P r o p e r i t e s U s e r s G u i d e GeForce2 MX Panels Standard Dualview Mode Figure A 6 Display Properties Settings Display 2 CRT Dualview mode Figure A 7 NVIDIA GeForce2 MX MX 400 Tab n...

Page 154: ...p l e N V I D I A G P U B a s e d C a r d s Figure A 8 NVIDIA GeForce2 MX MX 400 Menu Figure A 9 NVIDIA GeForce2 MX Standard Dualview Mode Span and Clone modes are not accessible when Standard Dualvi...

Page 155: ...the NVIDIA icon on your Windows task bar A menu of configuration options appears as shown in Figure A 10 Notice that both GeForce4 Ti 4200 and GeForce2 MX GPU based cards are shown in the menu 2 To s...

Reviews: