background image

TouchPoint Console Installation and Setup Guide

43

 Chapter 4: Additional Local Configuration

Meter Counts

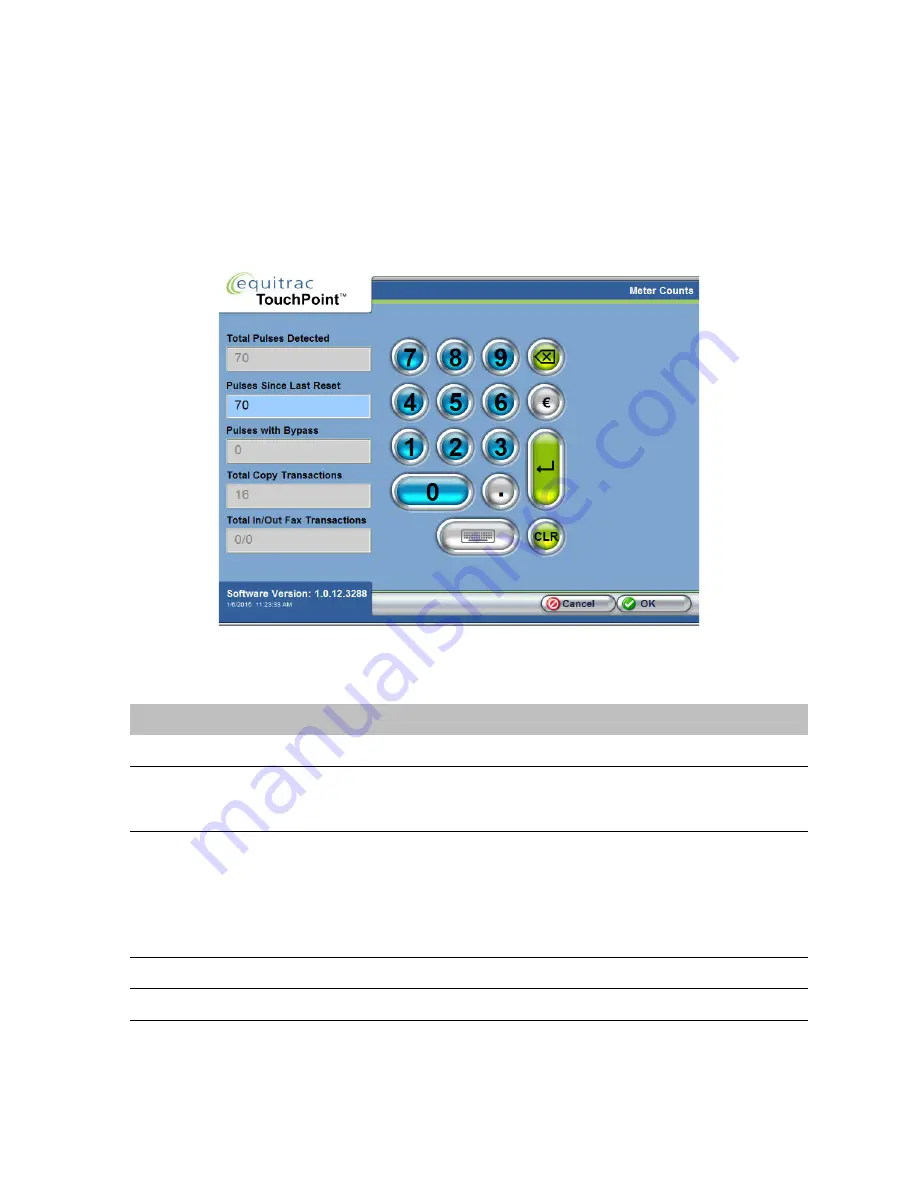
Meter Counts provides access to the copy meter counts that are stored in the TPC memory. This information may be 
useful when troubleshooting inconsistencies between the copier count and the TPC count. These fields are read-only 
values, with Pulses Since Last Reset as the exception. 

1

On the Administrative Options screen, press Meter Counts.

2

In the Meter Counts screen, view the following options: 

3

Press OK to close the dialog. 

Option

Description

Total Pulses Detected

The total number of pulses detected by TPC since manufacturing. 

Pulses Since Last Reset

Set this value at initial installation to match the copier count. When troubleshooting, 
you could compare this value to determine if there is an inconsistency between the 
copier and the TPC count. 

Pulses with Bypass

The total number of pulses detected when the bypass key was engaged. 

The Bypass key can be used to access the controlled device without requiring user 
authentication. The transactions will not be forwarded to the Equitrac Professional DCE 
server, but are tracked by TPC as bypass pulse. 

NOTE:

 Each TPC unit ships with 2 bypass keys. These keys must be stored in a safe 

location for security reasons. 

Total Copy Transactions

The total number of copy transactions only (does not include fax transactions). 

Total In/Out Fax Transactions

Total number of inbound and outbound fax transactions. 

Summary of Contents for Equitrac TouchPoint

Page 1: ...TouchPoint Console Installation and Setup Guide 2015...

Page 2: ...and their products are trademarks or registered trademarks of their respective holders and should be noted as such Symbols Used In This Guide The following symbols are used in the margins of this gui...

Page 3: ...Connection Descriptions 15 To connect the hardware 16 3 Initial Local Configuration 17 Identify the Server IP Address 18 DHCP 18 Server Hostname 20 Static IP 21 Assign the TouchPoint Console IP Addres...

Page 4: ...ut 42 Meter Counts 43 Fax Device 44 Fax board discovery 44 Outbound V 34 settings 46 Setting the Country Code 47 Outbound Calling Settings 48 Fax Call Monitoring 49 TouchScreen Calibration 50 Service...

Page 5: ...rsements such as couriers and catering TouchPoint Console places client matter allocation directly at the user s fingertips The compact LCD touch screen design enables fast and accurate allocation of...

Page 6: ...p Guide TPC communicates with the Equitrac Professional server via Ethernet connection and provides an Ethernet expansion port to connect the output device in a single network drop Equitrac Profession...

Page 7: ...are TPC ships with default version of the platform and application firmware Upgrade to the latest versions prior to performing server side configuration Instructions to upgrade firmware are available...

Page 8: ...rature 0 65 C 32 149 F Storage Stores over 40 000 transactions Ports and Connections Power Connection Power supply connector Serial Port Standard serial communication port Ethernet Connection RJ 45 Ja...

Page 9: ...the load file for TouchPoint Consoles See DHCP on page 18 for instructions About This Guide This guide provides physical setup and basic TPC configuration information only You must also perform confi...

Page 10: ...Chapter 1 About TouchPoint Console 10 TouchPoint Console Installation and Setup Guide...

Page 11: ...and Setup Guide 11 TPC Mounting and Setup Before you connect a TouchPoint Console to the network ensure you read the sections below to gather all required hardware Software Requirements Hardware Requ...

Page 12: ...iately you can add and configure TouchPoint Consoles to release print jobs and to track photocopies scans disbursements and faxes Windows services and applications that control TouchPoint Consoles dev...

Page 13: ...controlled device Fax Control If TPC will be used for fax control you will need one RJ 11 telephone or fax cable per fax device If you ordered a fax enabled TPC two RJ11 Fax cables are shipped with T...

Page 14: ...age for reference complete the hardware connection procedure outlined in To connect the hardware on page 16 Security Lock Power Connection USB Expansion Ports Device Control Cable Fax Port to fax devi...

Page 15: ...PC is controlling Ethernet to Wall RJ 45 Jack for Ethernet connection Connect the other end of the cable to the wall jack Serial Port Standard serial communication port If connecting a bar code reader...

Page 16: ...etwork Plug one end of an Ethernet cable into the TPC Ethernet port and then connect the other end to either an Ethernet hub or to an Ethernet wall jack if appropriate 4 Connect any optional USB devic...

Page 17: ...s by either creating a new instance or replacing an existing TPC and using the existing settings Refer to Assign the TouchPoint Console IP Address on page 22 3 Select the Date Time and Locale Synchron...

Page 18: ...ad file for TouchPoint Consoles The instructions below are specific to a Windows DHCP server If your DHCP server runs on a different platform for example UNIX Linux OS X server OpenVMS AS 400 DHCP ser...

Page 19: ...address or hostname The command will fail if it cannot find the final semi colon 8 Expand the Scope node and select Scope Options 9 From the Action menu select Configure Options 10 Select 230 11 Click...

Page 20: ...rd attached to TPC press the Soft keyboard button to access the soft keyboard screen for data entry Press the Enter key when finished to return to the Server Hostname screen These fields accept up to...

Page 21: ...Server Static IP screen enter the Primary DCE Server IP Address Press Enter to enable the Test button 3 Press Test TPC attempts to ping the DCE server by its IP Address In the Ping Test Results area...

Page 22: ...ed If replacing a TPC ensure that the existing TPC has been taken offline and is no longer using the IP Address If setting up a new TouchPoint Console not previously configured you must assign an IP A...

Page 23: ...can use to identify TPC Typically a good description involves TPC location or some other identifying factor 3 Press OK to continue 4 The Local IP Setting screen will appear giving you two methods for...

Page 24: ...Test In the IP Address Check area you should see a PASSED or FAILED message TPC performs a network check to determine if the IP Address you entered is used for any other device If not you will see th...

Page 25: ...ist of available time zones Select your time zone then press OK to apply that time zone 3 If you are in a region that complies with daylight savings ensure the Use Daylight Savings Time option is set...

Page 26: ...e the file on the Core Accounting Server Platform firmware is a bin format file and application firmware is a zip format file TPC must be connected to the network and it is helpful to know its IP Addr...

Page 27: ...ols and open the EQTerminalUpdate exe tool 2 Add the TPC s to update a In the Terminal Device List group box click Add An Add device dialog opens b In the Device IP address field enter the IP address...

Page 28: ...s well as their attributes and status in the Terminal device list 1 Click Discover 2 Enter a valid sample device IP address 3 Enter the subnet mask and click OK The time required to complete the devic...

Page 29: ...ber of other screens that offer local configuration per TPC This section provides extensive information about logging into a TPC to access the Administrative Options and in depth details about each op...

Page 30: ...TPC will operate External Serial Device Interface Configure an external proximity or magstripe device Copy Device Modify and troubleshoot copy pulse detection parameters About View platform software...

Page 31: ...icate that you are attempting an Administrative login rather than a User login 2 Login with the Administrator user name and password The user name is eqadmin and the password is eqadmin Press Enter to...

Page 32: ...network changes to an existing TPC setup i e changing the IP Address or if you want to replace an existing TPC you can run the wizard to perform these tasks CAUTION If you need to rename TPC ensure t...

Page 33: ...an IP Address to TPC 1 Press DHCP then click Test to have TPC contact the DHCP server for an IP Address The Current Settings field updates when the Test is complete If successful you will see the fol...

Page 34: ...uld see a PASSED or FAILED message TPC performs a network check to determine if the IP Address you entered is used for any other device If not you will see the PASSED message If there is a conflict yo...

Page 35: ...to help differentiate TPC when looking at a list of TPCs The description does not have to be a unique value You can change TPC name at any time WARNING Do not change the TPC name or description if TPC...

Page 36: ...change the date and time press the field you want to change the press the up down arrows until you reach the correct value 3 Ensure that you also select the correct time zone Press Modify to view a co...

Page 37: ...n the Display and Audio Settings screen adjust the following options if required Option Description Backlight Timeout mins After this set period of time dim the screen to preserve screen life and save...

Page 38: ...r screen option This feature is useful when users are first learning about the correct amount of pressure to apply to the touch screen This option is set to No by default Beep on timeout When enabled...

Page 39: ...rmation For additional information on card encoding refer to the Configuring TouchPoint Consoles chapter in the Equitrac Professional Administration Guide Serial communication between TPC and RS 232 c...

Page 40: ...to reset the connected card reader You should hear a beep from TPC then the card reader LED state should transition between Off Green and Red 3 When the LED light stays green and you are prompted to...

Page 41: ...to verify the pulses detected and the time associated with the pulse The On Off Report area updates to display each detected pulse and the number of milliseconds associated with the pulse 4 Press Stop...

Page 42: ...or example if working with Technical Support to resolve communication issues you can find this information in the About screen You do not need to login to the Administrative Options to view this infor...

Page 43: ...acturing Pulses Since Last Reset Set this value at initial installation to match the copier count When troubleshooting you could compare this value to determine if there is an inconsistency between th...

Page 44: ...t remotely on the TPC and then run it to determine which fax board is installed As part of the discovery process the FaxUpdate tool also allows you to set the needed fax country code on TPCs containin...

Page 45: ...d Filesize of the upload 7 From the top menu items select RUN CMD 8 In the Command String field type Disk1 FaxUpdate exe then press Enter 9 If you have not already done so use the IP address for the T...

Page 46: ...wer TPC application and firmware 3 TPCs with newer model fax boards that use older TPC application and firmware and are being used on older installations of Equitrac Professional Newer model fax board...

Page 47: ...untry code in these situations For information about setting country codes with the Faxupdate tool see FaxUpdate tool on page 44 Setting the Country Code NOTE These settings are only applicable for ne...

Page 48: ...the phone line and that the fax device is powered on 1 On the Administrative Options screen press Fax Devices 2 In the Fax Devices screen either press either V 34 Non V 34 or press Auto Detect if you...

Page 49: ...ccur they are recorded in the Fax Call Monitoring list If more than one fax device is controlled by TPC the events for both devices are interleaved in the display 2 To log the information press Enable...

Page 50: ...d during manufacturing you may need to make minor adjustments to the calibration If users notice that their finger presses are not quite accurate take a moment to perform a simple recalibration to res...

Page 51: ...c task for example TPC has four preset messages that you can quickly apply or you can create your own custom message 1 On the Administrative Options screen press Service Banner 2 Press Enable then cho...

Page 52: ...ocal Configuration 52 TouchPoint Console Installation and Setup Guide When you log out of the Administrative Options the message is displayed on the Information Bar The service banner message appears...

Page 53: ...on This function is not available to end users and is present from the Administrative Options screen only 1 On the Administrative Options screen press Reboot 2 In the confirmation screen press Yes to...

Page 54: ...inistrative Options screen press Logging 2 In the Logging screen press Enable to turn system logging on The following table describes the remaining options on this screen Option Description Send Loggi...

Page 55: ...figuration 3 Press OK to save the changes and start the log Information included Determines the amount of detail included in the log PID TID Dates File Name Modules Determines the specific modules to...

Page 56: ...Chapter 4 Additional Local Configuration 56 TouchPoint Console Installation and Setup Guide...

Page 57: ...s Help About Platform and software versions must correspond although the version numbers will not match Consult the Equitrac partner portal for details TPC software version _________________ On TPC pr...

Page 58: ...em and the error messages if any that are displayed on TPC Equitrac Professional DCE server IP Address _________________ In System Manager Software view the DCE version must be at least 5 2 0 3315 TPC...

Page 59: ...Administrative Options If using DHCP to assign IP Addresses ensure that you configured the DHCP server to associate the DCE server by option 230 BEFORE you connect TPC to the network See DHCP on page...

Page 60: ...lection requirements of the physical device On the local TPC Information bar you will see the message New configuration detected Rebooting used the Installation Wizard on the local TPC to replace an e...

Reviews: