background image

MicroE Optira Installation Manual 


Celera Motion 

IM-1001  |  REV181211 

Page 12 

©2018 Celera Motion 

LED Indications for Index Detection 

  LED flashes bright when passing over index 

  LED stays bright if stopped on index 

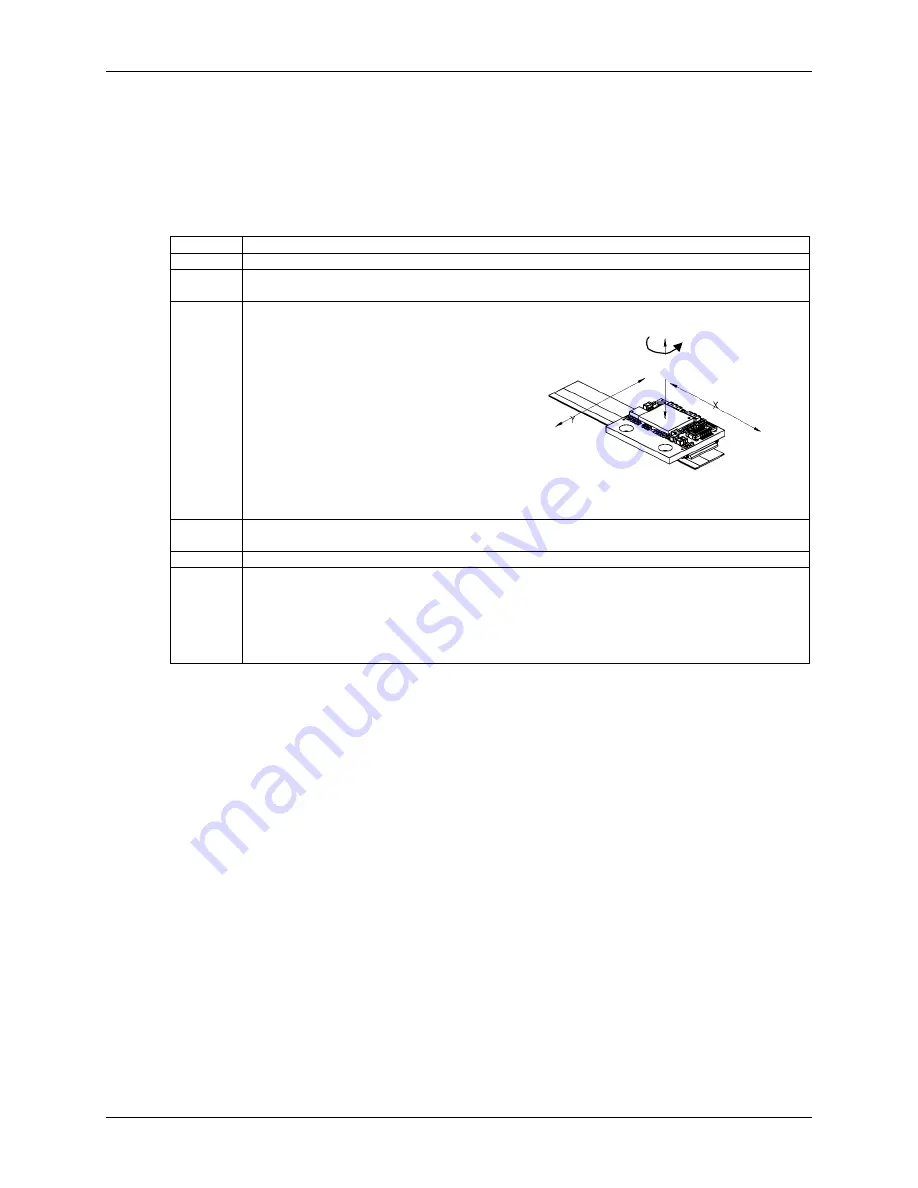
Align Sensor 

Perform the following steps to align the sensor: 


6.1.4.2  Status LED Version B 

Version B can be specified when there is a requirement for low ambient light. Version B operates 
identically to Version A on each power-up state facilitating sensor alignment. After 5 minutes, 

however, the LED operates as a fault indicator only.  
If calibration is initiated after the 5 minute period the LED will blink as in Version A but will revert 

to alarm indication only after calibration is complete. 

6.1.5  LSB Index Calibration 

Calibration is the process where the Least Significant Bit (LSB) index is set to its most stable 
operating location, which is centered within the sensor’s 20 µm wide, raw Index Window (IW). 

Calibration is only required for sensors with the LSB Index option

 (see 

Section 7.0 Order 

Guide

). Analog sensors or digital Optira sensors configured with the 20 µm Index Window do not 

require calibration. 
When to perform calibration: 

  When installing the sensor for first time 

  If the sensor is subsequently remounted 

  If the scale is replaced 

Step 

Action 

1.    Apply power to sensor. 

2.    Ensure that the sensor’s mounting screws are loosely tightened. Slowly move the sensor by 

allowing it to slide on the mounting surface until the Status LED illuminates green. 

3.    Confirm that the green LED flashes brightly when passing over the index. If not, readjust the 

sensor in the Y direction and repeat the above procedure. 


4.    When alignment is completed, tighten the sensor mounting screws per the torque 

specification: 0.34Nm (3 inch-lbs.) maximum. 

5.    Confirm that the LED remains green over the full range of motion. 

6.    If the sensor is not aligned over the entire range of motion: 

  Loosen the sensor mounting screws and repeat this procedure starting at Step 1. 

  Confirm that the scale has been installed parallel to the motion axis and that the LED 

remains green through the full range of motion. 


Result

: The LED remains green throughout travel and flashes over the Index. 

ϴ

Z


Z


Slowly slide sensor on its mounting 

surface in the Y or 

ϴ

Z directions 

Summary of Contents for Celera Motion Optira Series

Page 1: ...MicroE Optira Installation Manual Celera Motion IM 1001 REV181211 Page i 2018 Celera Motion...

Page 2: ...ll Sensor 8 6 1 1 Sensor Mounting Orientation and Tolerances 9 6 1 2 Top Mounting 9 6 1 3 PCB Mounting 11 6 1 4 Sensor Head Alignment 11 6 1 5 LSB Index Calibration 12 6 2 Install Optional Connector a...

Page 3: ...Using the Applicator Tool 34 12 0 Linear Glass Scales Installation 43 12 1 Before Installation 43 12 1 1 Items Required for Glass Scale Installation 43 12 1 2 Flowchart for Glass Scale Installation 4...

Page 4: ...ete system level electronic product is responsible for complying with 21 CFR MicroE Systems encoders contain an infrared laser diode or diodes Emitted invisible laser radiation levels have been measur...

Page 5: ...ies Encoders Interface Drawings 2 6 Trademarks Optira trademark of Novanta Inc d b a Celera Motion 2 7 Special Conventions Used The following symbols may be used in this document Symbol Description Wa...

Page 6: ...he Optira design allow easy access to the sensor for service and or replacement For optimal performance and reliability DO follow standard ESD precautions while handling the sensor DO allow proper cle...

Page 7: ...ment and calibration Design Mounting Is Z Height adjustable Align Sensor No Yes Set Z Height using shim Benching Edge Install Complete LSB Install Scale Calibrate Install Sensor Yes No Yes No Optional...

Page 8: ...Philips head screws are recommended Do not use slotted head screws which can allow the screwdriver to slip and damage components Tighten screws per torque specification 0 34Nm 3 inch lbs maximum Cauti...

Page 9: ...s per torque specification 0 34 Nm 3 inch lbs maximum Caution Be careful tightening these screws to avoid damaging nearby components PCB Mount Connector1 Molex part number 501591 1211 0 40 mm 016 pitc...

Page 10: ...Cable Custom Development Kit Cable with JST Connector and 15 Pin D Sub to connect between Connector and Calibration Board and customer s electronics Z Height Shim Spacer Shim for setting gap between s...

Page 11: ...nting This section contains instructions for designing the mounting scheme for installing the sensor A benching edge is recommended to locate the sensor to meet mechanical mounting tolerances Refer to...

Page 12: ...r information in Section 3 0 System Overview For installing the sensor to a PCB go to Section 5 1 3 PCB Mounting Note A scale must be installed before installing the sensor Refer to the Optira Series...

Page 13: ...riser and the top of the scale 0 493 mm Refer to the Optira Interface Drawing for details 6 Insert the Z Height Shim Spacer between the sensor s riser and the top of the scale 7 Fully tighten the two...

Page 14: ...e to achieve proper signal strength from the count track and the index track Proper sensor alignment may require minor adjustments to the sensor position with respect to the scale Sensor alignment can...

Page 15: ...og sensors or digital Optira sensors configured with the 20 m Index Window do not require calibration When to perform calibration When installing the sensor for first time If the sensor is subsequentl...

Page 16: ...al on the sensor connector pin 8 of J1 or JP1 to ground pin 10 of J1 or JP1 or to ground on the PCB Result The system status LED starts blinking at a regular rate 2 Move the sensor over the index up t...

Page 17: ...ctly to conductive surface without standoffs Use the board as an indicator of alignment by monitoring the alarm LED Refer to Section 5 1 4 Sensor Head Alignment to match Status Led on sensor and if Al...

Page 18: ...1 5 g sensor head Sensor Cable ZIF Flat Flexible Cable FFC 10 pins length up to 5 m Signal Levels A B I differential RS 422 compatible A B I single ended Voh min Vcc 0 4 VDC Vol max 0 4 VDC Alarm Voh...

Page 19: ...Connectors Pinouts The following are the pinouts for the two connectors on the Optira sensor JP1 Low Profile Board to Board Header Connector Manufacturer Part Number Molex 501594 1211 Pin Number Signa...

Page 20: ...rmination Note Below values are applicable for 5 V models only Digital Analog Outputs Alarm Circuit Example Alarm output is an open collector circuit that is factory programmable either active high or...

Page 21: ...IM 1001 REV181211 Page 18 2018 Celera Motion 7 5 Board to Board Header Wiring Examples The following are sample customer circuits for connecting to the Optira sensor using board to board mounting 3 3...

Page 22: ...MicroE Optira Installation Manual Celera Motion IM 1001 REV181211 Page 19 2018 Celera Motion 5 VDC Digital Operation 5 VDC Analog Operation...

Page 23: ...10 PWR PWR Development Kit Cable 15 Pin D sub 10 Pin JST Cable from Connector Calibration Board to Customer Interface 10 Pin JST Signal 15 Pin D Sub A quad B Analog NC NC NC 1 NC NC NC 2 Pin 6 Alarm A...

Page 24: ...Incremental Encoder Signals Optional RS 422 compliant circuitry for long cable runs in harsh electronic environments is illustrated below 7 9 Troubleshooting Problem Solution The LED on the sensor doe...

Page 25: ...PILT Optira Tape Scale Standard Resolution 5000 5 m 2500 2 5 m 1000 1 m 0500 0 5 m 0200 0 2 m 0100 0 1 m 0050 50 nm 0020 20 nm 0010 10 nm 0005 5 nm 0000 Analog 1 Vpp Accessories PI DK Development Kit...

Page 26: ...Scale Mounting 9 1 Overview The instructions in this manual apply to the following scales for Optira Series Encoders Optira Tape Scale Model PILT Optira Linear Glass Scales Model PILG Optira Rotary Gl...

Page 27: ...mm not required for installations 300 mm Refer to encoder data sheet or sensor installation manual for details on ordering parts 11 1 2 Pre Installation Information and Precautions Read all instructio...

Page 28: ...esive once the adhesive backing is removed DO NOT remove the tape scale from the mounting surface once it has been installed DO NOT reinstall the tape scale if it has already been installed once If th...

Page 29: ...is a simple flowchart showing the main steps in tape scale installation Clean and Inspect Scale Manually Use Applicator Tool Install Tape Scale Prepare Mounting Surface Refer to Design Guide Cut Tape...

Page 30: ...0 13 mm required between scale benching edge and bottom of mounting surface Benching edge must be parallel to axis of motion to within 05 100 mm Mounting surface flatness to within 003 10 mm 3 Machine...

Page 31: ...tion Step Action 7 Inspect the mounting surface for any machining irregularities MicroE Systems recommends a surface finish of better than 3 2 micrometers Ra 8 Thoroughly clean the scale mounting surf...

Page 32: ...ation kit Note Check interface drawing to make sure that the scale is cut to the correct length 2 Securely hold the tape scale close to the shears at an approximate distance of 40 mm 1 inches near the...

Page 33: ...g methods Manually by hand Using the Applicator Tool Note Use the Design Guide to help you select the method of installation 11 3 1 Install Tape Scale Manually Use the steps in this section to install...

Page 34: ...5 mm 1 inch of the bottom adhesive backing taking care not to touch the adhesive or allow any particulate contamination Note Be careful not to expose the adhesive backing more than 50 mm 2 inches Do n...

Page 35: ...scale while the other hand slides evenly along the scale During the sliding motion press the remaining tape on to the mounting surface and against the reference edge and then pull the adhesive backin...

Page 36: ...hesive is set evenly and permanently Performing this operation more than once is not necessary but will not have an adverse effect 7 Peel off the blue protective film Start the peeling process using a...

Page 37: ...hile feeding the tape scale to attach to a mounting surface Tape Travel Path The path for the tape scale through the applicator tool is shown in the following diagram Left end of tool Roller Dowel Ref...

Page 38: ...ds to the Optira encoder as shown below The benching surfaces correspond to the A and B faces shown in the Optira interface drawing Typical Motion Axis Recommended Customer Required Parts The followin...

Page 39: ...licator tool is shown in the example shown below The left end of the tape scale will go into the applicator tool entry channel first 2 Optira tape scales have four layers blue protective film Inconel...

Page 40: ...ing tool under the roller Take care not to touch the adhesive on the bottom of the tape scale or allow any particle contamination Note Do not peel the blue protective film off at this time 5 Place app...

Page 41: ...lation Manual Celera Motion IM 1001 REV181211 Page 38 2018 Celera Motion Step Action 6 Hold applicator tool firmly against benching pins 7 Attach applicator tool using the two mounting screws Benching...

Page 42: ...lling adhesive backing away from scale 9 Feed tape scale into the applicator tool until the end of the tape is past the roller Place applicator tool along reference edge and firmly press down on mount...

Page 43: ...pressure motion until all of the tape is installed on the mounting surface Be sure the adhesive backing film does not bunch up and jam inside the tool and exits freely from the exit slot 12 Pull adhe...

Page 44: ...Celera Motion IM 1001 REV181211 Page 41 2018 Celera Motion Step Action 14 Peel off the blue protective film Start the peeling process using a sharp tool being careful not to damage the scale Pull off...

Page 45: ...ean using alcohol or acetone and a lint free cotton cloth 16 Precautions If scale damage has occurred the tape scale may need to be replaced Clean the tape scale using alcohol or acetone and a lint fr...

Page 46: ...available for Optira linear glass scales installation Item Finger Cots or talc free gloves Acetone or isopropyl alcohol Lint free cotton cloths or wipes Epoxy non conductive Stick and disposable surfa...

Page 47: ...nds a mounting surface flatness of 0 0001 inch inch 3 Thoroughly clean the scale mounting surface and reference edge using a cotton swab or lint free cloth dampened with isopropyl alcohol or acetone R...

Page 48: ...stallation of new scale 13 2 Cleaning Scales Step Action 1 General Particle Removal Blow off any contamination with nitrogen clean air or a similar gas 2 Contamination Removal Use a lint free cleanroo...

Reviews: