background image

SECTION FOUR - Service/Maintenance

961 INSTALLATION MANUAL Revision A

Page 57

SECTION FOUR - Service/Maintenance

Service functions

This section explains the options at the 

SERVICE MENU

 screen for view-

ing product information, configuring the receivers, viewing GPS status, 
and saving and restoring databases and system logs. The port setup 
option is also introduced here, but described in detail in this manual in 
“Section Three, Interfacing.” 

Viewing product

information

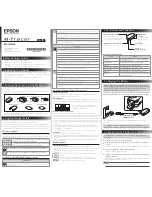
The 961’s

 PRODUCT INFORMATION 

screen provides you with access to 

current information about the 961’s control head, processor, GPS 
receiver, and DGPS receiver (if installed). To display these functions, press 
the 

STAR

 key until you reach the 

SERVICE MENU 

screen, then press the 

PRODUCT INFORMATION 

key to display the following screen:

 Figure 29:  Product information screen

Viewing head 1 serial number and software revision

The complete 961 system comprises two or three serial numbers—one for 
each control head and one for the processor. The serial number of the 
control head is affixed to the back of the unit, and also is permanently 
programmed into the 961’s database. You can view this serial number at 
the 

PRODUCT INFORMATION

 screen, in the 

HEAD 1 SN/SW REVS

 field.

Viewing head 2 serial number and software revision

For systems with two control heads, each head has its own serial number 
located at the back of the unit. You can view this serial number at the 

PRODUCT INFORMATION

 screen, in the 

HEAD 2 SN/SW REVS

 field.

Summary of Contents for 961X

Page 1: ...61X XD GPS CHART NAVIGATOR INSTALLATION MANUAL Revision A Part Number GM1708 Northstar Technologies 30 Sudbury Road Acton Massachusetts 01720 www northstarcmc com Service 978 897 0770 Sales 978 897 6600 ...

Page 2: ......

Page 3: ...f the owner To be covered by this warranty the Northstar equipment must have been in normal use This warranty does not apply to units with defects caused by improper installation physical damage abuse tampering lightning or other abnormal electrical discharge or to units with defaced or altered serial numbers or to units repaired by unauthorized persons or repaired in a manner that violates Norths...

Page 4: ......

Page 5: ...on 9 Wiring the 961 12 Installing the antenna 14 Turning the unit on and off 26 Testing and troubleshooting the 961 32 SECTION THREE Interfacing 45 Interfacing the unit 45 Configuring the NMEA output ports 46 Setting the auxiliary port 53 Setting PPNM 55 Using VGA output 56 SECTION FOUR Service Maintenance 57 Service functions 57 Maintenance functions 68 APPENDIX A Technical Specifications 69 Nort...

Page 6: ...Page ii 961 INSTALLATION MANUAL Revision A ...

Page 7: ...braid 18 Figure 9 Completed BNC connector 19 Figure 10 Combo GPS DGPS antenna AN205 P 19 Figure 11 Correct AN205 P combo antenna splitter wiring 20 Figure 12 Stripping the coax cable jacket 21 Figure 13 Flared cable braid 21 Figure 14 Completed TNC connector 21 Figure 15 ACU assembly 23 Figure 16 Correct AN150 and 8410 wiring 24 Figure 17 PL 259 UHF connector 26 Figure 18 Initial startup screen 27...

Page 8: ... PPNM output setup screen 55 Figure 29 Product information screen 57 Figure 30 Receiver information screen 59 Figure 31 GPS satellite status screen 62 Figure 32 Database function screen 64 Figure 33 Select database to save dialog box 65 Figure 34 Select database to restore dialog box 66 Figure 35 Select a restored database to undo dialog box 67 Figure 36 Save log data dialog box 68 ...

Page 9: ...e installation 32 Table 3 Troubleshooting the GPS DGPS antenna installation 39 Table 4 Troubleshooting the radar interface 42 Table 5 Interface cable wiring 46 Table 6 Port setup options 47 Table 7 NMEA 0183 sentence identifiers 49 Table 8 Aux port setup parameters 54 Table 9 PPNM output setup parameters 56 ...

Page 10: ...Page vi 961 INSTALLATION MANUAL Revision A ...

Page 11: ... receiver The 961XD has a built in differential receiver Unless specifically indicated all information in this manual refers to both the X non differential and XD differential ver sions of the unit Who should read this manual The Northstar 961 Installation Manual is intended for marine technicians who are configuring and installing the 961 GPS chart navigator Scope of this manual In this manual yo...

Page 12: ...nd be as complete and accurate as possible when describing the problem so that a service technician can research the problem and pro vide the quickest possible response Northstar s Service Department is available between 9 00 AM and 5 00 PM Eastern Time Monday through Friday excluding major holidays Table 1 Contacting Northstar Hearing from you Your feedback is important and helps ensure that this...

Page 13: ...ls The only cost to the owner will be the one way shipping charges and any associated charges that may be imposed by the dealer If you have overnight or second day shipping requirements before ship ping the unit please call the factory for turnaround time freight charges and payment arrangements The unit should be shipped only in a properly designed carton with pack ing material Shipments to the N...

Page 14: ...SECTION ONE Introduction Page 4 961 INSTALLATION MANUAL Revision A Ordering information To order spare parts or replacement missing parts call the Northstar Sales Department at 978 897 0770 ...

Page 15: ... during the installation fire electrical shock or other serious injury may occur WARNING Be sure that the voltage of the power supply is compatible with the unit s voltage rating which can be found on the label at the rear of the unit Connecting to the wrong power supply can result in fire or damage to the equipment Be sure to ground the equipment in order to pre vent electrical shock or mutual in...

Page 16: ...ng on page 9 6 Choose the best location to mount the antenna For suggestions and further information see Installing the antenna beginning on page 14 7 Review the section on wiring the system For details see Wiring the 961 beginning on page 12 8 Install the control head s processor and antenna You may want to temporally install the antenna then try operating the 961 to ensure the antenna location w...

Page 17: ...rical wiring hazards be mounted correctly accurately receive GPS and DGPS signals navigate safely Avoiding shortcuts The majority of installation problems are caused by shortcuts taken with system cables When installing your 961 be sure to assemble the connectors carefully don t make sharp bends in the cables leave service and drip loops tie wrap all cables to keep them secure if cables are length...

Page 18: ...her antennas The ACU can be mounted on a standard marine antenna mount 1 diameter 14 threads per inch For complete details about installing the AN150 8410 ACU see Install ing an 8410 ACU for use with the AN150 only beginning on page 22 Using the DGPS antenna AN205 P For complete details about installing the AN205 P see Installing the antenna beginning on page 14 Bench testing the 961 It is recomme...

Page 19: ...convenient accessible and within comfortable reach gives you easy access to the function keys is where you can clearly see the display screen from your normal vantage point when navigating for best display contrast is viewed from below looking up at the display screen provides a reasonably direct path for running the required electrical cables has minimal glare from windows or other bright objects...

Page 20: ...ION TWO Installation Page 10 961 INSTALLATION MANUAL Revision A Figure 1 961 control head yoke mount dimensions side Figure 2 961 control head yoke mount dimensions front 6 1 12 4 1 9 8 2 2 5 13 5 12 4 11 6 ...

Page 21: ...o the full size flush mount template P N GT1600 included in the 961 shipping carton Make sure you provide for adequate ventilation especially if the unit is installed in a closed area that s usually poorly ventilated Poor ventilation will cause the head to overheat which in turn may cause the display screen to darken Figure 3 961 control head flush mount drilling dimensions CAUTION When flush moun...

Page 22: ...ock the bottom ventilation holes or interfere with the mounting plate vibration shock mounts 10 foot power cable goes to 10 36 Volts DC Wiring the 961 The majority of installation problems are caused by shortcuts taken with system cables When installing the unit be sure that you assemble connectors carefully don t make sharp bends leave service and drip loops tie wrap all cables to keep them secur...

Page 23: ...le are connected as follows Red positive 10 to 40 Volts DC VDC Black negative Wiring the system The back of the processor with all the proper wiring and connections is shown in Figure 4 Processor connectors back of unit below Figure 4 Processor connectors back of unit CAUTION Ensure that fuse or circuit breaker protection is provided at the power source If you must cut the processor s 10 foot powe...

Page 24: ...nna location The GPS receiving antenna is a vital link between the unit s receiver and the outside world Aesthetics and easy access should be secondary to pro viding strong and reliable GPS signals to the unit s receiver You should select a location for the antenna that meets the following requirements The antenna should have a reasonably clear view of the horizon but be no higher than necessary s...

Page 25: ... however depending on the particular equipment and how it is configured Since each installation is unique according to the wishes of the customer this information should be used only as a guideline It is not absolution in determining the best locations for every possible equipment configuration Figure 5 Separation distances between antennas Choosing the AN205 P combination antenna location A combi...

Page 26: ...ble to the AN150 antenna must be no less than 50 feet and no more than 100 feet to the AN205 P no less than 20 feet and no more than 50 feet When installing antenna cable don t bend it tightly in any places and fasten the cable along its length to avoid chafing or whipping of any kind Coil up any unused length of cable Secure the cable well the center conductor is solid wire and securely fasten al...

Page 27: ...ver knife blade Amphenol crimp tools One TNC connector is pre attached to the antenna end of the RG 59 coaxial cable Connection to the antenna itself involves the following steps 1 Remove the antenna base by loosening the four captive screws in the base 2 Screw the base onto the top of the antenna mount standard 1 14 marine thread CAUTION The GPS only antenna must be used with a minimum of 20 feet...

Page 28: ...na halves 6 Make a termination for a male BNC connection as described in the following steps then connect the antenna to the female BNC con nection at the back of the unit 1 Strip cable jacket to the following dimensions in inches as illustrated in Figure 7 Stripping the coax cable jacket below a 0 57 b 0 34 c 0 14 d 0 43 Do not nick the center conductor Figure 7 Stripping the coax cable jacket 2 ...

Page 29: ...rfering with differential signals Figure 10 Combo GPS DGPS antenna AN205 P Wiring the AN205 P antenna When you use the AN205 P combo antenna a cable splitter is required to separate the signal path of the single cable from the antenna into two cables for connection to the 961 For the proper installation of the splitter refer to Figure 11 Correct AN205 P combo antenna splitter wiring below The spli...

Page 30: ...s length to avoid chafing or whipping of any kind After the antenna has been mounted and the cable has been cut to length not less than 20 feet install the supplied TNC connector at the other 961X end See Figure 12 Figure 13 and Figure 14 below A satis factory crimp for this connector may be made with a commonly available high quality crimping tool designed for use with TNC connectors NOTE Be sure...

Page 31: ...errule Figure 13 Flared cable braid 3 Place center contact onto center conductor so that it butts against the cable dielectric Crimp the contact in place using Amphenol tool handle 227 944 and Cavity B of Die Set 227 980 3 4 Figure 14 Completed TNC connector below Install cable assembly into body assembly so inner ferrule slides over dielectric and under braid Push cable assembly forward until con...

Page 32: ... can be sensitive to nearby noise sources and P static P static generally appears only during rain or snow conse quently it can easily be overlooked during installation Much like a loran antenna the effects of P static are minimized if the differential antenna is mounted so that it isn t the highest metallic object on the vessel The highest metal object acts much like a lightning rod attracting ti...

Page 33: ...al receiver and DC power to the ACU amplifier See Figure 16 below for the correct AN150 8410 wiring A 25 foot length of this cable is supplied with the unit this cable may be extended up to a length of 300 feet The cable passes up through the hollow ACU base and connects to the PL 259 UHF connector at the bottom of the ACU For UHF connector preparation see Differential GPS antenna cable connec tor...

Page 34: ...n systems will work equally well for differential antenna sys tems Essentially the ground system provides a secure connection to a large electrical mass ideally the earth itself On a vessel this means establishing electrical contact with seawater ground On a steel vessel a good connection to the hull or steel pilothouse is sufficient Wood or fiberglass vessels require a metal ground plate or a thr...

Page 35: ...ifferential GPS antenna cable connectors Both ends of the differential beacon receiver antenna cable end in UHF connectors To prepare UHF connectors follow the assembly instructions in Figure 17 For best results coat these connectors with silicone dielec tric grease DC 4 or equivalent to protect the connector junction against water intrusion and surface corrosion of the contacts In addition the co...

Page 36: ... unit briefly press the PWR key This activates the control head and the processor After several minutes the INITIAL STARTUP screen appears as shown in Figure 18 below This screen displays for about five to ten seconds The unit will then perform a series of system self tests in which it checks critical components and functions for any errors as shown in Figure 19 ...

Page 37: ...t screen After the SYSTEM TEST screen the 961 automatically displays the OWNER S MESSAGE screen as shown in Figure 20 for about 10 seconds For information on creating a personal owner s message such as the owner s name and name of the vessel see System security in the North star 961 Operations and Reference Manual GM1700 ...

Page 38: ... has been made to ensure that the data used by the unit is as close to paper charts as possible errors and omissions are inevitable Therefore extreme care must be used when navigating by means of electronic charts It is the captain s responsibility to cross check the 961 against other sources of navigation data To proceed accept the advisory message by pressing any key NOTE A brief warm up period ...

Page 39: ...t same position will usually be ready to navigate within several minutes If the 961 doesn t acquire GPS signals soon enough however your last position fix from the last time the unit ran will be represented by a small position fix circle you ll see an alarm message in the upper portion of the CHART screen and you ll hear the GPS alarm beep This sequence often occurs when a 961 is used for the firs...

Page 40: ... and a map indicating where the satellites are now located in the sky Satellites are identified by their pseu dorandom number PRN a two digit number assigned by the U S gov ernment The center of the satellite map represents the center of the sky and the outer ring is the horizon The view is looking down from above with East to your right and West to your left Also displayed on the screen is the fo...

Page 41: ...ng the GPS speed averaging value up to 10 seconds Increasing this averaging time however may reduce overall reaction time For more details about GPS speed averaging value see Chapter 14 in the Northstar 961 Opera tions and Reference Manual GM1700 Loran C TDs The 961 also calculates Loran C TDs from the GPS coordinates and dis plays them on the CHART screen INFO BARs For more details see View ing l...

Page 42: ...essor Next check for the presence of GPS and DGPS signals For GPS signals the time to first fix TTFF is about two to five minutes for DPGS signals it may take at least 20 minutes for the first channel of the 961 s internal beacon receiver to lock onto a transmit ter keep checking for the presence of the word DGPS in the upper left corner of the CHART screen Troubleshooting common installation prob...

Page 43: ...see if the problem goes away DISPLAY There is continuous or intermittent system failure as evidenced by the display screen flashing a plaid or multi colored waffle weave pattern There is continuous or intermittent system failure as evidenced by the display screen flashing a pulsing white flash in a continu ous repeating pattern Verify that the processor s power indi cator at the back of the unit i...

Page 44: ...at a time The unit may be running too hot based on its current environment In this case the display screen dims only about or notch or so which is normal There are two covered external fans at the back of the control head When one or both of these fans needs ser vicing the 961 s backlighting dims substantially to reduce the unit s over all temperature These fans are dealer serviceable call your No...

Page 45: ...tted lower attachment clips for the internal hard drive assembly If this is the case to rem edy the problem ensure that the tabs are engaged and tightly secured in their respective slots on the power supply frame so that the bot tom of the drive mounting bracket is properly restrained Use the mounting bracket with the ME500 series vibra tion mount PROCESSOR cont d System lock ups Hardware related ...

Page 46: ... ory battery has failed or the BIOS set tings were intentionally changed Consult with the Northstar Service Department for information on how to troubleshoot and correct this problem DGPS DIFFERENTIAL There s no DGPS indicator on the Chart screen and The BEACON RX SELF TEST AND SOFT WARE message says FAILED press the STAR key to access the SERVICE MENU screen then press the GPS STATUS key Wait 30 ...

Page 47: ...ne if there may be a scheduled mainte nance outage for the station you re trying to use For additional guidance call the Northstar Service Department DGPS cont d There s no DGPS indicator on the CHART screen and The BEACON RX SELF TEST AND SOFT WARE reads PASSED and the DGPS STATUS message reads OLD CORREC TIONS No DGPS corrections have been received and the system has returned to non differential...

Page 48: ...es as appropriate to the type of noise encountered GPS The head and processor power up but poor GPS SNR readings are obtained even after running the unit for several minutes Check that you have the proper length of cable and that all connec tions are clean and secure Verify the quality of the antenna loca tion the antenna should have a clear view of the sky For the correct antenna placement see Fi...

Page 49: ...rd It indicates a bad AN150 Replace the AN150 DGPS ANTENNA No GPS or DGPS Bad splitter configuration b Splitter cables may be reversed for GPS and DGPS output DGPS ANTENNA cont d Poor or no GPS signal while using the AN205 P antenna with splitter If 7 75 VDC is low or missing with load con nected If 7 75 VDC is low or missing with load dis connected If 7 75 VDC is present at processor UHF connecto...

Page 50: ...ETUP key Check that the DGPS SYSTEM option and BEACON FREQ options are set to on and that the BAUD RATE option is set to auto Press the STAR key to display the SETUP MENU screen then press the PRODUCT INFO key Check that the BCN RCVR ST reads PASSED Check the coax and antenna for open short and check for 7 75 VDC at the UHF connector under load The 1710 board in the processor may be bad Table 3 Tr...

Page 51: ... power lines and lights can cause interference Temporarily relocate the 8410 or combo antenna as far away from the interfering source as possible and monitor the effect on reception If it improves consider relocating the antenna or try to determine if the inter ference can be eliminated at its source Normally noise that affects an 8410 DGPS coupler won t affect a combo antenna and vice versa Consi...

Page 52: ...tom Possible Solutions Reasons 961 CONTROL HEAD The display is either knocked out completely or the screen flashes after the radar is turned on a white flash corresponds to each revolution of the radar when the radar range is set to 6 nm or above Stand directly in front of the display to determine if the problem is related to interference to the control head Put the radar into standby mode if the ...

Page 53: ...dar s scanning cable Inspect the radar scanning cable to scanner base grounding for a low impedance connection less than 5 ohms 1 2 between the display end and the scanner base termination is optimal if it s higher consult the radar manufacturers Shielding material can be used to attenuate interference effects Lead copper and Mu metal Mu is the most expensive are all good choices for flat sheet sh...

Page 54: ...SECTION TWO Installation Page 44 961 INSTALLATION MANUAL Revision A ...

Page 55: ...face data format used with installa tions and it is a widely accepted standard of data transfer between most all types of marine electronics today enabling completely different instru ments to speak a common language The unit has the following ports three bi directional NMEA input output ports one bi directional auxiliary aux port that you can use for commu nicating data to or from other instrumen...

Page 56: ...y the PORT SETUP OPTION screen 3 Press the PORT 1 PORT 2 or PORT 3 key A list of configurable port options identical for all three ports is displayed as shown below Table 5 Interface cable wiring Plug 1 Plug 2 Pin Function Pin Function 1 Alarm Out 1 Reserved 2 Alarm Out 2 Reserved 3 Reserved 3 Reserved 4 Reserved 4 Reserved 5 Gnd 5 Gnd 6 PPNM Out 6 MOB In 7 Reserved 7 Gnd 8 Reserved 8 SAVE In 9 Po...

Page 57: ...AT see below choose OFF 0180 0183 0183 R or CDX NMEA 0183 Talker ID see page 51 choose GP or II to make the unit look like a GPS receiver or an integrated instrument II NMEA 0183 lat lon precision see page 52 choose hundredths of minutes thousandths of minutes or ten thousandths of minutes OUTPUT RATE see page 53 choose 1 to 199 seconds NMEA 0183 waypoint ID as see page 53 choose NAMES or NUMBERS ...

Page 58: ...nd on input to the 961 the checksum is ignored It should be noted that with the checksum ignored on input there is a possibility of the unit receiving contaminated NMEA data when it is connected to an external Raytheon loran Format is supported on PORT 1 PORT 2 and PORT 3 DATAMARINE CDX is required by Datamarine s cross track error indicators the latest of which display distance and bearing to the...

Page 59: ...ition in lat lon coordinates so that you can see the target symbol dis played right on the 961 s CHART screen To have the TLL sentence input properly you must set to output the port to which you are connecting Three letter abbreviations identify each sentence and are listed alphabet ically The meanings of the NMEA 0183 three letter identifiers are described in the table below Table 7 NMEA 0183 sen...
Page 60: ...y the particular equipment to which you re interfacing the 961 Figure 26 shows the PORT 1 OUTPUT SETUP screen where you can set the output sentences to the factory default settings GSV GPS Satellites In View HSC Heading Steering Command MSS MSK Receiver Signal Status RMA Recommended Min Sentence A RMB Recommended Min Sentence B RMC Recom Min Specific GPS Transit Data RNN V1 5 Navigation Route vers...

Page 61: ...T key 5 Repeat for each sentence requiring modification Press the RETURN menu key to go back to the PORT OUTPUT SETUP screen Choosing the NMEA 0183 talker ID Part of the NMEA 0183 standard requires that the equipment you are interfaced to the listener know what type of device is transmitting the data The talker ID tells the listener that it is receiving information from a navigation source the 961...

Page 62: ...ber of digits of precision required for that particular device The factory setting is XXX thousandths of minutes To change the lat lon precision setting 1 From the PORT SETUP screen select the desired port by pressing the PORT 1 PORT 2 or PORT 3 key At the PORT OUTPUT SETUP screen highlight the 0183 PREC field then press the EDIT key 2 Press the CURSOR PAD to select the following options XX XX lat...

Page 63: ...e nine character waypoint names Included spaces will be output When exporting to another device be aware that the numerical identifiers aren t assigned sequentially and may be re used by the system on a random basis Setting the NMEA 0183 checksums Certain older devices may not accept sentences containing the NMEA 0183 checksum that s output by the 961 In such cases the device may not operate prope...

Page 64: ... format and baud rate Figure 27 Auxiliary port setup screen The following configuration parameters are available as outlined in Table 8 detailed in the text that directly follows output format NMEA 0183 baud rate To change the aux port settings 1 Press the CURSOR PAD down to highlight either FORMAT or BAUD then press the EDIT key 2 Press the CURSOR PAD left or right to highlight the desired settin...

Page 65: ...ers Do not turn this function on Port off Use the OFF setting when the aux port s input or output functions aren t needed Aux port baud rate The aux port s baud rate must match the external device s baud rate refer to the external device s instructions for the correct baud rate setting then follow the instructions on the previous page for changing an aux port set ting Setting PPNM To access the pu...

Page 66: ...ing VGA output The 961XD supports an external VGA monitor output from the female 15 pin standard VGA video connector located on the back of the proces sor See Figure 14 on page 21 Conversion of the signal to an NTSC or PAL video output is possible using VGA converters Use a VGA to NTSC PAL converter that doesn t require separate software This should be plug and play hardware for standard VGA video...

Page 67: ...splay these functions press the STAR key until you reach the SERVICE MENU screen then press the PRODUCT INFORMATION key to display the following screen Figure 29 Product information screen Viewing head 1 serial number and software revision The complete 961 system comprises two or three serial numbers one for each control head and one for the processor The serial number of the control head is affix...

Page 68: ... the test criteria the field says FAIL If the field says FAIL the 961 won t be receiving DGPS signals for details about troubleshooting the DGPS receiver see Testing and troubleshooting the 961 beginning on page 32 In many cases the reason for the failure is an open or shorted antenna cable which can be repaired in the field If this isn t the source of the failure call the North star Service Depar...

Page 69: ...is useful at lower speeds when you require the highest accuracy With this high degree of accuracy you ll see a steady display of your speed that s slow to change A shorter averaging time however provides less accuracy and a quicker changing display of your speed You also can turn off speed averaging completely for the quickest possi ble display reaction time NOTE If you re viewing and editing info...

Page 70: ...re necessary the advanced user can change this option to hide any low satellites This option prevents the use of low satellites as sources of GPS position infor mation and avoids potential errors You can adjust this option to 0 5 8 10 or 15 however Northstar rec ommends that you leave this option at the factory setting of 10 To change the satellite elevation 1 At the RECEIVER INFORMATION screen pr...

Page 71: ...uency band 283 5 to 325 kHz locating and measuring received DGPS differential signals which is then stored as a DGPS differential directory in its battery powered memory If the signal that s received and monitored by Channel 1 degrades for any reason such as bad weather between you and the transmitter the unit tries to select a better frequency from the differential directory it has compiled This ...

Page 72: ...ommended that you leave the beacon baud rate setting at AUTO To manually set the baud rate for the selected differential fre quency 1 At the RECEIVER INFORMATION screen press the CURSOR PAD to highlight the BEACON BAUD field then press the EDIT key 2 Press the CURSOR PAD left or right to highlight 200 100 50 or 25 bps 3 When done press the ACCEPT key or CANCEL to leave the option unchanged Viewing...

Page 73: ...r equipment see Section Three Interfacing Saving and restoring databases and system logs The DATABASE FUNCTION screen provides access to several database maintenance options To display these options press the STAR key until you reach the SERVICE MENU screen then press the DATABASES AND LOG key Saving and restoring a 961 database You can easily save or backup your entire database of user defined wa...

Page 74: ... to switch the position of the small square on the outer corner of the disk Saving a database To save the waypoint and route or user preference databases to a disk 1 Press the STAR key until you reach the SERVICE MENU screen then press the DATABASES AND LOG key The DATABASE FUNCTION screen appears Figure 32 Database function screen 2 Press the SAVE DATABASES key The SELECT DATABASE TO SAVE dialog ...

Page 75: ...s the CONFIRM key The SAVING DATA dialog box appears defined as either user preference data waypoint and route data or all data asking you to wait while the 961 saves the data This dialog box is followed by the SUMMARY OF DATA SAVED dialog box show ing the number of files saved 4 Press the CONFIRM key to return to the DATABASE FUNCTION screen Restoring a database To restore a previously saved data...

Page 76: ...ence data waypoint and route data or all data asking you to wait while the 961 restores the data This dia log box is followed by the SUMMARY OF DATA RESTORED dialog box showing the number of files restored 4 Press the CONFIRM key to return to the DATABASE FUNCTION screen To use the restored database you must restart the 961 Press the PWR key to turn the 961 off then press it again to restart The 9...

Page 77: ...les from the database Saving log data Occasionally the 961 may have a problem that requires looking at its log files to determine the cause If this happens you ll be prompted to save the 961 s log files which should then be sent to the Northstar Service Department If you have any questions call Northstar and ask to speak with a marine service technician To save the log files 1 Press the STAR key u...

Page 78: ...ally available glass cleaner Periodically dust the processor especially around its floppy or Zip drive and the CD ROM drive Installing 961 software updates Periodically you ll receive a notice from Northstar about the release of a new version of 961 software When you receive this notice call the Northstar Service Department to request the current software update on CD ROM installation instructions...

Page 79: ...z Navigation Accuracy 3m 2DRMS with Differential 100m 2DRMS w o Differential S A on Navigation Update Rate 1 per second Time To First Fix 30 seconds typical Dynamics Velocity 1800 km h Acceleration 4g Jerk 2 m sec Operating Modes 2D nav 3 or more satellites 3D nav 4 or more satellites visible SC 104 Processes all USCG SC 104 message types including 1 9 Interfacing IR link on control heads Three bi...

Page 80: ... heads second head optional 640 x 480 pixel 10 4 inch diagonal high temperature backlit transmissive 65 536 color LCD Flush and yoke mounts standard High contrast anti reflection screen Large easy to use backlit controls Control heads connect with single RG 59 coax cable Two audio beepers for alarms and configuration of action Protective plastic cover Processor CD ROM drive for charts and software...

Page 81: ...hannel fully automatic Frequency Range 283 5 325 0 kHz includes European frequencies Minimum Signal Strength 5µV m 100bps Dynamic Range 100 dB Adjacent Channel Rejection 50 dB 1 kHz Acquisition Time 15 seconds Data processing Demodulation MSK Minimum Shift Keying Bit Rates 25 50 100 200 automatically selected Data Decoding 2 parallel matched digital filters Power Power consumption 2 watts AN150 Ac...

Page 82: ...loaded or Radio Shack 21 934 AN205 P GPS DGPS antenna Frequency 1575 MHz 2 MHz Finish Outdoor Weatherable Polymer Polarization Right Hand Circular Weight 22 Ounces Axial Ration 3 dB Max Dimensions 152 mm W x 152 mm L x 67 mm H 6 00 W x 6 00 L x 2 63 H Altitude 12 000 Feet Noise Figure 2 5 dB Max Temperature 40º C to 70º C Impedance 50 Ohm VSWR 2 0 1 Band Rejection 35dB 1625 MHz Power Handling 1 Wa...

Page 83: ...ating temporary locations before mounting 22 grounding when disconnected 25 INMARSAT 14 separation distances between 15 troubleshooting installation 39 using a cable splitter 19 Antenna Coupling Unit See8410 ACU APB 0183 identifier 49 aux port outputting DGPS corrections 55 pins 46 setting 53 setup parameters 54 turning input or output functions off 55 B baud rate 47 55 BCN UNHEALTHY message 37 be...

Page 84: ...ing the GPS software version 60 satellite status screen 30 troubleshooting antenna installation 39 viewing information about satellites 30 GPS antenna See AN150 antenna GPS only antenna See AN150 antenna ground cautions when disconnecting antenna 25 Ground pins 46 grounding 24 problems 22 GSA 0183 identifier 49 GSV 0183 identifier 50 H HDOP viewing 30 horizontal dilution of precision See HDOP HSC ...

Page 85: ... 30 processor installing 12 mounting restrictions 5 troubleshooting 34 product information about the DGPS receiver 57 about the GPS receiver 57 viewing control head serial number and software revision 57 pseudorandom number See PRN P static 22 pulses per nautical minute setting 55 PWR key 26 R radar antennas using caution with GPS an tennas 16 range troubleshooting DGPS corrections 37 rattle sente...

Page 86: ...t clearance 9 test power switch 33 time to first fix 32 TNC connector 14 17 20 Tommy Tape 25 tools mounting the AN150 antenna 17 troubleshooting 32 DGPS 36 DGPS range corrections 37 poor SNR readings 16 power problems 32 testing 961 and 32 TTFF 32 U UHF connector 23 25 26 update intervals changing 53 V ventilation allowing for adequate 11 vessel symbol 29 vessels grounding for different types of 2...

Reviews: