Page 15 of 19
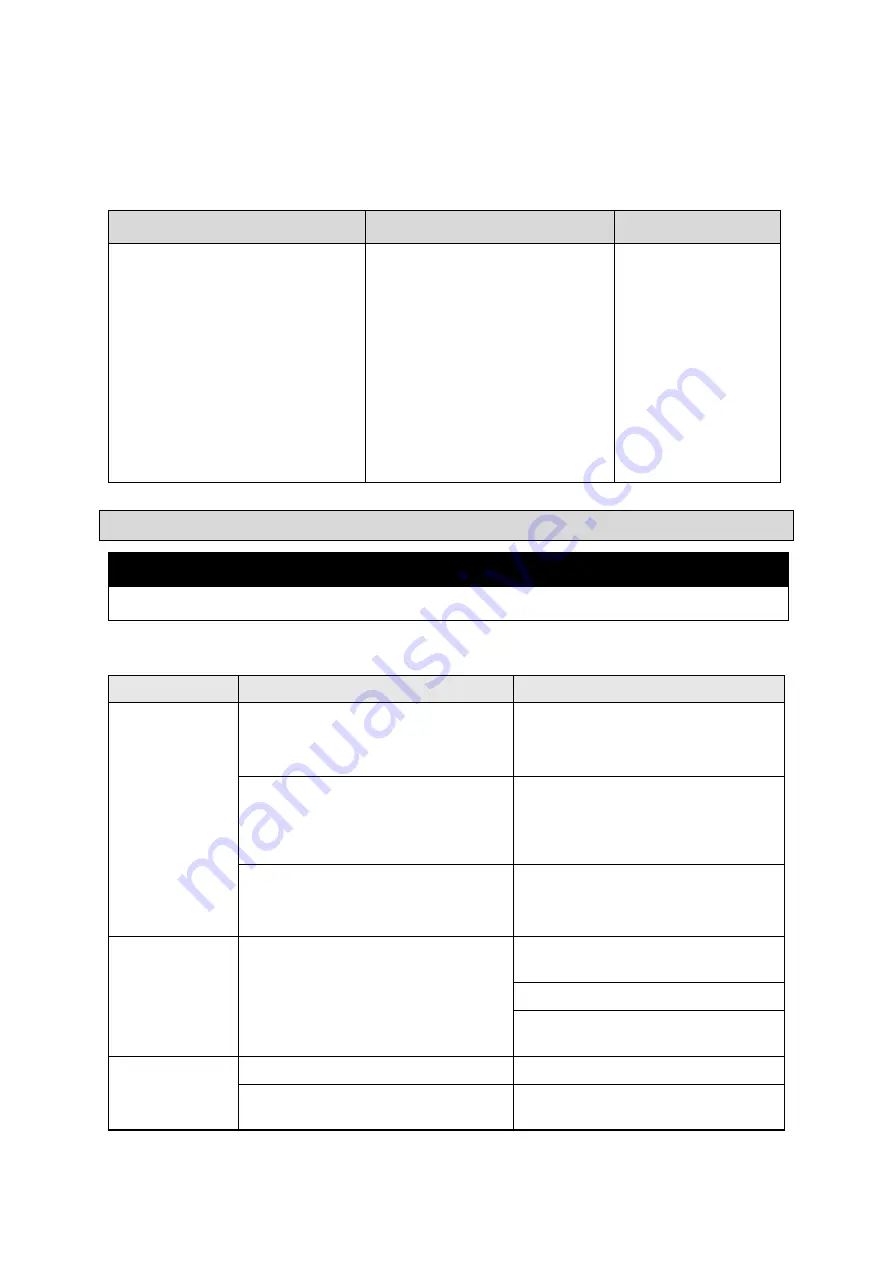
Maintain the grease gun by adopting a program of conscientious repair and maintenance in
accordance with the following recommended procedures. It is recommended that the general
condition of any tool be examined before it is used. Keep your grease gun in good repair. Keep
handles dry, clean, and free from oil and grease. The following chart is based on a normal operation
schedule.
Maintenance Interval
Maintenance Point
Action
Daily before operating, after the first
20 operating hours, and after the
first 50 operating hours or every
week:
Check for:
•
a damaged hose,
•
loose hardware,
•
misalignment or binding of
moving parts,
•
cracked or broken parts,
•
damaged electrical wiring,
•
any other condition that may
affect its safe operation.
If damaged, replace
the parts before use.
Troubleshooting
⚠
WARNING
•
After each use, disconnect from air supply and store in a safe, dry, childproof location.
Use the table below to troubleshoot problems before contacting service personnel or your local
dealer. If the problem continues after troubleshooting, call your local dealer for assistance.
Failure
Possible Cause
Corrective Action
The grease gun
does not work.
Low air pressure.
Set the air pressure to 30 - 100 PSI.
Working pressure of 90 PSI is
recommended for the best operation.
Air hose leaks.
Check and see if the air hose is in
good condition. Tighten and seal hose
fittings using thread sealant tape if
leaks are found.
Springs (#7 and #18) and/or piston
assembly (#6) are damaged.
Replace springs and/or piston
assembly if they are damaged.
The grease gun
cycles and does
not pump
grease.
Grease gun is out of grease.
Refill the grease gun if it is out of
grease.
Repeat priming operation.
Disconnect any extensions and prime
until grease flows.
The grease gun
continues to lose
prime.
Trapped air in the grease gun.
Release trapped air in the grease gun.
Grease gun is out of grease.
Refill the grease gun and repeat
priming.


