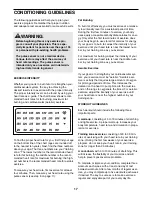
NordicTrack NTEL08991 User Manual Download Page 11

11

The training zone
display

ÑAs you

exercise, the train-
ing zone display
will show the
approximate inten-
sity level of your exercise. For example, if three or
four indicators in the display are lit (refer to the
drawing above), the display shows that your inten-
sity level is ideal for fat burning.

The left LED dis-
play

ÑAs you

exercise, the left
display will show
the elapsed time,
your current
speed, and the
current resistance level. The display will change
from one number to the next every six seconds,
as shown by the indicators around the display.
Note: When a preset program is selected, the left
display will show the 

time remaining in the pro-

gram

rather than the elapsed time. 

The right LED
display

ÑAs you

exercise, the right
display will show
the approximate
number of calories
you have burned
and the distance you have traveled. The display
will change from one number to the other every
six seconds, as shown by the indicators around
the display. This display will also show your heart
rate when the pulse sensor is used (see step 6).  

Note: If you stop exercising for six seconds or
longer, the console will pause and the left LED
display will begin to flash.

Measure your heart rate, if desired.

Note: Before using the pulse sensor, peel the
protective vinyl off the metal contacts on the
top and bottom of the pulse sensor.

To measure
your heart
rate, place
your hands on
the metal con-
tacts on the
pulse sensor.
Your palms

must be resting on the upper contacts and your
fingers must be touching the lower contacts.

Avoid moving your hands.

When your pulse is
detected, the heart
rate indicator above
the right LED dis-
play will light, one
to three dashes will
appear in the dis-
play, and then your heart rate will be shown. For
the most accurate heart rate reading, continue to
hold the contacts for about 15 seconds. Note: If
your heart rate is not shown, make sure that your
hands are positioned as described above. Be
careful not to move your hands excessively or
squeeze the metal contacts too tightly. 

Note: When you hold the pulse sensor, the right
LED display will show your heart rate for up to
two minutes. If you continue to hold the pulse
sensor, the display will show your heart rate along
with the number of calories you have burned and
the distance you have traveled.

When you are finished exercising, turn off the
power.

To turn off the power, simply wait for about ten
minutes. 

The console has an Òauto-offÓ feature.

If the console buttons are not pressed and the
pedals are not moved for ten minutes, the
console will turn off automatically.

Note: If the displays and indicators remain lit
after ten minutes, the console may be in the
ÒdemoÓ mode. Refer to the instructions on
page 16 to turn off the demo mode. 

7

6

WARNING:

The pulse sen-

sor is not a medical device. Various fac-
tors, including the user's movement,
may affect the accuracy of heart rate
readings. The pulse sensor is intended
only as an exercise aid in determining
heart rate trends in general.

Metal

Contacts

Summary of Contents for NTEL08991

Page 1: ...ave questions or if there are missing parts we will guarantee complete satisfaction through direct assistance from our factory TO AVOID UNNECESSARY DELAYS PLEASE CALL DIRECT TO OUR TOLL FREE CUSTOMER...

Page 2: ...SSEMBLY 5 HOW TO USE THE ELLIPTICAL CROSSTRAINER 9 MAINTENANCE 16 CONDITIONING GUIDELINES 17 PART LIST 18 EXPLODED DRAWING 19 HOW TO ORDER REPLACEMENT PARTS Back Cover LIMITED WARRANTY Back Cover 2 No...

Page 3: ...adings The pulse sensor is intended only as an exercise aid in determin ing heart rate trends in general 10 When you stop exercising allow the pedals to slowly come to a stop 11 Keep your back straigh...

Page 4: ...VGR940 If you have addi tional questions please call our Customer Service Department toll free at 1 888 825 2588 Monday through Friday 6 a m until 6 p m Mountain Time excluding holidays To help us as...

Page 5: ...ed in assembly Note Some small parts may have been pre assembled for shipping If a part is not in the parts bag check to see if it has been pre assembled 1 Identify the Rear Stabilizer 59 which has Wh...

Page 6: ...t Slide an M8 Split Washer 58 and an M8 Washer 33 onto the other Incline Axle Screw 30 Tighten the Incline Axle Screw into the open end of the Incline Axle 29 2 Console Wire 51 35 35 44 4 87 4 Remove...

Page 7: ...t the Harness Extension 51 and the Wire Harness 25 do not get pinched between the Upright 2 and the Frame 1 In addition feed the slack in the Harness Extension and the Wire Harness into the Upright Co...

Page 8: ...Upper Body Arm Center the Arm Axle Using the included pedal tool tap two Push Nuts 15 about 1 8 onto each end of the Arm Axle 19 Make sure that the Push Nuts are turned as shown in the inset drawing...

Page 9: ...ors in the TRAINING ZONE display will light in a rapid sequence EXERCISING ON THE ELLIPTICAL CROSSTRAINER To mount the elliptical crosstrainer hold the handlebar and step onto the pedal that is in the...

Page 10: ...he desired unit of measurement refer to the instructions at the top of page 16 HOW TO USE THE MANUAL MODE Make sure that the power supply is plugged in Refer to page 9 Press any button on the console...

Page 11: ...tacts on the pulse sensor Your palms must be resting on the upper contacts and your fingers must be touching the lower contacts Avoid moving your hands When your pulse is detected the heart rate indic...

Page 12: ...hen only three seconds remain in the first seg ment both the Current Segment column and the column to the right will flash a series of tones will sound and all resistance settings will move one column...

Page 13: ...ther side of the Y adapter HOW TO CONNECT YOUR PORTABLE STEREO Note If your stereo has an RCA type AUDIO OUT jack see instruction A below If your stereo has a 3 5mm LINE OUT jack see instruction B If...

Page 14: ...RCA Y adapter Plug the RCA Y adapter into the LINE OUT jack on your stereo HOW TO CONNECT YOUR COMPUTER Note If your computer has a 3 5mm LINE OUT jack see instruction A If your computer has only a PH...

Page 15: ...ions During the CD program the resistance of the ped als will automatically change according to the set tings of the program An electronic chirping sound will alert you when the resistance is about to...

Page 16: ...and the SELECT WORK OUT button at the same time The following informa tion will be shown The left LED display will show the total number of hours that the ellipti cal crosstrainer has been used In ad...

Page 17: ...se until your heart rate is near the middle num ber in your training zone as you exercise Aerobic Exercise If your goal is to strengthen your cardiovascular sys tem your exercise must be aerobic Aerob...

Page 18: ...1 1 Left Pedal 42 1 Right Pedal 43 6 Pedal Screw 44 4 Console Washer 45 2 Wheel 46 2 Wheel Bolt 47 1 Left Side Shield 48 1 Right Side Shield 49 1 Console Base 50 1 Reed Switch Wire 51 1 Harness Extens...

Page 19: ...24 69 10 9 57 73 9 69 26 64 46 26 45 60 45 26 46 64 59 26 8 6 83 76 85 63 76 61 3 66 16 65 26 12 31 36 52 54 73 50 72 80 31 67 17 39 38 55 26 62 14 26 62 86 51 18 2 20 75 89 23 15 34 19 23 26 74 23 2...

Page 20: ...t or if necessary the entire product for repair USER S MANUAL It is VERY IMPORTANT THAT YOU READ THE MANUAL before operating the Product Remember to do the periodic maintenance requirements specified...

Reviews: