NordicTrack 900 Zne Elliptical User Manual Download Page 18

18

Inspect and tighten all parts of the elliptical exerciser

regularly. Replace any worn parts immediately.

To clean the elliptical exerciser, use a damp cloth and

a small amount of mild soap.

IMPORTANT: To avoid

damage to the console, keep liquids away from

the console and keep the console out of direct

sunlight.

BATTERY REPLACEMENT

If the console display become dim, the batteries

should be replaced; most console problems are the

result of low batteries. See assembly step 11 on page

10 for replacement instructions.

HOW TO LEVEL THE ELLIPTICAL EXERCISER OR

ELIMINATE FLEXING IN THE FRAME

If the elliptical exerciser rocks on your floor during use,

turn one or both of the Leveling Feet (98) until the

rocking motion is eliminated.

If the elliptical exerciser flexes in the center during

use, turn the Center Foot (95) until the flexing is elimi-

nated.

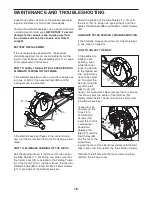
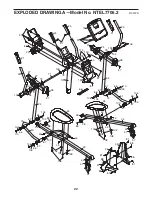
HOW TO ELIMINATE RUBBING OF THE DISCS

See the drawing above. If the Discs (12) rub against

the Side Shields (14, 15) during use, make sure that

the Center Foot (95) is installed in the Folding Frame

(2). If the Center Foot is installed, loosen the two indi-

cated Bolt Sets (88) and the two M4 x 16mm Screws

(97) in each side of the elliptical exerciser.

Adjust the position of the Side Shields (14, 15) until

the Discs (12) no longer rub against them, and then

tighten the Bolt Sets (88) and the M4 x 16mm Screws

(97).

HANDGRIP PULSE SENSOR TROUBLESHOOTING

If the handgrip pulse sensor does not function proper-

ly, see step 5 on page 14.

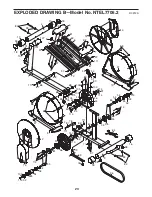
HOW TO ADJUST THE BELT

If the pedals slip

while you are

pedaling, even

while the resis-

tance is adjusted

to the highest set-

ting, the belt may

need to be adjust-

ed. To adjust the

belt, first carefully

pry off the left

Disc Cover (13)

using a flat screwdriver. Next, remove the four Screws

(not shown) from the center of the left Disc (12).

Gently rotate the Disc Cover and the Disc away from

the elliptical exerciser.

Loosen, but do

not remove, the

three 1/4" x

19mm Button

Screws (114).

Insert the shaft of

a screwdriver

downward

between the

Idler (47) and the

Idler Pulley (48).

Pull the top of the

screwdriver

toward the rear of the elliptical exerciser until the Belt

(96) is tight, and then tighten the three Button Screws.

Reattach the left disc with the four screws and then

reattach the left disc cover.

MAINTENANCE AND TROUBLESHOOTING

98

95

97

14, 15

12

2

88

47

13

12

48

114 96

Summary of Contents for 900 Zne Elliptical

Page 1: ...ANUAL www nordictrack com QUESTIONS If you have questions or if parts are damaged or missing DO NOT CONTACT THE STORE please contact Customer Care IMPORTANT Please register this product see the limite...

Page 2: ...ODED DRAWING 22 ORDERING REPLACEMENT PARTS Back Cover LIMITED WARRANTY Back Cover 2 NordicTrack is a registered trademark of ICON IP Inc WARNING DECAL PLACEMENT This drawing shows the location s of th...

Page 3: ...t 0 9 m of clearance in the front and rear of the ellip tical exerciser and 2 ft 0 6 m on each side 5 Inspect and properly tighten all parts regu larly Replace any worn parts immediately 6 Keep childr...

Page 4: ...ns after reading this manual please see the front cover of this manual To help us assist you note the product model number and serial number before con tacting us The model number and the location of...

Page 5: ...to the Frame with two M10 x 93mm Button Screws 82 and two M10 Curved Washers 99 4 99 99 82 1 1 ASSEMBLY Assembly requires two persons Place all parts of the elliptical exerciser in a cleared area and...

Page 6: ...into one end of the Ramp Axle 72 Apply a small amount of the included grease to the Ramp Axle Orient the Ramp 5 as shown Align the lower end of the Ramp with the welded tube on the Frame 1 Insert the...

Page 7: ...rm Latch and make sure that the Left Pedal Arm is securely connected to the Crank Bushing Sleeve Connect the Right Pedal Arm not shown to the right Crank Bushing Sleeve not shown in the same way 7 4 I...

Page 8: ...e Upright 10 near the Frame 1 connect the Upper Wire Harness 65 to the Lower Wire Harness 64 Carefully insert the Upright 10 into the Frame 1 be careful not to damage the Wire Harnesses 64 65 Attach t...

Page 9: ...9 9 Apply a small amount of grease to the axle on the Left Link Arm 30 to the axle on the Left Pedal Arm 32 and to a Wave Washer 100 Slide the Wave Washer 100 onto the axle on the Left Pedal Arm 32 Ne...

Page 10: ...e batteries are recommended IMPORTANT If the Console has been exposed to cold temperatures allow it to warm to room temperature before inserting batteries Otherwise you may damage the console displays...

Page 11: ...he crank arms Release the latches and make sure that the pedal arms are securely connected to the crank arms HOW TO MOVE THE ELLIPTICAL EXERCISER To move the elliptical exerciser first fold it as desc...

Page 12: ...r direction It is recommended that you turn the crank arms in the direction shown by the arrow however for variety you can turn the crank arms in the oppo site direction To dismount the elliptical exe...

Page 13: ...ise The console features the iFit interactive workout sys tem which enables the console to accept iFit cards containing workouts designed to help you achieve specific fitness goals For example lose un...

Page 14: ...etting of the pedals for a few seconds each time the resistance setting changes To view the approximate number of calories that you are burning per hour and the approximate number of calories that you...

Page 15: ...rget speed setting may be programmed for consecutive segments During the program the program profile will show your progress see the drawing at the left The flashing column of the profile represents t...

Page 16: ...It is not necessary to hold the handgrip pulse sen sor continuously during heart rate programs how ever you should hold the handgrip pulse sensor frequently for the programs to operate properly Each...

Page 17: ...e separately To purchase iFit cards go to www iFit com or see the front cover of this manual iFit cards are also available at select stores 1 Begin pedaling or press any button on the console to turn...

Page 18: ...s installed loosen the two indi cated Bolt Sets 88 and the two M4 x 16mm Screws 97 in each side of the elliptical exerciser Adjust the position of the Side Shields 14 15 until the Discs 12 no longer r...

Page 19: ...r goal is to strengthen your cardiovascular system you must perform aerobic exercise which is activity that requires large amounts of oxygen for prolonged periods of time For aerobic exercise adjust t...

Page 20: ...dler 48 1 Idler Pulley 49 1 Eddy Motor 50 1 Reed Switch Wire 51 1 Clamp 52 2 Large Axle Cover 53 2 Crank Bushing 54 2 Crank Bushing Sleeve 55 2 Crank Arm 56 1 Crank Arm Spacer 57 1 Large Pulley 58 1 C...

Page 21: ...mm Screw 110 6 M8 x 25mm Button Screw 111 4 M10 x 20mm Button Screw 112 8 M8 x 25mm Shoulder Screw 113 2 M8 x 30mm Button Screw 114 5 1 4 x 19mm Button Screw 115 3 M4 x 12mm Screw User s Manual Hex Ke...

Page 22: ...38 38 39 39 40 41 42 41 42 43 43 43 43 43 43 65 66 66 66 66 66 67 67 66 67 67 67 67 67 67 79 79 79 79 78 78 71 74 74 74 88 88 88 88 89 89 97 97 110 103 103 105 104 106 97 97 81 97 97 97 81 97 104 105...

Page 23: ...58 55 52 54 53 64 68 68 68 68 69 70 72 88 75 82 82 83 83 84 85 84 85 86 88 88 88 90 91 92 94 73 93 93 80 80 96 99 99 107 101 107 101 97 97 97 97 111 87 97 97 97 111 87 102 114 102 114 114 97 97 113 1...

Page 24: ...xtend to any damage to a product caused by or attributable to freight damage abuse misuse improper or abnormal usage or repairs not provided by an ICON authorized service center to products used for c...

Reviews: