background image

4

5


WELCOME

Dear rider, welcome to NOKO!

 You are now a member of our e-bike com-

munity all over the world. Our team thanks you for choosing our product, 

and we hope you enjoy the ride. 

This manual includes the information you need for the proper usage of 

NOKO

 e-bikes and your safety. Please, read carefully the information and 

instructions to follow on the first and subsequent rides. You will also find 

the guidelines for the necessary periodic maintenance. 

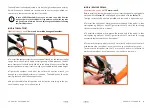
For your information, the frame number of your 

NOKO

 bike is located on 

the down tube, close to the bottom braket housing (see the image below). 

The number consists of a string of letters and numbers, i.e. 0X00TB*000*. 

For assistance, please contact us via email a

[email protected].

1.

Summary of Contents for NOKOFORZA 2022

Page 1: ...2022 NOKO BIKE NOKO BIKE...

Page 2: ...7 FIRST USAGE 32 7 1 Battery charging 33 7 2 Saddle and handlebar adjustement 34 7 3 Check the braking system 35 8 BEFORE EVERY RIDE 36 8 1 General instructions 36 8 2 Wheel removal and installation 3...

Page 3: ...your safety Please read carefully the information and instructions to follow on the first and subsequent rides You will also find the guidelines for the necessary periodic maintenance For your informa...

Page 4: ...6 7...

Page 5: ...for setting your e bike in the Support section of our website www nokobike com The instructions in this manual do not teach how to ride a pedal assist bike therefore the driver is responsible for any...

Page 6: ...10 11...

Page 7: ...irt roads and paths with moderate slopes Jumps of less than 20 cm are allowed To this category belongs the NOKOVULCANO e bike 3 CATEGORY 3 Rough paths and jumps up to 60 cm The bikes in this category...

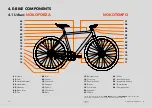
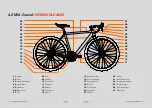
Page 8: ...05 06 07 08 18 09 10 11 12 13 16 14 15 17 18 19 22 20 21 26 24 25 23 The image above represents the NOKOFORZA e bike The NOKOTEMPO model has the same components it differs only for the superior tube...

Page 9: ...Pedals 13 Crank arm 14 Chain 01 02 03 04 05 06 07 08 18 09 10 11 12 13 16 14 15 17 18 19 22 20 21 26 24 25 23 27 15 Rear derailleur 16 Front chainring 17 Sprocket set 18 Brakes 19 Disc brake 20 Seatp...

Page 10: ...18 19...

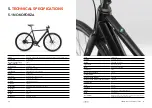
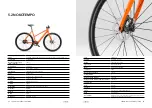
Page 11: ...nt and rear hydraulic disc brakes 160 mm Brake lever RAICAM Headset 1 1 Wheel Vision Wheel type Aluminium Carbon Tires 700x35 CST Seatpost Aluminium 27 2 mm Battery 36 V 250 Wh 250 Wh Type of cells Sa...

Page 12: ...nd rear hydraulic disc brakes 160 mm Brake lever RAICAM Headset 1 1 Wheel Vision Wheel type Aluminium Carbon Tires 700x35 CST Seatpost Aluminium 27 2 mm Battery 36 V 250 Wh 250 Wh Type of cells Samsun...

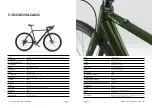
Page 13: ...disc brakes 160 mm Brake lever SRAM Wheel Vision Type of wheel Aluminium Carbon Tires 700x38 Vittoria Seatpost Aluminium 27 2 mm Saddle Prologo AKERO AGX Battery 36 V 250 Wh 250 Wh Type of cells Samsu...

Page 14: ...26 27...

Page 15: ...ASSEMBLING The box also includes the components to be assembled and or adjusted to your NOKO e bike handlebar seatpost with saddle and pedals ScantheQRCodetoviewthevideoguides alsoavailableonnokobike...

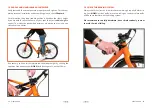
Page 16: ...addle should not be moving fasten bolt of the seatpost collar Adjust the saddle fore aft position and inclination according to the per sonal needs using a 6 mm allen wrench ARRIVAL OF YOUR NOKO INSTAL...

Page 17: ...to support a maximum weight of 120 kg which takes into consideration the rider and luggage on the rack if any For further information read Chapter 5 regarding the technical specifica tions of your NOK...

Page 18: ...he standard adjustment we advise you to visit a spe cialised service center If necessary you can further adjust the handlebar height by shifting the spacers of the headset your NOKO includes 3 spacers...

Page 19: ...upplier defines the suggested pressure values which are ex pressed in PSI and in bar Generally the pressure of a urban type tire should be maintained between 2 5 and 5 bar The minimum and maximum pres...

Page 20: ...Conclude by tightening with the 6 mm hexagonal wrench For the models NOKOFORZA and NOKOTEMPO to disassemble the rear wheel remember to release the tension of the belt bring down the belt tensioner an...

Page 21: ...and the washer of the valve remove the inner tube which needs to be replaced Now you are ready to install the new inner tube Start by placing the inner tube in the tire remove the cap and the washer o...

Page 22: ...42 43...

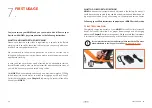
Page 23: ...and then plug the charger into the charging port on the e bike The battery charger will automatically switch on the power ON button will start flashing every 2 seconds displaying that the battery is...

Page 24: ...d the charge on the main battery NOTE 1 FSA System User Manual BATTERY USAGE PEDAL ASSISTANCE 10 1 ASSISTANCE LEVEL All NOKO e bikes have 5 assistance levels including the BOOST func tion available by...

Page 25: ...tend the battery life We advise you to con tact a specialised service center for the periodic ordinary and extraordinary maintenance of your NOKO usually once a year even if working properly It is adv...

Page 26: ...st to replace the chain once reached 5000 km approximately furthermore factors such as maintenance and usage contributes to the chain wear MAINTENANCE AND INSPECTION MAINTENANCE AND INSPECTION It is a...

Page 27: ...Therefore the buy er consumer has two years from the delivery of the good to contact the customer service at customercare nokobike com requesting in writing the repair of the product or if the said go...

Page 28: ...de NOKO with a copy of the bicycle purchase document purchase invoice The user must keep the purchased product in good condition in accord ance with the instructions and recommendations included in th...

Page 29: ...is safe Italian law and regula tions are applicable to this contract regardless of the buyer s location DELIVERY In the event of tampering with the parcel the Customer who should accept the delivered...

Page 30: ......

Page 31: ...NOKO POWER BIKE FACEBOOK INSTAGRAM TWITTER VIMEO YOUTUBE...

Reviews: