background image

Contacting NOCO.

About G750.

 The NOCO Genius® G750 represents 

some of the most innovative and advanced technology on 

the market, making each charge simple and easy. It is quite 

possibly the safest and most efficient charger you will ever 

use. The G750 is designed for charging all types of 6V & 

12V lead-acid batteries, including Wet (Flooded), Gel, MF 

(Maintenance-Free), CA (Calcium), EFB (Enhanced Flooded 

Battery), and AGM (Absorption Glass Mat) batteries. It is 

suitable for charging battery capacities from 2 to 30 Amp-

Hours and maintaining all battery sizes.

Getting Started.

 Before using the charger, carefully 

read the battery manufacturer’s specific precautions and 

recommended rates of charge for the battery. Make sure 

to determine the voltage and chemistry of the battery by 

referring to your battery owner’s manual prior to charging.

Mounting.

 The G750 is a direct wall plug-in charger, 

and it is important to keep in mind the distance to the 

battery. The DC cable length from the charger, with 

either the battery clamp or eyelet terminal connectors, is 

approximately 148-inches (3750mm). Allow for 12-inches 

(304mm) of slack between connections. 

Charging Modes.

 The G750 has three (3) modes: 

Standby, 12V NORM, and 6V NORM.  Some charge modes 

must be pressed and held for three (3) seconds to enter 

the mode. These “Press and Hold” modes are advanced 

charging modes that require your full attention before 

selecting.  “Press and Hold” are indicated on the charger by 

a red line. It is important to understand the differences and 

purpose of each charge mode. Do not operate the charger 

until you confirm the appropriate charge mode for your 

battery. Below is a brief description:

1.800.456.6626
[email protected]
30339 Diamond Parkway, #102
Glenwillow, OH 44139
United States of America

Phone:

Email:

Mailing Address:

Summary of Contents for G750

Page 1: ...not available in all areas visit www no co connect What s In The Box G750 Smart Charger 1 Battery Clamp Connectors 1 Eyelet Terminal Connectors User Guide Information Guide and Warranty User Guide G750V2 0 PRIOR TO USE READ AND UNDERSTAND PRODUCT SAFETY INFORMATION Failure to follow the instructions may result in ELECTRICAL SHOCK EXPLOSION or FIRE which may result in SERIOUS INJURY DEATH DAMAGE TO...

Page 2: ...ttery owner s manual prior to charging Mounting The G750 is a direct wall plug in charger and it is important to keep in mind the distance to the battery The DC cable length from the charger with either the battery clamp or eyelet terminal connectors is approximately 148 inches 3750mm Allow for 12 inches 304mm of slack between connections Charging Modes The G750 has three 3 modes Standby 12V NORM ...

Page 3: ...ically marked by these letters or symbol NEG N Do not make any connections to the carburetor fuel lines or thin sheet metal parts The below instructions are for Mode Explanation 12V NORM Standby 6V NORM 7 25V 750mA 2 30Ah Batteries Press Hold No Power 14 5V 750mA 2 30Ah Batteries In Standby mode the charger is not charging or providing any power to the battery Energy Save is activated during this ...

Page 4: ...itive first for positive ground systems Begin Charging 1 Verify the voltage and chemistry of the battery 2 Confirm that you have connected the battery clamps or eyelet terminal connectors properly and the AC power plug is plugged into an electrical outlet 3 The charger will begin in Standby mode indicated by an orange LED In Standby the charger is not providing any power 4 Press the mode button to...

Page 5: ...an 75 fully charged Pulsing Green LED Solid Green LED When the battery is 100 charged the Charge LED will be solid green The Charge LED will slowly pulse on and off when the battery is less than 90 charged Maintenance Green LED During maintenance charging the 100 Charge LED will pulse on and off slowly When the battery is topped off and fully charged again the 100 Charge LED will turn solid green ...

Page 6: ...ial Error Condition except reverse polarity and low voltage battery Error Reason Solution Single Flash Battery will not hold a charge Have battery checked by a professional Possible battery short Have battery checked by a professional Battery voltage is too high for the selected charge mode Check the battery and charge mode Error LED Solid Red Reverse polarity Reverse the battery connections Batte...

Page 7: ...pen circuits short circuits and overheating Fast Charges two times faster than traditional battery chargers Compensation Adjusts for varying A C line voltage for consistent charging Rugged Dirt water UV impact and crush resistant Compact High frequency energy conversion for ultra compact lightweight and portable charger Start Stop Counteracts increased cyclic energy demands placed on batteries in ...

Page 8: ...imizes energy consumption when full power is not needed Load Tracking Charge LEDs dynamically track the batteries state of charge when a load outpaces the charge current Diagnostics Intuitive visual diagnostic tool for detecting reverse polarity low voltage or damaged batteries CANBUS Automatically enables the charging port to charge CANBUS systems Thermal Monitor Internal temperature sensors adju...

Page 9: ...the charging process with a gentle soft charge Step 5 Bulk Begins the Bulk charging process based on the condition of the battery and returns 80 of the battery s capacity Step 6 Absorption Brings the charge level to 90 by delivering small amounts of current to provide a safe efficient charge This limits battery gassing and is essential to prolonging battery life Step 7 Optimization Finalizes the c...

Page 10: ...e battery charger can be safely left connected indefinitely without the risk of overcharging Charging Times The estimated time to charge a battery is shown below The size of the battery Ah and its depth of discharge DOD greatly affect its charging time The charge time is based on an average depth of discharge to a fully charged battery and is for reference purposes only Actual data may differ due ...

Page 11: ...tery Chemistries Battery Capacity Housing Protection Cooling Dimensions L x W x H Weight Technical Specifications 110 120 VAC 50 60Hz 85 130 VAC 50 60Hz 85 Approx 13W Max Various 750mA 12V 750mA 6V 2V 12V 2V 6V 5mA 0 C to 40 C 8 Step Smart Charger 6V 12V Wet Gel MF CA EFB AGM 2 30Ah 12V 2 30Ah 6V Maintains All Battery Sizes IP60 Natural Convection 4 45 x 2 67 x 1 54 Inches 0 49 Pounds ...

Page 12: ......

Page 13: ...ions consultez l adresse www no co connect Contenu de la boîte G750 Chargeur intelligent 1 Bride de serrage HD pour batterie 1 Connecteurs de borne à œil Manuel d utilisation Guide d utilisation et garantie Manuel d utilisation G750V2 0 AVANT TOUTE UTILISATION VEUILLEZ LIRE ET COMPRENDRE LES INDICATIONS DE SÛRETÉ Ne pas respecter ces instructions peut conduire à un CHOC ÉLECTRIQUE UNE EXPLOSION UN...

Page 14: ...e voltage et la composition chimique de la batterie en consultant le guide d utilisation avant tout chargement Montage Le G750 est un chargeur stationnaire direct plug in et il est important de penser à la distance jusqu à la batterie La longueur du câble DC depuis le chargeur avec soit la bride de serrage ou le connecteur de borne à œil est approximativement de 3750 mm 148 pouces Prévoyez 303 mm ...

Page 15: ...MODE EST UNIQUEMENT ADAPTÉ À DES BATTERIES PLOMBACIDE 6 VOLT NORME 12V Veille NORME 6V 7 25V 750mA 2 30Ah Batterie Pas de courant 14 5V 750mA 2 30Ah Batterie En mode veille le chargeur ne charge pas ou ne fournit aucune électricité à la batterie Le mode économie d énergie est activé durant ce mode et s alimente à très petites doses sur la prise de courant Lorsqu il est choisi un LED orange s allum...

Page 16: ...la borne positive POS P de la batterie 2 Connectez la bride de serrage négative noire avec la borne négative NEG N de la batterie ou avec le châssis du véhicule 3 Branchez la prise de courant AC de la batterie dans une prise électrique murale adaptée Ne faites pas face à la batterie lors de cette opération 4 Quand vous déconnectez le chargeur de la batterie déconnectez les brides dans le sens inve...

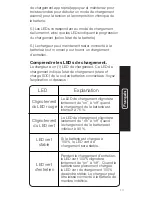
Page 17: ... de chargement state of charge SOC de la ou des batteries connectées Voyez l explication ci dessous LED Explanation Clignotement du LED rouge Le LED de chargement clignotera lentement de on à off quand le chargement de la batterie est inférieur à 75 Clignotement du LED vert LED vert stable Si la batterie est chargée à 100 le LED vert de chargement sera stable Le LED de chargement clignotera lentem...

Page 18: ... batterie La tension de la batterie est trop basse pour détecter la charge ou alors le chargeur est en chargement Faites un chargement jump pour augmenter la tension de la batterie Comprendre les diagnostics avancés Les diagnostics avancés sont utilisés pour afficher les états d erreur Ils afficheront différentes séquences de clignotements qui vous aideront à identifier les causes d erreur et les ...

Page 19: ...re une polarité inversée des étincelles un surchargement une surintensité une sous tension et une surchauffe Rapidité Charge deux fois plus vite que des chargeurs traditionnels Compensation S adapte à des tensions variables du courant alternatif pour un chargement constant Résistance Saleté eau rayons UV impact et résistant aux chocs Compact Une conversion de l énergie à haute fréquence pour un ch...

Page 20: ...e secteur en permanence en toute sécurité Économie d énergie Adapte la consommation d énergie au besoin réel Suivi du chargement Les LEDs de chargement suivent l état de chargement de la batterie si un chargement dépasse le niveau de charge Diagnostics Outil de diagnostic visuel et intuitif pour détecter les polarités inversées les tensions basses ou les batterie endommagées CANBUS Permet automati...

Page 21: ...état de la batterie et retourne 80 de la capacité de la batterie Étape 6 Absorption Augmente le niveau de charge à 90 en fournissant des petites charge de courant pour un chargement sûr et efficace Cela limite les dégagement gazeux et est essentiel pour prolonger la durée de vie de la batterie Étape 7 Optimisation Finalise le processus de chargement et amène le niveau de charge à sa capacité maxim...

Page 22: ... maintenir la batterie en charge complète Le chargeur de batterie peut être connecté en toute sécurité indéfiniment sans risque de surcharge Durées de chargement Les durées de charge estimées sont indiquées ci dessous La taille de la batterie Ah et la profondeur de décharge depth of discharge DOD influe beaucoup sur le temps de chargement Le temps de chargement est basé sur la profondeur de déchar...

Page 23: ...illes de batterie IP60 convection naturelle 113 x 68 x 39 mm 0 196 kg Tension d entrée AC Working Voltage AC Efficacité Puissance Tension de chargement Courant de chargement Détection de tension basse Courant de fuite Température ambiante Type de chargeur Type de batteries Composition chimique des batteries Capacité de la batterie Boitier protecteur Refroidissement Dimensions L x P x H Poids Spéci...

Page 24: ......

Page 25: ...nible en todas las áreas consulte www no co connect La caja contiene Cargador inteligente G750 Conectores de cables de arranque 1 Conectores de terminal redondo 1 Guía de usuario Guía de información y garantía Guía de usuario G750V2 0 ANTES DE USAR ASEGÚRESE DE QUE LEE Y ENTIENDE TODA LA INFORMACIÓN DE SEGURIDAD DEL PRODUCTO El incumplimiento de las instrucciones podría resultar en DESCARGA ELÉCTR...

Page 26: ...el manual de la batería antes de cargarla Instalación El G750 se enchufa directamente a la toma de corriente es importante tener en cuenta la distancia hasta la batería La longitud del cable de corriente continua desde el cargador bien con los conectores de cables de arranque bien con los de terminal redondo es de aproximadamente 3750 mm 148 in Modos de carga El G750 tiene tres 3 modos Standby 12V...

Page 27: ...Standby 6V NORM 7 25V 750mA 2 30Ah Batería Sin corriente 14 5V 750mA 2 30Ah Batería En el modo Standby el cargador no está cargando o suministrando energía a la batería Durante este modo se activa la función de ahorro de energía mediante la cual se extrae una cantidad mínima de energía de la corriente eléctrica Al seleccionar este modo de carga se iluminará un led naranja Para cargar baterías de 1...

Page 28: ...erminal redondo positivo rojo al polo positivo POS P de la batería 2 Conecte el cable de arranque o conector de terminal redondo negativo negro al polo negativo NEG N de la batería o el chasis del vehículo 3 Conecte el cable de alimentación de corriente alterna del cargador de batería a una toma de corriente No se ponga de cara a la batería al hacer esta conexión 4 Al desconectar el cargador de ba...

Page 29: ... de carga Este led de carga indica el estado de carga de la s batería s conectada s Vea la siguiente explicación LED Explanation Led rojo intermitente El led de carga se encenderá y apagará lentamente cuando la carga de la batería sea inferior al 75 Led verde intermitente Led verde sólido Cuando la carga de la batería alcance el 100 el led de carga se volverá verde sólido El led de carga se encend...

Page 30: ...lo destello Led de error rojo sólido Dos destellos Tres d estellos Led de Standby naranja sólido Error Razón solución La batería no soportará una carga Llévela a un especialista para que la examine Posible cortocircuito de la batería Llévela a un especialista para que la examine El voltaje de la batería es demasiado alto para el modo de carga seleccionado Compruebe la batería y el modo de carga Po...

Page 31: ...ortocircuitos y sobrecalentamiento Rápido Cargas dos veces más rápido que los cargadores de batería tradicionales Compensación Se ajusta a voltajes de corriente alterna distintos para suministrar una carga uniforme Resistente Es resistente a la suciedad el agua los rayos ultravioleta y los golpes Compacto Conversión de energía de alta frecuencia para un cargador ultracompacto ligero y portátil Tec...

Page 32: ...on toda seguridad Ahorro de energía Minimiza el consumo de energía cuando no es necesario usar la máxima potencia Seguimiento de la carga Los ledes de carga siguen el estado de carga de las baterías de forma dinámica cuando una carga supera la corriente de carga Diagnóstico La herramienta intuitiva de diagnóstico visual permite detectar polaridad inversa bajo voltaje o daños en las baterías CAN Bu...

Page 33: ...ga propiamente dicho en función del estado de la batería y devuelve el 80 de la capacidad de la batería Paso 6 Absorción Sitúa el nivel de carga en el 90 suministrando pequeñas cantidades de corriente para proporcionar una carga segura y eficaz Esto limita la emisión de gases de la batería y es esencial para prolongar la vida de la batería Paso 7 Optimización Concluye el proceso de carga y devuelv...

Page 34: ...to se repite indefinidamente para mantener la batería a plena carga El cargador de batería puede dejarse conectado indefinidamente con toda seguridad sin que se corra el riesgo de sobrecarga Tiempos de carga A continuación se muestra el tiempo estimado de carga de una batería El tamaño de la batería Ah y su profundidad de descarga afectan considerablemente al tiempo de carga El tiempo de carga se ...

Page 35: ...s de baterías IP60 convección natural 113 x 68 x 39 mm 0 196 kg Especificaciones técnicas Voltaje de entrada CA Voltaje normal de trabajo CA Eficacia Energía Voltaje de carga Drenaje de corriente Detección de bajo voltaje Corriente de carga Temperatura ambiente Tipo de cargador Tipo de baterías Química de la batería Capacidad de la batería Protección de la cubierta Enfriamiento Dimensiones largo x...

Page 36: ...NPD02052014C no co 1 800 456 6626 support no co 30339 Diamond Parkway 102 Glenwillow OH 44139 United States of America ...

Reviews: