background image

Nireeka Nyx User’s Manual

ENGLISH

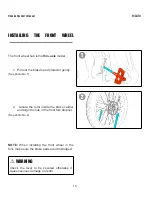
INSTALLING THE FRONT WHEEL

The front wheel hub is the

thru-axle

model.

1. Pull out the brake's pad protector gently.

(See photo No.1)

2.

Locate the rotor inside the brake caliper

and align the hub in the front fork dropout.

(See photo No.2)

NOTE:

When installing the front wheel in the

fork, make sure the brake pads aren't dislodged.

WARNING

Check the lever to be secured otherwise it
causes serious damage or death.

13

Summary of Contents for Nyx Series

Page 1: ...Nireeka Smart Electric Bike User s manual Nyx Series Original instructions User s manuals in other languages are available at http www nireeka com...

Page 2: ...CK AND OTHER SUBMISSIONS TO ANY OF OUR OFFICIAL CHANNELS 9 Disclaimer 10 QUICK INSTALLATION 11 UNPACKING 12 INSTALLING THE FRONT WHEEL 13 INSTALLING THE HANDLEBAR 15 INSTALLING THE PEDALS 16 INSTALLIN...

Page 3: ...Manual ENGLISH MOTOR 33 FULL SUSPENSION 34 ADJUSTING THE REAR SHOCK 35 ADJUSTING SUSPENSION FORK 37 MAINTENANCE 38 BATTERY 39 CHAIN 40 TORQUE 40 SADDLE SEATPOST 40 DERAILLEURS 41 TECHNICAL INFORMATION...

Page 4: ...much pleasure from riding with it as we have taken from developing it We have dedicated all our effort and know how to your bike but we are open to your comments Please don t hesitate to send us your...

Page 5: ...surance for your bike In order for getting any after sales services from Nireeka you might be asked to take a picture of your frame number and send it to the Nireeka representatives Your frame number...

Page 6: ...bottom bracket crank bearing to the top tube The size of a bike is typically measured at the frame The measurement typically refers to the length of the seat tube top tube or the distance from the ce...

Page 7: ...om fluid leakages overheating fire or explosions HANDLING THE BATTERY Do not deform modify disassemble or apply solder directly to the battery Doing so may cause leakage overheating bursting or igniti...

Page 8: ...e battery while it is installed on the bike do not move the bike The power plug for the battery charger may come loose and not be fully inserted into the electrical outlet resulting in a risk of fire...

Page 9: ...SIONS TO ANY OF OUR OFFICIAL CHANNELS If at our request you send certain specific submissions for example contest entries or without a request from us you send creative ideas suggestions proposals pla...

Page 10: ...es Inc is not responsible for personal injury or damage to personal property arising in conjunction with using this Guide Sound judgment and proper preparation are essential to traveling by bike Befor...

Page 11: ...Nireeka Nyx User s Manual ENGLISH QUICK INSTALLATION 11...

Page 12: ...Battery Charger Battery key Inside the Charger box User s Manuals Pedals Wooden Beam Frame Protector LCD Display Bottle Holder Extras Any other parts and accessories that you ve ordered such as taill...

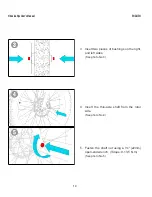
Page 13: ...ake s pad protector gently See photo No 1 2 Locate the rotor inside the brake caliper and align the hub in the front fork dropout See photo No 2 NOTE When installing the front wheel in the fork make s...

Page 14: ...H 3 Insert two pieces of bushings on the right and left sides See photo No 3 4 Insert the thru axle shaft from the rotor side See photo No 4 5 Fasten the shaft nut using a 7 8 22mm open end wrench Tor...

Page 15: ...eeka Nyx User s Manual ENGLISH INSTALLING THE HANDLEBAR 1 Adjust the handlebar in the proper and straight position See photo No 1 2 Fasten the bolts on the back of the stem respectively See photo No 2...

Page 16: ...icating on which side it should be installed You need to install each pedal on the correct side of the Crank Arm L stands for Left and R stands for Right 2 If you re standing on the right side of the...

Page 17: ...ENGLISH 3 If you re standing on the left side of the bike the left pedal should be tightened anticlockwise using a 6mm Allen key as shown in the picture Note You can also use a 15mm open end wrench i...

Page 18: ...isplay so that it is easy to be seen while riding and then use a 3mm Allen key to tighten the clamp bolt Torque 0 8 N m ON OFF BUTTON To turn on the power press and hold 2 Sec till power is on the dis...

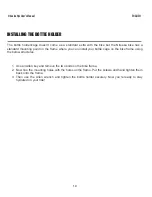
Page 19: ...the frame where you can install your bottle cage on the bike frame using the below structures 1 Use an Allen key and remove the two bolts on the bike frame 2 Now line the mounting holes with the holes...

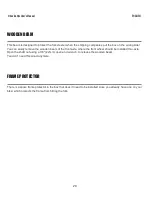
Page 20: ...wooden beam of the front axle where the front wheel should be installed thru axle Open the shaft nut using a 7 8 22mm open end wrench to release the wooden beam You don t need this wood anymore FRAME...

Page 21: ...Nireeka Nyx User s Manual ENGLISH BATTERY AND CHARGER 21...

Page 22: ...ge Connector This connector plugs into the male side of the battery bracket when the battery is installed on the bike Charger LEDs When green either the battery is not connected or the battery is full...

Page 23: ...otate the key anticlockwise to unlock it with your left hand See photo No 1 2 The battery drops in your right hand Pull it off to remove the battery See photo No 2 WARNING Make sure you keep your hand...

Page 24: ...ave it where you cannot see it during charging 1 Bottom of the battery 2 Charging port WARNING Do NOT leave the battery while charging The battery and charger must be seen during the charging time Lea...

Page 25: ...Nireeka Nyx User s Manual ENGLISH DISPLAY 25...

Page 26: ...Nireeka Nyx User s Manual ENGLISH DP C230 231 CAN Power Mode Button 1 button 2 button Press and hold the power button to turn on the display bike 26...

Page 27: ...Digital speed indicator Displays current speed value Speed unit can be set in Unit Selected mode indicator Single trip distance TRIP Total distance ODO Maximum speed MAX Average speed AVG Remaining di...

Page 28: ...Nireeka Nyx User s Manual ENGLISH DP C18 1 Power button 2 Menu 3 Light 4 button 5 button Press and hold the power button to turn on the display bike 28...

Page 29: ...tance RANGE Energy consumption CALORIES Time TIME 6 Battery level indicator Displays current battery level value 7 Voltage percentage indicator Displays actual battery level value display mode can be...

Page 30: ...Nireeka Nyx User s Manual ENGLISH BIKE PARTS 30...

Page 31: ...M Loosen the screws on the right side with an Allen key then adjust the height to the desired degree and finally tighten the screw SADDLE SEATPOST 1 Install your Seatpost by loosening the Allen bolt w...

Page 32: ...ortable balance of the frame geometry and the driving feeling is adapted to any rider The gears inside the electric motor are processed via gears which ensure the highest possible efficiency Motor pow...

Page 33: ...e dropper post routing 120mm head tube fully sealed cartridge bearings 150mm of travel A full suspension trail bike offers greater traction and excitement on your mountain and off road riding adventur...

Page 34: ...ut the fork or shock body caused by your body weight when you are sitting on the bike The process to set the SAG on your shock is that you simply need to follow these steps Place the rubber O ring aga...

Page 35: ...rear tire when we re on the bike This is because while we ride 40 of our body weight is distributed toward the front tire and 60 is toward the rear tire That s why the rear tire has to bear partially...

Page 36: ...rease Low Speed Compression LSC damping or adjust its sagging rotate the knob in the direction indicated 2 The Lockout setting prevents the fork from compressing until a significant impact occurs Rota...

Page 37: ...Nireeka Nyx User s Manual ENGLISH MAINTENANCE 37...

Page 38: ...Do not use non neutral soap solutions to wash plastic components BATTERY The battery must be well cared for to optimize useful life and range It is the responsibility of the bike owner to ensure the b...

Page 39: ...ubricated Consult us to choose among the many types of chain lubes best suited to your climate and riding conditions TORQUE Correct tightening torque for the fasteners bolts screws nuts on your bike i...

Page 40: ...cated Apply a small drop of oil to each pivot point and wipe off the excess In the end of course your individual maintenance requirements will be determined by everything from your riding style to geo...

Page 41: ...Nireeka Nyx User s Manual ENGLISH TECHNICAL INFORMATION 41...

Page 42: ...the battery 60 faster Display DP C230 231 CAN Display Type LCD Display Color Matrix Display Rated Voltage DCV 48 Operating Temperature 20 45 Com Protocol CAN Trip Computer Yes Error Code Display Yes...

Page 43: ...Degrees Grips RockBros TPR rubber Rear Derailleur Shimano XT RD M8100 SGS 12 speed Shift Lever Shimano SL M8100 single click lever 12 speed Cassette Shimano XT CS M8100 MICRO SPLINE 12 Speed HYPERGLID...

Page 44: ...Nireeka Nyx User s Manual ENGLISH GROUPSETS 44...

Page 45: ...SET J kit SHIMANO BL M6000 L BR M615 F FOR POST MOUNT RESIN PAD W O FIN 950MM HOSE SM BH90 SS BLACK Nyx US EU AM60002JTRXRX1 70 DEORE BD BRM6000KITM6 15 DISC BRAKE ASSEMBLED SET J kit SHIMANO BL M600...

Reviews: