14
ninjakitchen.co.uk
15
ninjakitchen.co.uk
EVERYDAY CLEANING
The unit should be cleaned thoroughly
after every use.
1
Unplug the unit from the socket and
allow it to cool down before cleaning.
2
Empty crumb tray by sliding it out of
the oven.
3
After every use, wipe away any food
splatter on the interior walls and glass
door of the unit with a soft, damp sponge.
4
To clean the exterior of the main unit
and the control panel, wipe them clean
with a damp cloth. A non-abrasive liquid
cleanser or mild spray solution may be
used. Apply the cleanser to the sponge,
not the oven surface, before cleaning.
5
When using accessories, we recommend
greasing them with recommended
cooking oil or covering them with
parchment paper or aluminum foil
before placing food on top.
DO NOT
cover roast tray holes with parchment
paper or aluminum foil.
DEEP CLEANING
1
Unplug the unit from the socket and
allow it to cool down before cleaning.
2
Remove all accessories from the unit,
including the crumb tray and wash
separately. Use a non-abrasive cleaning
brush to more thoroughly wash the air
fry basket. Accessories are hand-wash
recommended. The air fry basket and
wire racks can be put in the dishwasher,
but may wear more quickly over time.
DO NOT
place roast tray, oven tray or
crumb tray in dishwasher.
3
Use warm, soapy water and a soft cloth
to wash the oven’s interior and glass
door,
DO NOT
use abrasive cleaners,
scrubbing brushes or chemical cleaners,
as they will damage the oven.
CAUTION:
NEVER
put the main unit in
the dishwasher or immerse it in water
or any other liquid.
4
To remove tough grease, let oven tray
and roast tray soak overnight in warm,
soapy water, then wash with a non-
abrasive sponge or brush.
5
Thoroughly dry all parts before placing
them back in the oven.
CLEANING & MAINTENANCE
NOTE:
Empty crumb tray frequently.
Hand-wash when necessary.
IMPORTANT:
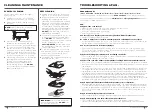
Place crumb tray below
lower heating elements.
DO N
OT
slide
into any rack positions.
TROUBLESHOOTING & FAQ .
ERROR MESSAGES
“CALL CUSt SrVC” followed by “Er0,” “Er1,” “Er2,” “Er3,” “Er4,” “Er5,” or “Er6”
Turn off the unit and call Customer Service at
0800 862 0453
. So we may better assist
you, please register your product online at
ninjakitchen.co.uk/registerguarantee
and have
the product on hand when you call.
FAQ
Why won’t the oven turn on?
• Make sure the power cord is securely plugged into the socket.
• Insert the power cord into a different socket.
• Reset the circuit breaker if necessary.
• Press the power button.
Can I use the oven tray instead of the air fry basket with Air Fry function?
• Yes, but crispiness results may vary.
Do I need to adjust the cook times and temperatures of traditional oven recipes?
• For best results, keep an eye out on your food while cooking. Refer to cook charts in the
Recipe Guide for more guidance on cook times and temperatures.
Can I restore the unit to its default settings?
• The oven will remember the last setting used for each function, even if you unplug it.
To restore the oven’s default settings for each function, press the Light and 2 LEVEL
buttons simultaneously for 5 seconds.
Why do the heating elements appear to be turning on and off?
• This is normal. The oven is designed to control temperature precisely for every function by
adjusting the heating elements’ power levels.
Why does the oven have a different temperature reading with an external thermometer?
• Convection ovens circulate air differently than traditional ovens, so when the door is opened,
more heat will escape. This may affect any external temperature reading of the unit’s interior
temperature.
• Since this is a convection oven, it can cook more quickly than a traditional oven. Convection
cooking includes a fan that helps speed up cook time by circulating hot air and can affect
temperatures within the cavity. The time it takes the unit to heat up to the set temperature
will vary based on the amount of food being cooked, the function being used and the cook
temperature and time. The oven features an algorithm that ensures temperature and time
settings work with most traditional oven recipes. As a result, the temperature inside the
oven may differ from the set temperature. This does not impact cooking quality. Refer to the
Recipe Guide to learn more about recommended cook times and temperatures.
Why is my unit not fully preheated when the preheat cycle is completed?
• During preheating, the unit will not reach the intended cook temperature, but it will preheat
to a level that will start cooking your ingredients. As the cook cycle continues, the oven will
continue to heat up and cook your food to doneness. It may take up to 10 minutes for the
unit to reach the intended cook temperature. This does not affect the cooking quality of
most recipes.
Why is steam coming out from the oven door?
• This is normal. Foods with a high moisture content may release steam around the door.
Why is water dripping onto the worktop from under the door?
• This is normal. The condensation created by foods with a high moisture content
(such as frozen breads) may run down the inside of the door and drip onto the worktop.


