

Printer Parts
Basic Operation
Take out Ribbon: Pull ribbon locking bar to unlock, take the ribbon out.
Press power button for 1.5s to turn the printer on.
Label paper: short press feed button to feed one label to the beginning of next label; long
press feed button to feed label continuously, release the feed button to stop at the beginning
of next label.
Printer will shut down automatically if no use it for a long period. Time of automatic shutdown
can be set by setting button, the default time is 15 minutes.
Printer can provide 5V ( 500mA ) power for external devices via power supply interface, like
phone, Pad, etc.
Connect with Printer
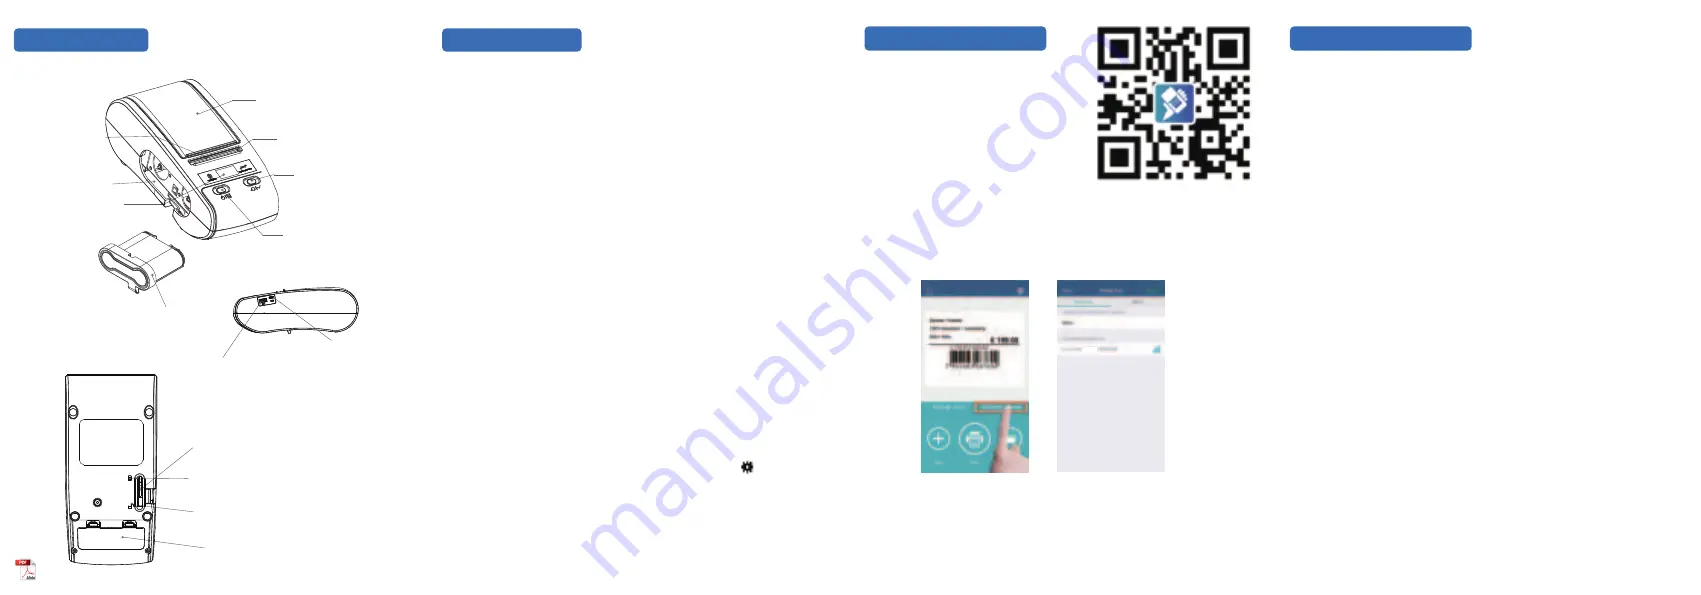
Scan QR Code on the right side, download
label editing App WeiDa Label (Android, iOS)
Turn on printer-turn on mobile phone Bluetooth-open label editing App, click “No
Printer Connected”. Then you can edit your label and print it.
If the printer hasn’t paired before, click search button, then the unpaired printer will
be listed. Select unpaired printer, WeiDa will pair with it automatically, enter
password and connect with printer.
Please consult your supplier for account password of cloud catalogue.
Log in your account to choose template you need from cloud catalogue, click it to
use, modify then save the template. In this case, you can choose and print it
directly from the cloud catalogue next time.
Front of Printer
Side of Printer
Back of Printer
Label Cartridge Cover
Paper Tear-off Knife
Feed Button
Power Button
Built-in Ribbon
OLED Display
USB Interface
Ribbon Locking Bar
( Print Head Locking Bar )
Lock
Unlock
Battery Compartment Cover
Label Exit Slot
Power Supply Interface
Ribbon Compartment
Install Ribbon: Pull ribbon locking bar to unlock, insert ribbon to the bottom of ribbon
compartment, hold it by hand and pull ribbon locking bar to lock.
Label size: Label printing side outward, diameter of label roll is less than 65mm ( must not
more than 67mm ), label width 12~54mm, maximum width 54mm ( including base paper ).
Install paper: Put label roll into the cartridge. Please make sure the label printing side face
down, move label adjusting plate to appropriate position according to label’s width, insert
front end of label into label guiding slot , press feed bottom simultaneously to locate position.
Continuous paper: press feed button to start feeding label, release feed button to stop
feeding.
Short press power button, printer enters setting status when the icon appears on the top
left corner of display, then press feed button to make corresponding options.
DT60S
This device complies with Part 15 of the FCC Rules. Operation is
subject to the following
two conditions:
This device may not cause harmful interference, and
This device must accept any interference received, including
interference that may cause undesired operation.
Warning: Changes or modifications not expressly approved by the
party responsible for compliance could void the user's authority to
operate the equipment.
NOTE: This equipment has been tested and found to comply with
the limits for a Class B digital device, pursuant to Part 15 of the FCC
Rules. These limits are designed to provide reasonable protection
against harmful interference in a residential installation. This
equipment generates uses and can radiate radio frequency energy
and, if not installed and used in accordance with the instructions,
may cause harmful interference to radio communications. However,
there is no guarantee that interference will not occur in a particular
installation. If this equipment does cause harmful interference to
radio or television reception, which can be determined by turning the
equipment off and on, the user is encouraged to try to correct the
interference by one or more of the following
measures:
Reorient or relocate the receiving antenna.
Increase the separation between the equipment and receiver.
Connect the equipment into an outlet on a circuit different from that
to which the receiver is connected.
Consult the dealer or an experienced radio/TV technician for help.
RF warning statement:
The device has been evaluated to meet general RF exposure
requirement. The device can be used in portable exposure condition
without restriction.
FCC STATEMENT


