Engine System
33
Service Manual – PBU Propane Floor Burnisher
Replacement
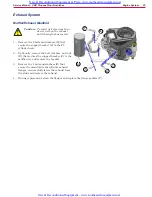
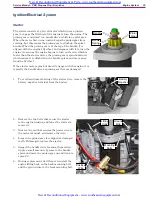
1 Remove the
2 Remove the 5 screws that secure the fan
cover to the engine, and remove the cover
Note the position of the wire clamp and oil
dipstick for the replacement
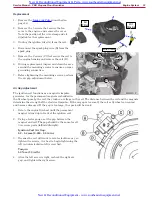
3 Unplug the ignition wire (A) from the coil
4 Disconnect the spark plug wire (B) from the
spark plug
5 Remove the 2 screws (C) that secure the coil to
the engine housing and remove the coil (D)
6 During replacement, inspect and clean the area
around the mounting screws to ensure a proper
grounding connection
7 Before tightening the mounting screws, perform
the air gap adjustment below
Air Gap Adjustment
The ignition coil functions as a magnetic impulse
generator As the permanent magnets embedded in
the flywheel pass by the coil, they induce a voltage in the coil. The distance between the coil and the magnets
determine the strength of the electrical impulse. If the air gap is too small, the coil or flywheel can contact
and become damaged If the gap is too large, the spark will be weak
1
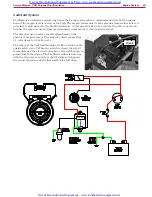
Rotate the engine flywheel until the permanent
magnet is lined up in front of the ignition coil
2 Using a feeler gauge, set the gap between the
magnet and coil The gap should be the same for all
3 iron core posts (left/middle/right)
Ignition Coil Air Gap:
0 2 - 0 4 mm (0 008 - 0 016 in )
3 Because the coil will want to rotate clockwise as you
tighten the screws, it is best to begin tightening the
left (counterclockwise-left) screw first.
Torque:
5 9 N
•
m (52 in
•
lb)
4 After the left screw is tight, recheck the right air
gap, and tighten the right screw
Air
Filter
Oil
Dipstick
Wire Clamp
C
D
A
C
B
New & Reconditioned Equipment & Parts- www.southeasternequipment.net
New & Reconditioned Equipment - www.southeasternequipment.net

