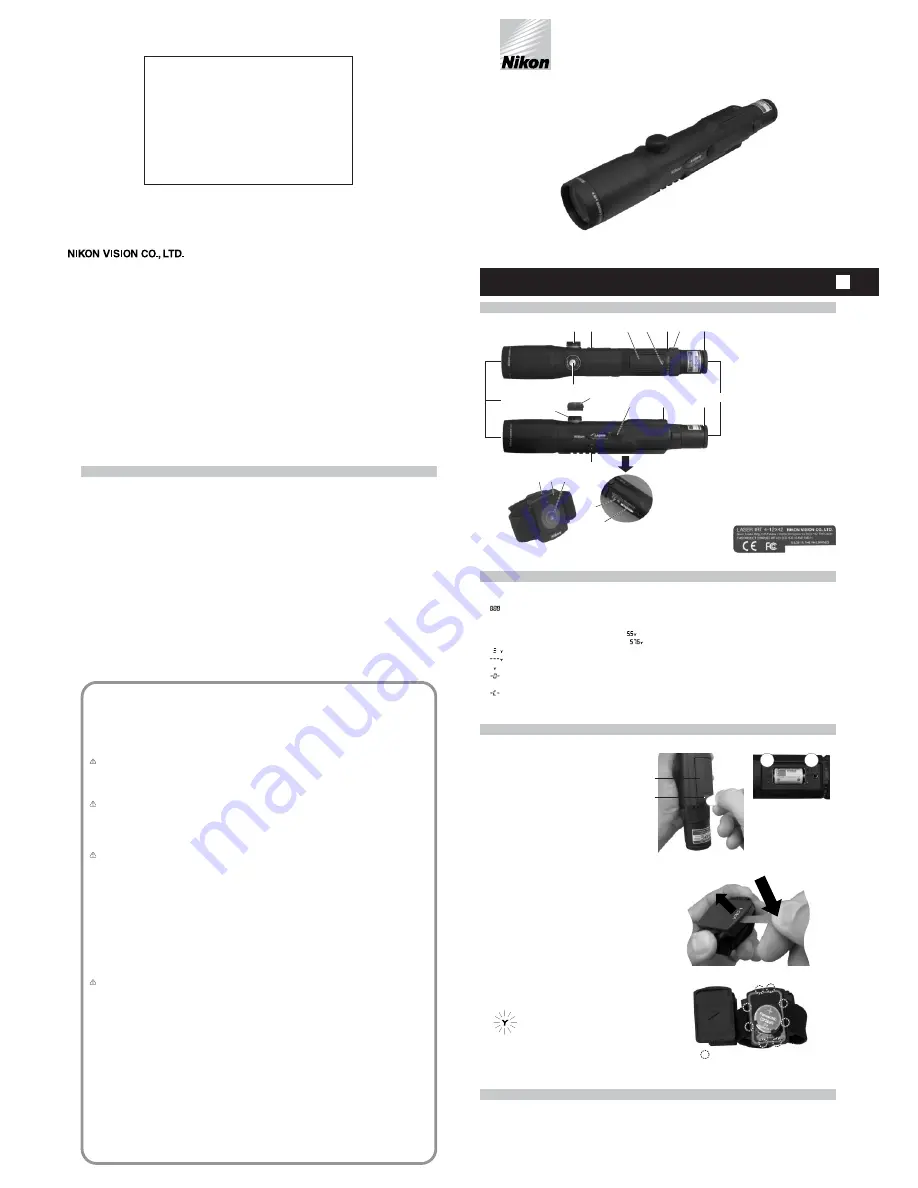
Congratulations on your choice of a Nikon Laser IRT. Your new
scope is the finest example of Nikon's rugged and durable construc-
tion and precision bright optics; important qualities for a serious
shooter's riflescope.
Whether you use your scope for hunting or for target shooting, the
procedure for mounting is identical. After mounting the scope on
your riflescope, follow the procedures for reticle alignment.
When setting the reticle for hunting, you should determine your stan-
dard range and then adjust the reticle based upon that reading dis-
tance. For targets which vary from that standard distance you may
simply adjust the position of the reticle in relation to your target, or
you may wish to use the procedure for trajectory compensation. It's
up to your personal preference.
We hope that you will enjoy your new Nikon Laser IRT for many
years to come. Enjoy using it, and above all, always follow safe
shooting procedures!
Key Features
蘆
Measuring range: 33 yards-766 yards
蘆
Distance measurement display: 1 yard
蘆
Easy-to-aim 4-12x optical observation system
蘆
Waterproof design (NOT designed for underwater usage)
蘆
Invisible/Eyesafe FDA Class I Laser
蘆
8-second results display
蘆
Compact, ergonomic design
蘆
Automatic shut-off (after approx. 8 sec. Unattended)
蘆
Default to "Last Use" settings
蘆
12-second continuous measuring function
蘆
Diopter adjustment function
蘆
Infrared/manual control distance measurement system
The Nikon Laser IRT emits invisible, eyesafe, infrared energy pulses
that reflect off the selected target back to its optical receiver.
Sophisticated precision charge circuitry is used to instantaneously
calculate distances, by measuring the time it takes for each pulse to
travel from the rangefinder to the target and back. The maximum
range of the instrument depends on the reflectivity of the target, its
color, surface finish, size and shape.
Please observe the following guidelines strictly so you can use the
equipment properly and avoid potentially hazardous problems.
Before using this product, read thoroughly the "SAFETY PRECAU-
TIONS" and instructions on correct usage accompanying the prod-
uct. Use of controls or adjustments or performance of procedures
other than those specified herein may result in hazardous radiation
exposure.
Keep this manual within reach for easy reference.
蘆
Specifications and design are subject to change without notice.
蘆
No reproduction in any form of this manual, in whole or in part
(except for brief quotation in critical articles or reviews), may be
made without written authorization from NIKON VISION CO., LTD.
The product(s) described herein may be subject to export control
regulations in the relevant country (ies). It (they) should not be
exported without authorization of the exporting govermental authority
if the regulations apply.
The following factors ensure best range and accuracy:
蘆
Nighttime use
蘆
Cloudy weather
蘆
Bright-colored targets
蘆
Targets with highly reflective surfaces
蘆
Targets with shiny exteriors
蘆
Large-size targets
蘆
Shooting targets facing at 90 degrees
Measurement may result in inaccuracy or failure in the
following cases:
蘆
Slender or small target
蘆
Target has diffusing reflective surface
蘆
Target does not reflect the laser beam (glass, a mirror, etc.,)
蘆
Black target
蘆
Target has pronounced depth
蘆
I
n snow, rain or fog
蘆
Target measured through glass
蘆
Reflective surface measured from diagonal direction
蘆
Moving target
蘆
Obstacle moving in front of the target
蘆
When targeting the surface of water
CAUTIONS BEFORE USE
Please observe the following guidelines strictly so you can use
the equipment properly and avoid potentially hazardous prob-
lems. Before using this product, read thoroughly the "SAFETY
AND OPERATION PRECAUTIONS" and instructions on correct
usage accompanying the product. Keep this manual within reach
for easy reference.
WARNING
This indication alerts you to the fact that any improper use ignor-
ing the contents described herein can result in potential death or
serious injury.
CAUTION
This indication alerts you to the fact that any improper use ignor-
ing the contents described herein can result in potential injury or
material loss.
SAFETY AND OPERATION PRECAUTIONS
Warning
蘆
Never look directly at the laser beam or directly at the sun
when using the Nikon Laser IRT.
蘆
Do not depress the POWER button while aiming with the eye
or looking into the optics from the objective side.
蘆
Do not operate the unit with other additional optical elements,
such as lenses or binoculars. Using an optical instrument
together with the Nikon Laser IRT increases the danger of
damaging the eyes.
蘆
Do not disassemble the Nikon Laser IRT. A product that has
been disassembled is not guaranteed by the manufacturer.
蘆
If the Laser IRT's body cover is damaged, or if it emits a
strange sound due to dropping or for some other cause,
immediately remove the battery and stop using.
Cautions
蘆
When not using the Nikon Laser IRT, do not push the POWER
button.
蘆
Do not leave the Nikon Laser IRT within the reach of small
children.
蘆
Rain, water, sand or mud should be removed from the Laser
IRT body surface as soon as possible, using a soft, clean, dry
cloth.
蘆
Although the Nikon Laser IRT is waterproof, it is not designed
for use underwater.
蘆
Do not leave the Nikon Laser IRT in an unstable place, as it
may fall and cause injury, or damage the equipment.
蘆
Do not look through the Nikon Laser IRT while walking. You
may walk into something and get hurt.
蘆
Do not leave the Nikon Laser IRT in a car on a hot or sunny
day, or near heat-generating equipment. This may damage or
negatively affect it.
蘆
Do not leave the Nikon Laser IRT in direct sunlight. Ultraviolet
rays and excessive heat may negatively affect or even damage
the unit.
蘆
When the Nikon Laser IRT is exposed to sudden changes in
temperature, water condensation may occur on lens surfaces.
Do not use the product until the condensation has evaporated.
蘆
Do not use alcohol for cleaning the main body.
蘆
Do not leave the polyethylene bag used for packaging within
the reach of small children.
蘆
Be careful that small children do not inadvertently swallow the
adjustment cap. If it does happen, consult a doctor immedi-
ately.
蘆
If your Nikon Laser IRT should fail to operate correctly, dis-
continue use immediately and consult the Troubleshooting
Table. If you are unable to fix the problem, contact your local
dealer for instructions on where to send it for repair.
CARE AND MAINTENANCE
Lenses
蘆
When removing dust on the lens surface, use a soft oil-free
brush.
蘆
When removing stains or smudges like fingerprints from the
lens surface, wipe the lenses very gently with a soft clean cot-
ton cloth or quality oil-free lens tissue.
Use a small quantity of pure alcohol (not denatured) to wipe
stubborn smudges. Do not use velvet cloth or ordinary tissue,
as it may scratch the lens surface. Once the cloth has been
used for cleaning the body, it should not be used again for the
lens surface.
Main body
蘆
Clean the body surface with a soft, clean cloth and a dry cloth.
Do not use benzene, thinner, or other organic agents because
they may cause discoloration or rubber degeneration.
Storage
蘆
Water condensation or mold may occur on the lens surface
because of high humidity. Therefore, store the Nikon Laser
IRT in a cool, dry place.
After use on a rainy day or at night, thoroughly dry it at room
temperature, then store in a cool, dry place.
NOTES ON LITHIUM BATTERY
If handled incorrectly, battery may rupture and leak, corroding equ-
ipment and staining clothing. Be sure to observe the following:
蘆
Install battery with the + and - poles positioned correctly.
蘆
Battery should be removed when exhausted or during extend-
ed periods of non-use.
蘆
Use the same type of battery.
蘆
If battery fluid contacts eyes or skin, rinse well with water. If
swallowed, consult a doctor immediately.
蘆
Do not short-circuit battery chamber terminals.
蘆
Do not carry batteries together with keys or coins in a pocket
or bag. This may overheat and short-circuit batteries.
蘆
Do not put batteries in fire or water. Never disassemble batter-
ies.
蘆
Do not change batteries.
蘆
Do not subject stored batteries to extremes in temperature.
蘆
Do not subject batteries to strong vibrations or shock.
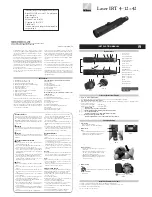
Nomenclature
①
Objective lens
②
Eyepiece lens
③
Elevation Adjustment
④
Windage Adjustment
⑤
Eyepiece Adjustment
⑥
Power index Dot
⑦
Power Scale
⑧
Power Selector Ring
⑨
Adjustment Cap
⑩
POWER button
⑪
Remote Control Detector (both side)
⑫
Battery Chamber Lid
⑬
Battery Chamber Lid Screw
⑭
Remote control unit
⑮
Remote control button
⑯
LED
⑰
Product number
⑱
Explanatory label
③
⑱
①
②
③
④
⑤
⑤
⑥
⑦ ⑧
⑨
⑩
⑪
⑪
⑫
⑬
⑭ ⑮
⑯
⑰
Status of the Internal Display
1. Fig. 10, 11 - Reticle (aiming system)
Use to take aim at the target. Position the target at the center of the reticle, which will always appear in the display.
2.
[
]
- Distance/measurement status display
Digitally Indicates measured distance in yards. Also indicates measuring status such as "Measurement in progress". "Measurement unsuc-
cessful" or "Unable to measure".
Display of results: (
<
100/yards)
e.g.55 yards = [
]
Display of results: (
≦
100/yards)
e.g.576 yards = [
]
[
]
- Now measuring
[
]
- Fail to measure or can not measure distance.
3.
[
]
- Indicates distance being measured in yards and battery condition.
4.
[
]
- one shot measurement mode.
Display at "after power on" or "Measurement mode is changed".
5.
[
]
- Normal (continuous) measurement mode
Display at "Measurement is over" or "Measurement mode is changed".
Changing Battery
蘆
Type of battery
Scope - 3V CR2 lithium Battery
Remote control unit - 3V CR2025 lithium Battery
蘆
Battery change
Scope
1.Loosen the Battery Chamber lid screw with coin. (Fig. 5)
2.Replace the CR2 Lithium Battery correctly. (Fig. 6)
3.Tighten the lid screw firmly for air tightness
Remote control unit
1.Insert the metal plate into the groove of opposite side of
LED. (Fig. 7)
2.Press down the metal plate (a) to lift up the rear cover
(b). (Fig. 7) There are eight hinge stoppers. (Fig. 8)
(Be careful to break the hinge stopper.)
3.Replace the CR2025 Lithium Battery correctly. (Fig. 8)
4.Put the rear cover back and press the edge of cover to
catch the hinge stopper.
Fig. 5
Fig. 6
Fig. 7
Fig. 8
shows a position of hinge stopper
b
a
+
−
⑫
⑬
INSTRUCTION MANUAL
E
Laser IRT 4
−
12
×
42
In the event that you should require service for your
Nikon RIFLESCOPE, in case of U.S.A. market, please
send it directly to:
Nikon Scope Service
841 Apollo Street, Suite 100
El Segundo, CA. 90245-4721
1-800-Nikon SV.
In other market, please bring it to dealer from which
you purchased it.
Printed in Japan (505B) /1E
3-25, Futaba 1-chome, Shinagawa-ku, Tokyo 142-0043, Japan
Tel:+81-3-3788-7697 Fax:+81-3-3788-7698
Fig. 1
Fig. 2
Fig. 3
Fig. 4
蘆
Battery condition
Scope
flashing: Battery charge is low and battery should be replaced.
Remote control unit
No Information
Install the Remote control unit
1. The Remote control unit is attached near the thumb of the hand which is holding the gun.
2. The LED on the Remote control unit must turn the direction of the Remote Control Detector. (Fig. 2 & 3)
3. Then fix the Remote control unit with the band.
Effective control range is less than 20 inches.


