


48
Bas
ic Ph
otography an
d Pl
ayba
ck
:
G
(Easy Auto) Mode
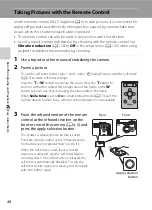
Taking Pictures with the Remote Control
Use the remote control ML-L5 (supplied;
6) to take pictures. It is convenient for
taking self-portraits and effectively eliminates blur caused by camera shake that
occurs when the shutter-release button is pressed.
•
The remote control can also be used in conjunction with the self-timer.
•
Use of a tripod is recommended during shooting with the remote control. Set
Vibration reduction
Off
in the setup menu (
142) when using
a tripod to stabilize the camera during shooting.
1
Use a tripod or other means of stabilizing the camera.
2
Frame a picture.
To use the self-timer, follow steps 1 and 2 under “
Taking Pictures with the Self-timer”
37) to make self-timer settings.
Press the
g
or
f
button to activate the zoom. Press the
g
button to
zoom in so that the subject fills a larger area of the frame, or the
f
button to zoom out, thus increasing the area visible in the frame.
When
Smile timer
is set to
On
in smart portrait mode (
camera detects human faces, remote control operation is not available.
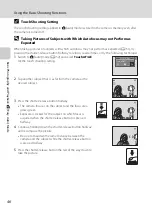
3
Point the infrared emitter of the remote
control at the infrared receiver on the
front or rear of the camera (
press the apply selection button.
The shutter is released and a picture is saved.
Point the remote control at the infrared receiver
from a distance not greater than 5 m (16 ft.).
When the self-timer is used, focus is locked,
exposure is adjusted, and the self-timer begins
counting down. Once the shutter is released, the
self-timer is automatically disabled. To stop the
self-timer before a picture is taken, press the apply
selection button again.
Rear
Front
Apply selection
button