


133
Connecting to a Computer
Con
n
e
cti
ng t
o
Te
le
vi
sion
s, Comp
u
te
rs
a
n
d
Pr
in
te
rs
5
Start the ViewNX 2 image transfer feature “Nikon Transfer 2” installed
on the computer.
•
Windows
7
When the
Devices and Printers
K
S
1100
pj
screen is displayed, click
Change
program
under
Import pictures and videos
. Select
Import File using Nikon
Transfer
2
in the
Change program
dialog and click
OK
.
Double-click
Import File
on the
Devices and Printers
K
S
1100
pj
screen.
•
Windows Vista
When the
AutoPlay
dialog is displayed, click
Import File using Nikon Transfer
2
.
•
Windows XP
When the action selection dialog is displayed, select
Nikon Transfer
2
Import File
,
and click
OK
.
•
Mac OS X
Nikon Transfer 2 will start automatically when the camera is connected to the
computer if
Yes
was selected in the
Auto-Launch setting
dialog when Nikon
Transfer 2 was first installed.
•
If there are a large number of images on the memory card, it may take some time for
Nikon Transfer 2 to start.
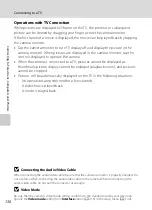
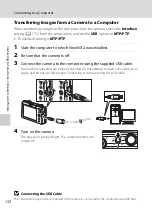
6
Confirm that the source device is displayed in the transfer options
Source
panel and click
Start Transfer
.
Any images that have not been transferred to the computer will be transferred (default
setting of ViewNX 2).
Start Transfer
button
Source
device