background image

29

s

“Point-and-Shoot” 
Photography (

i

 Mode)

This section describes how to take photographs in 

i

 mode, automatic “point-and-shoot” modes in 

which the majority of settings are controlled by the 
camera in response to shooting conditions.

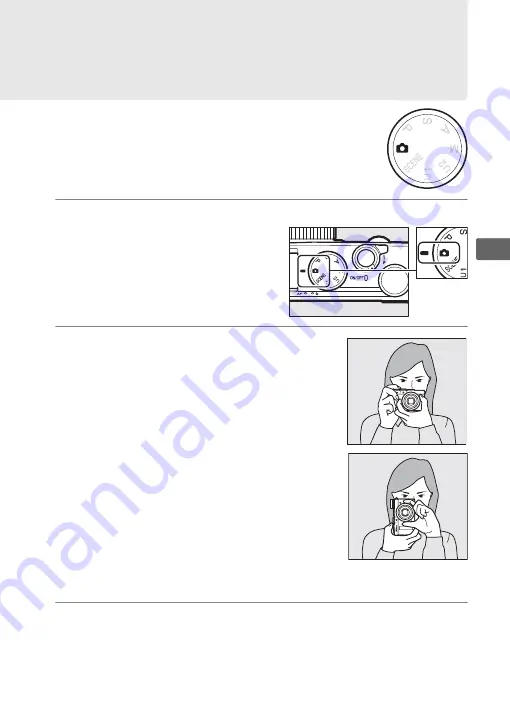
1

Select 

i

.

2

Ready the camera.

Keep your elbows propped lightly 
against your torso for support and place 
one foot half a pace ahead of the other 
to keep your upper body stable. Be 
careful that your fingers or hair, the 
camera strap, or other objects do not 
obstruct the lens, flash, AF-assist 
illuminator, or microphone. When using 
the flash to take pictures in “tall” 
(portrait) orientation, hold the camera 
so that the flash is above the lens. If 
lighting is poor, use the built-in flash 
(

0

112) or mount the camera on a tripod to prevent blur.

3

Frame the photograph.

Mode dial

Summary of Contents for COOLPIX A

Page 1: ...DIGITAL CAMERA En Reference Manual ...

Page 2: ... as memory cards in this manual Camera Settings The explanations in this manual assume that default settings are used Help Use the camera s on board help feature for help on menu items and other topics See page 12 for details A For Your Safety Before using the camera for the first time read the safety instructions in For Your Safety 0 vi viii ...

Page 3: ... s Basic Photography 0 27 y Recording and Viewing Movies 0 38 P S A and M Modes 0 52 User Settings U1 and U2 Modes 0 60 k Release Mode 0 63 d Image Quality and Size 0 69 N Focus 0 74 S ISO Sensitivity 0 81 Z Exposure 0 85 r White Balance 0 89 J Image Enhancement 0 99 l Flash Photography 0 112 t Other Shooting Options 0 121 I More on Playback 0 132 Q Connections 0 154 U Camera Menus 0 172 n Technic...

Page 4: ...ns see For Your Safety 0 vi 1 Attach the camera strap Attach the strap securely to the camera eyelets 2 Charge the battery 0 20 3 Insert the battery and a memory card 0 21 23 Quick Start Guide Battery charging Charging complete Plug charger in Insert battery Rear Memory card slot ...

Page 5: ...mpted to choose a language and set the camera clock 0 25 5 Rotate the focus mode selector to t autofocus 0 75 6 Frame the photograph 0 29 7 Focus and shoot 0 30 The focus area will light green when the focus operation is complete 8 View the photograph 0 33 Focus mode selector K button ...

Page 6: ... fall or other accident take the product to a Nikon authorized service representative for inspection after unplugging the product and or removing the battery ADo not use the camera or battery charger in the presence of flammable gas Using the camera in the presence of flammable gases such as propane and gasoline as well as flammable sprays or dust could result in explosion or fire AHandle the came...

Page 7: ...tery Do not transport or store with metal objects such as necklaces or hairpins The battery is prone to leakage when fully discharged To avoid damage to the product be sure to remove the battery when no charge remains Discontinue use immediately should you notice any change in the battery such as discoloration or deformation If liquid from the damaged battery comes in contact with clothing or skin...

Page 8: ...r subject s eyes could cause temporary visual impairment Particular care should be observed if photographing infants when the flash should be no less than 1 m 3 ft 4 in from the subject ADo not aim a flash at the operator of a motor vehicle Failure to observe this precaution could result in accidents ADo not operate the flash with the flash window touching a person or object Failure to observe thi...

Page 9: ...otices for Customers in Europe This symbol indicates that electrical and electronic equipment is to be col lected separately The following apply only to users in European countries This product is designated for separate collection at an appropriate collection point Do not dispose of as household waste Separate collection and recycling helps conserve natural resources and prevent negative conseque...

Page 10: ...ifferent from that to which the receiver is connected Consult the dealer or an experienced radio television technician for help CAUTIONS Modifications The FCC requires the user be notified that any changes or modifications made to this device that are not expressly approved by Nikon Corporation may void the user s authority to operate the equipment Interface Cables Use the interface cables sold or...

Page 11: ... not copy or reproduce passports issued by the government licenses issued by public agencies and private groups ID cards and tickets such as passes and meal coupons Comply with copyright notices The copying or reproduction of copyrighted creative works such as books music paintings woodcuts prints maps drawings movies and photographs is governed by national and international copyright laws Do not ...

Page 12: ...mation about Nikon brand accessories contact a local authorized Nikon dealer D Use Only Nikon Brand Accessories Only Nikon brand accessories certified by Nikon specifically for use with your Nikon digital camera are engineered and proven to operate within its operational and safety requirements THE USE OF NON NIKON ACCESSORIES COULD DAMAGE YOUR CAMERA AND MAY VOID YOUR NIKON WARRANTY D Servicing t...

Page 13: ...the Camera 2 The Camera Body 2 The Monitor 5 The Information Display 7 The Mode Dial 9 The Command Dial 10 Camera Menus An Overview 12 Using Camera Menus 13 Menu Options 16 First Steps 20 Charge the Battery 20 Insert the Battery 21 Insert a Memory Card 23 Basic Setup 25 Table of Contents ...

Page 14: ... Sports 36 n Close up 36 o Night Portrait 36 r Night Landscape 36 s Party Indoor 36 t Beach Snow 36 u Sunset 36 v Dusk Dawn 36 w Pet Portrait 36 x Candlelight 36 y Blossom 36 z Autumn Colors 36 0 Food 37 1 Silhouette 37 2 High Key 37 3 Low Key 37 Recording and Viewing Movies 38 Recording Movies 38 The Movie Recording Display 41 Movie Settings 43 Viewing Movies 45 Editing Movies 47 Trimming Movies ...

Page 15: ...g User Settings 60 Recalling User Settings 62 Resetting User Settings 62 Release Mode 63 Single Frame Continuous Self timer Remote and Movie Modes 63 Self Timer and Remote Control Modes 66 Image Quality and Size 69 Image Quality 69 Image Size 72 Focus 74 Autofocus 75 Autofocus Mode 75 AF Area Mode 76 Focus Lock 79 Manual Focus 80 ISO Sensitivity 81 Auto ISO Sensitivity Control 83 ...

Page 16: ...ontrol 99 Modifying Picture Controls 101 Creating Custom Picture Controls 106 Sharing Custom Picture Controls 109 Preserving Detail in Highlights and Shadows Active D Lighting 110 Flash Photography 112 Using the Built in Flash 112 Flash Mode 113 Flash Compensation 116 FV Lock 118 Other Shooting Options 121 Restoring Default Settings 121 Bracketing 123 Interval Timer Photography 127 Using a GPS Uni...

Page 17: ...k Menu 150 Connections 154 Using ViewNX 2 154 Installing ViewNX 2 154 Copy Pictures to the Computer 156 View Pictures 158 Printing Photographs 159 Connecting the Printer 159 Printing Pictures One at a Time 161 Printing Multiple Pictures 163 Creating a DPOF Print Order Print Set 166 Viewing Photographs on TV 169 HDMI Options 171 Camera Menus 172 D The Playback Menu ManagingImages 172 Playback Folde...

Page 18: ... 182 Format Memory Card 183 Monitor Brightness 183 Photo Info 184 Flicker Reduction 184 Time Zone and Date 185 Language 186 Image Comment 186 Auto Image Rotation 187 Self Timer 188 Auto off Timer 189 Image Review Time 189 Remote on Duration ML L3 189 Beep 190 Shutter Sound 190 File Number Sequence 191 MF Distance Indicator Units 192 Reverse Indicators 192 Assign Fn1 Button 193 Assign J Fn2 Button ...

Page 19: ...en 213 Fisheye 213 Color Outline 214 Color Sketch 214 Perspective Control 215 Miniature Effect 216 Selective Color 217 Side by Side Comparison 219 m Recent Settings O My Menu 221 My Menu 222 Technical Notes 226 Optional Flash Units Speedlights 226 Other Accessories 230 Caring for the Camera 232 Cleaning 232 Storage 232 Caring for the Camera and Battery Cautions 233 Caring for the Camera 233 Caring...

Page 20: ...bleshooting 238 Battery Display 238 Shooting All Modes 238 Shooting P S A M 240 Playback 240 Miscellaneous 241 Error Messages 242 Specifications 245 Approved Memory Cards 251 Memory Card Capacity 252 Index 253 ...

Page 21: ...fore taking the camera on a trip take a test shot to ensure that the camera is functioning normally Nikon will not be held liable for damages or lost profits that may result from product malfunction A Life Long Learning As part of Nikon s Life Long Learning commitment to ongoing product support and education continually updated information is available on line at the following sites For users in t...

Page 22: ...s for camera strap iv 5 Command dial 10 6 Power on lamp 25 7 Mode dial 9 8 Accessory Shoe Cover BS 1 226 9 Accessory shoe 226 10 Flash pop up control 112 A The Power Switch To turn the camera on rotate the power switch To turn the camera on for playback without extending the lens press and hold the K button 0 4 To turn the camera off rotate the power switch the monitor will turn off ...

Page 23: ...ocus mode selector 74 6 Focus ring 80 7 Lens ring 8 Lens 245 9 f button Fn1 193 10 AF assist illuminator self timer lamp 29 11 Accessory terminal 231 12 USB connector 156 159 13 Lens cover D The Microphone and Speaker Do not place the microphone or speaker in close proximity to magnetic devices Failure to observe this precaution could affect the data recorded on the magnetic devices ...

Page 24: ... button 7 9 O button Deleting pictures during playback 34 148 10 Power connector cover 230 11 Battery chamber memory card slot cover latch 20 12 Battery chamber memory card slot cover 23 13 Tripod socket 14 Speaker 3 15 W Q button Thumbnails 140 Zooming out during playback 142 Help 12 16 X button Zooming in during playback 144 17 S g button ISO 81 Fn2 194 18 E N L button Exposure compensation 87 A...

Page 25: ...17 18 16 19 20 21 22 26 23 24 25 13 11 32 33 31 29 28 30 27 15 14 12 13 Distance indicator 80 14 Bracketing progress indicator 125 15 Exposure Indicator 57 16 Flash ready indicator 112 17 Number of exposures remaining 27 18 ISO Sensitivity 81 19 Auto ISO sensitivity control 83 20 Exposure compensation 87 21 Flash compensation 116 22 Aperture 55 56 23 Shutter speed 54 56 24 AE lock indicator 25 FV ...

Page 26: ...001 JPG 1 12 4928x3264 NORMAL 1 2 3 5 6 7 8 4 9 1 Protect status 146 2 Retouch indicator 197 3 Frame number total number of images 4 Image quality 69 5 Image size 72 6 File name 191 7 Time of recording 25 185 8 Date of recording 25 185 9 Folder name 177 ...

Page 27: ...rol 99 12 Exposure compensation 87 Exposure compensation value 87 13 Flash compensation indicator 116 Flash compensation value 116 14 Flash mode 113 15 Help icon 12 16 Shutter speed 54 56 17 Aperture 55 56 18 Exposure indicator 57 Exposure compensation display 87 Bracketing progress indicator 125 19 K appears when memory remains for over 1000 exposures 27 20 Number of exposures remaining 27 21 Man...

Page 28: ...8 X A The Information Display To hide the information display press the P button again ...

Page 29: ...odes Select these modes for full control over camera settings P Programmed auto 0 53 S Shutter priority auto 0 54 A Aperture priority auto 0 55 M Manual 0 56 d and e Modes 0 60 Storeand recallcustomizedshooting settings Scene Modes 0 35 The camera automatically optimizes settings to suit the selected scene Match your selection to the scene being photographed Mode dial ...

Page 30: ...rols to adjust a variety of settings when shooting information is displayed in the monitor Choose a combination of aperture and shutter speed mode P 0 53 Mode P Command dial Command dial S g button ISO sensitivity Mode dial E N L button Exposure compensation Aperture ...

Page 31: ...ommand dial Choose an aperture mode A 0 55 Mode A Command dial Choose an aperture mode M 0 56 Mode M E N L button Command dial Set exposure compensation mode P S or A 0 87 Mode P S or A E N L button Command dial Adjust ISO sensitivity 0 81 S g button Command dial ...

Page 32: ...ults to Recent settings 0 221 B Setup 0 182 d If a d icon appears at the bottom left corner of the monitor a description of the currently selected option or menu can be displayed by pressing the W Q button A description of the currently selected option or menu will be displayed while the button is pressed Press 1 or 3 to scroll through the display G button Slider shows position in current menu Cur...

Page 33: ...he menus Press the G button to display the menus 2 Highlight the icon for the current menu Press 4 to highlight the icon for the current menu Select highlighted item or display sub menu Move cursor up Move cursor down J button select highlighted item Cancel and return to previous menu Items can also be highlighted by rotating multi selector G button ...

Page 34: ...nu 4 Position the cursor in the selected menu Press 2 to position the cursor in the selected menu 5 Highlight a menu item Press 1 or 3 or rotate the multi selector to highlight a menu item 6 Display options Press 2 to display options for the selected menu item ...

Page 35: ...t making a selection press the G button Note the following Menu items that are displayed in gray are not currently available While pressing 2 generally has the same effect as pressing J there are some cases in which selection can only be made by pressing J To exit the menus and return to shooting mode press the shutter release button halfway 0 31 ...

Page 36: ... print order Select set Deselect all Reset shooting menu Yes No Storage folder Select folder New Rename Delete Image quality NEF RAW JPEG fine NEF RAW JPEG normal NEF RAW JPEG basic NEF RAW JPEG fine JPEG normal default JPEG basic Image size Large default Medium Small White balance Auto default Incandescent Fluorescent Direct sunlight Flash Cloudy Shade Preset manual Set Picture Control Standard d...

Page 37: ...lash cntrl for built in flash TTL default Manual Optional flash TTL default Manual Auto bracketing set AE bracketing default WB bracketing ADL bracketing Interval timer shooting Choose start time Now Start time Interval Number of times Start Movie settings Frame size frame rate Movie quality Microphone 1 Not available if no custom Picture Controls are present 2 Defaults to Off modes P S A M 1 2 an...

Page 38: ...utter sound On default Off File number sequence On Off default Reset MF distance indicator units m default ft Reverse indicators default Assign Fn1 button Flash mode default Release mode Self timer FV lock AE AF lock AE lock only AE lock Hold AF lock only AF ON Exposure compensation NEF RAW Assign J Fn2 button ISO sensitivity default White balance Image quality size Metering Active D Lighting Auto...

Page 39: ...ay NEF RAW processing Resize Select image Choose size Quick retouch Straighten Fisheye Color outline Color sketch Perspective control Miniature effect Selective color Edit movie Choose start end point Save selected frame Side by side comparison Only available when J button is pressed to display retouch menu during full frame playback Choose tab My Menu Recent settings Add items Playback menu Shoot...

Page 40: ...nd remove the battery when charging is complete A The Plug Adapter Depending on the country or region of purchase a plug adapter may be supplied with the charger The shape of the adapter varies with the country or region of purchase If a plug adapter is supplied raise the wall plug and connect the plug adapter as shown at right making sure the plug is fully inserted Attempting to forcibly remove t...

Page 41: ...mber memory card slot cover 2 Insert the battery Insert the battery in the orientation shown q using the battery to keep the orange battery latch pressed to one side The latch locks the battery in place when the battery is fully inserted w 3 Close the battery chamber memory card slot cover K q Battery latch K w ...

Page 42: ...n could result in overheating and damage to the charger Do not move the charger or touch the battery during charging Failure to observe this precaution could in very rare instances result in the charger showing that charging is complete when the battery is only partially charged Remove and reinsert the battery to begin charging again If the CHARGE lamp flashes quickly unplug the charger and remove...

Page 43: ...ll be used in the camera or if the card has been formatted in another device select Format memory card in the setup menu and follow the on screen instructions to format the card 0 183 Note that this permanently deletes any data the card may contain Be sure to copy any photographs and other data you wish to keep to a computer before proceeding A Removing Memory Cards After confirming that the AF la...

Page 44: ...nals with your fingers or metal objects Do not bend drop or subject to strong physical shocks Do not apply force to the card casing Failure to observe this precaution could damage the card Do not expose to water heat high levels of humidity or direct sunlight Do not format memory cards in a computer A The Write Protect Switch SD memory cards are equipped with a write protect switch to prevent acci...

Page 45: ...the multi selector and J button to select a language and set the camera clock note that the camera uses a 24 hour clock When setup is complete the lens will extend and the view through the lens will be displayed in the monitor Select language Select time zone Select date format Note Thelanguageand date time can be changed at any time using the Language and Time zone and date options in the setup m...

Page 46: ...AC adapter 0 247 A day of charging will power the clock for about 2 weeks If the camera displays a warning at startup stating that the clock is not set the clock battery is exhausted and the clock has been reset Set the clock to the correct time and date 0 185 A The Camera Clock The camera clock is less accurate than most watches and household clocks Check the clock regularly against more accurate...

Page 47: ...nearest hundred e g values between 1600 and 1699 are shown as 1 6 k If a warning is displayed stating that there is not enough memory for additional photographs insert another memory card or delete some photos Battery Level and Card Capacity Monitor Description L Battery fully charged J Battery partially discharged H Low battery Ready fully charged spare battery or prepare to charge battery Shutte...

Page 48: ...both shooting and playback is about 1 minute the monitor will turn off to save power and the power on lamp will flash The display can be reactivated using the power switch rotating the mode dial or by pressing the shutter release or K button If no operations are performed for a further three minutes or so the camera will turn off automatically ...

Page 49: ...inst your torso for support and place one foot half a pace ahead of the other to keep your upper body stable Be careful that your fingers or hair the camera strap or other objects do not obstruct the lens flash AF assist illuminator or microphone When using the flash to take pictures in tall portrait orientation hold the camera so that the flash is above the lens If lighting is poor use the built ...

Page 50: ...us the focus area will flash red and the AF lamp memory card access lamp will flash If the subject is poorly lit the AF assist illuminator 0 180 may light to assist the focus operation 5 Shoot Smoothly press the shutter release button the rest of the way down to release the shutter and record the photograph The AF lamp memory card access lamp will light while the photograph is being recorded to th...

Page 51: ...f the camera is unable to focus using autofocus try pressing the shutter release button halfway a few times focus manually 0 80 or use focus lock 0 79 to focus on another subject at the same distance and then recompose the photograph The subject is extremely dark The frame contains areas of sharply contrasting brightness e g the subject is half in the shade There is little or no contrast between t...

Page 52: ...tion 0 184 although they may still be visible in the final photograph at some shutter speeds Note that the temperature of the camera s internal circuits may rise and noise bright spots randomly spaced bright pixels or fog may be displayed if the camera is used continuously for extended periods the camera may also become noticeably warm but this does not indicate a malfunction D Temperature Warning...

Page 53: ...ill be displayed in the monitor 2 View additional pictures Additional pictures can be displayed by pressing 4or 2 or by rotating the multi selector or command dial To end playback and return to shooting mode press the shutter release button halfway K button ...

Page 54: ...you wish to delete as described on the preceding page 2 Delete the photograph Press the O button A confirmation dialog will be displayed press the O button again to delete the image and return to playback To exit without deleting the picture press K A Delete To delete selected images all images taken on a selected date or all images in a chosen folder use the Delete option in the playback menu 0 1...

Page 55: ...lected scene is shown by an icon in the monitor Mode dial Command dial Monitor kPortrait Use for portraits with soft natural looking skin tones If the subject is far from the background background details will be softened to lend the composition a sense of depth lLandscape Use for vivid landscape shots in daylight pChild Use for snapshots of children Clothing and background details are vividly ren...

Page 56: ... colors when photographing night landscapes including street lighting and neon signs sParty Indoor Capture the effects of indoor background lighting Use for parties and other indoor scenes tBeach Snow Capture the brightness of sunlit expanses of water snow or sand uSunset Preserves the deep hues seen in sunsets and sunrises vDusk Dawn Preserves the colors seen in the weak natural light before dawn...

Page 57: ...s of food 1Silhouette Silhouette subjects against bright backgrounds 2HighKey Use with bright scenes to create bright images that seem filled with light 3LowKey Use with dark scenes to create dark somber images with prominent highlights ...

Page 58: ...will be displayed in the monitor 2 Display release mode options Highlight the current release mode and press J to display release mode options 3 Select 1 Movie recording Highlight 1 Movie recording and press J Press the shutter release button halfway to return to the shooting display Recording Movies P button Information display ...

Page 59: ...ibed in Steps 3 and 4 on page 29 When using manual focus 0 74 note that focus can not be adjusted during recording adjust focus before recording begins 6 Start recording Press the shutter release button the rest of the way down to start recording movie footage with sound A recording indicator and the time available are displayed in the monitor In P S and A modes exposure can be altered by up to 2 ...

Page 60: ...oosing autofocus and AF area modes see page 75 and 76 respectively A Full Time Servo AF AF F In AF F mode the camera will adjust focus in response to changes in the distance to the subject during shooting 0 75 A AF ON If AF ON is selected for Assign Fn1 button in the setup menu 0 193 autofocus can be initiated by pressing the f button A Focus and Exposure Lock Focus and or exposure lock can be ass...

Page 61: ...on 0 q No movie icon Indicates that movies can not be recorded w Movie frame size The frame size for movie recording 43 e Time remaining The recording time available for movies 39 A Before Recording Choose a color space before recording 0 178 q w e ...

Page 62: ...ternal circuitry The camera can record both video and sound do not cover the microphone during recording Note that the built in microphone may record lens noise during autofocus Note that the temperature of the camera s internal circuits may rise and noise bright spots randomly spaced bright pixels or fog may be displayed if the camera is used continuously for extended periods the camera may also ...

Page 63: ...ximum bit rate Mbps High quality Normal o 1 1920 1080 30p 18 10 20 min 29 min 59 s p 2 1920 1080 25p q 3 1920 1080 24p t 6 1280 720 30p 10 6 29 min 59 s 29 min 59 s u 7 1280 720 25p x 0 1280 720 24p 8 5 1 Listed value Actual frame rates for 30p 25p and 24p are 29 97 25 and 23 976 fps respectively 2 Camera may turn off automatically to prevent overheating before maximum length is reached A Frame Si...

Page 64: ...s Highlight Movie settings in the shooting menu and press 2 2 Choose movie options Highlight the desired item and press 2 then highlight an option and press J A The 2 Icon 2 is displayed in full frame and movie playback if the movie was recorded without sound G button ...

Page 65: ...yback Play Resume playback when movie is paused or during rewind advance Advance rewind Speed increases with each press from 2 to 4 to 8 to 16 keep pressed to skip to beginning or end of movie first frame is indicated by h in top right corner of monitor last frame by i If playback is paused movie rewinds or advances one frame at a time hold for continuous rewind or advance Frame advance rewind can...

Page 66: ...ume W Q to decrease Return to full frame playback K Press 1 or K to exit to full frame playback Exit to shooting mode Pressshutter release button halfway to exitto shooting display Display menus G See page 172 for more information To Use Description ...

Page 67: ...gh pictures until the movie you wish to edit is displayed 2 Choose a starting or end point Play the movie back as described on page 45 pressing J to start and resume playback and 3 to pause Your approximate position in the movie can be ascertained from the movie progress bar Option Description 9 Choose start end point Create a copy from which the opening or closing footage has been removed 4 Save ...

Page 68: ... the starting or end point of the copy and press J 5 Delete frames If the desired frame is not currently displayed press 4 or 2 or rotate the command dial to advance or rewind To switch the current selection from start point w to end point x or vice versa press E N L Once you have selected the start point and or end point press 1 All frames before the selected start point and after the selected en...

Page 69: ...w the copy Edited copies are indicated by a 9 icon in full frame playback D Trimming Movies Movies must be at least 2 seconds long If a copy can not be created at the current playback position the current position will be displayed in red in Step 5 and no copy will be created The copy will not be saved if there is insufficient space available on the memory card Copies have the same time and date o...

Page 70: ...k as described on page 45 your approximate position in the moviecanbeascertainedfrom the movie progress bar Pause the movie at the frame you intend to copy 2 Display movie edit options Press the E N L button to display movie edit options 3 Choose Save selected frame Highlight Save selected frame and press J Progress bar E N L button ...

Page 71: ...hlight Yes and press J to create a JPEG copy of the selected frame Movie stills are indicated by a 9 icon in full frame playback A Save Selected Frame JPEG movie stills created with the Save selected frame option can not be retouched JPEG movie stills lack some categories of photo information 0 134 ...

Page 72: ...ions in which there is little time to adjust camera settings S Shutter priority auto 0 54 User chooses shutter speed camera selects aperture for best results Use to freeze or blur motion A Aperture priority auto 0 55 User chooses aperture camera selects shutter speed for best results Use to blur background or bring both foreground and background into focus M Manual 0 56 User controls both shutter ...

Page 73: ... rotating the command dial flexible program Rotate the dial counterclockwise for large apertures low f numbers that blur background details or fast shutter speeds that freeze motion Rotate the dial in the opposite direction for small apertures high f numbers that increase depth of field or slow shutter speeds that blur motion All combinations produce the same exposure While flexible program is in ...

Page 74: ... auto you choose the shutter speed while the camera automatically selects the aperture that will produce the optimal exposure Use slow shutter speeds to suggest motion by blurring moving subjects fast shutter speeds to freeze motion Fast shutter speed 1 1600 s Slow shutter speed 1 6 s Command dial ...

Page 75: ...mbers increase flash range and reduce depth of field blurring objects behind and in front of the main subject Small apertures high f numbers increase depth of field bringing out details in the background and foreground Short field depths are generally used in portraits to blur background details long field depths in landscape photographs to bring the foreground and background into focus Large aper...

Page 76: ... speed and the multi selector to set aperture shutter speed can also be set by keeping the E N L button pressed and rotating the multi selector aperture by keeping the E N L button pressed and rotating the command dial Use the exposure indicators to check exposure Shutter speed Command dial Multi selector Aperture ...

Page 77: ...o bright or too dark for the camera to meter the indicator will flash Optimal exposure Underexposed by 1 3 EV Overexposed by over 2 EV The baseline for the exposure indicator is adjusted for exposure compensation 0 88 A See Also The Reverse indicators option in the setup menu can be used to reverse the exposure indicators so that negative values are displayed on the right and positive values on th...

Page 78: ...rol 0 231 Start the exposure by pressing the ML L3 shutter release button The shutter remains open for 30 minutes or until the button is pressed a second time 1 Ready the camera Mount the camera on a tripod or place it on a stable level surface To prevent loss of power before the exposure is complete use a fully charged EN EL20 battery or an optional EH 5b AC adapter and EP 5C power connector Note...

Page 79: ...focusing press the shutter release button on the camera or optional remote cord all the way down Keep the shutter release button pressed until the exposure is complete B Press the ML L3 shutter release button all the way down 5 Close the shutter A Take your finger off the shutter release button B Press the ML L3 shutter release button all the way down Shooting ends automatically after 30 minutes C...

Page 80: ...de 2 Adjust settings Make the desired adjustments to flexible program shutter speed aperture exposure and flash compensation flash mode metering autofocus and AF area modes bracketing and shooting menu 0 176 settings note that the camera will not store the options selected for Reset shooting menu Storage folder Manage Picture Control Release mode or Interval timer shooting Mode dial ...

Page 81: ...e user settings in the setup menu and press 2 4 Select Save to U1 or Save to U2 Highlight Save to U1 or Save to U2 and press 2 5 Save user settings Highlight Save settings and press J to assign the settings selected in Steps 1 and 2 to the mode dial position selected in Step 4 G button ...

Page 82: ...ng User Settings To reset settings for d or e to default values 1 Select Reset user settings Press the G button to display the menus Highlight Reset user settings in the setup menu and press 2 2 Select Reset U1 or Reset U2 Highlight Reset U1 or Reset U2 and press 2 3 Reset user settings Highlight Reset and press J The shooting mode will be set to P Mode dial G button ...

Page 83: ... release button is pressed all the way down E Self timer Use self timer for self portraits or to reduce blurring caused by camera shake 0 66 Delayed remote ML L3 Shutter is released 2 s after shutter release button on optional ML L3 0 231 remote control is pressed 0 66 Quick response ML L3 Shutter is released when shutter release button on optional ML L3 0 231 remote control is pressed 0 66 1 Movi...

Page 84: ...tor 2 Display release mode options Highlight the current release mode and press J to display release mode options 3 Select a release mode Highlight a release mode and press J Press the shutter release button halfway to return to the shooting display P button Information display ...

Page 85: ...Buffer The camera is equipped with a memory buffer for temporary storage allowing shooting to continue while photographs are being saved to the memory card Up to 100 photographs can be taken in succession While photographs are being recorded to the memory card the AF lamp memory card access lamp will light 0 23 Depending on shooting conditions and memory card performance recording may take from a ...

Page 86: ...en 1 Mount the camera on a tripod Mount the camera on a tripod or place the camera on a stable level surface 2 Select a release mode Select E Self timer Delayed remote ML L3 or Quick response ML L3 mode 0 63 note that if no operations are performed for about a minute after a remote control mode is selected the camera will turn off automatically P button Information display ...

Page 87: ...de ML L3 From a distance of 5 m 16 ft or less aim the transmitter on the ML L3 at the infrared receiver on the front of the camera 0 3 and press the ML L3 shutter release button to focus and shoot In delayed remote mode the self timer lamp will light for about two seconds before the shutter is released In quick response remote mode the self timer lamp will flash after the shutter has been released...

Page 88: ...r is counting down Note that when the flash is used in self timer mode only one photograph will be taken when the flash fires regardless of the number of exposures selected for Self timer in the setup menu 0 188 In remote control modes the flash begins charging when remote control mode is selected once the flash is charged it will automatically fire when required The camera will only respond to th...

Page 89: ...e NEF RAW image and one fine quality JPEG image NEF RAW JPEG normal Two images are recorded one NEF RAW image and one normal quality JPEG image NEF RAW JPEG basic Two images are recorded one NEF RAW image and one basic quality JPEG image NEF RAW NEF Raw data from the image sensor are saved directly to the memory card Settings such as white balance and contrast can be adjusted after shooting JPEG f...

Page 90: ... the monitor 2 Display image quality options Highlight the current image quality in the information display and press J 3 Choose a file type Highlight an option and press J To return to shooting mode press the shutter release button halfway P button Information display ...

Page 91: ...an be created using the NEF RAW processing option in the retouch menu 0 209 A NEF RAW JPEG When photographs taken at NEF RAW JPEG are viewed on the camera only the JPEG image will be displayed When photographs taken at these settings are deleted both NEF and JPEG images will be deleted A The Shooting Menu Image quality can also be adjusted using the Image quality option in the shooting menu 0 176 ...

Page 92: ... Highlight an option and press J To return to shooting mode press the shutter release button halfway Image size Size pixels Print size cm in Large 4928 3264 41 7 27 6 16 4 11 4 Medium 3696 2448 31 3 20 7 12 3 8 2 Small 2464 1632 20 9 13 8 8 2 5 4 Approximate size when printed at 300 dpi Print size in inches equals image size in pixels divided by printer resolution in dots per inch dpi 1 inch appro...

Page 93: ...enu Image size can also be adjusted using the Image size option in the shooting menu 0 176 A The S g Button Image quality and size can also be adjusted by rotating the command dial while keeping the S g button pressed 0 194 ...

Page 94: ... lens macro autofocus to focus on flowers insects or other small objects at ranges of about 10 cm 4 in or more Note that even when t normal autofocus is selected macro autofocus is used when n or 0 is chosen in scene mode A Autofocus with Manual Override After pressing the shutter release button halfway to focus using autofocus you can make manual adjustments to focus by keeping the shutter releas...

Page 95: ...ess J 3 Choose a mode Highlight an option and press J To return to shooting mode press the shutter release button halfway Option Description AF S Single servo AF For stationary subjects Focus locks when shutter release button is pressed halfway AF F Full time servo AF For moving subjects Camera focuses continuously until shutter release button is pressed Focus locks when shutter release button is ...

Page 96: ...ation display and press J Option Description Face priority AF Thecameraautomaticallydetectsandfocuses on portrait subjects Use for portraits Wide area AF Use for hand held shots of landscapes and other non portrait subjects Use the multi selector to position the focus area Normal area AF Use for pin point focus on a selected spot in the frame Subject tracking AF Track a selected subject as it move...

Page 97: ...m of 35 are detected the camera will focus on the closest subject to choose a different subject use the multi selector If the camera can no longer detect the subject because for example the subject has turned to face away from the camera the border will no longer be displayed and the camera will focus using Normal area AF Wide area normal area AF Use the multi selector to move the focus area anywh...

Page 98: ...t moves through the frame To end tracking press J again Note that the camera may be unable to track subjects if they move quickly leave the frame or are obscured by other objects change visibly in size color or brightness or are too small too large too bright too dark or similar in color or brightness to the background Focus area ...

Page 99: ...tton halfway to initiate focus Check that the focus area is displayed in green Focus will lock while the shutter release button is pressed halfway 2 Recompose the photograph and shoot Do not change the distance between the camera and the subject while focus lock is in effect If the subject moves focus again at the new distance A The f Button Focus lock can also be assigned to the f button 0 193 in...

Page 100: ... While the view through the lens is zoomed in the multi selector can be used to scroll to areas of the frame not visible in the monitor The distance indicator on the right side of the display shows the approximate focus distance the actual focus distance varies with aperture in meters or feet the units used can be selected using the MF distance indicator units option in the setup menu 0 192 Focus ...

Page 101: ...00 and Hi 2 equivalent to ISO 25600 Choosing Auto allows the camera to set ISO sensitivity automatically in the range ISO 100 to 3200 in response to lighting conditions 1 Press the P button Shooting information will be displayed in the monitor 2 Display ISO sensitivity options Highlight the current ISO sensitivity in the information display and press J Mode ISO sensitivity i h Auto 100 6400 in ste...

Page 102: ... S A or M mode will be restored A The Shooting Menu ISO sensitivity can also be adjusted using the ISO sensitivity settings option in the shooting menu 0 176 A See Also For information on enabling auto ISO sensitivity control in P S A or M modes see page 83 For information on using the High ISO NR option in the shooting menu to reduce noise at high ISO sensitivities see page 179 For information on...

Page 103: ... ISO sensitivity is adjusted appropriately when the flash is used 1 Select Auto ISO sensitivity control for ISO sensitivity settings in the shooting menu To display the menus press the G button Select ISO sensitivity settings in the shooting menu highlight Auto ISO sensitivity control and press 2 2 Select On Highlight On and press J if Off is selected ISO sensitivity will remain fixed at the value...

Page 104: ...e can not be achieved at the ISO sensitivity value selected for Maximum sensitivity Press J to exit when settings are complete A Auto ISO Sensitivity Control Noise randomly spaced bright pixels fog or lines is more likely at higher sensitivities Use the High ISO NR option in the shooting menu to reduce noise see page 176 Note that ISO sensitivity may be raised automatically when auto ISO sensitivi...

Page 105: ... Camera meters a wide area of the frame and sets exposure according to tone distribution color and composition M Center weighted metering Camera meters entire frame but assigns greatest weight to center area Classic meter for portraits N Spot metering Camera meters only current focus area making it possible to meter off center subjects Ensures that subject will be correctly exposed even when backg...

Page 106: ...ent metering method in the information display and press J 3 Choose a metering method Highlight an option and press J To return to shooting mode press the shutter release button halfway A See Also For information on using the S g button and the command dial to choose a metering method see page 194 P button Information display ...

Page 107: ...exposure in increments of 1 3 EV In general positive values make the subject brighter while negative values make it darker To choose a value for exposure compensation press the E N L button and rotate the command dial until the desired value is displayed in the monitor Normal exposure can be restored by setting exposure compensation to 0 Exposure compensation is not reset when the camera is turned...

Page 108: ...ng menu 0 180 can be used to restrict the effects of exposure compensation to the background only A Mode M In mode M exposure compensation affects only the exposure indicator shutter speed and aperture do not change The value selected for exposure compensation in other modes remains in effect when mode M is selected A See Also For information on automatically varying exposure over a series of shot...

Page 109: ...colors J Incandescent 3000 K Use under incandescent lighting I Fluorescent Use with Sodium vapor lamps 2700 K Sodium vaporlighting foundin sports venues Warm white fluorescent 3000 K Warm white fluorescent lights White fluorescent 3700 K White fluorescent lights Cool white fluorescent 4200 K Cool white fluorescent lights Day white fluorescent 5000 K Daylight white fluorescent lights Daylight fluor...

Page 110: ... To return to shooting mode press the shutter release button halfway N Flash 5400 K Use with built in or optional flash G Cloudy 6000 K Use in daylight under overcast skies M Shade 8000 K Use in daylight with subjects in the shade L Preset manual Use subject light source or existing photograph as reference for white balance 0 94 All values are approximate and do not reflect fine tuning if applicab...

Page 111: ...perature to which an object would have to be heated to radiate light in the same wavelengths While light sources with a color temperature in the neighborhood of 5000 5500 K appear white light sources with a lower color temperature such as incandescent light bulbs appear slightly yellow or red Light sources with a higher color temperature appear tinged with blue The camera white balance options are...

Page 112: ...l and press 2 If an option other than Auto or Fluorescent is selected proceed to Step 2 If Auto or Fluorescent is selected highlight the desired setting and press 2 2 Fine tune white balance Use the multi selector to fine tune white balance White balance can be fine tuned on the amber A blue B axis and the green G magenta M axis The horizontal amber blue axis corresponds to color temperature while...

Page 113: ...cursor to B blue when a warm setting such as J incandescent is selected will make photographs slightly colder but will not actually make them blue A See Also When white balance bracketing is on the camera will create several images each time the shutter is released 0 123 White balance will be varied with each image bracketing the value currently selected for white balance Increase green Increase m...

Page 114: ...the lighting that will be used in the final photograph Note that exposure is automatically increased by 1 EV when measuring white balance in mode M adjust exposure so that the exposure indicator shows 0 0 57 2 Display white balance options To display the menus press the G button Highlight White balance in the shooting menu and press 2 to display white balance options Highlight Preset manual and pr...

Page 115: ...e Before the indicator stops flashing frame the reference object so that it fills the display and press the shutter release button all the way down No photograph will be recorded white balance can be measured accurately even when the camera is not in focus D Preset White Balance The camera can store only one value for preset white balance at a time the existing value will be replaced when a new va...

Page 116: ... Return to Step 4 and measure white balance again A Other Methods for Measuring Preset White Balance To enter preset measurement mode see above after selecting preset white balance in the information display press J for a few seconds If white balance has been assigned to the S g button white balance preset measurement mode can be activated by keeping the S g button pressed for a few seconds after ...

Page 117: ...e menus press the G button Highlight White balance in the shooting menu and press 2 to display white balance options Highlight Preset manual and press 2 2 Select Use photo Highlight Use photo and press 2 3 Choose Select image Highlight Select image and press 2 to skip the remaining steps and use the image last selected for preset white balance select This image G button ...

Page 118: ...mage 6 Copy white balance Press J to set preset white balance to the white balance value for the highlighted photograph A Inspecting Pictures The picture currently highlighted in the thumbnail display can be inspected by pressing X the picture will be displayed full screen while the button is pressed X button ...

Page 119: ...amera selects a Picture Control automatically Picture Controls Option Description Q Standard Standard processing for balanced results Recommended for most situations R Neutral Minimal processing for natural results Choose for photographs that will later be extensively processed or retouched S Vivid Pictures are enhanced for a vivid photoprint effect Choose for photographs that emphasize primary co...

Page 120: ...button halfway A The Shooting Menu Picture Controls can also be selected using the Set Picture Control option in the shooting menu 0 176 A Custom Picture Controls Custom Picture Controls are created through modifications to existing Picture Controls using the Manage Picture Control option in the shooting menu 0 106 Custom Picture Controls can be saved to a memory card and shared with other cameras...

Page 121: ... a balanced combination of sharpening contrast and saturation using Quick adjust or make manual adjustments to individual settings 1 Display the Picture Control menu To display the menus press the G button Highlight Set Picture Control in the shooting menu and press 2 2 Select a Picture Control Highlight the desired Picture Control and press 2 G button ...

Page 122: ...until all settings have been adjusted or select Quick adjust to choose a preset combination of settings Default settings can be restored by pressing the O button 4 Save changes and exit Press J A Modifications to Original Picture Controls Picture Controls that have been modified from default settings are indicated by an asterisk ...

Page 123: ...t subjects from being washed out in direct sunlight higher values to preserve detail in misty landscapes and other low contrast subjects Brightness Choose 1 for reduced brightness 1 for enhanced brightness Does not affect exposure Manual adjustments non monochrome only Saturation Control the vividness of colors Select A to adjust saturation automatically according to the type of scene or choose fr...

Page 124: ...n relation to the other Picture Controls only contrast is displayed when Monochrome is selected Release the X button to return to the Picture Control menu The icons for Picture Controls that use auto contrast and saturation are displayed in green in the Picture Control grid and lines appear parallel to the axes of the grid A Previous Settings The line under the value display in the Picture Control...

Page 125: ...andscape photographs Orange produces more contrast than yellow red more contrast than orange O Orange R Red G Green Softens skin tones Can be used for portraits Note that the effects achieved with Filter effects are more pronounced than those produced by physical glass filters A Toning Monochrome Only Pressing 3 when Toning is selected displays saturation options Press 4 or 2 to adjust saturation ...

Page 126: ...e Control To display the menus press the G button HighlightManagePicture Control in the shooting menu and press 2 2 Select Save edit Highlight Save edit and press 2 3 Select a Picture Control Highlight an existing Picture Control and press 2 or press J to proceed to step 5 to save a copy of the highlighted Picture Control without further modification G button ...

Page 127: ...e Controls are named by adding a two digit number assigned automatically to the name of the existing Picture Control to use the default name proceed to Step 7 To move the cursor in the name area hold the E N L button and press 4 or 2 To enter a new letter at the current cursor position use the multi selector to highlight the desired character in the keyboard area and press J To delete the characte...

Page 128: ...ist A Manage Picture Control Rename Custom Picture Controls can be renamed at any time using the Rename option in the Manage Picture Control menu A Manage Picture Control Delete The Delete option in the Manage Picture Control menu can be used to delete selected custom Picture Controls when they are no longer needed X button ...

Page 129: ... Copy to camera Copy custom Picture Controls from the memory card to custom Picture Controls C 1 through C 9 on the camera and name them as desired Delete from card Delete selected custom Picture Controls from the memory card The confirmation dialog shown at right will be displayed before a Picture Control is deleted to delete the selected Picture Control highlight Yes and press J Copytocard Copy ...

Page 130: ...enery through a door or window or taking pictures of shaded subjects on a sunny day It is most effective when used with matrix metering 0 85 Active D Lighting X Off Active D Lighting Y Auto A Active D Lighting Versus D Lighting The Active D Lighting option in the shooting menu adjusts exposure before shooting to optimize the dynamic range while the D Lighting option in the retouch menu 0 200 brigh...

Page 131: ... to shooting mode press the shutter release button halfway D Active D Lighting Active D Lighting can not be used with movies Noise randomly spaced bright pixels fog or lines may appear in photographs taken with Active D Lighting Uneven shading may be visible with some subjects Active D Lighting can not be used at ISO sensitivities of Hi 0 3 or above A See Also For information on automatically vary...

Page 132: ...ayed and the flash lamp will light when the shutter release button is pressed halfway 2 Choose a flash mode See page 113 for more information In 0 mode flash mode is fixed at M fill flash and the flash fires with every shot 3 Take pictures Ini k p n o s andwmodes the flash fires as required To turn the flash off lower the flash or choose a flash mode of s In P S A M and 0 modes the flash fires wit...

Page 133: ... p n s w o NR Auto NjU Auto slow sync red eye reduction NjR Auto red eye reduction j Off NU Auto slow sync j Off P A S M N Fill flash N Fill flash Nj Red eye reduction Nj Red eye reduction NjS Slow sync red eye reduction NT Rear curtain sync 0 NS Slow sync N Fill flash NT Rear curtain slow sync S appears in information display when setting is complete In l m r t u v x y z 1 2 and 3 modes flash mod...

Page 134: ...fires at low intensity before main flash reducing red eye but increasing lag between shutter release button being pressed all the way down and shutter being released j off Flash does not fire even when lighting is poor or subject is back lit S slow sync Shutter speed slows automatically to capture background lighting at night or under low light Use to include background lighting in portraits T rea...

Page 135: ...l the latch clicks into place Do not use force failure to observe this precaution could result in product malfunction D The Built in Flash The shutter release may be briefly disabled to protect the flash after it has been used for several consecutive shots The flash can be used again after a short pause Objects close to the camera may appear overexposed in photographs taken with the flash at high ...

Page 136: ...er while negative values make it darker 1 Press the P button Shooting information will be displayed in the monitor 2 Display flash compensation options Highlight flash compensation in the information display and press J 3 Choose a value Highlight a value and press J To return to shooting mode press the shutter release button halfway Normal flash output can be restored by setting flash compensation...

Page 137: ... can be adjusted using the controls on the flash unit in addition to the procedure described above The flash compensation selected with the optional flash unit is added to the flash compensation selected with the camera A See Also The Exposure comp for flash option in the shooting menu 0 180 can be used to restrict the effects of exposure compensation to the background only ...

Page 138: ...ioned in the center of the frame Flash output is adjusted automatically for any changes in ISO sensitivity and aperture To use FV lock 1 Assign FV lock to the f button Select FV lock for Assign Fn1 button in the setup menu 0 193 then press G to return to the shooting display 2 Raise the flash 3 Focus Position the subject in the center of the frame and press the shutter release button halfway to fo...

Page 139: ... Flash output will be locked at this level and an FV lock icon e will be displayed 5 Recompose the photograph 6 Take the photograph Press the shutter release button the rest of the way down to shoot If desired additional pictures can be taken without releasing FV lock 7 Release FV lock Press the f button to release FV lock Confirm that the FV lock icon e is no longer displayed f button ...

Page 140: ... TTL is selected for Flash cntrl for built in flash in the shooting menu 0 181 A Using FV Lock with Optional Flash Units FV lock is also available with optional flash units in TTL and where supported monitor pre flash AA and monitor pre flash A flash control modes See the flash unit manual for details ...

Page 141: ...ettings Option Default 0 Image quality JPEG normal 69 Image size Large 72 White balance P S A M Auto 89 Fine tuning A B 0 G M 0 92 ISO sensitivity P S A M 100 81 Other shooting modes Auto Release mode m w Continuous 63 Other modes Single frame Autofocus mode AF S 75 AF area mode r Wide area AF 76 P S A M m n w 0 1 2 3 Normal area AF k l p o s t u v x y z Face priority AF Metering P S A M Matrix me...

Page 142: ...re Control settings P S A M Unmodified 99 Exposure compensation P S A M 0 0 87 Flash compensation P S A M 0 0 116 Flash mode P S A M 0 Fill flash 113 i k p n w Auto s Auto red eye reduction o Auto slow sync l m r t u v x y z 1 2 3 Off Flexible program P 53 Option Default 0 ...

Page 143: ...ust settings with each shot or to experiment with different settings for the same subject 1 Choose a bracketing option After pressing G to display the menus highlight Auto bracketing set in the shooting menu and press 2 The options shown at right will be displayed Highlight the desired bracketing type and press J then press G to return to the shooting display 2 Press the P button Shooting informat...

Page 144: ...ith each shot The value currently selected for exposure compensation is modified as follows for the first shot the bracketing increment is added to the current value for the second shot the current value is used without modification and for the third shot the bracketing increment is subtracted from the current value The modified values are reflected in the values shown for shutter speed and apertu...

Page 145: ...tive D Lighting set to Auto In continuous release mode shooting will pause after each bracketing cycle If the camera is turned off before all shots in the bracketing sequence have been taken bracketing will resume from the next shot in the sequence when the camera is turned on A The Bracketing Progress Indicator During AE bracketing progress is shown by the bracketing indicator in the information ...

Page 146: ... make room on the memory card A Exposure Bracketing The camera modifies exposure by varying shutter speed and aperture mode P aperture mode S or shutter speed modes A and M If auto ISO sensitivity control is enabled in modes P S and A the camera will automatically vary ISO sensitivity for optimum exposure when the limits of the camera exposure system are exceeded in mode M the camera will first us...

Page 147: ...terval timer shooting in the shooting menu and press 2 2 Choose a starting time Choosefrom thefollowing starting triggers To start shooting immediately highlight Now and press 2 Shooting begins about five seconds after settings are completed proceed to Step 3 To choose a starting time highlight Start time and press 2 to display the start time options shown at right Press 4 or 2 to highlight hours ...

Page 148: ...nue D Before Shooting Select single frame or continuous release mode when using the interval timer Before beginning interval timer photography take a test shot at current settings and view the results in the monitor To ensure that shooting starts at the desired time check that the camera clock is set correctly 0 185 Use of a tripod is recommended Mount the camera on a tripod before shooting begins...

Page 149: ...t proceed at current settings for example if a shutter speed of A is currently selected in shooting mode M or the start time is in less than a minute a warning will be displayed in the monitor If the interval between shots is long enough while the camera is powered by a battery the monitor will turn off and the power on lamp will flash between shots Pictures can not be played back but images will ...

Page 150: ...ached Position This item is only available if a GPS unit is connected when it displays the current latitude longitude altitude and Coordinated Universal Time UTC as reported by GPS Use GPS to set camera clock Select Yes to synchronize the camera clock with the time reported by the GPS device Option Description Enable The camera will enter standby if no operations are performed for the time selecte...

Page 151: ...s taken while this icon is displayed include an additional page of GPS data 0 138 n flashing The GPS unit is searching for a signal Pictures taken while the icon is flashing do not include GPS data No icon No new GPS data have been received from the GPS unit for at least two seconds Pictures taken when the n icon is not displayed do not include GPS data ...

Page 152: ... be displayed in the monitor Full Frame Playback A Rotate Tall To display tall portrait orientation photographs in tall orientation select On for the Rotate tall option in the playback menu 0 174 K button O button K button E N L button G button W Q button Multi selector J button Command dial X button ...

Page 153: ... button 0 146 Return to shooting mode K Press shutter release button halfway to exit to shooting display Retouch photo or play movie Create retouched copy of current photograph 0 199 retouch menu can also be displayed by pressing G button and selecting N tab If current picture is marked with 1 icon to show that it is a movie pressing J starts movie playback 0 45 Display menus G See page 172 for mo...

Page 154: ...tions 0 173 GPS data are only displayed if a GPS unit was used when the photo was taken File information None image only Overview GPS data Highlights RGB histogram Shooting data 100NIKON 15 05 2013 15 30 05 DSC_0001 JPG 1 1 4928x3264 NORMAL LATITUDE LONGITUDE ALTITUDE TIME UTC N 35º 36 371 E 139º 43 696 35m 15 05 2013 01 15 29 COOLPIX A 1 1 Highlights COOLPIX A 1 1 M E F L A F S T X O E F L Y R P ...

Page 155: ...me number total number of images 3 Camera name 1 Histogram RGB channel In all histograms horizontal axis gives pixel brightness vertical axis number of pixels 2 Histogram red channel 3 Histogram green channel 4 Histogram blue channel 5 Frame number total number of images 6 White balance 89 White balance fine tuning 92 Preset manual 94 100NIKON 15 05 2013 15 30 05 DSC_0001 JPG 1 12 4928x3264 NORMAL...

Page 156: ...applications Some sample histograms are shown below If the image contains objects with a wide range of brightnesses the distribution of tones will be relatively even If the image is dark tone distribution will be shifted to the left If the image is bright tone distribution will be shifted to the right Increasing exposure compensation shifts the distribution of tones to the right while decreasing e...

Page 157: ...cture Control3 99 14 Sharpening 103 15 Contrast 103 16 Brightness 103 17 Saturation 4 103 Filter effects 5 103 18 Hue 4 103 Toning5 103 M E F L A F S T X O E F L Y R P C N A N A S S C S M L H P O V M D D L R T O E E Y D A N P E P I G E S T O H 1 S B T 1 8 u T i S L 1 1 3 5 l L 0 m t O B 1 0 m W L 2 i 5 n 0 3 F5 6 COOLPIX A 1 12 1 2 3 4 5 6 7 8 9 W C P H O I Q S C B S H I L C U H O R A U T O T I A ...

Page 158: ...ding 19 High ISO noise reduction 179 Long exposure noise reduction 179 20 Active D Lighting 110 21 Retouch history 197 22 Image Comment 186 23 24 25 1 Latitude 2 Longitude 3 Altitude 4 Coordinated Universal Time UTC 5 6 7 N A R O C E I T T S O E U D C R H E L D I U G C H T H N D W C T I O A O R R L R L I I M I M O M S A G R O L H F T I B N I L A O N T L R G E A M R NCE COMMENT SPRING HAS COME COOL...

Page 159: ... 4 Retouch indicator 197 5 Histogram showing the distribution of tones in the image 0 136 6 Image quality 69 7 Image size 72 8 File name 191 9 Time of recording 25 185 10 Date of recording 25 185 11 Folder name 177 12 Metering 85 13 Shooting mode 29 35 52 14 Shutter speed 54 56 15 Aperture 55 56 16 ISO sensitivity 81 17 Image comment indicator 186 18 Focal length 19 GPS data indicator 130 20 Activ...

Page 160: ...isplayed Display fewer images X Press X button to reduce the number of images displayed When four images are displayed press to view highlighted image full frame Highlight images Use multi selector or command dial to highlight images for full frame playback playback zoom 0 144 deletion 0 148 or protection 0 146 View highlighted image Press J to display the highlighted image full frame Delete highl...

Page 161: ...atus of highlighted photo E N L See page 146 for more information Return to shooting mode K Press shutter release button halfway to exit to shooting display Display menus G See page 172 for more information To Use Description ...

Page 162: ...n date list to place cursor in thumbnail list Press again to return to date list Exit to thumbnail playback Zoom in on highlighted photo X Date list Exit to 72 frame playback Thumbnail list Press and hold X button to zoom in on highlighted picture Highlight dates Highlight images Date list Use multi selector or command dial to highlight date Thumbnail list Use multi selector or command dial to hig...

Page 163: ...humbnail list Delete highlighted picture 0 148 Change protect status of highlighted photo E N L See page 146 for more information Return to shooting mode K Press shutter release button halfway to exit to shooting display Display menus G See page 172 for more information To Use Description ...

Page 164: ...es Press W Q to zoom out While photo is zoomed in use multi selector to view areas of image not visible in monitor Keep multi selector pressed to scroll rapidly to other areas of frame Navigation window is displayed when zoom ratio is altered area currently visible in monitor is indicated by yellow border View other areas of image Select zoom in on or out from faces P Faces up to 35 detected durin...

Page 165: ...back zoom is cancelled when a movie is displayed Cancel zoom Cancel zoom and return to full frame playback Change protect status E N L See page 146 for more information Return to shooting mode K Press shutter release button halfway to exit to shooting display Display menus G See page 172 for more information To Use Description ...

Page 166: ... when the memory card is formatted 0 183 To protect a photograph 1 Select an image Display the image in full frame playback or playback zoom or highlight it in the thumbnail list in thumbnail or calendar playback 2 Press the E N L button The photograph will be marked with a P icon To remove protection from the photograph so that it can be deleted display the photograph or highlight it in the thumb...

Page 167: ...ng Protection from All Images To remove protection from all images in the folder or folders currently selected in the Playback folder menu press the E N L and O buttons together for about two seconds during playback ...

Page 168: ...der use the Delete option in the playback menu Once deleted photographs can not be recovered Note that protected pictures can not be deleted Full Frame Thumbnail and Calendar Playback Press the O button to delete the current photograph 1 Select an image Display the image or highlight it in the thumbnail list in thumbnail or calendar playback 2 Press the O button A confirmation dialog will be displ...

Page 169: ...aph press the O button again To exit without deleting the photograph press the K button A Calendar Playback During calendar playback you can delete all photographs taken on a selected date by highlighting the date in the date list and pressing the O button ...

Page 170: ...on in the playback menu Press the G button and select Delete in the playback menu Highlight Selected and press 2 2 Highlight a picture Use the multi selector to highlight a picture to view the highlighted picture full screen press and hold the X button Option Description Q Selected Delete selected pictures n Select date Delete all pictures taken on a selected date R All Delete all pictures in the ...

Page 171: ... highlighted picture Selected pictures are marked by a O icon Repeat steps 2 and 3 to select additional pictures to deselect a picture highlight it and press W Q 4 Press J to complete the operation A confirmation dialog will be displayed highlight Yes and press J W Q button ...

Page 172: ...he highlighted date press W Q Use the multi selector to scroll through the pictures or press and hold X to view the current picture full screen Press W Q to return to the date list 3 Select the highlighted date Press 2 to select all pictures taken on the highlighted date Selected dates are marked with a M icon Repeat steps 2 and 3 to select additional dates to deselect a date highlight it and pres...

Page 173: ...153 I 4 Press J to complete the operation A confirmation dialog will be displayed highlight Yes and press J ...

Page 174: ...atest information on supported operating systems see the websites listed on page 1 1 Start the computer and insert the installer CD Windows If prompted follow the on screen instructions to launch the ViewNX 2 installer Mac OS The contents of the CD will be displayed double click the Welcome icon to display the language selection dialog Using ViewNX 2 Windows Macintosh Windows 8 Windows 7 Windows V...

Page 175: ...tion Guide before proceeding 3 Start the installer Click Install and follow the on screen instructions 4 Exit the installer Click Yes Windows or OK Mac OS when installation is complete The following software is installed ViewNX 2 includes the following three modules Nikon Transfer 2 used to copy pictures to the computer ViewNX 2 used to view retouch and print pictures and Nikon Movie Editor used f...

Page 176: ...er is equipped with an SD card slot the card can be inserted directly in the slot SD card reader Connect a card reader available separately from third party suppliers to the computer and insert the memory card Nikon Transfer 2 will start automatically if a dialog is displayed prompting you to choose a program select NikonTransfer 2 Note that Nikon Transfer 2 may take some time to launch if the mem...

Page 177: ...isconnect the USB cable If you are using a card reader or card slot choose the appropriate option in the computer operating system to eject the removable disk corresponding to the memory card and then remove the card from the card reader or card slot A Windows 7 If the following dialog is displayed select Nikon Transfer 2 as described below 1 Under Import pictures and videos clickChangeprogram A p...

Page 178: ... ViewNX 2 when transfer is complete A Starting ViewNX 2 Manually Windows Double click the ViewNX 2 shortcut on the desktop Mac OS Click the ViewNX 2 icon in the Dock A For More Information Consult online help for more information on using ViewNX 2 ...

Page 179: ...nnect the camera using the supplied UC E16 USB cable 1 Turn the camera off 2 Connect the USB cable Turn the printer on and connect the USB cable as shown Do not use force or attempt to insert the connectors at an angle The camera will turn on automatically and a welcome screen will be displayed in the monitor followed by a PictBridge playback display ...

Page 180: ... is fully charged or use an optional EH 5b AC adapter and EP 5C power connector 0 230 When taking photographs to be printed via direct USB connection set Color space to sRGB 0 178 D USB Hubs Connect the camera directly to the printer do not connect the cable via a USB hub ...

Page 181: ...or 3 to highlight an option and press 2 to select Option Description Page size Highlight a page size only sizes supported by the current printer are listed and press J to select and exit to the previous menu to print at the default page size for the current printer select Printer default No of copies Press 1 or 3 to choose number of copies maximum 99 then press J to select and return to the previo...

Page 182: ...nd press J to select and exit to the previous menu Cropping This option is available onlyifsupportedby the printer To exit without cropping highlight No cropping and press J To crop the current picture highlight Crop and press 2 A crop selection dialog will be displayed press X to increase the size of the crop W Q to decrease Position the crop using the multi selector and press J Note that print q...

Page 183: ...t order created with the DPOF print order option in the playback menu 0 166 The current print order will be displayed in Step 3 Index print To create an index print of all JPEG pictures on the memory card proceed to Step 4 Note that if the memory card contains more than 256 pictures only the first 256 images will be printed D Selecting Photographs for Printing NEF RAW photographs 0 69 can not be s...

Page 184: ...the number of prints up to 99 to deselect the picture press 3 when the number of prints is 1 Continue until all the desired pictures have been selected If youchose Select datein Step 2 press 1 or 3 to highlight a date and press 2 to toggle the highlighted date on or off To view the pictures taken on the selected date press W Q Use the multi selector to scroll through the pictures or press and hold...

Page 185: ...e stamp options as described on page 161 a warning will be displayed if the selected page size is too small for an index print 6 Start printing Select Start printing and press J to start printing To cancel before all copies have been printed press J A See Also See page 242 for information on what to do if an error occurs during printing ...

Page 186: ...rint order select Deselect all 2 Select pictures Use the multi selector to scroll through the pictures on the memory card To display the current picture in full screen press and hold the X button To select the current picture for printing hold the W Q button and press 1 The picture will be marked with a Z icon and the number of prints will be set to 1 Keeping the W Q button pressed press 1 or 3 to...

Page 187: ... 2 to toggle the highlighted option on or off to complete the print order without including this information proceed to Step 5 Print shooting data Print shutter speed and aperture on all pictures in print order Print date Print date of recording on all pictures in print order 5 Complete the print order Press J to complete the print order ...

Page 188: ...SB connection to print the date of recording on photographs in the current print order use the PictBridge Time stamp option The DPOF print order option can not be used if there is not enough space on the memory card to store the print order NEF RAW photographs 0 69 can not be selected using this option JPEG copies of NEF RAW images can be created using the NEF RAW processing option in the retouch ...

Page 189: ...he camera 1 Turn the camera off Always turn the camera off before connecting or disconnecting an HDMI cable 2 Connect the HDMI cable as shown 3 Tune the device to the HDMI channel 4 Turn the camera on and press the K button During playback images will be displayed on the high definition television or monitor screen Note that the edges of images may not be displayed Connect to camera Connect to hig...

Page 190: ...output to the HDMI device at the resolution and frame rate selected for Movie settings Frame size frame rate in the shooting menu 0 43 note however that if 1080i interlaced is selected for HDMI Output resolution in the setup menu the image will be output at 720p while if 1920 1080 30p or 1920 1080 25p is selected for Frame size frame rate the image will be displayed on the camera not on the HDMI d...

Page 191: ... Auto off timer OutputResolution Choose the format for images output to the HDMI device If Auto is selected the camera will automatically select the appropriate format Regardless of the option selected Auto will be used for movie recording and playback DeviceControl If On is selected for HDMI Device control in the setup menu when the camera is connected to a television that supports HDMI CEC and b...

Page 192: ...tab The playback menu contains the following options D The Playback Menu ManagingImages G button Option 0 Delete 150 Playback folder 173 Playback display options 173 Image review 173 Rotate tall 174 Slide show 174 DPOF print order 166 Option 0 A See Also Menu defaults are listed on page 16 ...

Page 193: ... highlight Done and press J Choose whether pictures are automatically displayed in the monitor immediately after shooting If Off is selected pictures can only be displayed by pressing the K button Playback Folder G button D playback menu Option Description All Pictures in all folders will be visible during playback Current Only photos in the folder currently selected for Storage folder in the shoo...

Page 194: ...ck folder 0 173 Rotate Tall G button D playback menu Option Description On Tall portrait orientation pictures are automatically rotated for display in the camera monitor Pictures taken with Off selected for Auto image rotation 0 187 will be displayed in wide landscape orientation Off Tall portrait orientation pictures are displayed in wide landscape orientation Slide Show G button D playback menu ...

Page 195: ...ription Skip back skip ahead Press 4 to return to previous frame 2 to skip to next frame or rotate multi selector or command dial to skip frames View additional photo info Change photo info displayed 0 134 Pause resume slide show Pause show Press again to resume Exit to playback menu G End show and return to playback menu Exit to playback mode K End show and return to playback mode Exit to shootin...

Page 196: ...ting menu options to their default values 0 16 G button Option 0 Reset shooting menu 176 Storage folder 177 Image quality 69 Image size 72 White balance 89 Set Picture Control 99 Manage Picture Control 106 Color space 178 Active D Lighting 110 Long exposure NR 179 High ISO NR 179 ISO sensitivity settings 81 Release mode 63 Built in AF assist illuminator 180 Exposure comp for flash 180 Flash cntrl ...

Page 197: ... 999 photographs During shooting pictures are stored in the highest numbered folder with the selected name If a photograph is taken when the current folder is full or contains a photograph numbered 9999 the camera will create a new folder by adding 1 to the current folder number e g 101NIKON The camera treats folders with the same name but different folder numbers as the same folder For example if...

Page 198: ... be printed without modification or viewed in applications that do not support color management or when taking photographs that will be printed with ExifPrint the direct printing option on some household printers or kiosk printing or other commercial print services Adobe RGB photographs can also be printed using these options but colors may not be as vivid JPEG photographs taken in the Adobe RGB c...

Page 199: ...d while photographs are being processed the capacity of the memory buffer will drop Long exposure noise reduction is not available during movie recording Photographs taken at high ISO sensitivities can be processed to reduce noise Long Exposure NR G button C shooting menu High ISO NR G button C shooting menu Option Description High Reduce noise randomly spaced bright pixels lines or fog particular...

Page 200: ...s poor Off The AF assist illuminator does not light to assist the focus operation The camera may not be able to focus using autofocus when lighting is poor A See Also For information on the shooting modes in which AF assist is available see page 236 Exposure Comp for Flash G button C shooting menu Option Description YE Entire frame Both flash level and exposure compensation are adjusted to modify ...

Page 201: ...EG Flash Cntrl for Built in Flash G button C shooting menu Option Description 1 TTL Flash output is adjusted automatically in response to shooting conditions 2 Manual Choose a flash level between Full and 1 32 1 32 of full power The camera does not emit monitor pre flashes A Manual A Y icon flashes in the monitor when Manual is selected and the flash is raised A The SB 400 When an optional SB 400 ...

Page 202: ...183 Photo info 184 HDMI 169 Flicker reduction 184 Time zone and date 185 Language 186 Image comment 186 Auto image rotation 187 Self timer 188 Auto off timer 189 Image review time 189 Remote on duration ML L3 189 Beep 190 Shuttersound 190 File number sequence 191 MF distance indicator units 192 Reverse indicators 192 Assign Fn1 button 193 Assign J Fn2 button 194 Reverse dial rotation 194 Slot empt...

Page 203: ...er source during formatting Press 1 or 3 to choose monitor brightness Choose higher values for increased brightness lower values for reduced brightness Choose lower values if the monitor seems too bright when an optional external viewfinder is attached 0 231 Format Memory Card G button B setup menu D Formatting Memory Cards Formatting memory cards permanently deletes any data they may contain Be s...

Page 204: ...nder fluorescent or mercury vapor lighting Choose an option that matches the frequency of the local AC power supply Photo Info G button B setup menu Flicker Reduction G button B setup menu A Flicker Reduction If you are unsure as to the frequency of the local power supply test both options and choose the one that produces the best results Flicker reduction may not produce the desired results if th...

Page 205: ...tion Time zone Choose a time zone The camera clock is automatically set to the time in the new time zone Date and time Set the camera clock 0 25 Date format Choose the order in which the day month and year are displayed Daylight saving time Turn daylight saving time on or off The camera clock will automatically be advanced or set back one hour The default setting is Off ...

Page 206: ...he photo information display 0 137 The following options are available Input comment Input a comment as described on page 107 Comments can be up to 36 characters long Attach comment Select this option to attach the comment to all subsequent photographs Attach comment can be turned on and off by highlighting it and pressing 2 After choosing the desired setting highlight Done and press J to exit Lan...

Page 207: ...corded Camera orientation is not recorded when Off is selected Choose this option when panning or taking photographs with the lens pointing up or down Auto Image Rotation G button B setup menu Landscape wide orientation Camera rotated 90 clockwise Camera rotated 90 counterclockwise A Rotate Tall To automatically rotate tall portrait orientation photographs for display during playback select On for...

Page 208: ...and the number of shots taken 0 66 Self timer delay Choose the length of the shutter release delay Numberofshots Press 1 and 3 to choose the number of shots taken each time the shutter release button is pressed from 1 to 9 Self Timer G button B setup menu ...

Page 209: ...r 30 minutes when an optional EH 5b AC adapter is connected and will not turn off during slide shows or while images are being transmitted using an Eye Fi card Choose how long pictures are displayed in the monitor after shooting Choose how long the camera will wait for a signal from the optional ML L3 remote control before cancelling the currently selected remote control release mode and turning o...

Page 210: ...if you attempt to take a photograph when the memory card is locked 0 24 Select Off to prevent the beep from sounding Note that a beep will not sound in movie mode when the memory card is locked or the camera focuses Choose whether the camera makes a sound when the shutter is released Beep G button B setup menu Shutter Sound G button B setup menu A The 5 Icon A 5 icon is displayed when an option ot...

Page 211: ...aph numbered 9999 a new folder will be created automatically and file numbering will begin again from 0001 Off File numbering is reset to 0001 when a new folder is created the memory card is formatted or a new memory card is inserted in the camera Note that a new folder is created automatically if a photograph is taken when the current folder contains 999 photographs Reset Resets the file numberin...

Page 212: ...t If V is selected the exposure indicator is displayed with positive values on the left and negative values on the right Select W to display negative values on the left and positive values on the right MF Distance Indicator Units G button B setup menu Reverse Indicators G button B setup menu ...

Page 213: ...ot change if the composition is changed while the button is pressed AE lock Hold Press the f button to lock exposure Exposure remains locked until the f button is pressed again or the auto off timer expires AF lock only Focus locks while the f button is pressed 0 79 AF ON Pressing f button initiates autofocus When single servo autofocus is selected the camera can not be focused by pressing the shu...

Page 214: ...ance Press the S g button and rotate the command dial to adjust white balance 0 89 Image quality size Press the S g button and rotate the command dial to choose image quality and size 0 69 72 Metering Press the S g button and rotate the command dial to choose metering option 0 85 Active D Lighting Press the S g button and rotate the command dial to choose a setting for Active D Lighting 0 110 Auto...

Page 215: ...lected destination Note that pictures will not be uploaded if signal strength is insufficient Observe all local laws concerning wireless devices Where wireless devices are prohibited remove the card from the camera as the card may continue to emit wireless signals even when Disable is selected When an Eye Fi card is inserted its status is indicated by an icon in the monitor d Eye Fi upload disable...

Page 216: ... Eye Fi card and direct any inquiries to the manufacturer The camera can be used to turn Eye Fi cards on and off but may not support other Eye Fi functions A Supported Eye Fi Cards Some cards may not be available in some countries or regions consult the manufacturer for more information Eye Fi cards are for use only in the country of purchase A Using Eye Fi Cards in Ad Hoc Mode Additional time may...

Page 217: ...a Available only if J button is pressed in full frame playback when a retouched image or original is displayed G button Option 0 i D Lighting 200 j Red eye correction 201 k Trim 202 l Monochrome 203 m Filter effects 203 n Color balance 205 o Image overlay 206 7 NEF RAW processing 209 8 Resize 211 Quick retouch 213 e Straighten 213 Fisheye 213 f Color outline 214 g Color sketch 214 h Perspective co...

Page 218: ...t a picture Highlight a picture and press J to view the highlighted picture full screen press and hold the X button 3 Select retouch options For more information see the section for the selected item To exit without creating a retouched copy press G 4 Create a retouched copy Press J to create a retouched copy Retouched copies are indicated by a o icon ...

Page 219: ...tion will be cancelled if no actions are performed for a brief period any unsaved changes will be lost D Retouching Copies Most options can be applied to copies created using other retouch options although with the exceptions of Image overlay and Edit movie Choose start end point each option can be applied only once note that multiple edits may result in loss of detail Options that can not be appl...

Page 220: ...s making it ideal for dark or backlit photographs Press 1 or 3 to choose the amount of correction performed The effect can be previewed in the edit display Press J to copy the photograph D Lighting G button N retouch menu Before After ...

Page 221: ...fore proceeding Red Eye Correction G button N retouch menu To Use Description Zoom in X Press X button to zoom in W Q button to zoom out While photo is zoomed in use multi selector to view areas of image not visible in monitor Keep multi selector pressed to scroll rapidly to other areas of frame Navigation window is displayed when zoom buttons or multi selector is pressed area currently visible in...

Page 222: ...itch between aspect ratios of 3 2 4 3 5 4 1 1 and 16 9 Move crop Use multi selector to move the crop to another area of the image Press and hold the selector to move the crop more quickly Create copy Save the current crop as a separate file D Trim Image Quality and Size Copies created from NEF RAW or NEF RAW JPEG photos have an image quality of JPEG fine 0 69 cropped copies created from JPEG photo...

Page 223: ... After adjusting filter effects as described below press J to copy the photograph Monochrome G button N retouch menu Filter Effects G button N retouch menu Option Description Skylight Creates the effect of a skylight filter making the picture less blue The effect can be previewed in the monitor as shown at right Warm filter Creates a copy with warm tone filter effects giving the copy a warm red ca...

Page 224: ... sources Number of points Choose from four six or eight Filter amount Choose the brightness of the light sources affected Filterangle Choose the angle of the points Length of points Choose the length of points Confirm Preview the effects of the filter as shown at right Press X to preview the copy full frame Save Create a retouched copy Soft Add a soft filter effect Press 1 or 3 to choose the filte...

Page 225: ...displayed in the monitor press the X button The histogram will be updated to show data only for the portion of the image displayed in the monitor While the image is zoomed in press the E N L button to toggle back and forth between color balance and zoom When zoom is selected you can zoom in and out with the X and W Q buttons and scroll the image with the multi selector Increase amount of magenta I...

Page 226: ...e new picture is saved at current image quality and size settings before creating an overlay set image quality and size 0 69 72 all options are available To create an NEF RAW copy choose an image quality of NEF RAW 1 Select Image overlay Highlight Image overlay in the retouch menu and press 2 The dialog shown at right will be displayed with Image 1 highlighted press J to display a list of the NEF ...

Page 227: ...play 3 Select the second image The selected image will appear as Image 1 Highlight Image 2 and press J then select the second photo as described in Step 2 4 Adjust gain Highlight Image 1 or Image 2 and optimize exposure for the overlay by pressing 1 or 3 to select gain from values between 0 1 and 2 0 Repeat for the second image The default value is 1 0 select 0 5 to halve gain or 2 0 to double it ...

Page 228: ... 6 Save the overlay Press J while the preview is displayed to save the overlay After an overlay is created the resulting image will be displayed full frame in the monitor D Image Overlay The overlay has the same photo info including date of recording metering shutter speed aperture shooting mode exposure compensation and image orientation and values for white balance and Picture Control as the pho...

Page 229: ...isplay a picture selection dialog listing only NEF RAW images created with this camera 2 Select a photograph Use the multi selector to highlight a photograph to view the highlighted photograph full frame press and hold the X button Press J to select the highlighted photograph and proceed to the next step NEF RAW Processing G button N retouch menu ...

Page 230: ...re Control grid is not displayed when Picture Controls are adjusted 4 Copy the photograph Highlight EXE and press J to create a JPEG copy of the selected photograph note that the copy will be recorded in the color space currently selected in the shooting menu not the color space selected at the time the photograph was taken 0 178 The resulting image will be displayed full frame in the monitor To e...

Page 231: ...ect Resize To resize selected images press G to display the menusand selectResizeinthe retouch menu 2 Choose a size Highlight Choose size and press 2 The options shown at right will be displayed highlight an option and press J Resize G button N retouch menu ...

Page 232: ... a 8 icon Press J when the selection is complete 4 Save the resized copies A confirmation dialog will be displayed Highlight Yes and press J to save the resized copies D Viewing Resized Copies Playback zoom may not be available when resized copies are displayed D Image Quality Copies created from NEF RAW or NEF RAW JPEG photos have an image quality 0 69 of JPEG fine copies created from JPEG photos...

Page 233: ...wise the effect can be previewed in the edit display note that edges of the image will be trimmed to create a square copy Press J to copy the photograph or press K to exit to playback without creating a copy Create copies that appear to have been taken with a fisheye lens Press 2 to increase the effect this also increases the amount that will be cropped out at the edges of the image 4 to reduce it...

Page 234: ...dness or Outlines and press 4 or 2 to change Vividness can be increased to make colors more saturated or decreased for a washed out monochromatic effect while outlines can be made thicker or thinner Thicker outlines make colors more saturated The results can be previewed in the edit display Press J to copy the photograph or press K to exit to playback without creating a copy Color Outline G button...

Page 235: ...ector to adjust perspective note that greater amounts of perspective control result in more of the edges being cropped out The results can be previewed in the edit display Press J to copy the photograph or press K to exit to playback without creating a copy Perspective Control G button N retouch menu Before After ...

Page 236: ...cus Choose area in focus If area of effect is in wide orientation press 1 or 3 to position frame showing area of copy that will be in focus If area of effect is in tall orientation press4or2 to position frame showing area of copy that will be in focus Choose size If area of effect is in wide orientation press 4 or 2 to choose height If area of effect is in tall orientation press 1 or 3 to choose w...

Page 237: ...the X button Press J to select the highlighted photograph and proceed to the next step 3 Select a color Use the multi selector to position the cursor over an object and press E N L to select the color of the object as one that will remain in the final copy the camera may have difficulty detecting unsaturated colors choose a saturated color To zoom in on the picture for precise color selection pres...

Page 238: ... include hues from other colors The effect can be previewed in the edit display 6 Select additional colors To select additional colors rotate the command dial to highlight another of the three color boxes at the top of the display and repeat Steps 3 5 to select another color Repeat for a third color if desired To deselect the highlighted color press O To remove all colors press and hold O A confir...

Page 239: ...y the retouch menu when a copy or original is played back full frame 1 Select a picture Select a retouched copy shown by a N icon or a photograph that has been retouched in full frame playback and press J 2 Select Side by side comparison Highlight Side by side comparison in the retouch menu and press J Side by Side Comparison ...

Page 240: ...on If the copy was created from two images using Image overlay press 1 or 3 to view the other source image If multiple copies exist for the current source image press 1 or 3 to view the other copies To exit to playback mode press the K button or press J to return to playback with the highlighted image displayed D Side by Side comparison The source image will not be displayed if the copy was create...

Page 241: ... 20 most recently used settings with the most recently used items first Press 1 or 3 to highlight an option and press 2 to select G button A Removing Items from the Recent Settings Menu To remove an item from the recent settings menu highlight it and press the O button A confirmation dialog will be displayed press O again to delete the selected item ...

Page 242: ...lect O My Menu for m Recent settings Choose tab 1 Select Choose tab In the recent settings menu m highlight Choose tab and press 2 2 Select O My Menu Highlight O My Menu and press J The name of the menu will change from RECENT SETTINGS to MY MENU To view recent settings again select m Recent settings for O My Menu Choose tab ...

Page 243: ...h to add and press 2 3 Select an item Highlight the desired menu item and press J 4 Position the new item Press 1 or 3 to move the new item up or down in My Menu Press J to add the new item 5 Add more items The items currently displayed in My Menu are indicated by a check mark Items indicated by a V icon can not be selected Repeat steps 1 4 to select additional items ...

Page 244: ...cted items are indicated by a check mark 3 Delete the selected items Highlight Done and press J A confirmation dialog will be displayed press J again to delete the selected items A Deleting Items in My Menu To delete the item currently highlighted in My Menu press the O button A confirmation dialog will be displayed press O again to remove the selected item from My Menu ...

Page 245: ...items and press 2 2 Select an item Highlight the item you wish to move and press J 3 Position the item Press 1 or 3 to move the item up or down in My Menu and press J Repeat Steps 2 3 to reposition additional items 4 Exit to My Menu Press the G button to return to My Menu G button ...

Page 246: ...is equipped with a safety lock for flash units with a locking pin 1 Remove the accessory shoe cover 2 Mount the flash unit on the accessory shoe See the manual provided with the flash unit for details The built in flash will not fire when an optional flash unit is attached Optional Flash Units Speedlights D Use Only Nikon Flash Accessories Use only Nikon flash units Negative voltages or voltages o...

Page 247: ... SB 800 SB 700 1 SB 600 SB 400 Feature Guide No 2 ISO 100 34 111 34 111 38 125 28 92 30 98 21 69 ISO 200 48 157 48 157 53 174 39 128 42 138 30 98 1 If a color filter is attached to the SB 910 SB 900 or SB 700 when v or N flash is selected for white balance the camera will automatically detect the filter and adjust white balance appropriately 2 m ft 20 C 68 F SB 910 SB 900 SB 800 SB 700 and SB 600 ...

Page 248: ...n monitor pre flashes are used in AA and A modes Compatible flash units SB 900 SB 910 SB 800 SB 700 SB 600 SB 400 Single flash i TTL i TTL balanced fill flash 1 z z z z z Standard i TTL flash z2 z 2 z z 2 z AA Auto aperture z3 z 3 A Non TTL auto z3 z 3 GN Distance priority manual z z z M Manual z z z z z4 RPT Repeating flash z z Flash Color Information Communication z z z z z FV Lock 5 z z z z z R...

Page 249: ...use i TTL flash control with optional flash units other than the SB 400 select i TTL flash control mode on the flash unit before shooting When using an SB 700 or SB 400 note that i TTL balanced fill flash is activated automatically when matrix or center weighted metering is selected with the camera while standard i TTL is used with spot metering A Optional Flash Units Optional flash units enter st...

Page 250: ...n EP 5C power connector is required to connect the camera to the EH 5b EH 5a or EH 5 The power connector and adapters are each sold separately Before closing the battery chamber memory card slot cover be sure the power connector cable is fully inserted in the power connector slot The cable could be damaged if caught between the cover and the edge of the battery chamber when the cover is closed Aft...

Page 251: ...battery chamber latch to the right q insert a fingernail into the gap and open the battery chamber w Ensure that the battery is inserted in the correct orientation r Remote Cord MC DC2 GPS units GPS Unit GP 1 The GP 1 attaches to the camera accessory shoe allowing the current latitude longitude altitude and Coordinated Universal Time UTC to be recorded when photographs are taken Wireless mobile ad...

Page 252: ...ra body Use a blower to remove dust and lint then wipe gently with a soft dry cloth After using the camera at the beach or seaside wipe off sand or salt with a cloth lightly dampened in distilled water and dry thoroughly Important Dust or other foreign matter inside the camera may cause damage not covered under warranty Lens This glass element is easily damaged Remove dust and lint with a blower I...

Page 253: ...at generates strong electromagnetic radiation or magnetic fields Strong static charges or the magnetic fields produced by equipment such as radio transmitters could interfere with the monitor damage data stored on the memory card or affect the product s internal circuitry Donotleavethelenspointedatthesun Do not leave the lens pointed at the sun or other strong light source for an extended period I...

Page 254: ... mouth Caring for the Battery Batteries may leak or explode if improperly handled Observe the following precautions when handling batteries Use only batteries approved for use in this equipment Do not expose the battery to flame or excessive heat Keep the battery terminals clean Turn the product off before replacing the battery Remove the battery from the camera or charger when not in use and repl...

Page 255: ...eries tends to decrease Be sure the battery is fully charged before taking photographs outside in cold weather Keep a spare battery in a warm place and exchange the two as necessary Once warmed a cold battery may recover some of its charge Used batteries are a valuable resource recycle in accord with local regulations Charge the battery indoors at ambient temperatures of 5 C 35 C 41 F 95 F Do not ...

Page 256: ...z z z z z Active D Lighting1 2 z z Long exposure NR1 z z z z z z z High ISO NR1 z z z z z z z ISO sensitivity settings 1 2 z3 z z z3 z3 z3 z3 Release mode 1 2 z z z z z z z Built in AF assist illuminator1 z z z z z Exposure comp for flash 1 z z Flash cntrl for built in flash Optional flash1 z z Auto bracketing set1 z z Other settings 2 Autofocus mode1 z4 z z z4 z4 z4 z4 AF area mode 1 z z z4 z4 z4...

Page 257: ...tors z z z z z z z Assign Fn1 button z z z z z z z Assign J Fn2 button z z z z z z z Reverse dial rotation z z z z z z z Slot empty release lock z z z z z z z 1 Reset with Reset shooting menu 0 176 2 Reset with two button reset 0 121 Two button reset also resets parameters for Picture Control currently selected with Set Picture Control 3 Auto ISO sensitivity control is not available 4 Reset when m...

Page 258: ... without warning Choose longer delays for Auto off timer in the setup menu 0 189 Camera takes time to turn on Delete files or folders Shutter release disabled Memory card is locked full or not inserted 0 23 24 Built in flash is charging No photo taken when remote control shutter release button is pressed Replace battery in remote control 0 231 Built in flash is charging Time selected for Remote on...

Page 259: ...area and scene modes Off selected for Built in AF assist illuminator in the shooting menu 0 180 Smudges appear in photographs Clean lens Sound is not recorded with movies Off is selected for Movie settings Microphone 0 43 The brightness of the image in the monitor differs from the final photograph Center weighted or spot metering is selected 0 85 The camera is in mode M The subject is too bright o...

Page 260: ...ring can not be changed Autoexposure lock is in effect Exposure compensation can not be used Choose mode P S or A 0 52 Noise reddish areas or other artifacts appears in long exposures Turn long exposure noise reduction on 0 179 NEF RAW image is not played back Photo was taken at image quality of NEF RAW JPEG 0 69 Can not view pictures recorded with other cameras Pictures recorded with other makes ...

Page 261: ... television Select On for HDMI Device control in the setup menu 0 171 Adjust HDMI CEC settings for the television as described in documentation provided with the device Cannottransferphotostocomputer OS not compatible with camera or transfer software Use card reader to copy photos to computer 0 156 Photos are not displayed in Capture NX 2 Update to latest version 0 231 Computer displays NEF RAW im...

Page 262: ...ller aperture higher f number mode A If subject is too dark increase ISO sensitivity use the flash or choose slower shutter speed mode S or larger aperture lower f number mode A A shutter speed of Bulb is not available in shutter priority auto mode Choose a different shutter speed or select manual mode Change shutter speed or select mode M 54 56 Cardisfull Itmaybepossibleto take more pictures at a...

Page 263: ...d This card is not formatted Format the card Format memory card or insert new memory card 23 Clock has been reset Set camera clock 25 Failed to update flash unit firmware Flashcannotbeused Contact a Nikon authorized service representative Contact a Nikon authorized service representative Folder contains no images Select folder containing images from Playback folder menu or insert memory card conta...

Page 264: ...f correct size and select Continue 159 Paper jam Clear jam and select Continue 159 Out of paper Insert paper of selected size and select Continue 159 Check ink supply Check ink To resume select Continue 159 Out of ink Replace ink and select Continue 159 Indicator Solution 0 ...

Page 265: ...distances measured from center of front surface of lens Focus area selection Face priority normal area wide area and subject tracking AF Monitor 7 5 cm 3 in approx 921k dot TFT LCD with a wide viewing angle anti reflection coating and 9 level brightness adjustment Frame coverage shooting mode Approx 100 horizontal and vertical compared to actual picture Frame coverage playback mode Approx 100 hori...

Page 266: ...2000 30 s bulb and time available in mode M time requires optional ML L3 remote control Aperture Electronically controlled 7 blade iris diaphragm Range 19 steps of 1 3 EV Self timer Choose from durations of approximately 20 10 5 and 2 seconds Built in flash Range Approx 0 5 11 5 m 1 ft 8 in 37 ft mode i auto ISO Flash control TTL auto flash with monitor pre flashes manual flash control available G...

Page 267: ... Individual movies can be up to 20 minutes or 29 minutes 59 seconds long recording may end before these limits are reached if the camera temperature rises Supported languages Arabic Chinese SimplifiedandTraditional Czech Danish Dutch English Finnish French German Indonesian Italian Japanese Korean Norwegian Polish European Portuguese Russian Spanish Swedish Thai Turkish Power sources One rechargea...

Page 268: ...battery Rechargeable Li ion Battery EN EL20 Charging time Approx 2 hours at an ambient temperature of 25 C 77 F when no charge remains Operating temperature 0 C 40 C 32 F 104 F Dimensions W H D Approx 67 0 28 0 94 0 mm 2 6 1 1 3 7 in excluding plug adapter Weight Approx 83 g 2 9 oz excluding plug adapter D Specifications Nikon reserves the right to change the specifications of the hardware and sof...

Page 269: ...tput on Exif compliant printers PictBridge A standard developed through cooperation with the digital camera and printer industries allowing photographs to be output directly to a printer without first transferring them to a computer AVCPatentPortfolioLicense THIS PRODUCT IS LICENSED UNDER THE AVC PATENT PORTFOLIO LICENSE FOR THE PERSONAL AND NON COMMERCIAL USE OF A CONSUMER TO i ENCODE VIDEO IN CO...

Page 270: ...Corporation in the United States and or other countries PictBridge logo is a trademark The SD SDHC and SDXC logos are trademarks of the SD 3C LLC HDMI the HDMI logo and High Definition Multimedia Interface are trademarks or registered trademarks of HDMI Licensing LLC All other trade names mentioned in this manual or the other documentation provided with your Nikon product are trademarks or registe...

Page 271: ...ore details on the above cards please contact the manufacturer SD memory cards SDHC memory cards2 SDXC memory cards3 SanDisk 2 GB 1 4 GB 8 GB 16 GB 32 GB 64 GB 128 GB Toshiba 64 GB Panasonic Lexar 64 GB 128 GB 1 Check that any card readers or other devices with which the card will be used support 2 GB cards 2 Check that any card readers or other devices with which the card will be used are SDHC co...

Page 272: ...e quality Image size No of image 4GB NEF RAW 160 JPEG fine Large 410 Medium 720 Small 1600 JPEG normal Large 810 Medium 1400 Small 3000 JPEG basic Large 1600 Medium 2700 Small 5500 Frame size frame rate Footage High quality Normal 4GB Frame size pixels Frame rate o 1 1920 1080 30p 20 minutes 35 minutes p 2 1920 1080 25p q 3 1920 1080 24p t 6 1280 720 30p 35 minutes 55 minutes u 7 1280 720 25p x 0 ...

Page 273: ... Wide area AF 76 Normal area AF 76 Subject tracking AF 76 L Matrix metering 85 M Center weighted metering 85 N Spot metering 85 R auto flash 113 j red eye reduction 113 S slow sync 113 T rear curtain sync 113 d Help 12 5 Beep indicator 190 r Memory buffer 65 f 193 S g 194 A AC adapter 230 Accessories 230 Accessory shoe 226 Accessory terminal 231 Accessory terminal accessories 231 Active D Lighting...

Page 274: ... HDMI 171 Digital Print Order Format 163 166 249 Direct sunlight White balance 89 D Lighting 200 DPOF 163 166 249 DPOF print order 166 E Edit movie 197 Exif version 2 3 249 Exposure 85 87 Exposure compensation 87 Exposure indicator 57 Eye Fi upload 195 F Face priority AF 76 File information 134 File number sequence 191 Filter effects 203 Filter effects Picture control 103 105 Fine tuning white bal...

Page 275: ...card 23 183 251 Metering 85 Microphone 43 Miniature effect 216 Minimum shutter speed 84 Mode dial 9 Monitor 5 132 Monitor brightness 183 Monitor pre flash 119 Monochrome 203 Monochrome Set Picture Control 99 Movie quality 43 Movie settings 43 Movies 38 My Menu 222 N NEF 69 NEF RAW 69 209 NEF RAW processing 209 Neutral Set Picture Control 99 Nikon Transfer 2 157 Normal area AF 76 O Optional flash 1...

Page 276: ... color 217 Self timer 63 188 Sensitivity 127 Sepia 203 Setup menu 182 Shade White balance 90 Shooting data 137 Shooting menu 176 Shutter priority auto 54 Shutter release button 31 79 Side by side comparison 219 Single frame Release mode 63 Single servo AF 75 Size 43 72 Skylight Filter effects 203 Slide Show 174 Slot empty release lock 195 Slow sync 114 Small Image size 72 Soft Filter effects 204 S...

Page 277: ...257 n W Warm filter Filter effects 203 WB 89 White balance 89 Wide area AF 76 ...

Page 278: ...C03 11 6MN05611 03 No reproduction in any form of this manual in whole or in part except for brief quotation in critical articles or reviews may be made without written authorization from NIKON CORPORATION ...

Reviews: