background image

56

Con

nec

tin

g

 t

o

 Te
levi
sio

n

s, Co
mput

er

s,

 and

 Pr
in

te

rs

3

Press multi selector up or down to highlight option, press center 
to select:

Paper Size

The camera supports the following paper sizes: 

Default

 (the default paper size for the 

current printer), 

3.5"x5", 5"x7", Postcard, 100mmx150mm, 4"x6", 8"x10", Letter, 

A3

, and 

A4

. Only sizes supported by the current printer will be displayed.

Option

Description

Start print

Start printing. To cancel before all copies have been printed, 
press center of multi selector. Camera returns to PictBridge 
playback display when printing is complete; repeat from Step 
1 to print additional pictures.

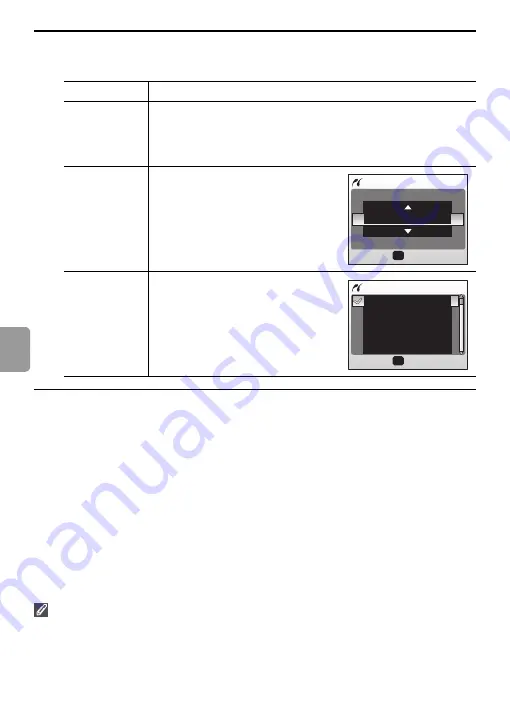
Copies

Press multi selector up or down to 
choose number of copies (up to 9). 
Press center of multi selector to 
return to previous menu.

Paper size

Press multi selector up or down to 
highlight desired paper size. Press 
center of multi selector to return 
to previous menu.

OK

Confirm

COPIES

8

OK

Confirm

PAPER SIZE

Default

3.5" × 5"

5" × 7"

Postcard

100mm × 150mm

1/2

Summary of Contents for 25543 - Coolpix L2 6MP Digital Camera

Page 1: ...En N I K KOR 3X OPTICAL Z O O M 6 3 19 2mm 1 3 2 5 3 The Nikon Guide to Digital Photography with the ...

Page 2: ...ark of the SD Card Association Adobe and Acrobat are registered trademarks of Adobe Systems Inc PictBridge is a trademark D Lighting technology is provided by Apical Limited Face priority AF technology is provided by Identix All other trade names mentioned in this manual or the other documentation provided with your Nikon product are trademarks or registered trademarks of their respective holders ...

Page 3: ...on removable memory cards If a memory card is inserted all new pictures will be stored on the memory card and delete playback and format operations will apply only to the pictures on the memory card The memory card must be removed before the internal memory can be formatted or used to store delete or view pictures This icon marks cautions infor mation that should be read before use to prevent dama...

Page 4: ...ed only by qualified technicians Should the camera break open as the result of a fall or other accident take the product to a Nikon authorized service representative for inspection after unplugging the product and or removing the batteries Do not use the camera or AC adapter in the presence of flammable gas Do not use electronic equipment in the presence of flammable gas as this could result in ex...

Page 5: ......

Page 6: ... close to your subject s eyes could cause temporary visual impair ment Particular care should be taken if photographing infants when the flash should be no less than one meter 39in from the subject Do not fire the flash while it is touching a person or object Such use can result in the person being burned and or their clothes igniting from the heat of the flash Avoid contact with liquid crystal Sh...

Page 7: ...es idential installation This equipment generates uses and can radiate radio frequency energy and if not installed and used in accordance with the instructions may cause harmful interference to radio communications However there is no guarantee that interference will not occur in a particular installation If this equip ment does cause harmful interference to radio or television reception which can...

Page 8: ......

Page 9: ...original image data Deleted files can sometimes be recovered from discarded storage devices using com mercially available software poten tially resulting in the malicious use of personal image data Ensuring the privacy of such data is the user s responsibility Before discarding a data storage device or transferring ownership to another person erase all data using commercial deletion software or fo...

Page 10: ...17 Deleting Unwanted Pictures 17 Using the Flash 18 Taking Pictures with the Self Timer 20 Macro Close up Mode 22 Scene Mode 23 Scene Mode 23 Assist Modes 24 Taking Pictures with Face Priority AF 26 Other Scenes 29 Movies 39 Movie Mode 39 Movie Playback 40 Movie Options The Movie Menu 41 Movie Options 41 Auto focus Mode 42 Viewing Pictures on the Camera 43 Viewing Multiple Pictures Thumbnail Playb...

Page 11: ...r Warning 69 Auto Off 69 Format Memory Format Card 70 Language 70 Interface 71 Reset All 71 Battery Type 71 Firmware Version 71 Shooting Options The Shooting Menu 72 Image Mode 72 White Balance 73 Exposure Compensation 75 Continuous 75 BSS 76 Color Options 77 Playback Options The Playback Menu 78 Print Set 78 Slide Show 79 Delete 80 Protect 80 Transfer Marking 80 Small Pic 81 Copy 82 Technical Not...

Page 12: ...argers batteries and AC adapters certified by Nikon specifically for use with this Nikon digital camera are engineered and proven to operate within the operational and safety requirements of this electronic circuitry THE USE OF NON NIKON ELECTRONIC ACCESSORIES COULD DAMAGE THE CAMERA AND MAY VOID YOUR NIKON WARRANTY For more information about Nikon brand accessories contact a local autho rized Nik...

Page 13: ... Guide show the COOLPIX L3 Illustrations and on screen text in this manual and the Quick Start Guide may differ from the actual display Before Taking Important Pictures Before taking pictures on important occasions such as at weddings or before taking the camera on a trip take a test shot to ensure that the camera is functioning nor mally Nikon will not be held liable for damages or lost profits t...

Page 14: ... K K O R 3X OPTICAL Z O O M Power on lamp 9 Power switch 9 Shutter release button 16 Eyelet for camera strap Battery chamber cover 7 Lens cover closed Power cord channel cover for optional AC adapter 83 Self timer lamp 20 Lens cover Lens 14 85 Built in flash 18 Battery chamber 7 Speaker 40 47 68 Built in microphone 47 ...

Page 15: ...3 Introduction The Multi Selector Press the multi selector up down left or right to highlight pictures and menu items then press the center to select The buttons on the multi selector are also used to ...

Page 16: ...ake icon 16 8 Internal memory Memory card indicator 11 9 Battery level indicator 13 10 Sensitivity 16 11 Self timer indicator 20 12 Date not set indicator 88 Time zone indicator 64 13 Date imprint Date counter 67 14 Number of exposures remaining 13 98 Movie length 39 98 15 Focus area 15 16 Exposure compensation 75 17 Image mode 72 18 Color options 77 19 White balance 73 20 Best Shot Selector BSS 7...

Page 17: ...de 47 9 Current frame number Total number of frames Movie length 40 10 D Lighting icon 46 11 Movie playback indicator 40 12 Voice memo icon 47 13 Image mode 72 14 Movie indicator 40 15 Protect icon 80 16 Print order icon 57 17 Transfer icon 50 80 18 Time of recording 9 19 Date of recording 9 12 00 12 00 10 10 2006 10 10 2006 9999 9999 9999 9999 100NIKON 100NIKON 9999 JPG 9999 JPG OK START START OK...

Page 18: ...atteries charge the batteries as described below If the camera came with a pair of alkaline batteries skip to Insert the batteries on the follow ing page 1 Plug the charger in Connect the power cable to the charger 1 and then plug it into a power outlet 2 The CHARGE lamp will light 3 2 Charge the batteries Insert the batteries as indicated on the charger The CHARGE lamp will start to blink Chargin...

Page 19: ...Read and follow the warnings and cautions on pages ii iii and 86 of this man ual The camera can be used with AA alkaline LR6 batteries Nikon rechargeable EN MH1 NiMH batteries ZR6 oxyride batteries and FR6 L91 lithium batteries Do not mix old and new batteries or batteries of different makes or types Batteries with the fol lowing defects cannot be used The Battery Type Menu After replacing the bat...

Page 20: ... button halfway The length of time before entering the standby mode can be changed Approx three minutes after the camera has entered standby mode The cam era will turn off EN MH1 Batteries Charge EN MH1 batteries before first use Charge and use as a set do not charge bat teries one at a time or mix batteries from different pairs Note that the batteries may tend to discharge more quickly when new o...

Page 21: ...w The buttons needed to perform a task are shown in white if more than one button is highlighted any of the highlighted buttons can be used For example press the multi selector up or down is shown as illustrated below 1 2 Turn the camera on The language selection screen is dis played Highlight the desired display lan guage and press the center of the multi selector The confirmation screen is displ...

Page 22: ...tor right The map of world time zones is dis played 5 6 Press the multi selector left or right to select the home time zone you are in and press the cen ter of the multi selector The DATE screen is displayed Edit Day order of Day Month and Year may differ in some areas and press the multi selector right OK TIME ZONE OK Confirm London Casablanca DaylightSaving HOME TIME ZONE OK Confirm London Casab...

Page 23: ...t the power on lamp is off before inserting or removing memory cards 7 8 Edit Month and press the multi selector right Repeat steps 6 and 7 to edit the year hour and minutes then press the multi selector right D M Y is highlighted 9 Choose the order in which Day Month and Year will be displayed and press the center of the multi selector The setting becomes effective and the screen of the mode sele...

Page 24: ...ng To begin formatting press the multi selector up to highlight Format and then press the center of the multi selector Do not turn the camera off or remove the batteries or memory card until formatting is complete Removing Memory Cards Before removing memory cards turn the camera off and confirm that the power on lamp is off Open the memory card slot cover and press the card in to partially eject ...

Page 25: ...camera on The power on lamp will light and the monitor will turn on To turn the camera off at any time press the power switch again Do not remove the bat teries while the power on lamp is lit 2 Check indicators in the monitor Check the battery level and number of expo sures remaining Auto Mode Display Battery level NO ICON Batteries fully charged Low battery ready spare batter ies WARNING BATTERY ...

Page 26: ...ect in the monitor Press to zoom out increasing the area visible in the frame Press to zoom in up to 3 so that the sub ject fills a larger area of the frame Pressing for about two seconds at 3 zoom will trigger digital zoom allowing the subject to be magnified up to 4 more for a total of magnification of 12 Note that unlike optical zoom digital zoom does not increase the amount of detail visible i...

Page 27: ...hts up green Blinking red indicates that the camera was unable to focus Change the composition and try again 2 Take the picture Press the shutter release button the rest of the way down to take the picture Note that the flash may fire if the subject is poorly lit During Recording The or icon will blink while pictures are recorded Removing memory cards or batteries while these icons are blinking co...

Page 28: ...ng brightness in the scene e g the sun is behind your subject and their features are in deep shadow or if there are several objects at different distances from the camera at the center of the frame e g your subject is inside a cage When Lighting Is Poor If lighting is poor and the flash is off a icon will be dis played to warn that pictures may be blurred as a result of the slow shutter speeds If ...

Page 29: ...yed briefly at low resolution while being read from memory Press the button again to return to shooting mode Deleting Unwanted Pictures To delete the picture currently displayed in the monitor press the button A con firmation dialog will be displayed high light one of the following options and press the center of the multi selector No Exit without deleting the picture Yes Delete the picture Viewin...

Page 30: ...ture is taken Use to fill in illuminate shadows and back lit subjects Slow sync Flash illuminates main subject slow shutter speeds are used to capture background at night or under dim light 1 2 Press the flash mode button Highlight the desired mode and press the center of the multi selector The selected flash mode icon appears at the top of the monitor If AUTO is selected the icon extin guishes au...

Page 31: ...era Red eye Fix note that this may slightly increase the time needed to record the picture This mode is not recom mended where a quick shutter response is required if the desired results are not achieved try again at a different flash setting The Flash Lamp The flash lamp shows flash status when the shut ter release button is pressed halfway On Flash will fire when picture is taken Blinks Flash ch...

Page 32: ...anceled if five sec onds pass without pressing the center of the multi selector 3 4 Frame the picture and press and hold the shutter release button halfway The focus and exposure are adjusted Press the shutter release button fully The self timer starts and the shutter will be released automatically after about 10 seconds Remaining seconds before the shutter is released are displayed in the monitor...

Page 33: ...ken staying lit during the final second to warn that the shutter is about to be released Auto Mode In addition to the flash self timer and macro close up options described on pages 18 22 auto mode offers a menu of shooting options controlling such settings as image size picture color and white balance 72 77 ...

Page 34: ...cro Close up Mode 1 2 Display options Press the button Highlight ON and press the cen ter of the multi selector appears 3 4 Frame picture Minimum focus distance varies with zoom position if zoom is adjusted until icon turns green camera can focus at distance of 10cm 3 9in Focus and shoot In macro close up mode the camera focuses continuously even when the shutter release button is not pressed half...

Page 35: ...an be adjusted by selecting from the scene mode menu Flash Mode Self Timer and Macro Close Up See the Appendix for information on the settings available in scene mode 97 Scene Mode Mode Description Portrait For portraits Landscape For landscapes Sports For moving subjects Night Portrait For portraits taken against a backdrop of night scenery Party Indoor Night Landscape Copy Beach Snow Close Up Ba...

Page 36: ......

Page 37: ...IT LEFT Compose shot with subject in left or right half of frame Cam era focuses on subject in framing guide PORTRAIT RIGHT PORTRAIT CLOSE UP Compose shot with subject s face in top half of frame Camera focuses on face area in framing guide PORTRAIT COUPLE Compose shot with two subjects side by side Camera focuses on subject in framing guide PORTRAIT FIG URE Compose shot in tall orientation Camera...

Page 38: ...y double yellow border If camera detects multiple faces clos est subject will be indicated by double border other subjects by single border Camera will focus on closest subject If camera can no longer detect subject for example because subject has looked away from camera borders will no longer be displayed and icon will blink in monitor 3 4 Set focus and exposure Double border turns green Take the...

Page 39: ...sed halfway the camera is unable to focus release the button and try again Landscape Assist Use for vivid landscapes or portraits that fea ture a landmark in the background Pictures taken at slow shutter speeds are processed to reduce noise 16 Focus indicator 15 is always displayed in green when shutter release button is pressed halfway note however that foreground objects may not always be in foc...

Page 40: ...mount the camera on a tripod or rest it on a flat stable surface SPORTS Camera shoots about 1 7 frames per second fps while shut ter release button is pressed Camera focuses continuously even when shutter release button is not pressed SPORT SPEC TATOR As above except that camera focuses at about 4 5m 14 8ft 6m 19 7ft at maximum zoom to infinity for improved shutter response SPORT COM POSITE Each t...

Page 41: ...nd take the picture PARTY INDOOR Captures the effects of candlelight and other indoor background lighting Camera focuses on subject in cen ter of frame Hold camera steady to prevent blurring BEACH SNOW Captures the brightness of such subjects as snowfields beaches or sunlit expanses of water Camera focuses on subject in center of frame MENU Exit OK Confirm Help PORTRAIT SCN ...

Page 42: ...ing pictures may be pro cessed to reduce noise 16 CLOSE UP Photograph flowers insects and other small objects at close range 22 Camera focuses continuously until shutter release button is pressed halfway to lock focus Hold camera steady to prevent blurring MUSEUM Use indoors where flash photography is prohibited for example in museums and art galleries or in other set tings in which you do not wan...

Page 43: ...rawings may not show up well BACK LIGHT Use when light is coming from behind a portrait subject throwing their features into shadow The flash fires auto matically to fill in illuminate shadows Camera focuses on subject in center of frame PANORAMA ASSIST Use when taking a series of pictures that will later be joined side by side in PictureProject to form a panorama 32 VOICE RECORDING Use to record ...

Page 44: ...The direction can be re selected by pressing the center of the multi selector again If the first shot is taken without decid ing the pan direction it will be auto matically set for the right 3 4 Take the first picture The first picture is displayed in about 1 3 of the monitor AE L icon is dis played to show that white balance and exposure have been locked at values for first shot Compose the next ...

Page 45: ...n Pictures cannot be deleted or zoom or image mode 72 cannot be adjusted until shooting is complete Making a Voice Recording 31 5 End series The monitor returns to the screen in step 1 1 2 Highlight Voice Recording in the scene menu The monitor will show a icon and the length of the voice recording hr min sec that can be made 2 2 ...

Page 46: ...pressing the multi selector up down left or right during recording The camera can locate the index during playback and begin playback from this point The start is assigned an index of one other indices are assigned in ascending order to a maximum of 98 The current index number is shown in the monitor 3 Press the shutter release button to start voice recording The monitor turns off after five secon...

Page 47: ...aved voice recordings are listed 3 Highlight the desired voice recording and press the center of the multi selector The voice recording playback screen is displayed and playback starts To Press Description Pause playback Use multi selector to select icon then press the center of the multi selector to pause play back REC VOICE RECORDING 2006 10 10 20 18 MENU Back Max rec time 03 44 41 SELECT SOUND ...

Page 48: ... playback is paused use multi selector to select icon then press the center of the multi selector Rewind Use multi selector to select icon then press and hold the center of the multi selector Fast forward Use multi selector to select icon then press and hold the center of the multi selector If playback reaches the end playback stops and voice recording list screen appears Index return Use multi se...

Page 49: ...e copy direction and press the multi selector right from internal memory to a memory card from a memory card to inter nal memory 3 4 Select the copy mode and press the multi selector right Selected data copy Go to step 4 All data copy Go to step 6 Highlight the data you want to copy and press the multi selector right Repeat this step until all desired data is selected COPY SOUND FILES MENU OK Conf...

Page 50: ...d if using a mem ory card before trying again Copying of voice recordings taken with another make of camera is not guaranteed by Nikon 5 6 Press the center of the multi selector Selected data will be marked with To cancel the selection highlight the data again and press the multi selector right Highlight Yes and press the cen ter of the multi selector Copying starts To cancel highlight No and pres...

Page 51: ...rded 2 Start recording Progress bar shows amount of memory remaining 3 End recording The monitor returns to the screen in step 1 See Movie Options The Movie Menu 41 for information on movie size and focus options Recording Movies The flash 18 and self timer 20 are not available in movie mode Macro close up can be used 22 Optical zoom cannot be adjusted during recording See the Appendix for informa...

Page 52: ... tion Volume is controlled by the zoom button Press to lower volume to increase Movie Playback Control Description Rewind movie while center of multi selector is pressed Advance movie while center of multi selector is pressed Playback pause Advance paused movie one frame Rewind paused movie one frame Resume playback End movie and return to full frame playback 100NIKON 100NIKON 15 30 15 30 15 30 10...

Page 53: ...u Option Size pixels Frames per second TV movie 640 640 480 30 TV movie 640 640 480 15 Small size 320 320 240 30 Small size 320 320 240 15 Smaller size 160 160 120 15 MENU Exit OK Confirm Help MOVIE SET UP Movie options Auto focus mode Select mode Press MENU button MOVIE OPTIONS TV movie 640 TV movie 640 Small size 320 Small size 320 Smaller size 160 MENU OK Confirm Exit ...

Page 54: ...orded at different settings 98 Option Description Single AF Default Camera focuses when shutter release button is pressed halfway and locks at this position during shooting prevent ing sound of camera focusing from interfering with recording Full time AF Camera constantly adjusts focus even when shutter release button is not pressed AUTO FOCUS MODE Single AF Full time AF MENU OK Confirm Exit ...

Page 55: ... playback mode The following operations can be performed To Press To Press View next picture 17 View playback menu MENU 78 View previous picture 17 Record play voice memo Shutter release but ton 47 Delete picture 17 Still Enhance contrast 46 Zoom picture in 45 Movie Play movie 40 View thumbnails 44 Exit to shooting mode 100NIKON 100NIKON 5 5 5 15 30 15 30 15 30 100NIKON 0005 JPG 0005 JPG 0005 JPG ...

Page 56: ...he button in full frame or thumb nail playback displays the dialog shown at right Highlight Yes and press the center of the multi selector to delete the selected picture Viewing Pictures in Internal Memory Pictures in internal memory can only be viewed if no memory card is inserted To Press To Press Highlight picture Delete high lighted picture Exit to full frame playback Change number of pictures...

Page 57: ...pending on the size of the original and the zoom ratio at the time the copy was created copies will be 2 816 2 112 COOLPIX L2 only 2 592 1 944 COOLPIX L3 only 2 048 1 536 1 600 1 200 1 280 960 1 024 768 640 480 320 240 or 160 120 pixels in size Cropped pictures are stored in JPEG format compression ratio 1 8 as separate pic tures from the original pictures Cropped Copies Cropped copies may not dis...

Page 58: ...th D lighting may not display or transfer correctly when viewed on other models of Nikon camera See the Appendix for more information on D lighting copies 99 1 2 Confirmation dialog is displayed Highlight OK and press the center of the multi selector The enhanced brightness copy is made D Lighting Confirm OK Cancel OK 100NIKON 100NIKON 5 5 5 15 30 15 30 15 30 100NIKON 0005 JPG 0005 JPG 0005 JPG 10...

Page 59: ......

Page 60: ...x pectedly during connection use fresh batteries or an optional EH 65A AC adapter kit 1 The Interface Video mode item in the setup menu offers a choice of NTSC and PAL standards for analog video output 71 Select a standard to match the television 2 Turn the camera off and con nect the A V cable Connect the black plug to the camera the yellow plug to the video in jack on the TV and the white plug t...

Page 61: ... transfer pictures to a computer 1 Start a computer to which PictureProject has been installed 2 Choose an Interface USB option as described in Choosing a USB Option for Connection to a Computer 51 3 Turn the camera off and con nect the USB cable as shown at right 4 Turn the camera on 5 Press the center of the multi selector to copy all marked pic tures to the computer Viewing Pictures on a Comput...

Page 62: ...r Two options control transfer marking Interface Auto transfer setup menu Choose On to mark all new pictures for transfer 71 Transfer marking playback menu Change mark ing for existing pictures 80 The PictureProject Transfer Button To copy both marked and unmarked pictures to the computer click the PictureProject Transfer button instead of pressing the center of the multi selector in Step 5 PREPAR...

Page 63: ...re wizard is displayed then click Cancel and disconnect the cam era Select Mass storage in the camera USB menu before reconnecting the camera Computer operating system Pictures transferred using Camera Transfer button 1 PictureProject button Windows XP Home Edition Windows XP Professional Windows 2000 Professional Windows Millennium Edition Me Windows 98 Second Edition SE Choose Mass storage 2 Mac...

Page 64: ...in the taskbar and select Safely remove USB Mass Storage Device from the menu that appears Windows 2000 Professional Click the Unplug or Eject Hardware icon in the taskbar and select Stop USB Mass Storage Device from the menu that appears Windows Millennium Edition Me Click the Unplug or Eject Hardware icon in the taskbar and select Stop USB Disk from the menu that appears Windows 98 Second Editio...

Page 65: ...amera Print set option can be used to select pictures for printing 59 See the printer manual for details Taking memory cards to a digital print service If the service supports DPOF the camera Print set option can be used to select pictures for printing 59 Transferring pictures to a computer Once transferred to a computer 49 pic tures can be printed using imaging software See the application and pr...

Page 66: ...a date imprint Connecting the Printer 1 Turn the printer on 2 Set the Interface USB option in the setup menu to PTP 71 See Menus 60 for more informa tion on menu operations 3 Turn the camera off and con nect the USB cable as shown at right Date imprint Print set Date Must be set before picture is taken Set after picture is taken Date permanently imprinted on picture Date stored separately Date app...

Page 67: ...ge logo displayed in the monitor Printing Pictures One at a Time 1 2 Select a desired picture To choose picture from thumbnail list press and use multi selector to highlight desired picture or press to exit to full frame playback Display print options PictBridge 4 4 5 5 OK 4 4 4 5 5 OK 4 OK Confirm PRINT MENU Start print Copies Paper size 1 2 3 4 5 1 2 3 4 5 MENU OK Start print Back ...

Page 68: ...ption Start print Start printing To cancel before all copies have been printed press center of multi selector Camera returns to PictBridge playback display when printing is complete repeat from Step 1 to print additional pictures Copies Press multi selector up or down to choose number of copies up to 9 Press center of multi selector to return to previous menu Paper size Press multi selector up or ...

Page 69: ...below Print all images Print one copy of all images DPOF printing Press multi selector up or down to highlight option press center to select Start print Print current print order 59 Confirm View print order Press center of multi selector to start printing or press MENU to exit Cancel Exit without printing Paper size Choose page size 56 1 2 Scroll through pictures Current picture shown at center of...

Page 70: ...58 Connecting to Televisions Computers and Printers Press center of multi selector again to cancel before printing is complete 3 4 ...

Page 71: ...ghlight Print selected Display selection dialog To delete current print order highlight Delete print set and press center of multi selector 3 Select pictures as described in Steps 1 4 of Printing Selected Pic tures 57 4 Press multi selector up or down to highlight option press center to select Date Print date of recording on all pictures in print order Info Print shutter speed and aperture on all ...

Page 72: ......

Page 73: ...ay options and highlight a desired option 3 Select the highlighted option Move cursor up Move cursor left Move cursor right Move cursor down Make selection MENU Exit 1 2 OK Confirm Help SHOOTING MENU SET UP Image mode White balance Exp Continuous CONTINUOUS Single Continuous Multi shot 16 MENU OK Confirm Exit MENU Exit 1 2 OK Confirm Help SHOOTING MENU SET UP Image mode White balance Exp Continuou...

Page 74: ...layback 1 2 Scroll through pictures and select a desired picture The current picture is shown at the center of the monitor E g To protect a picture Set ON OFF or the number of copies When ON is set the icon according to the function being performed appears in the center of the current picture Repeat steps 1 and 2 to select addi tional pictures 3 Complete operation The setting becomes effective 4 5...

Page 75: ...when camera is turned on 64 Date Set clock and choose home and destination time zones 64 Monitor settings Adjust monitor brightness and choose display style 66 Date imprint Imprint date or birthday counter on pictures 67 Sound settings Adjust sound and volume settings 68 Blur warning Turn blur warning on or off 69 Auto off Choose when monitor will turn off to save power 69 Format memory Format car...

Page 76: ...card is removed Date Set the camera clock and choose home and travel destination time zones Option Description Date Set camera clock to current date and time 9 Time zone Choose home or travel destination time zone 100 turn daylight saving time on or off MENUS Text Icons MENU OK Confirm Exit MENU Exit OK Confirm Help WELCOME IMAGE SELECT MENU Exit 1 3 OK Confirm Help SET UP Shooting menu Menus Welc...

Page 77: ...cated by a dot To change the home or travel destination time zone highlight or then press the multi selector right Choose a time zone and daylight saving time as described in Basic Setup 9 The Clock Battery The clock battery charges when the main battery is installed or an AC adapter is con nected and can provide several days of backup power after about 10 hours of charg ing MENU Exit OK TIME ZONE...

Page 78: ...in moni tor Brightness Choose from five settings for monitor brightness Option Description Display Shooting mode Playback mode Show info Indicators are dis played in monitor 4 Hide info Indicators are not displayed in moni tor MONITOR SETTINGS Photo info Brightness MENU OK Confirm Exit 3 5 5 100NIKON 100NIKON 5 5 5 15 30 15 30 15 30 100NIKON 0005 JPG 0005 JPG 0005 JPG OK 10 10 2006 10 10 2006 10 1...

Page 79: ...nd date do not appear on pictures Date Date or date and time are imprinted on pictures taken while this option is in effect Date and time Date counter Time stamp shows number of days between date of shooting and selected date see below Stored dates Up to three dates can be stored To set highlight press multi selector to right and enter date 9 To select highlight and press center of multi selector ...

Page 80: ...een 1024 or larger when using date imprint Sound Settings Adjust the following sound settings Display options Highlight Number of Days Years and Days or Yrs Mnths Days and press center of multi selector Option Description Button sound When ON is selected beep will sound once when operations are completed successfully three times when error is detected Shutter sound Choose volume of shutter sound S...

Page 81: ...ain on for a minimum of three minutes when menus are displayed and for thirty minutes during a slide show Option Description Auto off Choose delay before monitor turns off when no operations are performed Sleep Mode Select On or Off If On is selected monitor will turn off if no change is detected in brightness of subject for 30 s Auto off set to 1 min or less or 1 min Auto off set to 5 min or more...

Page 82: ... card Format is not available when batteries are low Format Do not turn the camera off or remove the batteries or memory card during formatting Use the Format option to format memory cards before first use and reformat them regularly thereafter Without regular formatting performance will drop with use Language Choose a language for camera menus and messages from the following options Deutsch Germa...

Page 83: ...13 choose a type that matches the batter ies currently in use Firmware Version View the current camera firmware version Option Description USB Select USB option for connection to computer 51 or printer 54 Video mode Choose from NTSC and PAL 48 Auto transfer Choose On to mark all new pictures for transfer to computer 50 Option Battery Type Alkaline Alkaline COOLPIX NiMH EN MH1 oxyride Lithium Lithi...

Page 84: ...cording to how you plan to use the picture Shooting Options The Shooting Menu Option Description SET UP Display the setup menu 63 Image mode Choose image size and quality 72 White balance Match white balance to the light source 73 Exposure compensation Exposure can be compensated for in the case of a subject that is bright dark or with strong con trast 75 Continuous Take pictures one at a time or ...

Page 85: ...tored PC screen 1024 1 024 768 Suited to computer display TV screen 640 640 480 Suited to e mail or television viewing Option Description Auto White balance automatically adjusted to suit lighting condi tions Best choice in most situations White bal preset Neutral colored object used as reference to set white balance under unusual lighting conditions 74 Daylight White balance adjusted for direct s...

Page 86: ...olor cast for example to make pictures taken under a lamp with a red shade look as though they had been taken under white light Flash Use with the flash 1 Place white or gray reference object under lighting that will be used during shooting 2 Highlight White bal preset 3 4 Camera zooms in Highlight Measure Option Description WHITE BALANCE Auto White bal preset Daylight Incandescent Fluorescent MEN...

Page 87: ... on a portrait subject photograph a subject that is moving unpredictably or capture motion in a series of pictures 5 Frame the reference object and press the center of the multi selector The new white balance value is set Option Description Single One shot is taken each time shutter release button is pressed Continuous While shutter release button is pressed camera takes pictures at up to 1 7 fram...

Page 88: ...When BSS is on the camera takes up to ten pictures while the shutter release button is pressed The sharpest pic ture in the series is saved and the others are dis carded A BSS icon is displayed when BSS is on BSS BSS may not produce the desired results if the subject moves or the composition is changed during shooting Multi shot 16 Each time shutter release button is pressed camera takes 16 shots ...

Page 89: ...r than Standard Color the current setting is also indicated by an icon in the display Option Description Standard color Natural color Vivid color Vivid photoprint colors Black and white Take pictures in black and white Sepia Record pictures in sepia Cyanotype Take pictures in blue tinted mono chrome COLOR OPTIONS Standard color Vivid color Black and white Sepia Cyanotype MENU OK Confirm Exit ...

Page 90: ... 63 Print set Select pictures for printing 78 Slide show View pictures in an automatic slide show 79 Delete Delete all or selected pictures 80 Protect Protect selected pictures from accidental deletion 80 Transfer Marking Change transfer marking for existing pictures 80 Small pic Create a small copy of the current picture 81 Copy Copy files between memory card and internal memory 82 MENU Exit 1 2 ...

Page 91: ...s the multi selector to the right or press the multi selector to the left to return to the previous picture Hold the multi selector down to fast forward or rewind To pause the slide show press the center of the multi selector When the slide show ends or is paused the menu shown at right will be displayed Highlight Restart and press the center of the multi selector to restart the show or select End...

Page 92: ...when the camera is connected to it via the supplied USB cable In the default setting all pictures will be marked Pictures selected for transfer are marked with a icon Option Description All on Mark all images for transfer All off Remove transfer marking from all images Select Image s Mark selected pictures for transfer 62 DELETE Erase selected images Erase all images MENU OK Confirm Exit 4 5 ON OF...

Page 93: ...ayed when copies are viewed full frame Small Picture Small copies are compressed for reduced file size and may not display or transfer cor rectly when viewed on other models of Nikon camera See the Appendix for more information on small copies 100 Option Description 640 480 Suited to television playback 320 240 Suited to display on web pages 160 120 Suitable for e mail Save this image as displayed...

Page 94: ...ss the center of the multi selector to copy the images Copy The camera may be unable to copy pictures that were created with another make of camera or that have been modified on a computer See pages 99 100 for more infor mation on how copies are stored Option Description Copy pictures from internal memory to memory card Copy pictures from memory card to internal memory MENU OK Confirm Exit COPY CA...

Page 95: ...gh speed 10MB s Other cards have not been tested For more details on the above cards please contact the manufacturer Optional Accessories Rechargeable battery Nikon EN MH1 Rechargeable NiMH Batteries EN MH1 B2 Battery charger MH 71 battery charger AC adapter EH 65A AC adapter kit connects as shown EH 62B AC adapter kit cannot be used SanDisk 64MB 128MB 256MB 512MB 1GB 256MB 512MB 1GB Toshiba 64MB ...

Page 96: ...eted from the card Failure to observe this precaution could result in loss of data or dam age to the camera or card Do not disassemble or modify Do not drop bend or expose to water or strong physical shocks Do not touch the metal terminals with your fingers or metal objects Do not affix labels or stickers to the memory card Do not leave in direct sunlight closed vehicles or areas exposed to high t...

Page 97: ...s on or while images are being recorded or deleted Forcibly cutting power in these circumstances could result in loss of data or in damage to product memory or internal circuitry To prevent an accidental interruption of power avoid carrying the product from one place to another while an AC adapter is connected Keep dry The device will be damaged if immersed in water or subjected to high levels of ...

Page 98: ...ts with your fingers Remove dust or lint with a blower typically a small device with a rubber bulb attached to one end that is pumped to produce a stream of air out the other To remove fingerprints or other stains that cannot be removed with a blower wipe the lens with a soft cloth using a spiral motion that starts in the center of the lens and works out to the edges If this fails clean the lens u...

Page 99: ...th Turn the camera on and release the shutter a few times before put ting the camera away again Notes on the Monitor The monitor may contain a few pixels that are always lit or that do not light This is a characteristic common to all TFT LCD displays and does not indicate a malfunction Images recorded using the product will not be affected When you frame bright subjects vertical comet like streaks...

Page 100: ...ng camera in both hands with elbows against torso 16 18 WARNING PLEASE WAIT FOR CAMERA TO FIN ISH RECORDING Camera cannot perform other operations until recording is complete Message clears from dis play automatically when recording is complete MEMORY CARD IS WRITE PROTECTED Write protect switch is in Lock position Slide write protect to write position 12 THIS CARD CAN NOT BE USED Error accessing ...

Page 101: ...ecording data in the internal memory or memory card Press to change to the voice recording mode 33 CANNOT RECORD MOVIE Time out error while recording movie Choose memory card with faster write speed 83 OUT OF MEMORY or Memory card is full Choose smaller image size Delete pictures Insert new memory card Remove memory card and use internal memory 72 80 11 11 CARD CONTAINS NO IMAGES No pictures avail...

Page 102: ...SB option incorrect Choose correct USB option 51 PictureProject did not start See the PictureProject refer ence manual on CD for more information NO IMAGES ARE MARKED FOR TRANSFER No pictures selected for transfer Select pictures for transfer and try again 80 TRANSFER ERROR Transfer error Check battery level Check that USB cable is connected 13 49 SYSTEM ERROR Error has occurred in camera s intern...

Page 103: ...91 Technical Notes If the camera fails to function as expected check the list of common prob lems below before consulting your reta ...

Page 104: ... window is blocked Subject is outside range of flash Exposure compensation is too low Subject is backlit select scene mode or use fill flash 18 14 18 75 18 31 Randomly spaced bright pixels noise appear in image Shutter speed too slow Noise can be reduced by Using flash Choosing or in scene mode 18 23 Pictures are smeared Lens is dirty Clean lens 86 Colors are unnatural White balance does not match...

Page 105: ...ate not appearing on pictures Date does not appear on movies or on pictures taken using panorama assist 32 40 File cannot be played back File has been overwritten or renamed by computer or other make of camera Cannot zoom in on picture Playback zoom cannot be used with movies small pictures or pictures that have been cropped to below 320 240 Cannot record voice memo Voice memos cannot be appended ...

Page 106: ...rce as described above may result in the loss of any data not recorded to internal memory or the memory card at the time the problem occurred Data already recorded will not be affected PictureProject does not start when camera is connected Camera is off Batteries are exhausted USB cable is not correctly connected Appropriate USB option is not selected Camera is not registered in Device Manager Win...

Page 107: ...ome screen 64 Animation Shooting menu Photo info 66 Show info Image mode 72 Normal 2816 COOLPIX L2 Normal 2592 COOLPIX L3 Brightness 66 3 Date imprint 67 Off White balance 73 Auto Button sound 68 On Exposure compensa tion 75 0 Shutter sound 68 Normal Continuous 75 Single Start up sound 68 Normal BSS 76 Off Blur warning 69 On Color Options 77 Standard color Auto off 69 1 min Movie menu Sleep Mode 6...

Page 108: ...ensure compatibility among different makes of camera DPOF Digital Print Order Format DPOF is an industry wide standard that allows pic tures to be printed from print orders stored on the memory card Exif version 2 2 This camera supports Exif Exchangeable Image File Format for Dig ital Still Cameras version 2 2 a standard that allows information stored with photo graphs to be used for optimal color...

Page 109: ...eset all in the setup menu Settings in parentheses can be changed Default for GROUP RIGHT and GROUP LEFT is AUTO Other modes can be selected Mode Flash mode 18 Self timer 20 Macro close up 22 Portrait OFF OFF Landscape AUTO OFF OFF Sports OFF OFF Night portrait OFF OFF Party Indoor OFF OFF Beach Snow AUTO OFF OFF Sunset OFF OFF Dusk Dawn OFF OFF Night landscape OFF OFF Close up AUTO OFF ON Museum ...

Page 110: ...he type of scene recorded If memory remains for more than 9999 pic tures exposure count display will show 9999 Image mode Movie Options Internal mem ory 23MB 256MB memory card Print size printed at 300dpi cm in High 2816 COOLPIX L2 8 83 24 18 9 7 High 2592 COOLPIX L3 9 98 22 16 5 8 6 Normal 2816 COOLPIX L2 16 165 24 18 9 7 Normal 2592 COOLPIX L3 18 192 22 16 5 8 6 Normal 2048 29 302 17 13 7 5 PC s...

Page 111: ...s named with a three digit folder number followed by a five character identifier P_ plus a three digit sequence number for pictures taken using panorama assist e g 101P_001 31 and NIKON for all other pictures e g 100NIKON Folders can hold up to 200 pictures if a picture is taken when the current folder contains 200 pictures a new folder will be created by adding one to the Flash mode Flash turns o...

Page 112: ...100 Technical Notes current folder number Not 6 3 e 0 7 s TJ F2 1 Tf7 418 9 3 Tcr ...

Page 113: ...s the REFRESH button until the REFRESH lamp lights and close the lid The REFRESH lamp turns off when the batteries are fully discharged The batteries can now be removed or left in the MH 71 to recharge 6 Unplug the charger after removing the batteries To resume charging before the batteries are fully discharged or to refresh the bat teries once charging has begun press the REFRESH button for about...

Page 114: ......

Page 115: ... 10in T 0 3 1 75m 1ft 5ft 9in Sync method Sensor flash system I O terminals Audio video out digital IO USB Interface USB Video output Can be selected from NTSC and PAL Supported languages Chinese Simplified and Traditional Dutch English French German Italian Japanese Korean Russian Spanish Swedish Power sources Two AA alkaline oxyride or lithium batteries Two rechargeable EN MH1 NiMH batteries EH ...

Page 116: ...y discharged The batteries will return to normal once fully discharged Note that NiMH batteries gradually lose their charge when not in use refresh the batteries immediately before use MH 71 Battery Charger Option Supplied with Camera in Some Regions Rated input AC 100 240V 0 11 0 065A 50 60Hz Charging out put DC 1 2V 2000mA Applicable bat teries Nikon EN MH1 rechargeable Ni MH batteries Discharge...

Page 117: ...l frame playback 17 44 selected pictures 80 Design rule for Camera File System 96 Digital Print Order Format 57 59 96 D lighting 46 E E mail 73 Error messages 88 90 Exif 2 2 96 Exposure compensation 75 Extension 99 F Face priority AF 25 27 Fill flash 18 firmware 71 Firmware version 71 Flash 18 95 97 lamp 3 19 mode 18 97 Focus 4 15 42 area 4 15 face priority 25 27 indicator 15 lock 16 mode 42 mode ...

Page 118: ...0 Copy 31 Dusk Dawn 30 Fireworks show 30 Landscape 27 Museum 30 Night landscape 30 Night portrait 28 Panorama assist 31 Party Indoor 29 Portrait 25 27 Sports 28 Sunset 30 Self timer 20 99 Self timer lamp 2 21 Sepia 77 SET UP menu 60 63 71 SHOOTING MENU 60 72 77 Shutter release button 2 16 Side show 79 Small pic 81 100 Smear 87 Sound 39 68 Sound settings 68 Strap Camera 2 Support information 1 T Te...

Page 119: ...107 ...

Page 120: ...tion in any form of this manual in whole or in part except for brief quotation in critical articles or reviews may be made without written authorization from NIKON CORPORATION Printed in Belgium YP6B01 11 6MA14611 ...

Reviews: