Nextar XPJ User Manual Download Page 9

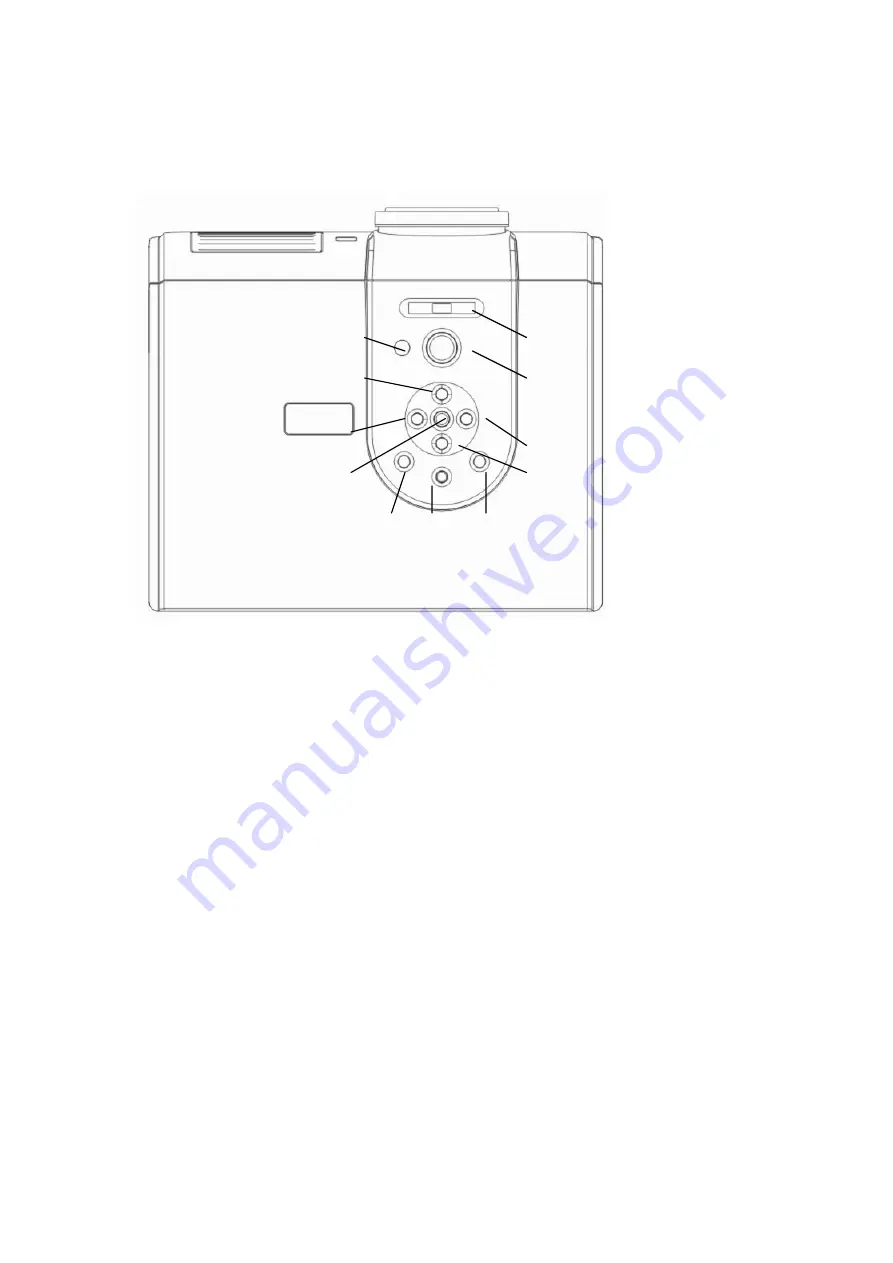
Controls and Functions 

External Control Panel


10 

11 

7

6

5

4

2

1


1. Focus adjuster (lens focus can be adjusted by this key). 

2. Power (Refer to 

"Start up" on page 

14


and 

"Shutdown" on page 1

5


for more information.)   

Turns the projector on or off. 

3. Right key. (OSD control only). 

4. Down key. (OSD control only). 

5. Volume increase. Digital volume control. 

6. OSD Menu. Menu recalls for OSD. 

7. Volume decrease. Digital volume control. 

8. OSD Enter/Source (Refer to 

"Switching input signal" on page 1

4


for more information.) 

Sequentially selects the input signal Video, S-Video, Component Video, or RGB. 

9. Left Key. (OSD control only). 

10. Up key. (OSD control only). 

11. Top infrared sensor.


9

Summary of Contents for XPJ

Page 1: ......

Page 2: ...nterference to radio communications Operation of this equipment in a residential area is likely to cause harmful interference in which case the user will be required to correct the interference at his...

Page 3: ...IONS 9 External Control Panel 9 Remote Control 10 Remote control effective range 11 Replacing the remote control battery 11 Connection 12 CABLE CONNECTION 12 Connecting video source devices 12 Operati...

Page 4: ...itself The wall outlet should be near the unit and easily accessible The unit is not disconnected from the AC power source mains as long as it is connected to the wall outlet with the power switch set...

Page 5: ...display 16 7 million colors Multi language on screen menus Built in speaker providing mixed mono audio when an audio input is connected Powerful AV function to provide a high quality AV picture Extern...

Page 6: ...ou have all of the items shown below If any of these items are missing please contact your place of purchase The supplied accessories will be suitable for your region and may differ from those illustr...

Page 7: ...on 1 2 Ventilation grill 4 3 Lens cap 3 4 Focus adjuster 5 Front IR remote sensor 5 2 Left Side View Refer to Connection on page 12 for more information on making connections to various equipment 8 7...

Page 8: ...Right Side View 11 12 11 2W mono speaker 12 Lamp cover Lower Bottom View 13 14 13 Lamp Cover 14 Ceiling mount and adjustable feet 8...

Page 9: ...ctor on or off 3 Right key OSD control only 4 Down key OSD control only 5 Volume increase Digital volume control 6 OSD Menu Menu recalls for OSD 7 Volume decrease Digital volume control 8 OSD Enter So...

Page 10: ...and mode UP Up key for OSD control LEFT Left key for OSD control RIGHT Right key for OSD control DOWN Down key for OSD control ENTER Enter key for OSD control VOL Volume increase Digital volume contr...

Page 11: ...y 1 Pull out the battery holder 2 Insert the new battery into the holder Note The positive polarity should face outward 3 Push the holder into the remote control until it clicks into place Avoid exces...

Page 12: ...des a different level of video quality The method you choose will most likely depend upon the availability of matching terminals on both the projector and the video source device as described below Be...

Page 13: ...deo source device to that sound system instead of to the mono audio projector The audio connections illustrated in the following sections are provided for informational purposes only You need not conn...

Page 14: ...fore energizing the lamp 5 Switch all of the connected equipment on 6 You can also press Source on the projector or remote control to select your desired input signal For more information please refer...

Page 15: ...uring the cooling process To shorten the cooling time you can also activate the Quick Cooling function 3 Switch off the main Power at the left side and disconnect the power cord at the adaptor from th...

Page 16: ...Menu operation Menu system OSD MENU1 Video S Vide Dynamic Static Theater Game Front Up Front Down Rear Up Rear Down OSD Menu 2 0 to 100 Brightness Default 50 0 to 100 Contrast Default 50 16...

Page 17: ...0 to 100 Color Default 50 OSD Menu 3 0 to 100 Hue Default 50 English French German Spanish Portuguese Italian System Default 17...

Page 18: ...ebox based video games in a normal living room lighting level environment Flip Mirror 1 Front Down Front projection on floor 2 Front Up Front projection on ceiling 3 Rear Up Rear projection on ceiling...

Page 19: ...mage becomes The lower the value the more reddish the image becomes Language Language sets the language for the OSD control menus Use Left Right on the projector or Left Right on the remote control to...

Page 20: ...he connection The input signal has not been correctly selected Select the correct input signal with the Source key on the projector or remote control The lens cap is still attached to the lens Remove...

Page 21: ...rd To remove dirt or dust wipe the case with the supplied cleaning cloth To remove stubborn dirt or stains moisten a soft cloth with water and a neutral PH detergent Then wipe the case Never use wax a...

Page 22: ...200mm Aspect Ratio 4 3 Standard Noise Level 32dB Projection Lens f 24 0 30 1 mm F 2 4 2 50 Image Size 30 to 90 inch 1 5 to 3 meters Video Compatibility NTSC PAL 480i 576i Displayable Colors 8 bit per...

Page 23: ...Dimensions 90 240 200 Unit mm 23...

Page 24: ...he dealer from which you purchased the product of any defects Important The above warranty shall be void if the customer fails to operate the product in accordance with NEXTAR s written instructions e...

Page 25: ...e All specifications and features are subject to change without notice All screen shots shown are simulated and may not represent the actual screen on production units sold to consumers For instructio...

Reviews: