background image

- 5 - 

Parts Introduction                                                           

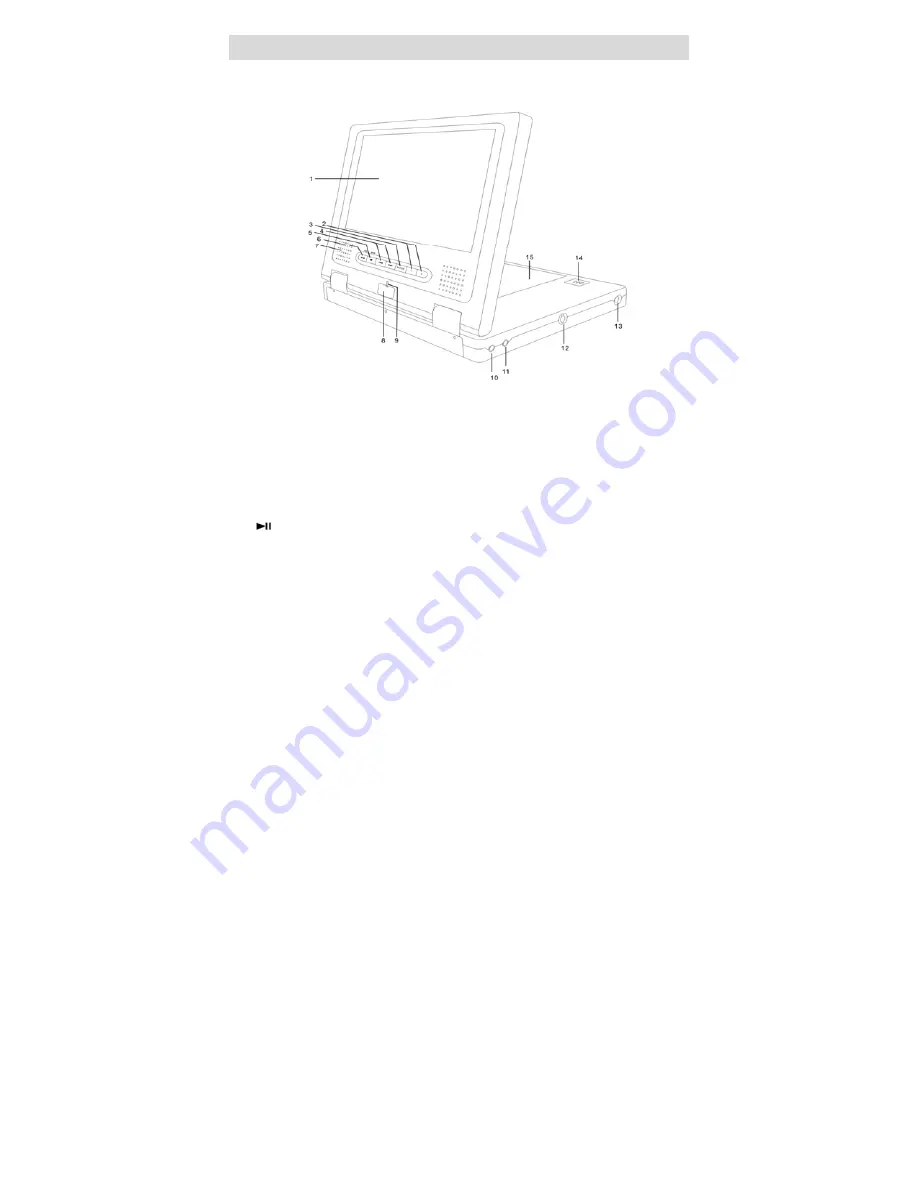
DVD Player 


1. 

TFT Liquid Crystal Display 

2. 

+/- 

buttons  

3. MODE 

button 


4. 

NEXT SKIP button 


PREV SKIP button 

5. 

STOP/ OFF button   

6. 


PLAY / ON button   

7. Speaker 

8. Remote 

sensor 

9. Indicator 

light 

10. Headphone 

jack 

11. VIDEO 

jack 

12.  Stand fixing hole 

13.  DC 9.5V input jack 

14.  OPEN button 

15. Disc 

cover 


Summary of Contents for MP1607

Page 1: ...structions 3 Precautions with Moisture 4 Function Features 5 Parts Introduction 6 Remote Control 9 Connections 11 Preparation 13 Use of Remote Control 13 Compatible disc formats 14 Power Supply 15 Use of Adapter 15 Use of Car Adapter 16 Basic Operations 17 FM transmitter use 19 System Setup 20 Play Functions 23 Care of Discs 26 Troubleshooting 27 Specifications 28 ...

Page 2: ...tect the power cord from being walked on or pinched particularly at plugs convenience receptacles and the point where they exit from the apparatus 11 Only use attachments accessories specified by the manufacturer 12 Use only with the cart stand tripod bracket or table specified by the manufacturer or sold with the apparatus When a cart is used use caution when moving the cart apparatus combination...

Page 3: ...rts operating or the DVD is placed by an air conditioner In the hot summer season the DVD player is moved from an air conditioned room to a hot damp place to be used The DVD player is being operated in a damp place If moisture appears on the player discontinue use If the player is operated under said conditions or the disc is loaded certain interior components could be damaged Take disc out plug p...

Page 4: ...se English Spanish or French for ON SCREEN display language 9 AUDIO OUT Analog audio output 10 POWER ADAPTER SWITCH Automatically adapts to voltage requirements in U S and other countries 11 Wireless transmitter function Transform the audio signal to FM signal first and then output 2 FM channels DVD players and discs are coded by region So the region code of unit should match with the code of disc...

Page 5: ...al Display 2 buttons 3 MODE button 4 NEXT SKIP button PREV SKIP button 5 STOP OFF button 6 PLAY ON button 7 Speaker 8 Remote sensor 9 Indicator light 10 Headphone jack 11 VIDEO jack 12 Stand fixing hole 13 DC 9 5V input jack 14 OPEN button 15 Disc cover ...

Page 6: ... 6 Parts Introduction Front View 1 Latch hook Left View 1 Stand fixing hole ...

Page 7: ...ut jack 3 AUDIO input output jack 4 AV IN OUT switch 5 FM CH1 fixed frequency 87 9 FM CH2 fixed frequency 88 1 FM OFF switch 6 DC 9 5V IN Attention Noise may occur in speakers when input external audio signal while playing a DVD disc Please unplug the audio cord to avoid the noise ...

Page 8: ... 8 Remote Control ...

Page 9: ...f the disc contains multiple audio languages 12 MUTE button Press to turn speakers sound on or off during play 13 LCD ON OFF Press to close LCD screen when loading a disc in normal mode Press this button again to open LCD screen 14 REP button Press to repeat a chapter track title or all content 15 MENU button Press to select the disc menu 16 ROTATE button Press to inverse the image 17 button Press...

Page 10: ...ectrical equipment connected to DVD player is switched off and unplugged from the power supply 2 Connect the DVD player to the TV s audio video inputs with audio video cables Connect to an Amplifier The DVD player can be connected to an AV amplifier Please refer to your Audio equipment s manual before connecting ...

Page 11: ... 11 Connections Connect to Headphone Connect the headphone to the jack on the right side of the unit When headphone is connected the speaker will automatically turn off ...

Page 12: ...s film 3 Place the battery into the tray and then insert the tray into the remote control 4 For best usage aim the remote directly at the player s receiving window from a range no greater than 15 feet and at angles no greater than 60 degrees 5 In the case of normal use the battery will last for one year 6 Remove the battery when the remote control is not in use for a long time ...

Page 13: ...t playback of CD R or CD RW discs created on a computer requires proper formatting and finalization of the disc for audio playback Some computers and or software programs may not be capable of creating compatible discs About Disc Terms Title Generally pictures or music compressed in a DVD are divided into several sections the title is the heading of each section Chapter A smaller section of pictur...

Page 14: ... socket Note Please turn player s power off before unplugging Pre operation 1 Connect to power 2 Press OPEN button to open disc cover 3 Put disc into the tray with printed side up 4 Close the disc cover 5 Press and hold button for more than 2 seconds on the front panel to turn on the player 6 Adjust the volume with VOLUME VOLUME buttons on the remote control Or you can adjust the volume with and b...

Page 15: ...not operate the unit or view video software while driving a vehicle Place the unit in a proper position for viewing Please detach battery pack when using car adapter as power source We advise you power off the player at the instant of car start up A lithium ion rechargeable battery pack is available as an optional accessory for greater ease and portability Details available in store or online at w...

Page 16: ...than 2 seconds on the front panel 2 Press OPEN button to open the disc cover 3 Load disc with the label side up 4 Close the disc cover The player will automatically search for the disc and play it Begin Play 1 Press the button on the remote control 2 Press direction buttons or the number buttons to select a scene 3 Press the ENTER or Pause 1 Press the button on remote control to pause during play ...

Page 17: ...buttons to select the title or disc menu item you wish to play 3 Press or Enter button to start a disc NOTE Title Menu functions are only available for DVD discs Previous and Next 1 Press PREV button on the remote control or on the control panel to play the previous track 2 Press NEXT button on the remote control or on the control panel to play the next track Mode Press MODE button on the control ...

Page 18: ...n FM transmitter during play Regulate the volume to your satisfaction 2 Turn on your FM receiving equipment and regulate the frequency to match the unit about FM 87 9 for CH1 about FM 88 1 for CH2 3 Switch to FM OFF to turn off this function Attention 1 Please press MUTE button on the remote control to turn off the sound of speakers before you receive the FM signal by FM earphones 2 Please adjust ...

Page 19: ... ENTER button to confirm your selection Category 1 When you enter a category the item highlighted is the current setup 2 Press right direction button on the remote control to select category 3 Press the direction buttons to select your preference The item you select will be highlighted 4 Press the ENTER or button to confirm your selection 5 Press left direction button to enter other setup menus Ge...

Page 20: ...te control to enter general setup move the highlight to last memory by buttons enter last memory item by button and then select on or off Dolby Digital Setup 1 Dual Mono Please use this item set the output mode of channel Stereo L Mono R Mono or Mix Mono 2 Dynamic Please use this item to adjust linear dynamic compression rate to get different signal compression effects Speaker Setup 1 Down Mix Sel...

Page 21: ...of the disc altogether Access parental control on sub menu by pressing direction buttons on the remote control then press ENTER An interactive menu will appear 3 Password Parental control features are password protected Choose a password that you can remember easily or write it down The default password is 1369 4 Default Reset Use this function to reset all the settings NOTE Please stop the disc b...

Page 22: ...ou press the AUDIO button in succession NOTE This function is only available for discs onto which several audio bit streams have been recorded Fast Forward Rewind Press to fast forward and press to rewind Subtitle A DVD disc can be recorded with 32 subtitles Press SUBTITLE button on the remote control the mode of subtitles will recycle as follows SUBTITLE 1 N Subtitle 1 appears on the screen SUBTI...

Page 23: ...e time press the ENTER button again to start playback Resume Play 1 Press button at the spot that you wish to stop The player memorizes the track where playback was stopped 2 Press button to resume normal play The player resumes play from where you stopped last time If the disc is removed this function will be invalid Press button twice or open the disc tray to stop the disc play completely when y...

Page 24: ...nu Press the direction buttons to choose item and then press Enter to confirm your selection Many discs have other items besides pictures Use left right button to move cursor to playback mode column use the UP DOWN button to confirm 2 Picture Rotation Press direction buttons on the remote control to rotate pictures when browsing JPEG files Once another picture is selected rotate function will stop...

Page 25: ...se noise Gently wipe from the center to the outer edge Cleaning Care Use a soft dry cloth for cleaning For stubborn dirt soak the cloth in some detergent ring well first and wipe Use a dry cloth to wipe it dry Do not use any volatile agents such as gas or paint thinner because they may damage the surface of the player Lens cleaner The player s pickup lens should not become dirty under normal use b...

Page 26: ...ep the player powered up for at least two hours There is no sound Please make sure system connection is correct Please make sure the speakers are turned on Please make sure the sound setup of DVD disc is correct Is your disc dirty or warped Clean or replace the disc There is no picture Please make sure TV is on and in correct video mode Please make sure your system connection is correct Please mak...

Page 27: ...ut Out Level 1 5V 0 2 1 0 Load 10kΩ Video Out Video Out Out Level 1VP P 0 2 Load 75Ω Unbalanced Negative Power AC 100 240V 50 60Hz Power Consumption 25W Dimensions 200mm x 156mm x 30mm L W D Weight 0 9kg DESIGN AND SPECIFICATIONS ARE SUBJECT TO CHANGE WITHOUT NOTICE Manufactured under license from Dolby Laboratories Dolby and the double D symbol are trademarks of Dolby Laboratories Confidential un...

Reviews: