background image

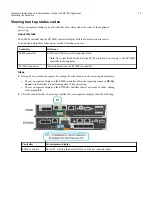
Note: If you cannot access the Home page over a link-local connection, configure the
service laptop IP address as 

169.254.0.2

, and try again.

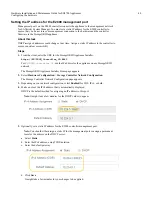
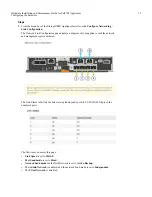
4. Review any messages displayed on the Home page and configure the link configuration and the

IP configuration, as required.

Related reference

Web browser requirements

 on page 12

You must use a supported web browser.

Configuring network links

You can configure network links for the ports used to connect the appliance to the Grid Network,
the Client Network, and the Admin Network. You can set the link speed as well as the port and
network bond modes.

Before you begin

If you plan to use the 25-GbE link speed for the 10/25-GbE ports:

You have installed SFP28 transceivers in the ports you plan to use.

You have connected the ports to switches that can support these features.

You understand how to configure the switches to use this higher speed.

If you plan to use Aggregate port bond mode, LACP network bond mode, or VLAN tagging for
the 10/25-GbE ports:

You have connected the ports on the appliance to switches that can support VLAN and LACP.

If multiple switches are participating in the LACP bond, the switches support multi-chassis
link aggregation groups (MLAG), or equivalent.

You understand how to configure the switches to use VLAN, LACP, and MLAG or equivalent.

You know the unique VLAN tag to use for each network. This VLAN tag will be added to each
network packet to ensure that network traffic is routed to the correct network.

If you plan to use Active-Backup mode for the Admin Network, you have connected Ethernet
cables to both management ports on the controller.

About this task

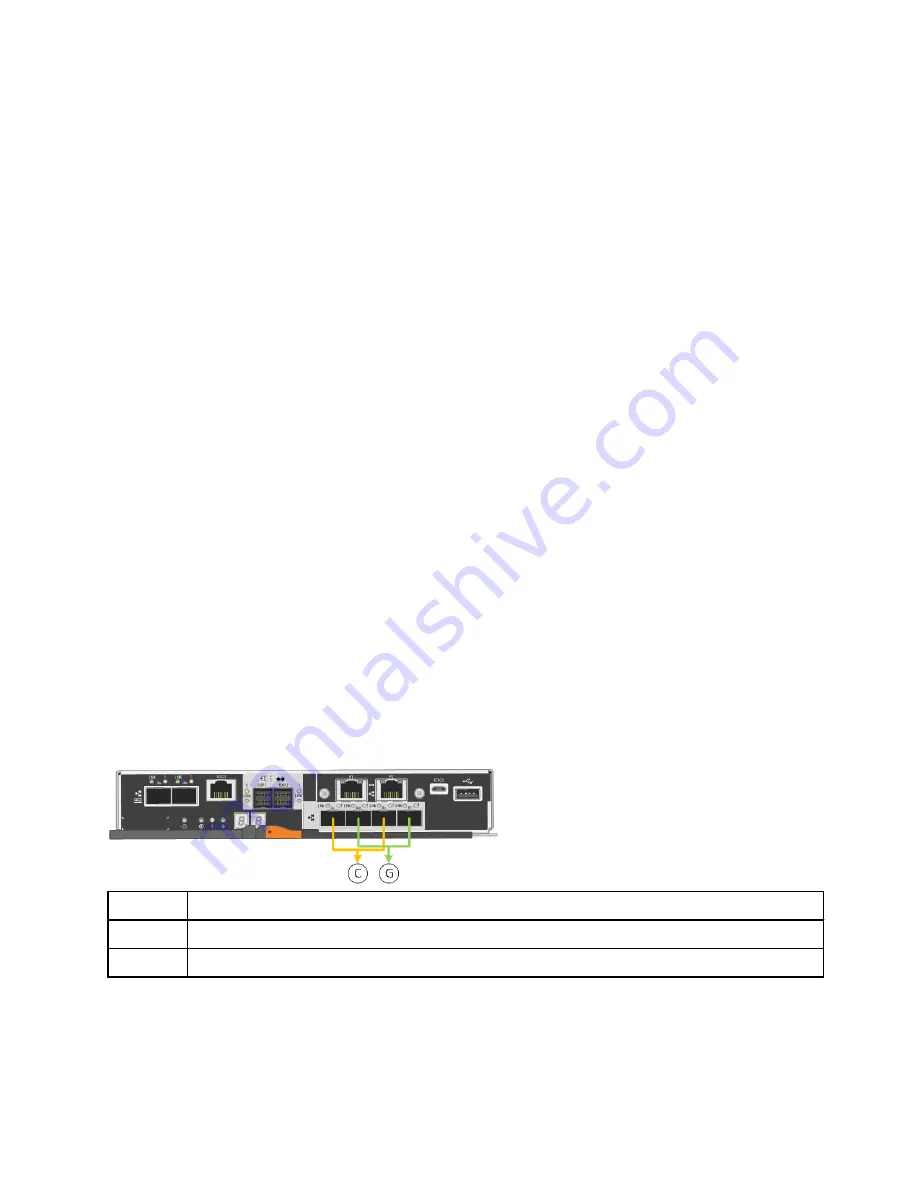
This figure shows how the four 10/25-GbE ports are bonded in Fixed port bond mode (default
configuration).

Callout

Which ports are bonded

C

Ports 1 and 3 are bonded together for the Client Network, if this network is used.

G

Ports 2 and 4 are bonded together for the Grid Network.

This figure shows how the four 10/25-GbE ports are bonded in Aggregate port bond mode.

Hardware Installation and Maintenance Guide for SG5700 Appliances 

33

Configuring the hardware

Summary of Contents for StorageGRID SG5712

Page 1: ...StorageGRID 11 4 Hardware Installation and Maintenance Guide For StorageGRID SG5700 Series Appliances July 2020 215 14699_2020 07_en us doccomments netapp com ...

Page 2: ...the E5700SG controller 27 Configuring the hardware 30 Configuring StorageGRID connections 30 Accessing the StorageGRID Appliance Installer 30 Configuring network links 33 Setting the IP configuration 38 Verifying network connections 44 Verifying port level network connections 45 Accessing and configuring SANtricity System Manager 47 Setting the IP address for the E2800 management port 48 Accessing...

Page 3: ... 61 Upgrading SANtricity OS Software on the storage controllers using the Grid Manager 61 Upgrading SANtricity OS Software on the E2800 controller using maintenance mode 67 Replacing the E2800 controller 70 Replacing the E5700SG controller 78 Replacing other hardware components 80 Changing the link configuration of the E5700SG controller 80 Changing the MTU setting 84 Copyright and trademark 89 Co...

Page 4: ...ANtricity System Manager unauthorized access to data is prevented The SG5700 appliance is available in two models the SG5712 and the SG5760 Both models include the following components Component SG5712 SG5760 Compute controller E5700SG controller E5700SG controller Storage controller E Series E2800 controller E Series E2800 controller Chassis E Series DE212C enclosure a two rack unit 2U enclosure ...

Page 5: ...Model SG5760 This figure shows the front and back of the SG5760 model a 4U enclosure that holds 60 drives in 5 drive drawers The SG5760 includes two controllers two fan canisters and two power canisters Hardware Installation and Maintenance Guide for SG5700 Appliances 5 StorageGRID appliance overview ...

Page 6: ...networks including the Grid Network the Admin Network and the Client Network Connects to the E2800 controller and operates as the initiator This figure shows the connectors on the back of the E5700SG controller Port Type Use 1 Interconnect ports 1 and 2 16Gb s Fibre Channel FC optical SFP Connect the E5700SG controller to the E2800 controller 2 Diagnostic and support ports RJ 45 serial port Micro ...

Page 7: ...or managing alerts the AutoSupport feature and the Drive Security feature Connects to the E5700SG controller and operates as the target This figure shows the connectors on the back of the E2800 controller Port Type Use 1 Interconnect ports 1 and 2 16Gb s FC optical SFP Connect the E2800 controller to the E5700SG controller 2 Management ports 1 and 2 1 Gb RJ 45 Ethernet Port 1 connects to the netwo...

Page 8: ...k IP settings required to connect to StorageGRID networks 4 Deploying the appliance as a Storage Node Task Instructions Deploying an appliance Storage Node in a new StorageGRID system Deploying an appliance Storage Node on page 55 Adding an appliance Storage Node to an existing StorageGRID system Instructions for expanding a StorageGRID system Deploying an appliance Storage Node as part of a Stora...

Page 9: ...lation Ubuntu or Debian installation SG1000 appliance installation and maintenance Expanding a StorageGRID system Recovery and maintenance Hardware Installation and Maintenance Guide for SG5700 Appliances 9 Installation and deployment overview ...

Page 10: ...wer and grounding See the NetApp Hardware Universe for more information 2 If you are installing the SG5760 model confirm that your location provides 240 volt AC power 3 Obtain a 19 inch 48 3 cm cabinet or rack to fit shelves of this size without cables Appliance model Height Width Depth Maximum weight SG5712 12 drives 3 41 in 8 68 cm 17 6 in 44 7 cm 21 1 in 53 6 cm 63 9 lb 29 0 kg SG5760 60 drives...

Page 11: ...se instead of the power cords that ship with the appliance Two optical cables for the FC interconnect ports Eight SFP transceivers compatible with both the four 16Gb s FC interconnect ports and the four 10 GbE network ports Obtaining additional equipment and tools Before installing the StorageGRID appliance confirm you have all of the additional equipment and tools that you need You need the follo...

Page 12: ... Ethernet port Optional tools Power drill with Phillips head bit Flashlight Mechanized lift for SG5760 Web browser requirements You must use a supported web browser Web browser Minimum supported version Google Chrome 74 Microsoft Internet Explorer 11 Native Mode Mozilla Firefox 67 You should set the browser window to a recommended width Browser width Pixels Minimum 1024 Optimum 1280 Hardware Insta...

Page 13: ... The Client Network provides client protocol access to the grid so the Grid Network can be isolated and secured The Client Network is optional Management network for SANtricity System Manager This network provides access to SANtricity System Manager on the E2800 controller allowing you to monitor and manage the hardware components in the appliance This management network can be the same as the Adm...

Page 14: ... the Grid Network and the Client Network for StorageGRID See 10 25 GbE port connections for the E5700SG controller Related concepts Port bond modes for E5700SG controller ports on page 15 When configuring network links for the E5700SG controller ports you can use port bonding for the 10 25 GbE ports that connect to the Grid Network and optional Client Network and the 1 GbE management ports that co...

Page 15: ...etwork if this network is used G Ports 2 and 4 are bonded together for the Grid Network When using Fixed port bond mode you can use one of two network bond modes Active Backup or Link Aggregation Control Protocol LACP In Active Backup mode default only one port is active at a time If the active port fails its backup port automatically provides a failover connection Port 4 provides a backup path fo...

Page 16: ...oller you can choose Independent network bond mode or Active Backup network bond mode to connect to the optional Admin Network In Independent mode only management port 1 is connected to the Admin Network This mode does not provide a redundant path Management port 2 is left unwired and available for temporary local connections use IP address 169 254 0 1 In Active Backup mode both management ports 1...

Page 17: ... Ethernet switch for the SANtricity System Manager management network is set to autonegotiate Must be Autonegotiate default IP address format Choose one IPv4 IPv6 Static IP address you plan to use for the appliance on the management network For IPv4 IPv4 address Subnet mask Gateway For IPv6 IPv6 address Routable IP address E2800 controller router IP address Table 2 Information needed to connect th...

Page 18: ...5 GbE ports on the E5700SG controller connect to the StorageGRID Grid Network and Client Network Note See 10 25 GbE port connections for the E5700SG controller for more information about the options for these ports Information needed Your value Link speed Note If you select 25 GbE you must install SPF28 transceivers Auto negotiation is not supported so you must also configure the ports and the con...

Page 19: ...etwork does not have a gateway specify the same static IPv4 address for the gateway IPv4 address CIDR Gateway Grid Network subnets CIDR Note If the Client Network is not enabled the default route on the controller will use the gateway specified here Table 5 Information needed to connect the E5700SG controller to the Client Network The Client Network for StorageGRID is an optional network typically...

Page 20: ...ports that connect to the Grid Network and optional Client Network and the 1 GbE management ports that connect to the optional Admin Network Port bonding helps protect your data by providing redundant paths between StorageGRID networks and the appliance Related tasks Configuring the hardware on page 30 After applying power to the appliance you must configure SANtricity System Manager which is the ...

Page 21: ...nd password b Select Products My Products c Confirm that the new serial number is listed d If it is not follow the instructions for new NetApp customers New NetApp customer a Click Register Now and create an account b Select Products Register Products c Enter the product serial number and requested details After your registration is approved you can download any required software The approval proc...

Page 22: ...ove these handles as you slide the appliance onto the rails 3 See the Installation and Setup Instructions and slide the appliance in the cabinet or rack 4 See the Installation and Setup Instructions and secure the appliance to the cabinet or rack If you have an SG5760 use the back brackets to secure the appliance to the rear of the rack or cabinet Use the cage nuts if your rack or cabinet has squa...

Page 23: ...e network ports to use a 10 GbE link speed You have obtained the following items which are not included with the appliance One to four optical cables for the 10 25 GbE ports you plan to use One to four SFP28 transceivers if you plan to use 25 GbE link speed Ethernet cables for connecting the management ports CAUTION Risk of exposure to laser radiation Do not disassemble or remove any part of an SF...

Page 24: ...8 transceivers Connect to the Grid Network and the Client Network for StorageGRID See 10 25 GbE port connections for the E5700SG controller Steps 1 Connect the E2800 controller to the E5700SG controller using two optical cables and four of the eight SFP transceivers Connect this port To this port Interconnect port 1 on the E2800 controller Interconnect port 1 on the E5700SG controller Interconnect...

Page 25: ...Network and the 1 GbE management ports that connect to the optional Admin Network Port bonding helps protect your data by providing redundant paths between StorageGRID networks and the appliance Related tasks Accessing the StorageGRID Appliance Installer on page 30 You must access the StorageGRID Appliance Installer to configure the connections between the appliance and the three StorageGRID netwo...

Page 26: ...ontroller Status indicators on the E5700SG controller Steps 1 During boot up monitor progress by viewing the codes shown on the seven segment displays The seven segment display on the E2800 controller shows the repeating sequence OS Sd blank to indicate that it is performing start of day processing The seven segment display on the E5700SG controller shows a sequence of codes ending with AA and FF ...

Page 27: ...e is initializing You can use these displays to determine status and troubleshoot errors Troubleshooting the hardware installation on page 58 If you encounter issues during the installation you might find it helpful to review troubleshooting information related to hardware setup and connectivity issues Related information E5700 and E2800 System Monitoring Guide Status indicators on the E5700SG con...

Page 28: ...pliance the seven segment display on the E5700SG controller shows the following codes in the order listed Code Indicates HI The master boot script has started PP The system is checking to see if the FPGA needs to be updated HP The system is checking to see if the 10 25 GbE controller firmware needs to be updated RB The system is rebooting after applying firmware updates FP The hardware subsystem f...

Page 29: ...ding failure 92 to 96 PCI bus initialization A0 to A3 SATA drive initialization AB Alternate boot code AE Booting OS EA DDR4 training failed E8 No memory installed EU The installation script was not found EP Installation or communication with the E2800 controller has failed Related reference Troubleshooting the hardware installation on page 58 If you encounter issues during the installation you mi...

Page 30: ... you plan to use You know the IP address gateway and subnet for the appliance on these networks You have configured the network switches you plan to use About this task When you first access the StorageGRID Appliance Installer you can use the DHCP assigned IP address for the Admin Network assuming the appliance is connected to the Admin Network or the DHCP assigned IP address for the Grid Network ...

Page 31: ...0SG controller next to the port 2 If you were able to obtain either of the DHCP addresses a Open a web browser on the service laptop b Enter this URL for the StorageGRID Appliance Installer https E5700SG_Controller_IP 8443 For E5700SG_Controller_IP use the DHCP address for the controller use the IP address for the Admin Network if you have it c If you are prompted with a security alert view and in...

Page 32: ... web browser on the service laptop c Enter this URL for the StorageGRID Appliance Installer https 169 254 0 1 8443 The StorageGRID Appliance Installer Home page appears The information and messages shown when you first access this page depend on how your appliance is currently connected Hardware Installation and Maintenance Guide for SG5700 Appliances 32 Configuring the hardware ...
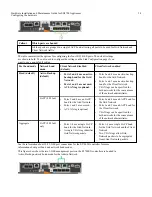
Page 33: ... bond mode or VLAN tagging for the 10 25 GbE ports You have connected the ports on the appliance to switches that can support VLAN and LACP If multiple switches are participating in the LACP bond the switches support multi chassis link aggregation groups MLAG or equivalent You understand how to configure the switches to use VLAN LACP and MLAG or equivalent You know the unique VLAN tag to use for e...

Page 34: ... network administrator LACP 802 3ad Ports 2 and 4 use an LACP bond for the Grid Network Ports 1 and 3 are not used A VLAN tag is optional Ports 2 and 4 use an LACP bond for the Grid Network Ports 1 and 3 use an LACP bond for the Client Network VLAN tags can be specified for both networks for the convenience of the network administrator Aggregate LACP 802 3ad only Ports 1 4 use a single LACP bond f...

Page 35: ...s table lists the link state up down and speed 1 10 25 40 100 Gbps of the numbered ports The first time you access this page Link Speed is set to 10GbE Port bond mode is set to Fixed Network bond mode for the Grid Network is set to Active Backup The Admin Network is enabled and the network bond mode is set to Independent The Client Network is disabled Hardware Installation and Maintenance Guide fo...

Page 36: ...be installed in the ports 3 Enable or disable the StorageGRID networks you plan to use The Grid Network is required You cannot disable this network a If the appliance is not connected to the Admin Network unselect the Enable network check box for the Admin Network b If the appliance is connected to the Client Network select the Enable network check box for the Client Network Hardware Installation ...

Page 37: ...lect values between 0 and 4095 Active Backup selected for the Admin Network 5 When you are satisfied with your selections click Save Note You might lose your connection if you made changes to the network or link you are connected through If you are not reconnected within 1 minute re enter the URL for the StorageGRID Appliance Installer using one of the other IP addresses assigned to the appliance ...

Page 38: ... configure the IP addresses and routing information used for the appliance Storage Node on the StorageGRID Grid Admin and Client Networks About this task You must either assign a static IP for the appliance on each connected network or assign a permanent lease for the address on the DHCP server If you want to change the link configuration see the instructions for changing the link configuration of...

Page 39: ...efault value of 1500 Attention The MTU value of the network must match the value configured on the switch port the node is connected to Otherwise network performance issues or packet loss might occur Attention For the best network performance all nodes should be configured with similar MTU values on their Grid Network interfaces The Grid Network MTU mismatch alert is triggered if there is a signif...

Page 40: ...pulated with that value and the field becomes read only Your web browser is automatically redirected to the new IP address for the StorageGRID Appliance Installer b Confirm that the list of Grid Network subnets is correct If you have grid subnets the Grid Network gateway is required All grid subnets specified must be reachable through this gateway These Grid Network subnets must also be defined in...

Page 41: ...way If your network does not have a gateway re enter the same static IPv4 address c If you want to use jumbo frames change the MTU field to a value suitable for jumbo frames such as 9000 Otherwise keep the default value of 1500 Attention The MTU value of the network must match the value configured on the switch port the node is connected to Otherwise network performance issues or packet loss might...

Page 42: ...er b Confirm that the list of Admin Network subnets is correct You must verify that all subnets can be reached using the gateway you provided Note The default route cannot be made to use the Admin Network gateway To add a subnet click the insert icon to the right of the last entry To remove an unused subnet click the delete icon c If you want to use jumbo frames change the MTU field to a value sui...

Page 43: ...might occur e Click Save 10 If you selected DHCP follow these steps to configure the Client Network a After you select the DHCP radio button click Save The IPv4 Address and Gateway fields are automatically populated If the DHCP server is set up to assign an MTU value the MTU field is populated with that value and the field becomes read only Your web browser is automatically redirected to the new I...

Page 44: ...nce To validate routing through network gateways you should test connectivity between the StorageGRID Appliance Installer and IP addresses on different subnets Steps 1 From the StorageGRID Appliance Installer click Configure Networking Ping Test The Ping Test page appears 2 From the Network drop down box select the network you want to test Grid Admin or Client 3 Enter the IPv4 address for a host o...

Page 45: ...ance You can use this table to test the connectivity between the appliance you are installing and the other nodes in your Grid Network Note The Grid Network ports listed in the table are valid only for StorageGRID version 11 4 0 To verify which ports are correct for each node type you should always consult the installation instructions for your version of StorageGRID 2 From the Network drop down s...

Page 46: ...n one or more of the selected ports the Port connectivity test failed message appears in a yellow banner The nmap command output is listed below the banner Any remote port the host is not listening to has a state of closed For example you might see this yellow banner when the node you are trying to connect to is in a pre installed state and the StorageGRID NMS service is not yet running on that no...

Page 47: ... Accessing and configuring SANtricity System Manager You can use SANtricity System Manager to monitor the status of the storage disks and hardware components in your StorageGRID appliance You can access this software by browsing to the IP address of management port 1 on the E2800 controller the storage controller in the appliance Steps 1 Setting the IP address for the E2800 management port on page...

Page 48: ...orageGRID Appliance Installer Home page appears 2 Select Hardware Configuration Storage Controller Network Configuration The Storage Controller Network Configuration page appears 3 Depending on your network configuration select Enabled for IPv4 IPv6 or both 4 Make a note of the IPv4 address that is automatically displayed DHCP is the default method for assigning an IP address to this port Note It ...

Page 49: ...wser Steps 1 Open a web browser and enter the IP address as the URL for SANtricity System Manager https E2800_Controller_IP The login page for SANtricity System Manager appears 2 Set or enter the administrator password Note SANtricity System Manager uses a single administrator password that is shared among all users The Set Up wizard appears 3 Click Cancel to close the wizard Do not complete the S...

Page 50: ...se it to configure hardware settings Typically you configure these settings before deploying the appliance as a Storage Node in a StorageGRID system About this task You use SANtricity System Manager to configure the following settings Email alerts SNMP alerts or syslog alerts for the appliance hardware AutoSupport settings for the appliance hardware Drive Security keys which are needed to unlock s...

Page 51: ...plex controller The security key needed to unlock the drives is saved to the E2800 controller but not to the E5700SG controller You must be able to locate your key identifier pass phrase and the downloaded key file in case the E2800 controller fails and needs to be replaced 7 Optionally change the administrator password a Select Help to access the online help for SANtricity System Manager b Use th...

Page 52: ...the shelf you can view the E2800 controller the power and fan canisters in the appliance the battery in the E2800 controller and component temperatures Note SANtricity System Manager does not show information about the E5700SG controller The slot for this controller appears as B empty in the graphic Hardware Installation and Maintenance Guide for SG5700 Appliances 52 Configuring the hardware ...
Page 53: ...rmance reduced rebuild times after drive failures and ease of management DDP also provides drawer loss protection in 60 drive appliances DDP16 This mode uses two parity drives for every 16 data drives which results in higher storage efficiency compared to DDP When compared to RAID6 DDP16 delivers better system performance reduced rebuild times after drive failures ease of management and comparable...

Page 54: ...ort remaps Steps 1 From the menu bar of the StorageGRID Appliance Installer click Configure Networking Remap Ports The Remap Port page appears 2 From the Network drop down box select the network for the port you want to remap Grid Admin or Client 3 From the Protocol drop down box select the IP protocol TCP or UDP 4 From the Remap Direction drop down box select which traffic direction you want to r...

Page 55: ...Node in a StorageGRID system you access the StorageGRID Appliance Installer and perform the following steps You specify or confirm the IP address of the primary Admin Node and the name of the Storage Node You start the deployment and wait as volumes are configured and the software is installed When the installation pauses partway through the appliance installation tasks you resume the installation...

Page 56: ...dress Option Description Manual IP entry a Unselect the Enable Admin Node discovery check box b Enter the IP address manually c Click Save d Wait for the connection state for the new IP address to become ready Automatic discovery of all connected primary Admin Nodes a Select the Enable Admin Node discovery check box b Wait for the list of discovered IP addresses to be displayed c Select the primar...

Page 57: ...llation and maintenance instructions for your appliance 6 From the StorageGRID Appliance Installer home page click Start Installation The Current state changes to Installation is in progress and the Monitor Installation page is displayed Note If you need to access the Monitor Installation page manually click Monitor Installation from the menu bar 7 If your grid includes multiple appliance Storage ...

Page 58: ...segment displays show different codes for each controller 2 Review the codes on the seven segment display for the E5700SG controller Note The installation and provisioning take time Some installation phases do not report updates to the StorageGRID Appliance Installer for several minutes If an error occurs the seven segment display flashes a sequence such as HE 3 To understand what these codes mean...

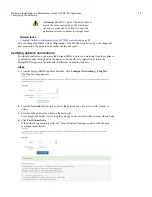
Page 59: ...ht be a network issue or the hardware installation might not have been completed successfully Steps 1 If you are unable to connect to SANtricity System Manager a Try to ping the appliance using the IP address for the E2800 controller on the management network for SANtricity System Manager ping E2800_Controller_IP b If you receive no response from the ping confirm you are using the correct IP addre...
Page 60: ...oller if the installation fails About this task This procedure only applies when the compute controller is running the StorageGRID Appliance Installer Once the installation is completed this step no longer works because the StorageGRID Appliance Installer is no longer available Steps 1 From the menu bar of the StorageGRID Appliance Installer click Advance Reboot Controller The Reboot Controller pa...

Page 61: ...g SANtricity OS Software on the storage controllers using the Grid Manager on page 61 If the storage controller is using a SANtricity OS version older than 08 42 20 00 11 42 use maintenance mode to perform the upgrade Upgrading SANtricity OS Software on the E2800 controller using maintenance mode on page 67 Upgrading SANtricity OS Software on the storage controllers using the Grid Manager Use the ...

Page 62: ...as been successfully applied to all applicable nodes It might take more than 30 minutes to load the SANtricity OS software on each node and up to 90 minutes to reboot each StorageGRID storage appliance Note This procedure will automatically upgrade the NVSRAM to the most recent version associated with the SANtricity OS upgrade Steps 1 From a service laptop or management client download the new SAN...

Page 63: ... Open The file is uploaded and validated When the validation process is done the file name is shown in the Details field Note Do not change the file name since it is part of the verification process 6 Enter the provisioning passphrase Hardware Installation and Maintenance Guide for SG5700 Appliances 63 Maintaining the SG5700 appliance ...

Page 64: ...rted resolve them and click Start again b The SANtricity OS Upgrade Progress table appears This table shows all Storage Nodes in your grid and the current stage of the upgrade for each node Note The table shows all Storage Nodes including software based Storage Nodes You must approve the upgrade for all Storage Nodes even though a SANtricity OS upgrade has no effect on software based Storage Nodes...

Page 65: ...s to the SANtricity OS upgrade queue Note If the order in which nodes are upgraded is important approve nodes or groups of nodes one at a time and wait until the upgrade is complete on each node before approving the next node s Click one or more Approve buttons to add one or more nodes to the SANtricity OS upgrade queue Note You can delay applying a SANtricity OS upgrade to a node but the SANtrici...

Page 66: ...the SANtricity OS upgrade process 12 Wait while the SANtricity OS upgrade is applied to each approved grid node Attention If any node shows a stage of Error while the SANtricity OS upgrade is being applied the upgrade has failed for that node The appliance might need to be placed in maintenance mode to recover from the failure Contact technical support before continuing If the firmware on the node...

Page 67: ...able Technical support will help you consult the NetApp Interoperability Matrix Tool IMT to determine which versions of SANtricity are compatible with your appliance You have contacted NetApp technical support to confirm you need to update the SANtricity OS and you know which version you need You must have the Maintenance permission You must be signed in to the Grid Manager using a supported brows...

Page 68: ...orage Node c Select the Tasks tab d Click Maintenance Mode A confirmation dialog box appears e Enter the provisioning passphrase and click OK A progress bar and a series of messages including Request Sent Stopping StorageGRID and Rebooting indicate that the appliance is completing the steps for entering maintenance mode Hardware Installation and Maintenance Guide for SG5700 Appliances 68 Maintaini...

Page 69: ...SANtricity System Manager and sign in 3 Download the new SANtricity OS Software file and NVSRAM file to the management client Attention The NVSRAM is specific to the StorageGRID appliance Do not use the standard NVSRAM download 4 Follow the instructions in the E2800 and E5700 SANtricity Software and Firmware Upgrade Guide or the SANtricity System Manager online help to upgrade the E2800 controller...

Page 70: ...Replacing the E2800 controller You might need to replace the E2800 controller if it is not functioning optimally or if it has failed Before you begin You have a replacement controller with the same part number as the controller you are replacing You have downloaded the instructions for replacing the simplex configuration of a failed E2800 controller canister Attention Refer to the E Series instruc...

Page 71: ...er into maintenance mode Before changing the link configuration you must place the E5700SG controller controller into maintenance mode Putting a StorageGRID appliance into maintenance mode might make the appliance unavailable for remote access When you replace a controller you must remove the battery from the original controller and install it in the replacement controller Note The E2800 controlle...

Page 72: ...Grid Manager select Nodes b From the tree view of the Nodes page select the appliance Storage Node c Select the Tasks tab d Click Maintenance Mode A confirmation dialog box appears e Enter the provisioning passphrase and click OK A progress bar and a series of messages including Request Sent Stopping StorageGRID and Rebooting indicate that the appliance is completing the steps for entering mainten...

Page 73: ...on to the local management port g Confirm that the appliance is in maintenance mode by noting the maintenance mode message on the StorageGRID Appliance Installer home page 3 If the E2800 controller is functioning sufficiently to allow for a controlled shutdown confirm that all operations have completed a From the home page of SANtricity System Manager select View Operations in Progress b Confirm t...

Page 74: ...ontroller on a flat static free surface with the removable cover facing up f Remove the cover by pressing down on the button and sliding the cover off 5 Remove the battery from the failed controller and install it into the replacement controller a Confirm that the green LED inside the controller between the battery and the DIMMs is off If this green LED is on the controller is still using battery ...

Page 75: ...r h Move the battery latch up to secure the battery When the latch clicks into place the bottom of the latch hooks into a metal slot on the chassis i Turn the controller over to confirm that the battery is installed correctly Attention Possible hardware damage The metal flange at the front of the battery must be completely inserted into the slot on the controller as shown in the first figure If th...

Page 76: ...o a network with a DHCP server and on whether all drives are secured If management port 1 is connected to a network with a DHCP server the new controller will obtain its IP address from the DHCP server This value might be different than the original controller s IP address If all drives are secured you must use the Enterprise Management Window EMW in SANtricity Storage Manager to unlock the secure...

Page 77: ...o the expected status by viewing the icon to the left of the node name When the reboot is complete the Tasks tab looks like the following screenshot 9 From SANtricity System Manager confirm that the new controller is Optimal and collect support data Related information NetApp E Series Systems Documentation Center Hardware Installation and Maintenance Guide for SG5700 Appliances 77 Maintaining the ...

Page 78: ...ageGRID software you might not be able to access the StorageGRID Appliance Installer immediately after completing this procedure While you can access the StorageGRID Appliance Installer from other hosts on the same subnet as the appliance you cannot access it from hosts on other subnets This condition should resolve itself within 15 minutes when any ARP cache entries for the original controller ti...

Page 79: ...disconnect the cables and SFPs Attention To prevent degraded performance do not twist fold pinch or step on the cables c Release the controller from the appliance by squeezing the latch on the cam handle until it releases and then open the cam handle to the right d Using two hands and the cam handle slide the controller out of the appliance Attention Always use two hands to support the weight of t...

Page 80: ...lly or if it has failed Related information NetApp E Series Systems Documentation Center Changing the link configuration of the E5700SG controller You can change the Ethernet link configuration of the E5700SG controller You can change the port bond mode the network bond mode and the link speed Before you begin You must have the Maintenance or Root Access permission For details see the instructions...

Page 81: ...he Tasks tab d Click Maintenance Mode A confirmation dialog box appears e Enter the provisioning passphrase and click OK A progress bar and a series of messages including Request Sent Stopping StorageGRID and Rebooting indicate that the appliance is completing the steps for entering maintenance mode Hardware Installation and Maintenance Guide for SG5700 Appliances 81 Maintaining the SG5700 applian...

Page 82: ...nce mode by noting the maintenance mode message on the StorageGRID Appliance Installer home page 2 Select Configure Networking Link Configuration from the menu 3 Make the desired changes to the link configuration For more information on the options see Configuring network links 4 When you are satisfied with your selections click Save Note You might lose your connection if you made changes to the n...

Page 83: ...ose to perform confirm that you can ping the grid IP address of the primary Admin Node and the grid IP address of at least one other Storage Node If necessary correct any link configuration issues 7 Once you are satisfied that your link configuration changes are working return the appliance to normal operating mode a From the StorageGRID Appliance Installer select Advanced Reboot Controller b Clic...

Page 84: ... instructions for administering StorageGRID You must be signed in to the Grid Manager using a supported browser About this task Before changing the MTU setting you must place the SG1000 into maintenance mode Putting a StorageGRID appliance into maintenance mode might make the appliance unavailable for remote access Steps 1 Follow these steps to place the appliance into maintenance mode a From the ...

Page 85: ...and Rebooting indicate that the appliance is completing the steps for entering maintenance mode When the appliance is in maintenance mode a confirmation message lists the URLs you can use to access the StorageGRID Appliance Installer Hardware Installation and Maintenance Guide for SG5700 Appliances 85 Maintaining the SG5700 appliance ...

Page 86: ... Confirm that the appliance is in maintenance mode by noting the maintenance mode message on the StorageGRID Appliance Installer home page 2 From the StorageGRID Appliance Installer select Configure Networking IP Configuration 3 Make the desired changes to the MTU settings for the Grid Network Admin Network and Client Network Hardware Installation and Maintenance Guide for SG5700 Appliances 86 Mai...

Page 87: ... interfaces The Grid Network MTU mismatch alert is triggered if there is a significant difference in MTU settings for the Grid Network on individual nodes The MTU values do not have to be the same for all network types 4 When you are satisfied with the settings click Save 5 Return the appliance to normal operating mode a From the StorageGRID Appliance Installer select Advanced Reboot Controller Ha...

Page 88: ... take up to 20 minutes c On the Nodes page verify that the appliance node returns to the expected status by viewing the icon to the left of the node name When the reboot is complete the Tasks tab looks like the following screenshot Hardware Installation and Maintenance Guide for SG5700 Appliances 88 Maintaining the SG5700 appliance ...

Page 89: ...n at any time and without notice NetApp assumes no responsibility or liability arising from the use of products described herein except as expressly agreed to in writing by NetApp The use or purchase of this product does not convey a license under any patent rights trademark rights or any other intellectual property rights of NetApp The product described in this manual may be protected by one or m...

Reviews: