background image


Mercury Neo electric scooters 


Part Code: Z40948 (Rev A) 

Owner’s Handbook 


Page 22 of 24 

SPECIFICATION 


Neo 

Neo 6 

Neo 8 

Dimensions (L x W x H) 

126cm x 58cm x 112cm (49½” x 22¾” x 44”)   

Total Weight 

80kg (176lb) 

86kg (190lb) 

92.5kg (203.5lb) 

Battery 

2No. 12V 36ah (compliant with IATA special provision A67) 

Motor 

350W 24V DC 

450W 24V DC 

500W 24V DC 

Control system 

CTE 70A 

CTE 70A 

Dynamics Rhino 110A 

Drive system 

Direct drive to rear wheels (with transaxle) 

Brake system 

Electromagnetic (EM) and regenerative 

EM and regenerative. 

Secondary cable brake. 

Turning radius 

110cm / 43¼” 

Front / rear tyre 

4No. 3.0-4 grey pneumatic (25cm x 10cm / 10” x 4”) 

Charger 

4A 24V DC 

Maximum speed 

4mph / 6.4kph 

6mph / 9.7kph 

8mph / 12kph 

Climbing angle 

8° / 1 in 7 

Cruising range 

20 miles / 32 km 

Maximum user weight 

135kg / 21 stone 

 
Note: 

• 

Maximum driving distance (cruising range) is based on an ambient temperature of 20°C, a 100kg 
driver and a battery which has reached optimum capacity, a constant driving speed of 4mph / 6kph 
with 70% battery power discharged. 

• 

When a battery is new off-the-shelf it is approximately two-thirds of its optimum capabilities. 
During the first 3 – 6 months of use the batteries will improve to a peak point at which they will 
remain for 50% - 60% of their expected lifespan (if maintained and charged correctly, as 
described in this manual). At this point the batteries will begin to deteriorate until they will require 
replacing. It is for this reason that the batteries must be correctly charged at all times else the peak 
point reached may not be the batteries’ optimum capacity and their lifespan may be dramatically 
reduced. 

• 

The manufacturer reserves the right to modify the specification if necessary. The final 
specification is subject to the individual scooter your purchase from your dealer. 


Summary of Contents for 468

Page 1: ...TER RANGE Feel free to enjoy life The team at Medicare Technology develops its products to give our customers the freedom to live independently This encompasses their daily home life and provides them...

Page 2: ...e 1 of 24 NEO ELECTRIC SCOOTER RANGE OWNERS HANDBOOK TABLE OF CONTENTS 1 PREFACE AND INTRODUCTION 2 SAFETY NOTICE 3 PARTS DESCRIPTION 4 OPERATION 5 BATTERY CHARGING AND CARE 6 INSPECTION AND MAINTENAN...

Page 3: ...Suggestion Follow these instructions to keep your vehicle in good working order This manual includes a copy of the repair and maintenance record chart and warranty information Keep it in a safe place...

Page 4: ...shopping centres Do not drive your scooter after consuming alcohol or when you are tired It is an offence to drive this scooter whilst under the influence of alcohol or drugs Be careful when driving...

Page 5: ...ces whilst driving Always switch off the scooter and remove the ignition key before using a mobile phone Do not charge the mobile phone or any other electrical devices from your scooter s battery Auto...

Page 6: ...your safety the power will automatically cut off and the electromagnetic brake system will activate whilst you are driving down a steep gradient This will limit the speed to a safe level Turn the pow...

Page 7: ...te the scooter unless the handlebar is in the lock position Do not lean against or pull forward on the handlebar while mounting or dismounting from the scooter Serious harm or injury can occur The man...

Page 8: ...sources of relatively intense electromagnetic fields in the everyday environment Some of these sources are obvious and easy to avoid Others are not apparent and exposure is unavoidable However we bel...

Page 9: ...and try to avoid coming close to them 3 If unintended movement or brake release occurs switch the scooter off as soon as it is safe 4 Be aware that adding accessories or components or modifying the sc...

Page 10: ...wivelling 9 Side reflector 10 Seat lever for legroom adjustment 11 Rear view mirror not shown 12 Rear indicator light not Neo 4 13 Rear lamp on Neo 4 this is located in the centre of the rear shroud 1...

Page 11: ...ward with your left thumb and the scooter will move backward emitting an audible reversing alarm To brake release the wigwag paddle This will return to neutral and activate the electromagnetic brake a...

Page 12: ...wigwag paddle Push down on the side of the switch with the white dot to set indoor mode and push the other side of the switch to set outdoor mode Seat The seat can be rotated and locked in position at...

Page 13: ...performing optimally Please see your dealer about replacement batteries If you continue to use an old battery when it should be replaced it could lead to a rapid decline in performance 6 The battery r...

Page 14: ...LED light turns green NEVER stop charging before it is complete 3 When fully charged the battery charger will still trickle charge the battery to ensure optimum range 4 If you do not use your scooter...

Page 15: ...llustrate operation If this LED does not illuminate the charger is faulty please contact your dealer If the battery charger is switched on and no LEDs are lit check the battery charger fuse 5 3 BATTER...

Page 16: ...o wipe off the soiled area 5 Take out the battery 6 Clean the battery with a clean cloth If the terminal is covered by white powder please wipe it clean using a damp cloth Suggestions 1 Make sure the...

Page 17: ...he paddle is operated Does the scooter completely stop when the paddle is released Motor Does the motor make any abnormal noises Does the electromagnetic brake work correctly Freewheel lever Does the...

Page 18: ...ions Test run Discharge test Forwards Wheels and Tyres Reverse Wear Emergency stop Pressure Left turn Bearings Right turn Wheel nuts Slope test Motors Over obstacles Wiring List Items repaired Noise C...

Page 19: ...t splash water directly to wash your scooter as this could lead to malfunction of the system electrics Do not use petrol solvents or vaporizing solution as these may deform or damage the shrouds Do no...

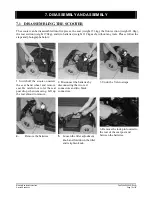
Page 20: ...e steps and photographs below 1 Switch off the scooter unscrew the seat hand wheel and remove seat Be careful not to let the seat post drop when removing Lift up the rear shroud to remove 2 Disconnect...

Page 21: ...re assembling the scooter 1 Position the front and rear sections of the scooter 2 Align the lower curved locking brackets of the front section with the corresponding pegs on the front of the rear sect...

Page 22: ...gaged in the DRIVE position The scooter appears slow Check the battery power level and recharge Check the speed dial is not set to slow Check the indoor outdoor switch setting Neo 6 and Neo 8 The seat...

Page 23: ...ximum driving distance cruising range is based on an ambient temperature of 20 C a 100kg driver and a battery which has reached optimum capacity a constant driving speed of 4mph 6kph with 70 battery p...

Page 24: ...has expired will by covered by a three months warranty 6 Consumable items supplied will not generally be covered during the normal warranty period unless such items require repair or replacement clea...

Page 25: ...Mercury Neo electric scooters Part Code Z40948 Rev A Owner s Handbook Page 24 of 24 NOTES AND ADDITIONS...

Reviews: