background image

Cleaning and servicing

 en

21

15.3 Operating the appliance with the

Home Connect app

You can use the Home Connect app to set and start

the appliance remotely.

WARNING ‒ Risk of fire!

Combustible objects that are left in the cooking com-

partment may catch fire.

Never store combustible objects in the cooking

compartment.

If smoke is emitted, the appliance must be switched

off or the plug must be pulled out and the door

must be held closed in order to stifle any flames.

Requirements

¡

The appliance is switched on.

¡

The appliance is connected to the home network

and to the Home Connect app.

¡

In order to be able to set the appliance via the app,

the manual or permanent remote start must be se-

lected in the "Remote control status" basic setting.

1.

To activate remote start, press  ⁠.

2.

Configure a setting in the Home Connect app and

send it to the appliance.

Notes

¡

If you open the appliance door within 15 minutes

of activating remote start or of the operation end-

ing, the manual remote start is deactivated.

¡

When you start the oven using the controls on

the appliance itself, the remote start function is

activated automatically. You can use the

Home Connect app to adjust the settings or start

a new programme.

15.4 Software update

Your appliance's software can be updated using the

software update function, e.g. for the purposes of op-

timisation, troubleshooting or security updates.

To do this, you must be a registered Home Con-

nect user, have installed the app on your mobile device

and be connected to the Home Connect server.

As soon as a software update is available, you will be

informed via the Home Connect app and will be able to

start the software update via the app. Once the update

has been successfully downloaded, you can start in-

stalling it via the Home Connect app if you are in your

WLAN home network (Wi-Fi). The Home Connect app

will inform you once installation is successful.

Notes

¡

You can continue to use your appliance as normal

while updates are downloading. Depending on your

personal settings in the app, software updates can

also be set to download automatically.

¡

We recommend that you install security updates as

soon as possible.

¡

Installation takes a few minutes. You cannot use

your appliance during installation.

15.5 Remote diagnostics

Customer Service can use Remote Diagnostics to ac-

cess your appliance if you contact them, have your ap-

pliance connected to the Home Connect server and if

Remote Diagnostics is available in the country in which

you are using the appliance.

Tip: 

For further information and details about the avail-

ability of Remote Diagnostics in your country, please

visit the service/support section of your local website:

www.home-connect.com.

15.6 Data protection

Please see the information on data protection.

The first time your appliance is registered on a home

network connected to the Internet, your appliance will

transmit the following types of data to the

Home Connect server (initial registration):

¡

Unique appliance identification (consisting of appli-

ance codes as well as the MAC address of the Wi-Fi

communication module installed).

¡

Security certificate of the Wi-Fi communication mod-

ule (to ensure a secure data connection).

¡

The current software and hardware version of your

appliance.

¡

Status of any previous reset to factory settings.

This initial registration prepares the Home Connect

functions for use and is only required when you want to

use the Home Connect functions for the first time.

Note: 

Please note that the Home Connect functions

can only be utilised with the Home Connect app. In-

formation on data protection can be retrieved in the

Home Connect app.

16  Cleaning and servicing

To keep your appliance working efficiently for a long

time, it is important to clean and maintain it carefully.

16.1 Cleaning products

In order to avoid damaging the various oven surfaces

on the appliance, do not use unsuitable cleaning

products.

WARNING ‒ Risk of electric shock!

An ingress of moisture can cause an electric shock.

Do not use steam- or high-pressure cleaners to

clean the appliance.

ATTENTION!

Unsuitable cleaning agents damage the surfaces of the

appliance.

Do not use harsh or abrasive cleaning products.

Do not use cleaning products with a high alcohol

content.

Do not use hard scouring pads or cleaning

sponges.

Do not use any special cleaners for cleaning the ap-

pliance while it is hot.

Summary of Contents for C29MR21.0

Page 1: ...Oven en User manual and installation instructions C29MR21 0 ...

Page 2: ...rmation safe for future refer ence or for the next owner Do not connect the appliance if it has been damaged in transit 1 2 Intended use This appliance is designed only to be built into kitchen units Read the special installation instructions Only a licensed professional may connect ap pliances without plugs Damage caused by in correct connection is not covered under the warranty Only use this app...

Page 3: ...ents Young children under 8 years of age must be kept away from the appliance Accessories and cookware get very hot Always use oven gloves to remove ac cessories or cookware from the cooking compartment When the cooking compartment is hot any al coholic vapours inside may catch fire The ap pliance door may spring open Hot steam and jets of flame may escape Only use small quantities of drinks with ...

Page 4: ...play with small parts 1 5 Microwave CAREFULLY READ THE IMPORTANT SAFETY INSTRUCTIONS AND KEEP THEM SAFE FOR FUTURE USE WARNING Risk of fire Using the appliance for anything other than its intended purpose is dangerous and may cause damage For example heated slippers and pillows filled with grain or cereal may catch fire even several hours later Never dry food or clothing with the appli ance Never ...

Page 5: ... cleaning cloths or similar with the appliance The appliance must only be used to pre pare food and drink WARNING Risk of scalding There is a possibility of delayed boiling when a liquid is heated This means that the liquid reaches the boiling temperature without the usual steam bubbles rising to the surface Ex ercise caution even when only gently shaking the container The hot liquid may suddenly ...

Page 6: ...e the drying function Do not keep moist food in the cooking compartment for a long time with the door closed Do not store food in the cooking compartment Take care not to trap anything in the appliance door Fruit juice dripping from the baking tray leaves stains that cannot be removed When baking very juicy fruit flans do not pack too much on the baking tray If possible use the deeper universal pa...

Page 7: ...com partment and eliminates the need for the appliance to reheat When baking multiple dishes do so in succession or in parallel The cooking compartment is heated after baking the first dish This reduces the baking time for the second cake If the cooking time is relatively long you can switch the appliance off 10 minutes before the cooking time ends There will be enough residual heat to finish cook...

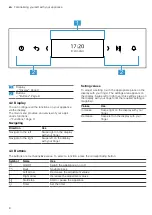
Page 8: ...ng touch the appropriate place on the display with your finger The settings area appears on the display Swipe left or right over this settings area on the display with your finger until the required setting is magnified Values Use Increase Swipe right on the display with your finger Decrease Swipe left on the display with your finger 4 3 Buttons The buttons are touch sensitive areas To select a fu...

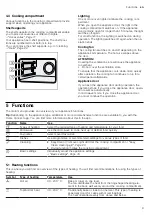
Page 9: ...f you close the appliance door opera tion resumes automatically In microwave mode if you close the appliance door you must continue the operation 5 Functions The main menu provides an overview of your appliance s functions Tip Depending on the appliance type additional or more comprehensive functions are available to you with the Home Connect app You can find more information about this in the app...

Page 10: ...0 50 C For proving dough and culturing yoghurt Dough will prove more quickly than at room temperature The surface of the dough does not dry out Bottom heat 30 230 C For cooking in a bain marie and for baking food for extra time The heat is emitted from below Plate warming 30 90 C For heating cookware 5 2 Microwave power settings This is where you can find an overview of the different microwave out...

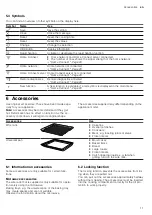
Page 11: ...sories may become deformed if they get hot Deformation has no effect on function As the ac cessory cools down it will regain its original shape The accessories supplied may differ depending on the appliance model Accessories Use Wire rack Cake tins Ovenproof dishes Cookware Meat e g roasting joints or steak Frozen meals Universal pan Moist cakes Baked items Bread Large roasts Frozen meals Catch dr...

Page 12: ...ter sales service 7 Before using for the first time Configure the settings for initial start up Clean the ap pliance and accessories 7 1 Initial use After connecting the appliance to the power supply you must configure the settings for its initial start up It may take a few minutes for the settings to appear on the display Notes You can adjust the settings at any time in the basic settings Basic s...

Page 13: ...witch the appliance off Notes The residual heat indicator will appear on the dis play while the cooking compartment is still hot Residual heat indicator Page 13 The cooling fan will continue to run until the cooking compartment has cooled down Cooling fan Page 9 8 3 Residual heat indicator After you have switched off the appliance the residual heat indicator will appear on the display Display Temp...

Page 14: ...h a different function 9 1 Cookware and accessories with microwave To heat food evenly and avoid damaging your appli ance it is important to only use the right cookware and accessories Follow the cookware manufacturer s instructions Unless otherwise specified place the cookware and accessory on level 1 Microwave safe cookware Cookware made from heat resistant microwave safe material Glass Glass ce...

Page 15: ...ance reduction for the maximum microwave output Boost Microwave power settings Page 10 a When the time has elapsed a signal sounds A noti fication appears on the display confirming that the operation has finished 8 Press any button to end the signal tone 9 If condensation has formed in the cooking compart ment dry the cooking compartment Note If you open the appliance door during operation the ope...

Page 16: ...ime 5 Press to confirm the setting 6 Press to start operation with a cooking time a The cooking time appears on the display The cook ing time counts down a When the time has elapsed a signal sounds 7 Press any button to end the audible signal Changing the cooking time 1 Press 2 Press Cooking time 3 Use or to change the cooking time 4 Press to confirm the setting Cancelling the cooking time 1 Press...

Page 17: ...osition Suitable accessory or cookware Added liquid Time for turning or stirring When this time is reached a signal sounds To call up the information press Information Some notifications are displayed automatically Programmes The optimum type of heating temperature and cooking time are preset for programmes To achieve an optimal cooking result you must also set the weight thickness or the cooking ...

Page 18: ...ect app You can start the favourites on the appliance or us ing the Home Connect app All other functions are available via the Home Connect app 12 1 Saving favourites You can save up to 10 different functions as your fa vourites To save a function as a favourite you must use the Home Connect app When your appliance is con nected follow the instructions in the app 12 2 Selecting favourites If you h...

Page 19: ... Long Very long Illumination On when cooking and opening the door1 Only when the door is opened Always off 1 Factory setting may vary according to model Appliance set tings Selection Microwave out put presetting 90 W 180 W 360 W 600 W Boost1 Continue to microwave On Off1 1 Factory setting may vary according to model Personalisa tion Selection Brand logo Display1 Do not display Operation after swit...

Page 20: ...ownload the Home Connect app 2 Open the Home Connect app and scan the follow ing QR code 3 Follow the instructions in the Home Connect app 15 2 Home Connect settings You can adjust the Home Connect settings and network settings in your appliance s basic settings Which settings the display shows will depend on whether Home Connect has been set up and whether the appliance is connected to your home ...

Page 21: ...atically We recommend that you install security updates as soon as possible Installation takes a few minutes You cannot use your appliance during installation 15 5 Remote diagnostics Customer Service can use Remote Diagnostics to ac cess your appliance if you contact them have your ap pliance connected to the Home Connect server and if Remote Diagnostics is available in the country in which you ar...

Page 22: ...agents Information Door panels Hot soapy water Oven cleaners Do not use a glass scraper or stainless steel wool Tip Remove the door panels in order to clean them thoroughly Appliance door Page 25 Stainless steel in terior door frame Stainless steel cleaner Discolouration can be removed using stainless steel cleaner Do not use stainless steel care products Door handle Hot soapy water To avoid perma...

Page 23: ...ompartment is cold room temperature and the ap pliance door is closed To remove particularly stubborn dirt rub washing up liquid onto dirty areas on the smooth surfaces before starting the cleaning aid 1 Remove any accessories from the cooking compart ment 2 ATTENTION Distilled water in the cooking compartment leads to corrosion Do not use distilled water Mix 0 4 litres water with a drop of washin...

Page 24: ...24 1 Press Cleaning 2 Press Drying function a The duration appears on the display You cannot change the duration of the drying function 3 Start the drying function using a A notification stating that you should carry out the necessary preparatory work for the drying function appears on the display 4 Press OK to confirm the notification a The drying function starts The duration counts down on the d...

Page 25: ...semble the appliance door 20 1 Detaching the door outer pane WARNING Risk of injury The hinges on the appliance door move when the door is opened and closed which could trap your fingers Keep your hands away from the hinges Components inside the appliance door may have sharp edges Wear protective gloves 1 Open the appliance door 2 Place a folded up tea towel in the appliance door 3 Undo and remove...

Page 26: ...door Notes Do not use the cooking compartment again until the door panes have been correctly fitted 21 Troubleshooting You can rectify minor faults on your appliance yourself Read the troubleshooting information before contacting after sales service This will avoid unnecessary costs WARNING Risk of injury Improper repairs are dangerous Repairs to the appliance should only be carried out by trained...

Page 27: ... Home Connect is not working properly Different causes are possible Go to www home connect com During simple mi crowave operation the cooking compart ment becomes hot The drying function is switched on Observe the information on operating with microwave The interior lighting does not work Basic setting has been changed Change the basic setting for the lighting Basic settings Page 19 The LED light ...

Page 28: ... in the enclosed Customer Service directory or on our website This product contains light sources from energy effi ciency class G These light sources are available as a spare part and should only be replaced by trained spe cialist staff 23 1 Product number E Nr production number FD and consecutive numbering Z Nr You can find the product number E Nr the produc tion number FD and the consecutive num...

Page 29: ...n the Home Connect app or on our website www neff international com 26 1 General cooking tips Take note of the following information when cooking all types of food The temperature and cooking time depend on the amount of food and the recipe Settings ranges are specified for this reason Try using the lower values to start with The setting values apply to food placed in the cook ing compartment whil...

Page 30: ...s also excellent for toasting bread Circo roasting is very well suited to cooking whole poultry and fish as well as meat e g roast pork with crackling Information for those allergic to nickel In rare cases small amounts of nickel may pass into the food When grilling several food items choose pieces that are of a similar weight and thickness The grilled food will brown evenly and will remain succul...

Page 31: ...g function Temperature in C Microwave power setting in W Cooking time in mins Fruit tart or cheesecake with shortcrust pastry base Springform cake tin diameter 26 cm 1 170 180 80 90 Fruit tart or cheesecake with shortcrust pastry base Springform cake tin diameter 26 cm 1 1 170 180 2 100 1 180 2 1 30 40 2 20 Sponge flan 6 eggs Springform cake tin Ø 28 cm 1 150 170 1 30 50 Sponge flan 6 eggs Springf...

Page 32: ...Joint of pork without rind e g neck 1 5 kg Uncovered cook ware 1 180 200 120 130 Joint of pork without rind e g neck 1 5 kg Covered cookware 1 180 200 180 55 65 Joint of pork without rind e g neck 1 5 kg Uncovered cook ware 1 180 190 120 140 Fillet of beef medium 1 kg Uncovered cook ware 1 210 220 40 50 Pot roasted beef 1 5 kg Covered cookware 1 200 220 130 140 Pot roasted beef 1 5 kg Covered cook...

Page 33: ...he instructions on the packaging Always use oven gloves to remove the dishes from the cooking compartment 1 Heat resistant shallow glass ovenware Do not use porcelain or deep plates 2 Place the popcorn bag onto the cookware in ac cordance with the instructions on the packaging 3 Use the recommended settings when configuring the appliance settings 4 The time may need to be adjusted depending on the...

Page 34: ...ng 125 g Uncovered cook ware 1 90 7 9 1 Turn the dish halfway through the cooking time Warming up food using the microwave mode You can use the microwave mode to warm up food or to defrost and warm up food in a single step Tips for warming up food using the microwave mode Use microwave safe cookware with a lid Turn or stir the food 2 3 times during warming After warming up the food leave it to res...

Page 35: ...formation in this section is provided for test institutes to facilitate testing of the appliance in accordance with EN 60350 1 or IEC 60350 1 and EN 60705 or IEC 60705 Baking The setting values apply to food that is placed into a cold cooking compartment Take note of the information on preheating in the re commended settings tables These setting values apply without rapid heat up For baking use th...

Page 36: ...d using the microwave Food Accessory cook ware Shelf pos ition Heating function Temperature in C Microwave power setting in W Cooking time in mins Meat Uncovered cook ware 1 1 180 2 90 1 5 2 10 15 Recommended settings for cooking food using the microwave Food Accessory cook ware Shelf pos ition Heating function Temperature in C Microwave power setting in W Cooking time in mins Custard Uncovered co...

Page 37: ...ce with the installation sheets for installing accessories Fitted units must be heat resistant up to 95 C and adjacent unit fronts up to 70 C Do not install the appliance behind a decor ative door or the door of a kitchen unit There is a risk of overheating Cut out work on the units should be carried out before installing the appliance Remove any shavings Otherwise the correct opera tion of electr...

Page 38: ...ventilation cut out The worktop must be secured to the built in unit Observe any available installation instructions for the hob 27 5 Installation underneath a hob If the appliance is installed under a hob the following minimum dimensions must be adhered to including substructure if applicable The minimum worktop thickness a is based on the required minimum clearance Hob type a raised in mm a flus...

Page 39: ... work is being carried out The appliance must only be connected using the power cable provided The power cable must be plugged in at the rear of the appliance until you hear a clicking sound A 3 m power cable can be obtained from the after sales service The power cable must only be replaced with a cable from the original manufacturer This is available from after sales service Contact protection mu...

Page 40: ...over sharp edges 6 Centre the appliance There must be an air gap of at least 4 mm between the appliance and adjacent unit fronts 7 Attach the four fastening elements Page 41 Attach the red fastening elements at the top Attach the green fastening elements at the bottom 8 Screw the appliance into place 9 Insert the left and right hand panels until a clicking sound is heard a The panels are engaged 1...

Page 41: ...ls Do not use pointed or sharp tools 1 Loosen and remove the panels with a plastic tool e g one of the other fastening elements 2 Turn the fastening element to the left or right to ad just the alignment of the panels 3 Refit the panels 27 12 Removing the door handle and side panels ATTENTION Unsuitable tools may damage the surface of the appli ance Only use plastic tools Do not use pointed or shar...

Page 42: ......

Page 43: ......
Page 44: ...sgeräte GmbH Carl Wery Straße 34 81739 München GERMANY 9001696988 9001696988 030124 en Valid within Great Britain Imported to Great Britain by BSH Home Appliances Ltd Grand Union House Old Wolverton Road Wolverton Milton Keynes MK12 5PT United Kingdom ...

Reviews: