NEFF B5ACM7H 0B Series Instruction Manual Download Page 28

en

    Trouble shooting

28

3

Trouble shooting

Trouble shooting

If a fault occurs, there is often a simple explanation. 

Before calling the after-sales service, please refer to the 
fault table and attempt to correct the fault yourself.

Rectifying faults yourself

You can often easily rectify technical faults with the 
appliance yourself.

If a dish does not turn out exactly as you wanted, you 
can find useful cooking tips and instructions at the end 
of this instruction manual. 

~

 "Tested for you in our 

cooking studio" on page 30

--------

:

Warning – Risk of electric shock! 

Incorrect repairs are dangerous. Repairs may only be 
carried out and damaged power cables replaced by 
one of our trained after-sales technicians. If the 
appliance is defective, unplug the appliance from the 
mains or switch off the circuit breaker in the fuse box. 
Contact the after-sales service.

Error messages on the display

If an error message with "

" appears on the display, 

e.g. 

“‹†

-

„ƒ

, touch the 

v

 button. This will reset the 

error message. Reset the time, if necessary.

If the fault was a one-off, you can continue to use your 
appliance as normal. If the error message appears 
again, call our after-sales service and quote the exact 
error message and the E no. of your appliance. 

~

 "Customer service" on page 29

Maximum operating time

If you do not change the settings on your appliance for 
several hours, the appliance will stop heating 
automatically. This prevents unintentional continuous 
operation.

When the maximum operating time is reached depends 
on the various different settings that have been 
configured on the appliance.

Maximum operating time reached


”‰

 appears on the display.

Turn the function selector to the "Off" position. You can 
configure new settings if required.

Tip: 

To prevent the appliance from switching off when 

you do not want it to, e.g. with an extremely long 
cooking time, you should always set a cooking time. 
The appliance will heat up until the set cooking time has 
elapsed.

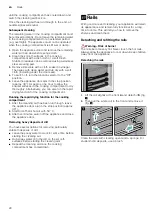
Replacing the bulb in the top of the cooking 
compartment

If the cooking compartment light bulb fails, it must be 
replaced. Heat-resistant, 25 watt, 230 V halogen bulbs 
are available from the after-sales service or specialist 
retailers.

When handling the halogen bulb, use a dry cloth. This 
will increase the service life of the bulb. Only use these 
bulbs.

:

Warning – Risk of electric shock! 

When replacing the cooking compartment bulb, the 
bulb socket contacts are live. Before replacing the bulb, 
unplug the appliance from the mains or switch off the 
circuit breaker in the fuse box.

:

Warning – Risk of burns! 

The appliance becomes very hot. Never touch the 
interior surfaces of the cooking compartment or the 
heating elements. Always allow the appliance to cool 
down. Keep children at a safe distance.
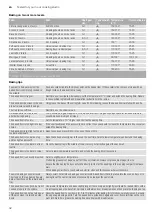
Fault

Possible 
cause

Notes/remedy

The appliance is 
not working.

Defective cir-
cuit breaker.

Check the circuit breaker in the 
fuse box.

Power failure

Check whether the kitchen light 
or other kitchen appliances are 
working.

The time is flash-
ing on the display.

Power failure. Reset the time.

After switching on 
an operating 
mode, 

œ

 flashes 

in the display.

The appliance 
has not 
cooled down 
sufficiently.

Switch off the appliance, allow it 
to cool down and switch the oper-
ating mode on again.

No settings can 
be made on the 
appliance. The 
symbol 

1

 lights 

up in the display.

The child-
proof lock is 
activated.

Press and hold the 

v

 button until 

the 

1

 symbol goes out in the dis-

play. Settings can be made on the 
appliance.
The childproof lock can be deacti-
vated in the basic settings. 

~

 "Basic settings" on page 16

The appliance 
door cannot be 
opened. The 
symbol 

1

 lights 

up in the display.

The appliance 
door is locked 
with the child-
proof lock.

Press and hold the 

v

 button until 

the 

1

 symbol goes out in the dis-

play. Settings can be made on the 
appliance.
The childproof lock with door lock 
can be switched off in the basic 
settings. 

~

 "Basic settings" 

on page 16

The appliance 
door cannot be 
opened. The 
symbol 

5

 lights 

up in the display.

The appliance 
door is locked 
due to the 
cleaning func-
tion.

Wait until the cooking compart-
ment has cooled and the 

5

 symbol goes out.

The appliance is 
not heat-
ing."DEMO" is 
shown on the dis-
play.

Demo mode 
is activated.

Briefly disconnect the appliance 
from the mains (switch off the cir-
cuit breaker in the fuse box) and 
then deactivate demo mode 
within approx. 5 minutes by 
changing the basic setting 

™‚„


to 

~

 "Basic settings" 

on page 16

Summary of Contents for B5ACM7H 0B Series

Page 1: ...en INSTRUCTION MANUAL BUILT IN OVEN B5ACM7H 0B...

Page 2: ......

Page 3: ...ildproof lock 15 Q Basic settings 16 List of basic settings 16 Changing the basic settings 16 Meat thermometer 17 Types of heating 17 Inserting the meat probe into the food 17 Core temperatures of dif...

Page 4: ...e and power cable Always slide accessories into the cooking compartment the right way round Accessories on page 10 Important safety information ImportantsafetyinformationGeneral information Warning Ri...

Page 5: ...x Contact the after sales service Warning Hazard due to magnetism Permanent magnets are used in the control panel or in the control elements They may affect electronic implants e g heart pacemakers or...

Page 6: ...ompartment do not pour water into the cooking compartment when it is hot This will cause steam The temperature change can cause damage to the enamel Moisture in the cooking compartment Over an extende...

Page 7: ...ment Open the appliance door as infrequently as possible when the appliance is in use It is best to bake several cakes one after the other The cooking compartment stays warm This reduces the baking ti...

Page 8: ...display To use the individual time setting options touch the v button several times If there is a red bar above or below a symbol this means that the value being shown in large digits on the display r...

Page 9: ...d the cooking compartment This heating function is used to measure both the energy consumption in air recircula tion mode and the energy efficiency class Bread baking 180 240 C For baking bread bread...

Page 10: ...appliance may overheat So that the cooking compartment cools down more quickly after operation the cooling fan continues to run for a certain period afterwards _Accessories AccessoriesYour appliance...

Page 11: ...the accessories fully into the cooking compartment so that they do not touch the appliance door Take any accessories that you will not be using out of the cooking compartment The shelves can be taken...

Page 12: ...ew seconds the time that has been set is adopted Cleaning the cooking compartment To remove the new appliance smell heat up the cooking compartment when it is empty and with the oven door closed 1 Rem...

Page 13: ...t selector If you change the heating function the temperature will be changed to the corresponding default value Temperature display As soon as the appliance heats up the symbol appears in the display...

Page 14: ...ng is applied automatically The appliance starts heating after a few seconds The duration counts down in the display Once the cooking time has elapsed an audible signal sounds and the appliance brings...

Page 15: ...appliance cannot be switched on To switch it on the automatic childproof lock must be interrupted After the appliance operation the control panel is locked automatically To set or interrupt the automa...

Page 16: ...asic settings again at any time Basic setting Options Automatic childproof lock no yes Audible signal duration upon completion of a cooking time or timer duration approx 10 seconds approx 30 seconds a...

Page 17: ...t must not be inserted in the fat or be touching the ovenware or bones Place the meat preferably in an item of cookware in the centre of the wire shelf Caution Ensure that the meat probe s cable does...

Page 18: ...function selector to the Off position Use an oven glove to unplug the meat thermometer from the socket in the cooking compartment Changing and cancelling You can use the or button to change the core...

Page 19: ...h Control panel Hot soapy water Clean with a dish cloth and then dry with a soft cloth Do not use glass cleaner or a glass scraper Door panels Hot soapy water Clean with a dish cloth and then dry with...

Page 20: ...dirtier the cooking compartment and the longer the dirt has been there the more powerful the cleaning cycle should be It is sufficient to clean the cooking compartment every two to three months You ca...

Page 21: ...ts after a few seconds The cooking time counts down on the display Ventilate the kitchen when the cleaning function is running The appliance door locks shortly after the function starts running The 5...

Page 22: ...e rapid drying function for the cooking compartment Running the rapid drying function for the cooking compartment 1 After the cleaning aid has been run through leave the appliance door ajar in the sto...

Page 23: ...lean Direct coating may be damaged If your appliance features the pyrolytic self cleaning function you will need to take the pull out rails out of the cooking compartment before running the cleaning f...

Page 24: ...time to come This will tell you how to remove the appliance door and clean it Removing and fitting the appliance door To clean the door panels you can detach the appliance door Warning Risk of injury...

Page 25: ...y break off Do not carry the appliance door by the door handle To carry or remove the appliance door take hold of it with both hands one on the left and one on the right 5 Take hold of the appliance d...

Page 26: ...Components inside the appliance door may have sharp edges Wear protective gloves Removal Note Lay the glass panels you have removed on an even surface that is soft and clean 1 Remove the appliance doo...

Page 27: ...eals and spacers The arrow on the intermediate panel must line up with the arrow on the frame Fig 4 Insert the second intermediate panel without the seals and spacers and push it in the direction of t...

Page 28: ...0 V halogen bulbs are available from the after sales service or specialist retailers When handling the halogen bulb use a dry cloth This will increase the service life of the bulb Only use these bulbs...

Page 29: ...full product number E no and the production number FD no so that we can provide you with the correct advice The rating plate bearing these numbers can be found on the base of the appliance when you o...

Page 30: ...erence Additional information can be found in the baking tips listed after the settings tables Remove unused accessories from the cooking compartment This will ensure that you achieve the best possibl...

Page 31: ...fruit cake High 20cm tin 2 140 160 70 100 Rich fruit cake High 23cm tin 2 140 150 180 210 Fruit crumble Flat glass dish 3 160 180 30 40 Sponge Cake fatless 3 eggs Springform cake tin 26cm 2 160 170 3...

Page 32: ...e 10 C higher and shorten the baking time The baked item is too light in colour overall If the shelf position and the accessories are correct then you should increase the temperature if necessary or e...

Page 33: ...re rack is correctly positioned on the universal pan Roasting and braising in cookware Warning Risk of injury from shattering glass Place hot glass cookware on a dry mat after cooking The glass may cr...

Page 34: ...weight of the heaviest item as a basis for determining the cooking time The individual pieces should be approximately the same size As a general rule The larger the poultry meat or fish the lower the...

Page 35: ...cm medium Wire rack 3 1 side 11 13 2 side 4 6 Beef burger height 1 2cm Wire rack 4 1 side 8 9 2 side 4 5 Lamb chops height 1 2cm Wire rack 3 1 side 5 6 2 side 5 6 Bacon rashers Wire rack 3 1 side 4 5...

Page 36: ...er values to start with A lower temperature will result in more even browning You can use a higher setting next time if necessary Baking Pork loin joint Cookware uncovered 3 180 190 35 35 Pork belly C...

Page 37: ...anched vegetables thoroughly and spread them evenly on the wire rack Dry herbs on the stem Position the herbs evenly and slightly heaped on the wire rack Use the following shelf positions for drying 1...

Page 38: ...while small bubbles will form at short intervals Switch off the appliance once all preserving jars are bubbling Remove the jars from the cooking compartment after the indicated residual heating time V...

Page 39: ...shelf position indicated in the table If you want to preheat the oven the final fermentation stage takes place outside the appliance in a warm place The temperature and proving time are dependent on...

Page 40: ...oking compartment stays cleaner Baking 2 1 Food Dish Shelf posi tion Type of heating Temperature in C Grill setting Time in minutes Shortbread Baking tray 3 140 150 25 35 Shortbread Baking tray 3 140...

Page 41: ...6...

Page 42: ...6...

Page 43: ...6...

Page 44: ...9001282751 9001282751 980110 en...

Reviews: