background image

44

Free motion darning, embroidery and 

monogramming


v

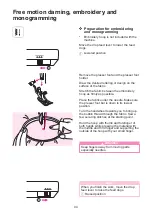
Preparation for embroidering 

and monogramming

*  Embroidery hoop is not included with the 

machine.

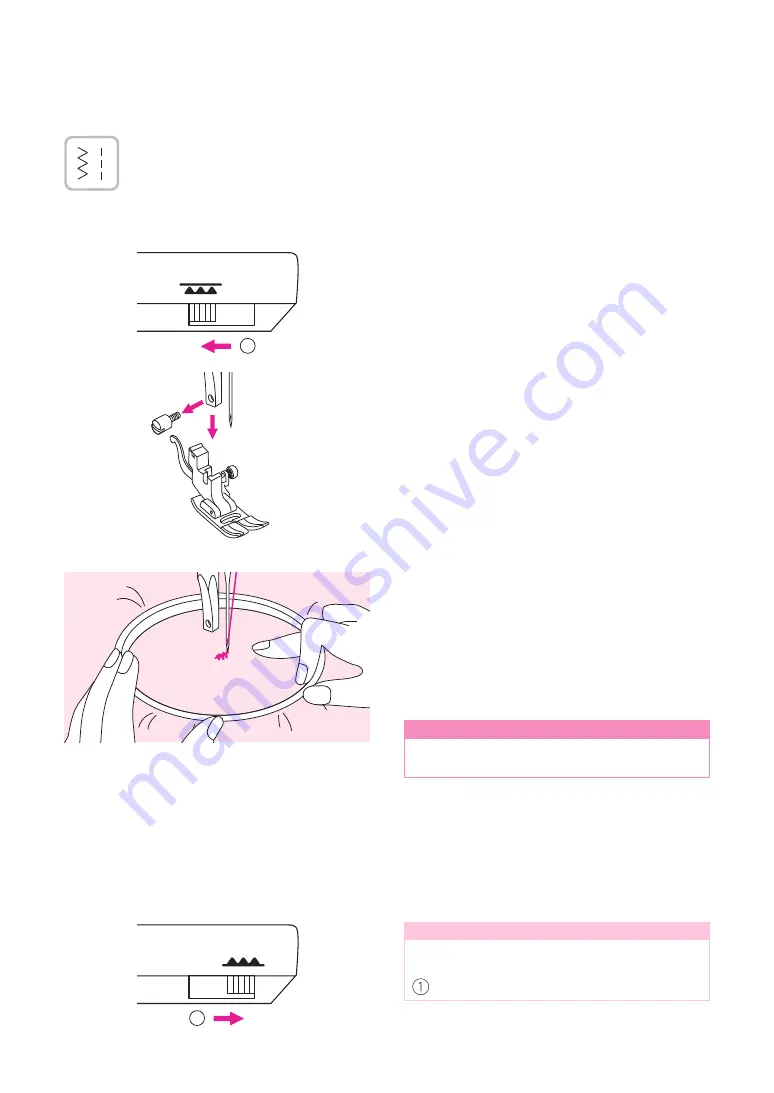
Move the drop feed lever to lower the feed 

dogs. 

① 

Lowered position

Note

When you finish the work, move the drop 

feed lever to raise the feed dogs. 

 Raised position

1

1

Remove the presser foot and the presser foot 

holder.
Draw the desired lettering or design on the 

surface of the fabric.
Stretch the fabric between the embroidery 

hoop as firmly as possible.

Place the fabric under the needle. Make sure 

the presser foot bar is down to its lowest 

position.
Turn the handwheel towards you to bring up 

the bobbin thread through the fabric. Sew a 

few securing stitches at the starting point.

Hold the hoop with thumb and forefinger of 

both hands while pressing the material with 

the middle and third finger and supporting the 

outside of the hoop with your small finger.


n

Attention

Keep fingers away from moving parts, 

especially needles. 

Summary of Contents for NC-59QD

Page 1: ...Instruction Manual NC 59QD NecchiAIO Enjoy your Necchi time...

Page 2: ......

Page 3: ...years and above and persons with reduced physical sensory or mental capabilities or lack of experience and knowledge if they have been given supervision or instruction concerning use of the appliance...

Page 4: ...dumps hazardous substances can leak into the groundwater and get into the food chain damaging your health and well being 21 When replacing old appliances with new ones the retailer is legally obligate...

Page 5: ...cing the needle 15 Matching needle fabric thread 16 Changing the presser foot 17 Remove the presser foot 17 Attach the presser foot 17 Remove and insert the presser foot holder 17 Insert the edge quil...

Page 6: ...side zipper 40 Satin stitch sewing 42 Gathering 42 Smocking 43 Free motion darning embroidery and monogramming 44 Preparation for embroidering and monogramming 44 Darning 45 Embroidery 45 Monogramming...

Page 7: ...Machine Introduction...

Page 8: ...winder stopper Stitch display v Needle area overview Needle threader Buttonhole lever Needle plate Needle clamp screw Presser foot v Back overview Horizontal spool pin Second spool pin hole Handwheel...

Page 9: ...in 4x 1x already installed Spool holder Large Spool holder Small L screwdriver Pack of Needle 3x single needles 75 11 90 14 100 16 Seam ripper brush Edge quilting guide Spool pin felt Second spool pin...

Page 10: ...is appliance has a polarized plug one blade is wider than the other to reduce the risk of electrical shock this plug will fit in a polarized outlet only one way If the plug does not fit fully in the o...

Page 11: ...Machine Setup...

Page 12: ...toward the left to remove it from the machine Attach the sewing table and then push it to the right The inside space of the sewing table is used as an accessory box v Free arm Free arm sewing is conv...

Page 13: ...he dial it could be take out By that time just turn the screw clockwise it could be locked back and readjust the pressure For heavy fabric increase the pressure by turning it clockwise Once dial could...

Page 14: ...thread and attach it next to the spool Large spool holder Small spool holder 2 Draw the thread from the spool and place the thread in between the thread guide 4 Place the thread end through one of the...

Page 15: ...the foot control or press the start stop button to stop the machine then push the bobbin winder spindle to the left 8 Cut the thread and then remove the bobbin Note When the bobbin winder spindle is p...

Page 16: ...release button to the right Release button Insert the bobbin in the bobbin case with the thread running in a counter clockwise direction arrow Pull the thread through the slit A With a finger hold ge...

Page 17: ...le threader can be with a 75 11 through 100 16 home sewing machine needle 1 Raise the presser foot lifter 2 Turn the handwheel towards you to bring the needle and take up lever to highest position 3 P...

Page 18: ...e the thread into the silver discs to keep the thread in proper tension 7 Pass the thread under the take up spring then pull it upwards as arrow marks illustrated 8 Pull the thread to the top then pas...

Page 19: ...pin 12 The needle threader automatically turns to the threading position and the hook pin passes through the needle eye Hook pin Needle 13 Take the thread in front of the needle and make sure it is u...

Page 20: ...d with your left hand Turn the handwheel towards you counter clockwise to lower the needle down below the needle plate then raise it to bring the bobbin thread up Gently pull on the upper thread to br...

Page 21: ...w Needles must be in perfect condition When inserting a new needle keep the flat side of the shaft to the back Push the needle into the clamp until it touches the pin and stops Then secure it by tight...

Page 22: ...d always use needle 90 14 100 16 The same thread is usually used for the bobbin thread and upper threading FABRICS THREAD NEEDLE SIZE Light weight Thin cottons voile serge silk muslin Qiana interlocks...

Page 23: ...Raise the presser foot lifter Align the presser foot holder with the lower left side of the presser bar Hold the presser foot holder then tighten the screw using the enclosed screwdriver Presser foot...

Page 24: ...lower or raise the feed dogs When lever is in raised position the feed dog will arise automatically when you are sewing Drop feed lever Lowered position Raised position Note When you finish the work e...

Page 25: ...ad Surface Wrong side Thread tension is too loose for straight stitch sewing Turn the dial to the higher number Thread tension is too tight for straight stitch sewing Turn the dial to the lower number...

Page 26: ...Sewing Basics...

Page 27: ...y operate the machine without foot control Speed adjustment slider The speed adjustment slider can control the sewing speed To increase the speed slide the lever to the right To decrease the sewing sp...

Page 28: ...h select pattern with the pattern selector dial For zigzag stitch select pattern with the pattern selector dial Adjust the stitch length and stitch width according to the fabric being used To obtain t...

Page 29: ...dial approaches 0 The length of the individual stitches will increase as the dial approaches 4 Generally speaking the thicker the fabric thread and needle the longer the stitch should be v Changing t...

Page 30: ...se as the setting of stitch length approaches 0 Neat zig zag stitches are usually achieved at 2 5 or below Closed up zigzag stitches close together are referred to as a satin stitch v Adjusting the st...

Page 31: ...presser foot pass the thread under the presser foot and then pull out about 10cm of thread toward the rear of the machine 10cm 5 Turn the handwheel toward you counter clockwise to lower the needle in...

Page 32: ...rse sewing for back tacking and reinforcing seams by pressing the reverse sewing lever Please refer to Useful skills chapter for more information 8 Turn the handwheel toward you counter clockwise to r...

Page 33: ...stitch length and width Since the results differ depending on types of stitching and layers of fabric sewn perform the trial sewing under the same conditions that will be used with your project v Sewi...

Page 34: ...v Sewing thin fabrics When sewing thin fabrics the stitches may become misaligned or the fabric may not feed correctly If this occurs place thin paper or stabilizer material under the fabric and sew i...

Page 35: ...ms when hemming jeans When you reach the point of an increased thickness lower the needle and raise the presser foot lifter Press the toe of the foot to the horizontal line and push in the black butto...

Page 36: ...Utility Stitches...

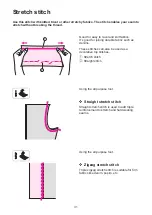
Page 37: ...raight stretch stitch Straight stretch stitch is used to add triple reinforcement to stretch and hardwearing seams v Zigzag stretch stitch Triple zigzag stretch stitch is suitable for firm fabrics lik...

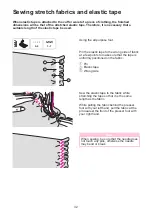
Page 38: ...a few points to make sure that the tape is uniformly positioned on the fabric Pin Elastic tape Wrong side Sew the elastic tape to the fabric while stretching the tape so that it is the same length as...

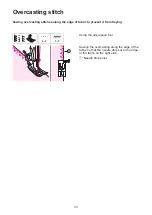
Page 39: ...stitches along the edge of fabric to prevent it from fraying Sewing the overcasting along the edge of the fabric so that the needle drops over the edge of the fabric on the right side Needle drop poi...

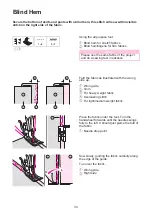
Page 40: ...he same fabric of the project and do a sewing test in advance Place the fabric under the foot Turn the handwheel forwards until the needle swings fully to the left It should just pierce the fold of th...

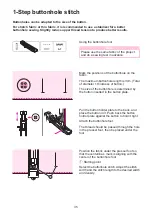
Page 41: ...is 3cm Total of diameter thickness of button The size of the buttonhole is determined by the button inserted in the button plate Pull the button holder plate to the back and place the button in it Pus...

Page 42: ...ut the thread To sew over the same buttonhole raise the presser foot lifter it will return to its original position After sewing the buttonhole stitch raise the buttonhole lever as far as it will go B...

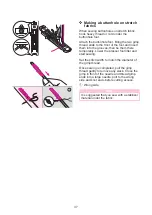
Page 43: ...ooves then tie them there temporarily Lower the presser foot lifter and start sewing Set the stitch width to match the diameter of the gimp thread Once sewing is completed pull the gimp thread gently...

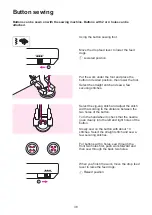
Page 44: ...h and adjust the stitch width according to the distance between the two holes of the button Turn the handwheel to check that the needle goes cleanly into the left and right holes of the button Slowly...

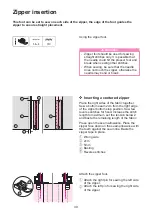
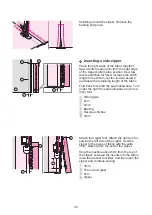
Page 45: ...lace the right sides of the fabric together Sew a bottom seam 2cm from the right edge of the zipper bottom stop position Sew few reverse stitches for fixed Increase the stitch length to maximum set th...

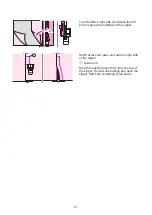
Page 46: ...the right the seam allowance to form a 3mm fold Wrong side 2cm 5mm Basting Reverse stitches 3mm Attach the zipper foot Attach the right pin for sewing the left side of the zipper Sew the zipper to the...

Page 47: ...eft pin for sewing the rightside of the zipper Stitch across the lower end and the right side of the zipper Lower end Stop the machine about 5cm from the top of the zipper Remove the basting and open...

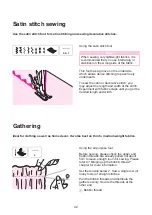
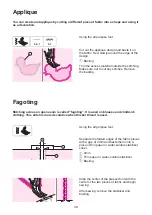
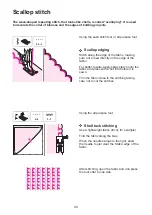
Page 48: ...th and width of the stitch Experiment with fabric scraps until you get the desired length and width 0 5 1 Gathering Ideal for clothing as well as home decor It works best on thin to medium weight fabr...

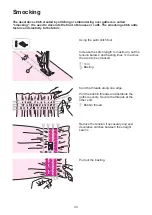
Page 49: ...ric Increase the stitch length to maximum set the tension below 2 and basting lines 1cm across the area to be smocked 1cm Basting Knot the threads along one edge Pull the bobbin threads and distribute...

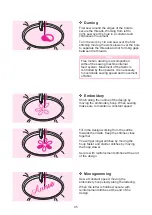
Page 50: ...ering or design on the surface of the fabric Stretch the fabric between the embroidery hoop as firmly as possible Place the fabric under the needle Make sure the presser foot bar is down to its lowest...

Page 51: ...eads and not form big gaps between the threads Note Free motion darning is accomplished without the sewing machine internal feed system Movement of the fabric is controlled by the operator It is neces...

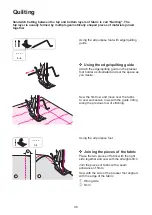
Page 52: ...together and sew with the straight stitch Join the pieces of fabric with a seam allowance of 5mm Sew with the side of the presser foot aligned with the edge of the fabric Wrong side 5mm 1 2 1 v Using...

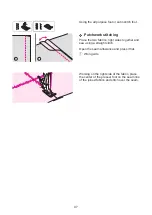
Page 53: ...Place the two fabrics right sides together and sew using a straight stitch Open the seam allowance and press it flat Wrong side Working on the right side of the fabric place the center of the presser...

Page 54: ...wly around the edge of the design Basting Trim the excess material outside the stitching Make sure not to cut any stitches Remove the basting Separate the folded edges of the fabric pieces with a gap...

Page 55: ...ts apply spray starch onto the fabric and press with a hot iron before it is sewn Trim the fabric close to the stitching taking care not to cut the stitches Using the satin stitch foot or all purpose...

Page 56: ...Maintenance and Trouble shooting...

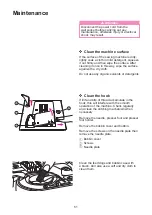
Page 57: ...with a dry cloth Do not use any organic solvents or detergents Clean the feed dogs and bobbin case with a brush And also use a soft and dry cloth to clean them v Clean the hook If lint and bits of th...

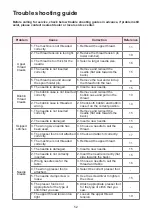
Page 58: ...edle flat side towards the back 15 2 The needle is damaged 2 Insert a new needle 15 3 The wrong size needle has been used 3 Choose a needle to suit the thread 16 4 The presser foot is not attached cor...

Page 59: ...stitch length shorter 23 5 Sewing on thin fabric 5 Sew with a stabilizer material under the fabric 28 stitches are distorted 1 The presser foot is not suited for the stitch 1 Select the correct foot 2...

Page 60: ...ewing machine doesn t operate 1 The machine is not turned on 1 Turn on the machine 4 2 The presser foot lifter is raised 2 Lower the presser foot lifter 7 3 The machine is not plugged in 3 Connect the...

Page 61: ......

Page 62: ......

Page 63: ......

Page 64: ...llection systems available If electrical appliances are disposed of in landfills or dumps hazardous substances can leak into the groundwater and get into the food chain damaging your health and well b...

Reviews: