

Preparing for Setup
Preparing for Setup
(Continued)
Preface
Thank you for buying the Speed Wi-Fi NEXT WX05 (simply called the "product" from here on).
Before using the product, be sure to read the "Setup Guide" (this manual) and the "Notes on usage" to ensure
correct use.
List of Packaged Items
Before you start using the product, make sure that you have all the following items packaged
with the product.
□
Speed Wi-Fi NEXT WX05 (main unit)
□
Battery pack (NAD34UAA)
□
Rear cover
□
USB2.0 TypeC-A cable (sample)(GXE-000771)
Use this to connect the product to a PC.
□
つなぎかたガイド
"Setup Guide" (Japanese)
□
ご利用にあたっての注意事項(保証書付)
"Notes on usage" (with warranty) (Japanese)
About the Instruction Manual
The "Setup Guide" (this manual) explains only the main operations and settings of the main functions for using
this product. As an instruction manual related to the product, the "Setup Guide" (this manual), the "Notes
on usage", and the "
取扱説明書 詳細版
(Full Instruction Manual)" (Japanese) are available for download from
the WiMAX Support Information website. In this manual, all such manuals are collectively referred to as the
"Instruction Manual".
• A PDF version of the "
取扱説明書 詳細版
(Full Instruction Manual)" (Japanese), in which the explanations of
various functions are described in detail, is also included with this product.
Connect the product to a PC or the like by means of wireless LAN (Wi-Fi
®
) or a USB2.0 TypeC-A cable, launch
the web browser, type "http://192.168.179.1" in the address field and log in to the Advanced Settings on
Quick Setting Web to view [
情報
(Information)], and access [
マニュアル
(Manual)].
(Refer to "Launch Quick Setting Web" in "
Configuring the Connection Destination Connecting Wide
Area Network (WAN)" on the next page of this manual.)
• The PDF versions of the "Instruction Manual" can be downloaded from the WiMAX
Support Information website.
https://www.necplatforms.co.jp/support/wimax/wx05/index.html
About the Notations in This Manual
■
Notes on Illustrations / Screenshots
• The screenshots and methods of operation in this manual are those when an au Nano IC Card 04 LE U is
inserted.
• The illustrations and screenshots in this manual are simplified and may look different from the actual
illustrations and screens. Also, a part of a screen may be omitted.
• This manual uses the display of the body color "Sonic Red" to explain examples.
• In this manual, the "au Nano IC Card 04 LE U" is referred to as an "au IC card".
• In this manual, the "USB2.0 TypeC-A cable" provided in the package is referred to as a "USB cable".
• Company names and product names referred to in this manual are trademarks or registered trademarks of
their respective companies. TM and the
®
mark may be omitted in this manual.
Before using the product
• The product can transmit data by using the WiMAX 2+ system or the LTE system. You can select from the
following communication modes to use this.
High Speed
High Speed Plus Area
WiMAX 2+
〇
〇
LTE
-
〇
For an explanation of how to select and set the communication modes, see "About Communication
Modes" on the next page of this manual.
* The default setting is "High Speed" mode. Note that an additional charge may be incurred, depending on your billing plan,
when you switch to "High Speed Plus Area" mode.
• The product supports USB 2.0 (except for USB ports that are proprietary to computer manufacturers) and can
be used on computers that are equipped with these ports.
(The USB cable provided in the package complies to the USB 2.0 standard.)
* Keep the packaged items, including the warranty, in a safe place.
* An AC adapter is not included. Purchase the specified charging
equipment (sold separately). For details, see "Related Accessories" in
"Notes on usage".
* The illustrations of the product used in this manual are simulated
images. They may differ from the actual product.
How to Use the Touch Panel
This product is equipped with an intuitively operable touch panel. It operates by detecting your
finger's movements using a capacitive sensing method.
• The touch panel is designed to be operated by lightly touching it with your fingers.
Do not apply strong pressure with your fingers or sharp-pointed objects (such as fingernails, ballpoint
pens and pins) on the touch panel.
• In the following cases, the product may not respond to touching the touch panel. Or, doing so might
cause false operation.
– Operation with gloved hands
– Operation with fingernails
– Operation with a foreign object placed on the
touch panel
– Operation with a protective sheet or sticker
on the touch panel
– Operating with drops of water or condensation on
the touch panel
– Operation with wet or sweaty fingers
– Operating with two or more fingers
◆
Tap
Lightly touch the touch panel, and then remove
your finger.
If you tap too briefly, there may be no reaction
.
◆
Slide
Put your finger lightly on the touch panel and then
slide your finger.
• If the lock screen is displayed, unlock it by
sliding the lock mark
to unlock it.
The
home screen is displayed.
• To return to the home screen, tap the
button.
Inserting the au IC Card
When inserting the au IC Card, be sure to disconnect the product from the power source
and turn off the power to the product.
Remove the USB cable and cradle (sold separately) if they are connected.
1
Slide the clasp (cover) on the card slot in the direction
of the arrow to release the lock and lift up the card
slot. With the IC (metal) part of the au IC card facing
up, insert it straight into the card slot.
* Be careful of the orientation of the notch.
* Do not press on the clasp from above.
2
Push the card slot down, and lock it by sliding it in
the direction of the arrow, while lightly pressing the
top of the clasp, until you hear a click.
* Your telephone number and other details are stored on
the au IC card.
* This product supports au Nano IC Card 04 LE U.
* Data communication via a Wide Area Network (WAN)
cannot be done if the au IC card is not inserted.
* Confirm the correct inserting direction of the IC card. Failure
to do so might cause a malfunction or damage.
* Do not place the IC card directly on the connectors in
the bottom of the card slot. Doing so might cause a
malfunction or damage.
* Do not insert or push the IC card forcefully. Doing so might
cause a malfunction or damage.
If something feels strange, return the card slot temporarily and lock it again.
* Refrain from inserting an SD card or IC card with a conversion adapter. Doing so might cause failures.
* Be careful not to touch or damage the IC (metal) part of the au IC card.
* An error message is displayed if the au IC card is not properly inserted, or if there is an abnormality with the au IC card.
* Be careful not to lose the au IC card after you remove it.
• You can confirm the product's device information (phone number, ICCID, etc.) on its display (touch panel).
<How to confirm>: Home screen - [Information] - [Device Information]
Notch
Front
au Nano IC Card 04 LE U
Back
IC (metal) part
IC (metal) part
SIM card slot
Notch
Attaching the Battery Pack
1
Slide the battery pack, with the marked surface
(recycling symbol, etc.) facing up, all the way in.
Align the product's terminals and the battery pack's
(terminals), attach them in the direction of
①
,
and then insert it in the direction of
②
.
* Use the battery pack specified for this product.
<Removing the battery pack>
Lift up the front part of the battery pack and pull it
out in the direction of the arrow to remove it.
2
Attach the rear cover.
Check the direction of the rear cover and place it so that it aligns with the product. While firmly
pressing the parts in the following illustration, attach the rear cover so that there are no
gaps.
Charging the Product
This section explains how to charge the product using the specified TypeC Common AC Adapter
01 U (0601PQV) (sold separately).
* The battery pack is not fully charged at the time of purchase. Be sure to charge the battery before using the product.
* We recommend charging this product while the power is off or while it is idling.
* If the power is on, or if the temperature of the product or battery pack is high, charging may stop, even if the battery
is not full, in order to maintain the battery's life. Also, if you continue charging it for a long time while the power is on,
the battery enters the Long Life Charge state (the maximum charge capacity is about 70%) and the remaining battery
power is automatically reduced gradually to protect the battery.
* The charging time varies depending on the environment and conditions in which the product is used.
Fast charging is possible if you are using a typeC Common AC Adapter 01 U (0601PQV) (sold separately).
For the time it takes to charge, refer to the "Product Specifications" section on the next page.
1
Insert the USB connector (type C) of the AC adapter (sold separately) into the USB port (type C) on the
product.
* Plug the USB connector (type C) straight into the USB port (type C) of the product.
2
Plug the power plug of the AC adapter (sold
separately) into a power outlet.
* Make sure that the AC adapter (sold separately) does not
come unplugged.
* Pressing the Power button
when charging with the
power off or while idling shows how much of the battery
has been charged (%).
* Because the battery pack is initializing when being used
for the first time after attaching it, showing how much
of the battery has been charged may take some time.
* If you turn on "Long Life Charge", charging stops when the battery's level is about 70%. Repeatedly charging and
discharging the battery pack frequently while it has sufficient remaining power prevents accelerated deterioration of
the battery pack. (Default setting: OFF)
• Display procedure: In the home screen, tap [Quick Menu] - [ECO Settings] - [Long Life Charge].
For information on how to charge the battery pack on the cradle (sold separately), refer to the "WX05
ク
レードル
(NAD35PUU)
取扱説明書
(Instruction Manual of the cradle)" (Japanese).
Turning the Power On
1
Hold down the Power button
until "NEC" is displayed in the display and the product is turned on.
(The remaining battery level appears while "NEC" is displayed immediately after you install a battery pack and when
you turn on the power after the power was fully off.)
* When the home screen (refer to "Displayed Information" on the next page) is displayed, proceed to
.
* To turn the power off, hold down the Power button
and tap [Power OFF] on the Power Option screen.
(The power can be turned off, even on the lock screen, by
holding down the Power button
.)
2
When the language selection screen is displayed, tap [English].
Switching to English display
From the home screen, tap [
設定
(Settings)]
→
[
メンテナンス
(Maintenance)]
→ [ 言語設定
(Language)]
→
[English].
3
Read the guidelines for the "Notes on usage" by sliding them to the
bottom, and then tap [YES]
.
4
Read the guidelines for the "Favor on usage" by sliding them to the
bottom, and if you agree, tap [YES]
.
5
When "Do you want to start Setup Wizard?" is displayed, continue to
by tapping [YES].
Terminals
Recycling
symbol
(Terminals)
Notch
Press the parts firmly and securely to attach the rear cover.
Power button
Notch
A l i g n t h e
tabs on this
side first.
Verifying the Connection Status
◆
If
is displayed along with
in the display and the product can be connected to the internet, the settings are complete.
* For an explanation of each icon, see "Displayed Information" on the
next page of this manual.
appears in High Speed Plus Area mode, and
(green)
appears in Onetime HS+A mode.
For details, see "About Communication Modes" on the next page
of this manual.
◆
If
is displayed along with
in the display and the product cannot be connected to the internet,
Configure the connection destination in
.
◆
If the wireless LAN (Wi-Fi®) connection with the product is not established,
Select [OFF] on the home screen - [Settings] - [LAN Settings] - [Wi-Fi Management Frame], and then redo the
wireless LAN (Wi-Fi®) connection using
(or
).
◆
If "Please checking APN settings." is displayed,
Configure the connection destination in
.
Confirm that this product has the latest firmware. (How to confirm: Home screen ‑ [Settings] ‑ [Maintenance] ‑ [Firmware Update])
The version of this product is confirmed via the display (touch panel). (How to confirm: Home screen - [Information] - [Device Information] - "Firmware Version")
When “There is new firmware available. Do you want to update?” is displayed on the display of this product, it indicates that a new firmware exists. In that case, refer to
the “Updating the Firmware” on the next page of this manual to update the version.
NWA-A07669-001-00
Technically Certified
November, 2018
Instruction Manual
Read this to connect and configure the product
Part Names and Functions
Name
Function
①
Display
(Touch panel)
Lets you view the status of
this product and notification
information.
Main settings for the product can
be done with the touch panel.
②
USB port (type C)
Used to connect the USB cable
(packaged item) (sample) to
the product, or when placing
the product on the cradle (sold
separately).
③
Power button
Turns the power on/off.
Use to turn on/off the display.
Use to put the product in an idle
state, or to recover from idling or
waiting.
④
SIM card slot
Insert the au IC card into this slot.
⑤
Strap hole
Used to attach a strap.
①
Display (Touch panel)
③
Power button
④
SIM card slot
⑤
Strap hole
②
USB port (type C)
• The antenna is built-in. Covering the product with
your hand during communication may affect the
communication quality.
Connecting to Wireless LAN (Wi-Fi®)
Downloading the "NEC WiMAX 2+ Tool" Application for Your Smartphone
By using "NEC WiMAX 2+ Tool", an application designed especially for this product, it is possible to
view information about the product on your smartphone, etc. and perform operations to update
the firmware or switch to the idle state.
*
This specialized application enables remote-activation. Search the Google Play or App Store for "NEC
WiMAX 2+ Tool" to download and install this specialized application.
<Google Play Store>
<App Store>
(As of September, 2018)
* The "NEC WiMAX 2+ Tool" smartphone application has a Japanese user
interface.
* Settings cannot be done on this product with "NEC WiMAX 2+ Tool" while the
display (touch panel) is on. In addition, operating the product's display (touch
panel) while doing settings via "NEC WiMAX 2+ Tool" may interrupt the settings
being done with "NEC WiMAX 2+ Tool". Change the display to the home screen
or open the lock screen.
* You can use "NEC WiMAX 2+ Tool" to connect to a wireless LAN (Wi-Fi
®
).
(Refer to "
Using a QR Code to Connect to Wireless LAN (Wi-Fi
®
)"
on the next page)
Data communication can be performed with this product by connecting wireless LAN (Wi-Fi
®
) devices such as a PC, game console,
smartphone, etc.
Up to 10 wireless LAN (Wi-Fi
®
) devices can be connected to this product.
However, depending on the ambient reception environment, the number of connected devices may not reach the limit.
* The wireless LAN (Wi-Fi
®
) function and the Bluetooth
®
function (on the next page) cannot be used simultaneously.
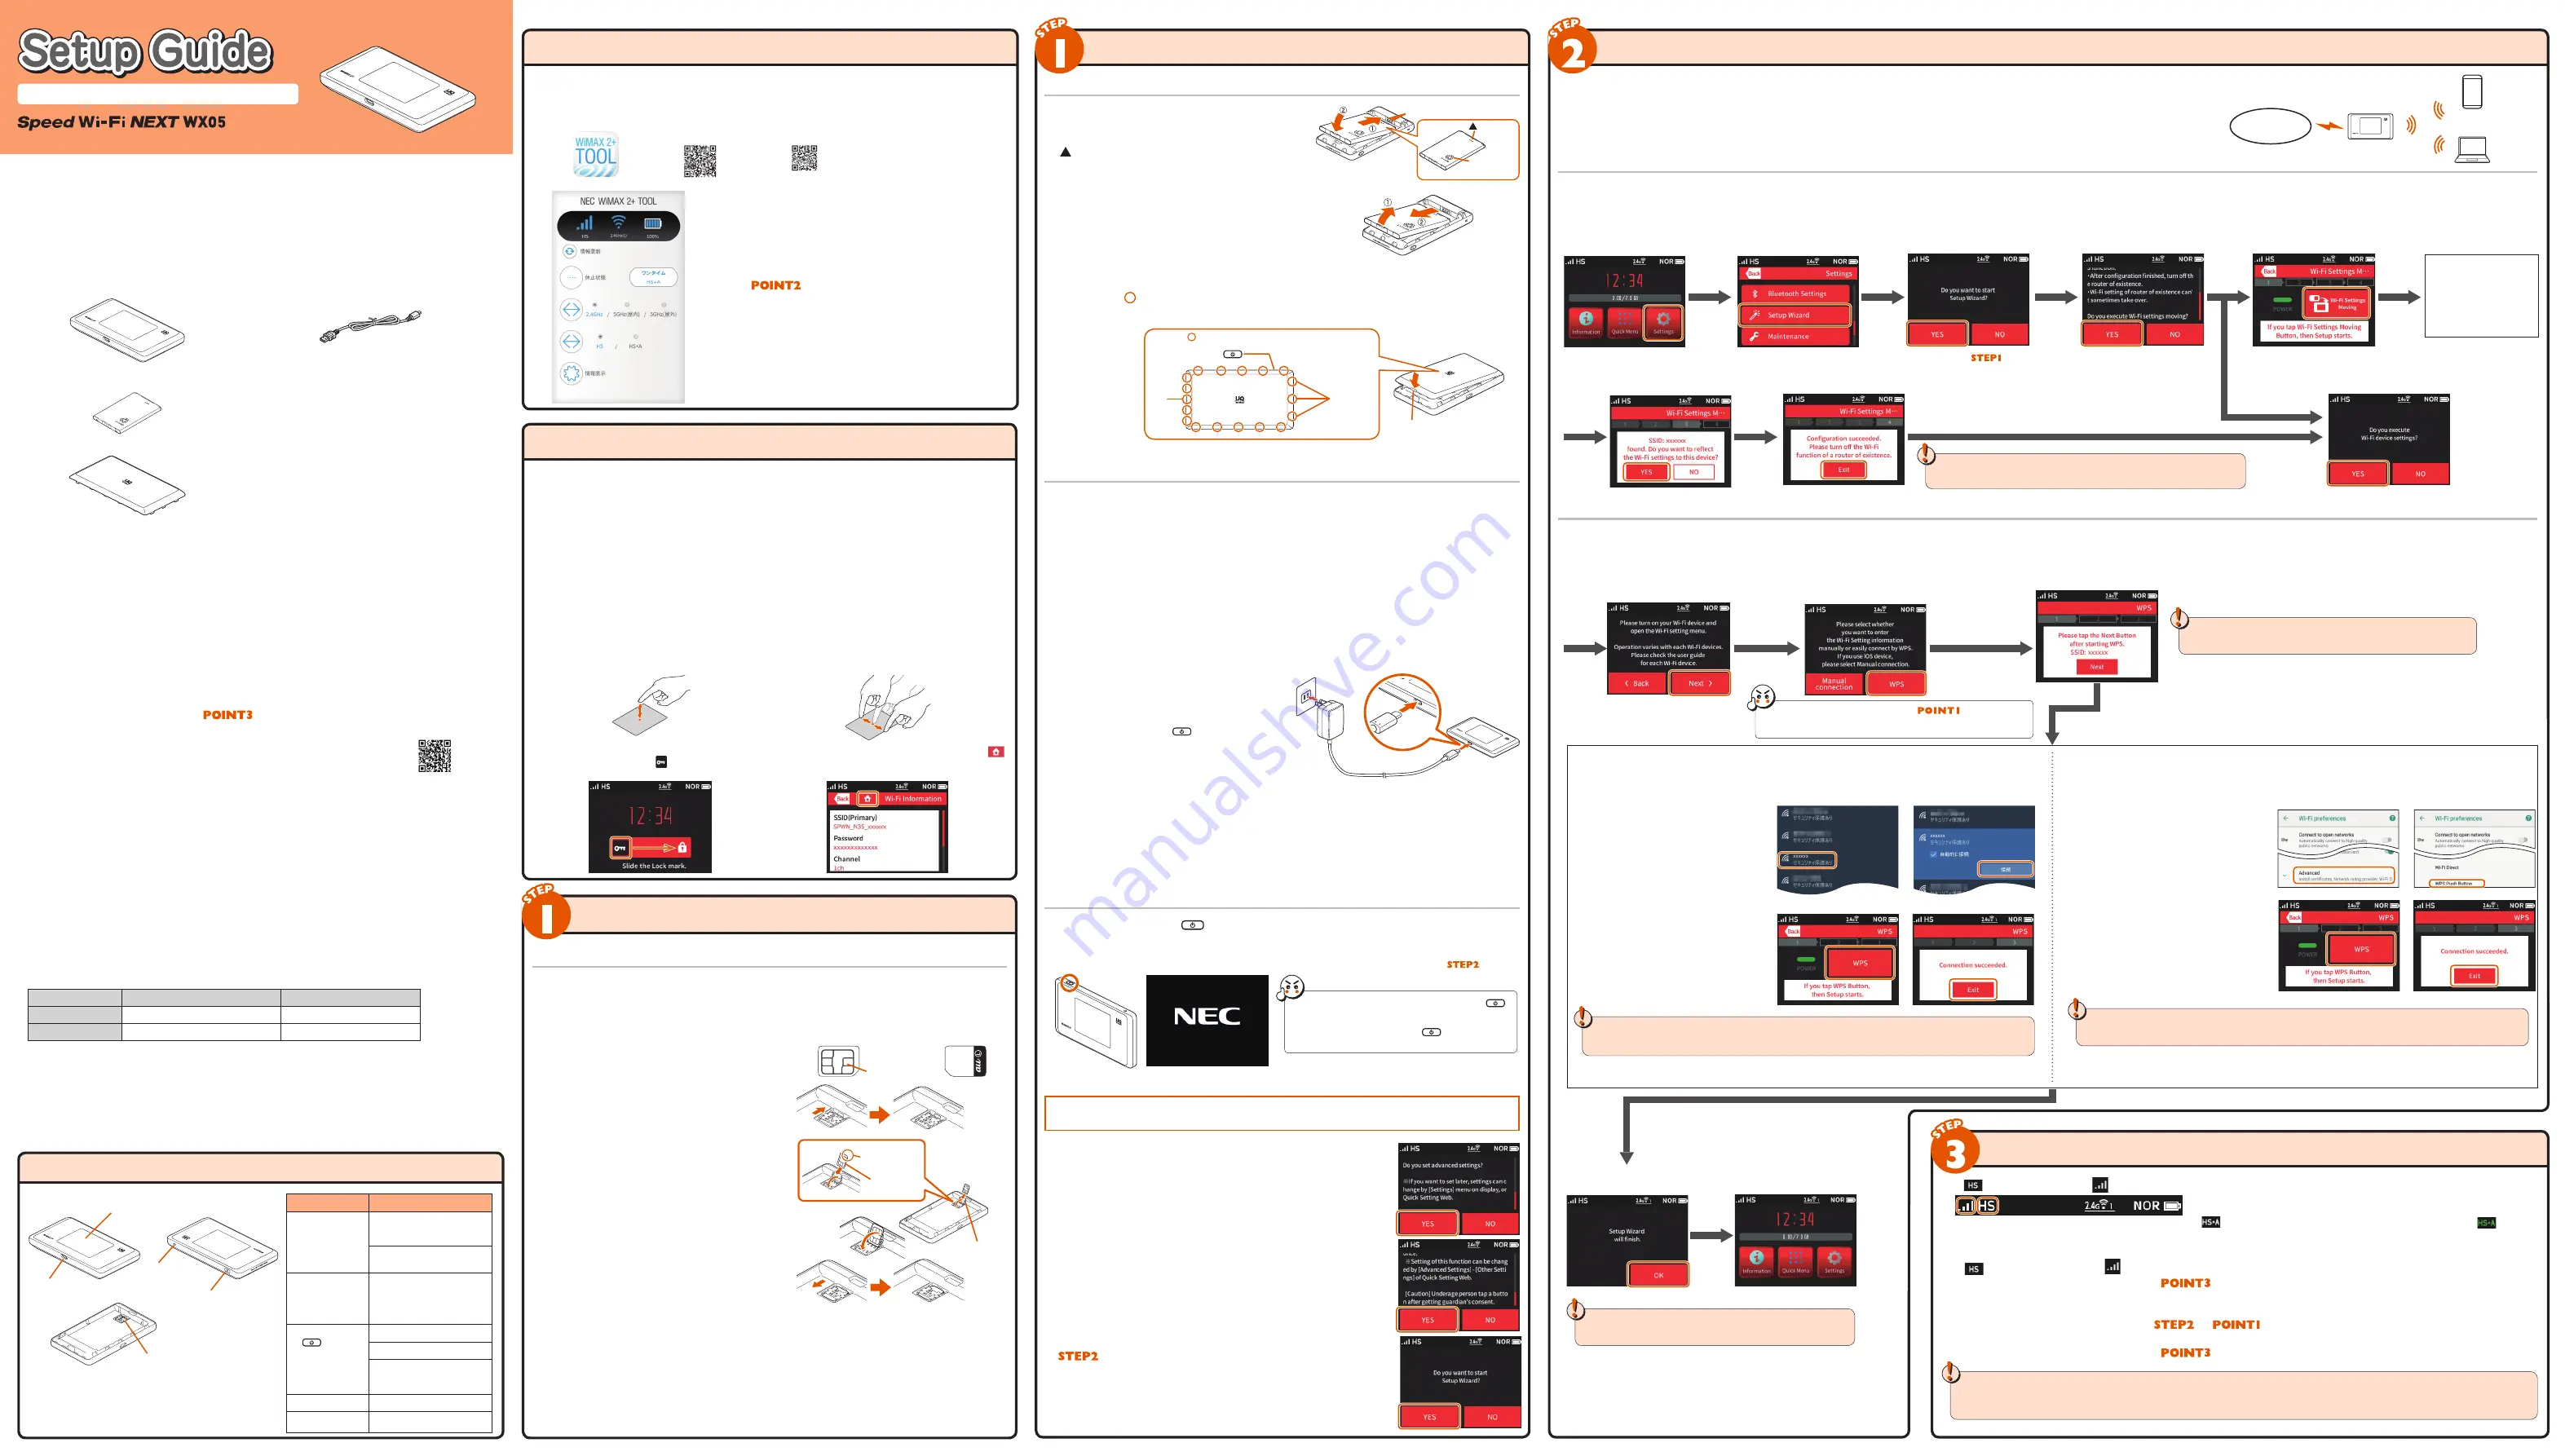
Using the Wi‑Fi Settings Moving Function
You can carry over to the product the settings for a wireless LAN (Wi-Fi
®
) router that you used in the past by using the "Wi-Fi Settings Moving" function. This way you do not need to redo the settings.
* The router you have used in the past needs to have supported WPS. In addition, some of the wireless LAN (Wi-Fi
®
) settings may not carry over, depending on the functions and settings (such as unusable text or encryption mode) of the router you were
using in the past.
* In the home screen, tapping [Settings] - [Easy Wireless Settings] - [Wi-Fi Settings Moving] shows a guidance screen.
You can confirm if the "SSID(Primary)" is the SSID of the router you have used until now,
by going to home screen - [Information] - [Wi-Fi Information].
[For Windows PCs]
The following is explained using Windows 10 as an example.
2
Turn the PC on and enable wireless functions.
* Refer to the user manual, etc., for your PC
for how to connect.
3
From your PC's network (Wi-Fi®) screen,
select the network name (SSID) that
was displayed in step
1
,
select "
自動
的に接続
(Connect automatically)"
,
and
then click [
接続
(Connect)]
.
4
"Please tap the Next Button after starting WPS. SSID: xxxxxx" is displayed on the product's display (touch
panel). Tap [Next].
5
If "If you tap WPS Button, then Setup
starts." is displayed, tap [WPS].
A little while after "WPS is in progress…"
is displayed, "Connection succeeded." is
displayed. Tap [Exit].
If the product cannot connect to the PC, "Connection failed." is displayed. Check that the PC's wireless function is enabled,
and then retry from step
1
.
[For smartphones/tablets (Android devices)]
* Refer to the user manual, etc., for your Android device for how to connect.
2
Turn on your Android device, select from its home screen [Settings] - [Network & Internet] - [Wi-Fi]
,
and put it in list view.
3
From the Wi-Fi screen of your Android
device, tap [Wi-Fi preferences] - [Advanced] -
[WPS Push Button]
.
* This screen is an example using Android 8.1.
4
"Please tap the Next Button after starting
WPS. SSID: xxxxxx" is displayed on the
product's display (touch panel). Tap
[Next].
5
If "If you tap WPS Button, then Setup
starts." is displayed, tap [WPS].
A little while after
"WPS
is in
progress…" is displayed, "Connection
succeeded." is displayed. Tap [Exit].
If the product cannot connect to the Android device, "Connection failed." is displayed. Check that the Android device's
wireless LAN (Wi-Fi®) function is enabled, and then retry from step
1
.
Read the guidelines for the "Wi-Fi Settings Moving" function
by sliding them to the bottom, and then tap [YES].
In the home screen, tap [Settings].
Tap [Setup Wizard].
Tap [Wi-Fi Settings Moving].
Tap [YES] in the settings confirmation
screen for the Wi-Fi device.
Tap [YES].
Tap [Exit] in the settings successful screen.
Turn off the power to the router you were using previously.
Tap [YES] in the find router screen.
Start up the WPS function
of the router you were using
previously.
(Refer to the user manual for
the router you are using for
the method to start up the
WPS function.)
• About [Manual connection]: Refer to "
To Do Wireless LAN
(Wi-Fi®) Connections via Manual Settings" if you are manually setting a
Mac OS computer or iPad/iPhone/iPod touch, etc.
1
Tapping [WPS] on the Setup Wizard shows the screen on the left.
If you are doing settings from the home screen, tapping [Settings] - [Easy
Wireless Settings] - [WPS] shows the network name (SSID).
Tap [WPS].
Tap [Next].
Tap [OK].
* This screen is an example.
The home screen is displayed.
The Setup Wizard is complete.
[YES]
[NO]
(
Screen from
)
You can redo the Setup Wizard from the home screen [Settings] - [Setup
Wizard].
Use the WPS Function to Connect to Wireless LAN (Wi‑Fi®).
If the wireless LAN (Wi-Fi®) device supports the push-button format of the WPS function, you can easily do the setup without having to input the SSID, security methods and other settings needed to
connect.
This section explains how to connect to wireless LAN (Wi-Fi®) using a Windows PC and Android device as examples.
WAN
The product
Wireless LAN
(Wi-Fi®)
Smartphone
PC, game
console, etc.
Select how to connect the product
with a wireless LAN (Wi-Fi®) terminal
to set up the wireless LAN (Wi-Fi®).