background image

3


On-Screen Display (OSD) Menu Settings

 39


3-8


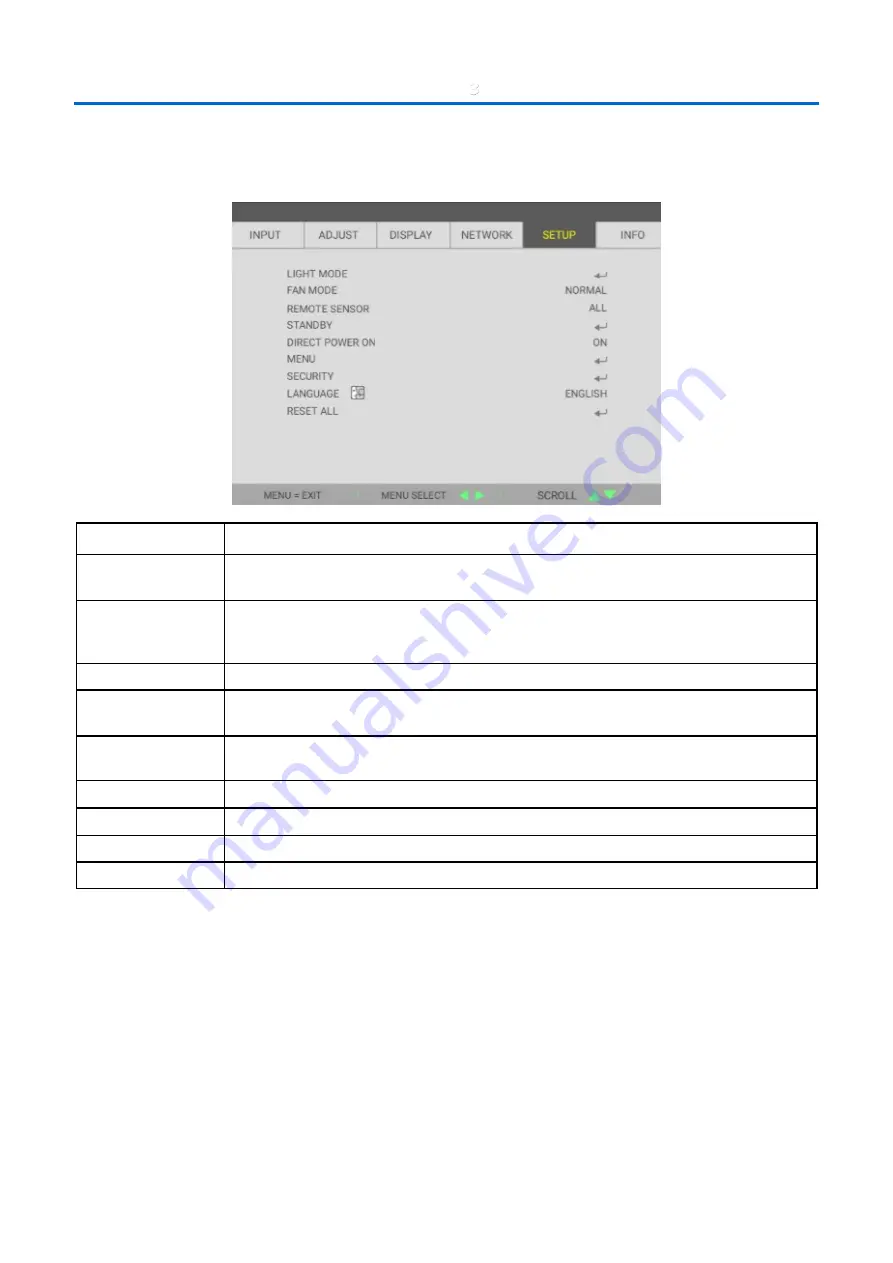
SETUP 

Press the MENU button to open the OSD menu. Press the cursor 

◄►

 button to move to the SETUP menu. Press the 

cursor 

▲▼

 button to move up and down in the SETUP menu. Press 

◄►

 to enter and change values for settings. 


I

TEM


D

ESCRIPTION


LIGHT MODE 

Press Enter to enter the Light mode menu. See page 

40 

for more information on 

LIGHT 

MODE.


FAN MODE 

Press the cursor 

◄►

 button to enter and toggle between Normal and High fan speeds.  

Note: We recommend selecting high speed in high temperatures, high humidity, or high 
altitude (higher than 1500m/4921ft) areas. 

REMOTE SENSOR 

Press the cursor 

◄►

 button to enter and select Remote Sensor. 

STANDBY 

Press Enter to enter the Standby menu. See page 

41

 for more information on 

STANDBY 

MODE

 . 

DIRECT POWER ON 

Press the cursor 

◄►

 button to enter and enable or disable automatic power On when AC 

power is supplied. 

MENU 

Press Enter to enter the MENU menu. See pag

42

 for more information on

 MENU

SECURITY 

Press Enter to enter the Security menu. See page 

43 

for more information on

 SECURITY

LANGUAGE 

Press the cursor 

◄►

 button to enter and select a different localization Menu. 

RESET ALL 

Press  Enter to reset all settings to default values (except Language). 

Summary of Contents for P506QL

Page 1: ......

Page 2: ... 2 4 Adjusting Projected Image Position Using Lens Shift 15 Adjusting the vertical image position 16 Adjusting the horizontal image position 16 2 5 Adjusting the Zoom Focus and Keystone 17 2 6 Adjusting the Volume 18 3 On Screen Display OSD Menu Settings 19 3 1 OSD Menu Controls 19 Navigating the OSD 19 3 2 Setting the OSD Language 20 3 3 OSD Menu Overview 21 3 4 INPUT Menu 23 COMPUTER Menu 24 3D ...

Page 3: ... 4 Image Problems 48 5 5 Light Source Problems 49 5 6 Remote Control Problems 49 5 7 Audio Problems 49 5 8 Having the Projector Serviced 49 5 9 HDMI Q A 50 6 Specifications 51 6 1 Specifications 51 6 2 Projection Distance vs Projection Size 53 Projection Distance and Size Table 54 6 3 Timing Mode Table 55 Table of Supported Frequency 55 Table of Supported Frequency For 3D mode 57 6 4 Projector Dim...

Page 4: ...ing to heed this symbol and handing the product erroneously could result in accidents leading to death or major injury Failing to heed this symbol and handing the product erroneously could result in personal injury or damage to surrounding property Examples of Symbols This symbol indicates you should be careful of electric shocks This symbol indicates you should be careful of high temperatures Thi...

Page 5: ...rself AC 230 V European countries AC 120 V North America The power cord included with this projector is exclusively for use with this projec tor For safety do not use it with other devices Handle the power cord with care Damaging the cord could lead to fire or electric shock Do not place heavy objects on the cord Do not place the cord under theprojector Do not cover the cord with a rug etc Do not ...

Page 6: ...utlet and contact your dealer Do not insert or drop metal or combustible objects or other foreign materials into the projector from the vents Doing so could lead to fire or electric shock Be par ticularly careful if there are children in the home Should a foreign object get inside the projector first turn off the projector s power then unplug the power cord from the power outlet and contact your d...

Page 7: ...rojector ceiling mounting device and installation location When installed suspended from the ceiling etc do not hang from the projector The projector could drop and cause injury When installing suspended from the ceiling use a power outlet that is within reach so the power cord can be easily plugged and unplugged Do not place objects in front of the lens while the projector is operating Do not lea...

Page 8: ...tion range before turning on the projector Do not allow children to operate the projector alone When a child is operating the projector an adult should always be present and watch the child carefully The below pictogram that is indicated near the lens on the cabinet describes this projector is categorized in the risk group 2 of IEC EN 62471 5 2015 When cleaning the projector Do not use flammable g...

Page 9: ... the power cord from the power outlet and check that all connection cables connecting the projector to other devices have been disconnected When planning not to use the projector for long periods of time always unplug the power cord from the power outlet Do not use on networks subject to overvoltage Connect the projector s Ethernet HDBaseT port and LAN port to a network for which there is no risk ...

Page 10: ...tor is installed and its surroundings as a general rule at least 50cm 19 69 inches for the intake vent 50cm 19 69 inches for the exhaust vent Do not touch the exhaust vent area while projecting or immediately after project ing images The exhaust vent area may be hot at this time and touching it could cause burns Moving the projector When moving the projector do not hold the lens section The focus ...

Page 11: ...at any distance from the projector An adult should supervise the children to prevent exposure risks Check that there is no one looking at the lens when using the remote control for starting the projector Do not look at the projected light using optical devices binoculars telescopes magnifying glasses reflectors etc WARNING MOUNT ABOVE THE HEADS OF CHILDREN The use of a ceiling mount is recommended...

Page 12: ...ion xi Product labels The caution and the explanatory labels of the LASER PRODUCT in Class 1 conforming to IEC 60825 1 Third edition and in CLASS 3R conforming to GB 7247 1 2012 are stuck on the below indicated positions ...

Page 13: ...ser light Horizontal angle unit degree Vertical angle unit degree Zoom Lens position Right most Center Reference value Left most HR HC HL Wide 32 3 24 3 32 3 Tele 22 7 16 6 22 7 Vertical angle unit degree Zoom Lens position Upper most Center Reference value Down most VU VC VL Wide 29 2 14 2 29 2 Tele 20 2 9 5 20 2 ...

Page 14: ...ver there is no guarantee that interference will not occur in a particular installation If this equipment does cause harmful interference to radio or television reception which can be determined by turning the equipment off and on the user is encouraged to try to correct the interference by one or more of the followingmeasures Reorient or relocate the receivingantenna Increase the separation betwe...

Page 15: ... at the minimum level The mark on the electrical and electronic products only applies to the current European Union Member States Outside the European Union If you wish to dispose of used electrical and electronic products outside the European union please contact your local authority and ask for the correct method of disposal For EU The crossed out wheeled bin implies that used batteries should n...

Page 16: ...uded lens cap to protect the lens from scratches Do not subject the projector to vibrations or strong shocks The projector could be damaged otherwise Improper handling such as carrying the projector by the tilt feet or using it leaned against a wall could lead to mal function Do not touch the surface of the projection lens with bare hands Fingerprints or dirt on the surface of the projection lens ...

Page 17: ...hat there is sufficient space above the projector There is also an intake vent on the back Leave about 50 cm or more space behind and even more space for installing the cables Precautions for Ceiling Installation Do not install the projector in the following places Attached substances such as oil chemicals and moisture may cause deformation or cracks of the cabinet corrosion of the metal parts or ...

Page 18: ...TONE Magnifying feature and other similar features Power management function The projector has power management functions To reduce power consumption the power management functions 1 and 2 are factory preset as shown below To control the projector from an external device via a LAN or serial cable connection use the on screen menu to change the settings for 1 and 2 1 STANDBY MODE Factory preset NOR...

Page 19: ... countries PJLink trademark and logo are trademarks applied for registration or are already registered in Japan the United States of America and other countries and areas CRESTRON and CRESTRON ROOMVIEW are trademarks or registered trademarks of Crestron Electronics Inc in the United States and other countries Ethernet is either a registered trademark or trademark of Fuji Xerox Co Ltd trademarks of...

Page 20: ...953001 ImportantInformation 7N8R0401 SecuritySticker 24L67991 QuickSetupGuide 7N8R0421 Contact your dealer immediately if any items are missing appear damaged or if the unit does not work It is recommend that you keep the original packing material should you ever need to return the equipment for warranty service For North America only Limited warranty For customers in Europe You will find our curr...

Page 21: ...on Lens 5 Remote Sensor Receives IR signal from remote control 6 Monaural Speaker Outputs audio sound 7 Indicators Display the messages of projector 8 Tilt Foot Rotate adjuster lever to adjust angle position 14 9 Lens Shift Adjusts the image position 15 10 Exhaust Vent Hot air exhaust Caution Ventilation openings on the projector allow for good air circulation which keeps the projector light sourc...

Page 22: ...ff sequence status 48 2 STATUS Indicator Display the status of projector 3 Light Indicator Display the light source status 4 Temp Indicator Display the thermal status 5 Vertical Lens Shift UP DOWN Adjusts the image position vertically 16 6 Horizontal Lens Shift LEFT RIGHT Adjusts the image position horizontally 16 ...

Page 23: ...s settings in the OSD Quick Menu For Volume 19 3 Navigates and changes settings in the OSD 19 4 Navigates and changes settings in the OSD Quick Menu For Volume 19 5 Turn the projector on or off 12 6 EXIT Return to last OSD page 7 ENTER Enter or confirm highlighted OSD menu item 19 8 Navigates and changes settings in the OSD 19 9 MENU Opens and exits OSD menus 19 ...

Page 24: ...DMI device 8 Ethernet HDBaseT Connect a LAN cable from Ethernet Connect Cat5e Cat6 cable from HDBaseT TX Box VIDEO EXTENDER for HDBaseT signal received 9 LAN Connect a LAN cable from Ethernet 10 PC CONTROL Connects RS 232 serial port cable for remote control 11 3D SYNC Connect 3D sync in cable from a computer or an enabled device 12 AC IN Connect the POWER cable 13 Security chain opening Secures t...

Page 25: ...installing ensure that you use only UL Listed ceiling mounts For ceiling installations use approved mounting hardware and M4 screws with a maximum screw depth of 8 mm 0 315 inch The construction of the ceiling mount must be of a suitable shape and strength The ceiling mount load capacity must exceed the weight of the installed equipment and as an additional precaution be capable of withstanding th...

Page 26: ...k of the projector to secure it to the stand Screw hole center dimension 250 200 mm Screw hole dimension on the projector M4 with the maximum depth 12 mm Horizontal adjustment mechanism for example bolts and nuts in 4 places Please design the stand so that it does not easily topple over The drawing showing the dimensional requirements is not an actual stand design drawing 250m m 9 84 200mm 7 87 50...

Page 27: ...disrupt remote control operation 2 Be sure nothing obstructs the path between the remote control and the projector If the path between the remote control and the projector is obstructed you can bounce the signal off certain reflective surfaces such as projector screens 3 The buttons and keys on the projector have the same functions as the corresponding buttons on the remote ...

Page 28: ... Operation UP Menu Operation ENTER Menu Operation LEFT Menu Operation RIGHT Menu Operation DOWN Menu Operation D ZOOM Zoom Up D ZOOM Zoom Down PAGE UP PAGE DOWN L CLICK R CLICK ECO Display Menu of LIGHT MODE tab directly KEYSTONE Display Menu of DISPLAY tab and set UI focus to KEYSTONE PICTURE Toggle display direct menu of CONTRAST BRIGHTNESS SHARPNESS VOLUME Adjust Volume Up directly HELP Display...

Page 29: ...ar of the projector the remote will function well within a radius of about 7 meters 23 feet and 30 degrees above or below the projector level If the projector does not respond to the remote control move a little closer 1 5 Projector and Remote Control Buttons The projector can be operated using the remote control or the buttons on the top of the projector All operations can be carried out with the...

Page 30: ... positive side facing up 3 Replace the cover Remote Control Precautions 1 Only use AAA batteries Alkaline batteries are recommended 2 Dispose of used batteries according to local ordinance regulations 3 Remove the batteries when not using the projector for prolonged periods 4 RISK OF EXPLOSION IF BATTERY IS REPLACED BY AN INCORRECT TYPE 5 DISPOSE OF USED BATTERIES ACCORDING TO THE INSTRUCTIONS O P...

Page 31: ... power led will flash green to solid green 2 Turn on the light source remote control The PWR LED will now flash blue The startup screen will display in approximately 30 seconds The first time you use the projector you can select your preferred language from quick menu after the startup screen display See Setting the OSD Language on page 20 ...

Page 32: ... IR function over standard CAT5e 6 LAN cable Note It is recommended to use a certified TX box VIDEO EXTENDER Rextron EVBMN 110L38 for the HDBaseT function and there is no guarantee of full response when other brands of TX box are used Using a single HDBaseT CAT5e cable the projector supports an HDBaseT connection distances to 100m 328ft 4 POWER OFF ARE YOU SURE message appears press the POWER butt...

Page 33: ...he Projector Level Take note of the following when setting up the projector 1 To raise the level of the projector twist the adjusters counter clockwise 2 To lower the level of the projector lift the projector and twist the adjusters clockwise ...

Page 34: ... to adjust the position of the projected image either horizontally or vertically within the range detailed below Shift is a unique system that provides lens shift while maintaining a much higher ANSI contrast ratio than traditional lens shift systems Note Do not rotate lens shift knob further under click sound and lightly press the knob to rotate back ...

Page 35: ...image position is at maximum Please consult the Shift Range diagram below for further clarification Adjusting the horizontal image position With the lens horizontal image position can be adjusted to a maximum of 20 for UHD of the image width Note that the maximum horizontal image height adjustment can be limited by the vertical image position For example it is not possible to achieve the maximum h...

Page 36: ...one 1 Use the Image zoom control on the projector only to resize the projected image and screen size 2 Use the Image focus control on the projector only to sharpen the projected image 3 Press the Keystone and button on the remote to selected V Vertical keystone A B ...

Page 37: ... 1 Press the Volume buttons on the remote control or press the buttons on the keypad to adjust Volume 2 The volume control appears on the display 3 Press the AV MUTE button to turn off the image and volume This feature is available only on the remote ...

Page 38: ...3 4 4 5 5 5 6 6 1 To enter the OSD press the MENU button 2 There are six menus Press the cursor buttons to move through the menus 3 Press the cursor buttons to move up and down in a menu 4 Press the cursor buttons to change values for settings 5 Press the MENU button to close the OSD or leave a submenu Press the EXIT button to return to the previous menu Note Depending on the video source not all ...

Page 39: ...D language to your preference before continuing 1 Press the MENU button Press the cursor button to navigate to SETUP 2 Press the cursor button until LANGUAGE is highlighted 3 Press the cursor button until the language you want is highlighted 4 Press the MENU button to close the OSD ...

Page 40: ...DJUST REFERENCE HIGH BRIGHT PRESENTATION VIDEO MOVIE sRGB DICOM USER HDR DETAIL SETTINGS GAMMA CORRECTION 1 8 2 2 2 2 4 B W LINEAR COLOR TEMPERATURE WARM NORMAL COLD DYNAMIC CONTRAST OFF ON WHITE BALANCE CONTRAST R 0 200 CONTRAST G 0 200 CONTRAST B 0 200 BRIGHTNESS R 100 100 BRIGHTNESS G 100 100 BRIGHTNESS B 100 100 ADVANCED WHITE PEAKING 0 10 MEMC OFF LOW MEDIUM HIGH IMAGE PEAKING OFF 0 10 COLOR ...

Page 41: ... MODE NORMAL ECO ADJUST 30 100 CONSTANT BRIGHTNESS OFF ON FAN MODE NORMAL HIGH ALTITUDE REMOTE SENSOR ALL FRONT BACK STANDBY STANDBY MODE NORMAL NETWORK STANDBY HDBaseT AUTO POWER OFF 0 180 OFF TIMER 0 600 DIRECT POWER ON OFF ON MENU MESSAGE DISPLAY OFF ON MENU POSITION CENTER UP DOWN LEFT RIGHT DISPLAY TIME MANUAL AUTO 5SEC AUTO 15SEC AUTO 45SEC BACKGROUND BLUE BLACK SECURITY CONTROL PANEL LOCK O...

Page 42: ...and change values for settings ITEM DESCRIPTION HDMI Press the cursor button to enter and set the HDMI COMPUTER Press Enter to enter the Computer menu See COMPUTER Menu on page 24 3D Press Enter to enter the 3D menu See 3D Setting on page 25 AUTO SOURCE Press the cursor button to enter and set the Auto Source TEST PATTERN Press the cursor button to enter and select internal Test Pattern Note To en...

Page 43: ...ess to move up and down in the COMPUTER menu ITEM DESCRIPTION H POSITION Press the cursor button to enter and adjust the display position to left or right V POSITION Press the cursor button to enter and adjust the display position to up or down PHASE Press the cursor button to enter and adjust the A D clock timing phase CLOCK Press the cursor button to enter and adjust the A D sampling dots ...

Page 44: ...content may have a 3D on off selection feature 6 You need DLP link 3D or IR 3D shutter glasses With IR 3D shutter glasses you need to install a driver on your PC and connect a USB emitter 7 The 3D mode of the OSD needs to match the type of glasses DLP link or IR 3D 8 Power on the glasses Glasses normally have a power on off switch Each type of glasses has their own configuration instructions Pleas...

Page 45: ...SETTINGS Press Enter to enter the Detail Settings menu See 3D Setting on page 25 COLOR CORRECTION Press Enter to enter the Color Correction menu See page 30 for more information on COLOR CORRECTION CONTRAST Press the cursor button to enter and adjust the display Contrast BRIGHTNESS Press the cursor button to enter and adjust the display Brightness SHARPNESS Press the cursor button to enter and adj...

Page 46: ...ESCRIPTION GAMMA CORRECTION Press the cursor button to enter and adjust the Gamma Correction of the display COLOR TEMPERTURE Press the cursor button to enter and adjust the Color Temperature DYNAMIC CONTRAST Press the cursor button to enter and enable or disable the Dynamic Contrast WHITE BALANCE Press the Enter button to enter the White Balance sub menu See WHITE BALANCE on page 28 ADVANCED Press...

Page 47: ... Press the buttons to adjust the Red Contrast CONTRAST G Press the buttons to adjust the Green Contrast CONTRAST B Press the buttons to adjust the Blue Contrast BRIGHTNESS R Press the buttons to adjust the Red Brightness BRIGHTNESS G Press the buttons to adjust the Green Brightness BRIGHTNESS B Press the buttons to adjust the Blue Brightness ...

Page 48: ... to enter the ADVANCED sub menu ITEM DESCRIPTION WHITE PEAKING Press the cursor button to enter and adjust the White Peaking value MEMC Press the buttons to select different MEMC level IMAGE PEAKING Press the buttons to adjust motion adaptive sharpness enhancement 2D Peaking value ...

Page 49: ...tion and Gain GREEN Select to enter the Green Color Correction Press the buttons to adjust the Hue Saturation and Gain BLUE Select to enter the Blue Color Correction Press the buttons to adjust the Hue Saturation and Gain YELLOW Select to enter the Yellow Color Correction Press the buttons to adjust the Hue Saturation and Gain MAGENTA Select to enter the Magenta Color Correction Press the buttons ...

Page 50: ...e values for settings ITEM DESCRIPTION ASPECT RATIO Press the cursor button to enter and adjust the video Aspect Ratio DIGITAL ZOOM Press the cursor button to enter and adjust the Digital Zoom KEYSTONE Press the cursor button to enter and adjust the Keystone ORIENTATION Press the cursor button to enter and choose from four Orientation methods Note ASPECT RATIO such as 1280 x 1024 4 3 the image wou...

Page 51: ...splays the network connection status DHCP Press to turn DHCP On or Off Note If you select DHCP Off complete the IP Address Subnet Mask Gateway and DNS fields IP ADDRESS Enter a valid IP address if DHCP is turned off SUBNET MASK Enter a valid Subnet Mask if DHCP is turned off GATEWAY Enter a valid Gateway address if DHCP is turned off DNS Enter a valid DNS name if DHCP is turned off APPLY Press Ent...

Page 52: ...ojector is supported by the specified commands of the Crestron Electronics controller and related software ex RoomView http www crestron com This projector is supported by AMX Device Discovery http www amx com This projector supports all commands of PJLink Class1 Version 1 00 http pjlink jbmia or jp english For more detail of information about the diverse types of external devices which can be con...

Page 53: ...Screen Display OSD Menu Settings 34 LAN_RJ45 1 Connect an RJ45 cable to RJ45 ports on the projector and the PC Laptop 2 On the PC Laptop select Start Settings Network Internet Ethernet Change adapter options ...

Page 54: ...3 On Screen Display OSD Menu Settings 35 ...

Page 55: ...ight click on Ethernet and select Properties 4 In the Properties window select the Networking tab and select Internet Protocol TCP IP 5 Click Properties 6 Click Use the following IP address and fill in the IP address and Subnet mask then click OK ...

Page 56: ...ff IP Address 10 10 10 10 Subnet Mask 255 255 255 0 Gateway 0 0 0 0 DNS Server 0 0 0 0 10 Press Enter to confirm settings Open a web browser for example Microsoft Internet Explorer with Adobe Flash Player 9 0 or higher 11 In the Address bar input the IP address 10 10 10 10 12 Press Enter The projector is setup for remote management The LAN RJ45 function displays as follows ...

Page 57: ...rojector Projector Name 10 Location 10 Assigned To 10 Network Configuration DHCP Enabled N A IP Address 15 Subnet Mask 15 Default Gateway 15 DNS Server 15 User Password Enabled N A New Password 10 Confirm 10 Admin Password Enabled N A New Password 10 Confirm 10 For more information please visit http www crestron com ...

Page 58: ... high temperatures high humidity or high altitude higher than 1500m 4921ft areas REMOTE SENSOR Press the cursor button to enter and select Remote Sensor STANDBY Press Enter to enter the Standby menu See page 41 for more information on STANDBY MODE DIRECT POWER ON Press the cursor button to enter and enable or disable automatic power On when AC power is supplied MENU Press Enter to enter the MENU m...

Page 59: ...the LIGHT MODE menu and then press Enter or Press to move up and down in the LIGHT MODE menu ITEM DESCRIPTION ECO MODE Press the cursor button to enter and adjust the ECO Mode ADJUST Press the cursor button to enter and adjust the brightness level CONSTANT BRIGHTNESS Press the cursor button to enter and enable or disable the Constant Brightness ...

Page 60: ...enu ITEM DESCRIPTION STANDBY MODE Press the cursor button to select the standby mode The options are NORMAL NETWORK STANDBY and HDBaseT AUTO POWER OFF Press the cursor buttons to set the Auto Power Off timer The projector automatically turns off if no input source is detected after the preset period of time OFF TIMER Press the cursor button to enter and set Sleep timer The projector automatically ...

Page 61: ... Enter or Press to move up and down in the MENU menu ITEM DESCRIPTION MESSAGE DISPLAY Press the cursor button to enter and enable or disable the Message Display MENU POSITION Press the cursor button to enter and select Menu Position DISPLAY TIME Press the cursor button to enter and select Display Time BACKGROUND Press the cursor button to enter and select Background ...

Page 62: ...NU button to open the OSD menu Press to move to the SETUP menu Press to move to the SECURITY menu and then press Enter or Press to move up and down in the SECURITY menu ITEM DESCRIPTION CONTROL PANEL LOCK Press the cursor button to enter and set Control Panel Lock ...

Page 63: ...to move up and down in the INFO menu ITEM DESCRIPTION INPUT TERMINAL Display the activated source SOURCE NAME Displays resolution video information for RGB source and color standard for Video source LIGHT HOURS USED Light hour used information is displayed IP ADDRESS Showing IP Address VERSION Showing system software version SERIAL NUMBER Showing serial number of product ...

Page 64: ...r serviced Cleaning the Lens You can purchase optic lens cleaner from most camera stores Refer to the following to clean the projector lens Remove the lens cap before wiping the lens 1 Apply a little optic lens cleaner to a clean soft cloth Do not apply the cleaner directly to the lens 2 Lightly wipe the lens in a circular motion Caution 1 Do not use abrasive cleaners or solvents 2 To prevent disc...

Page 65: ...le Note Contact your vendor for details on purchasing a suitable Kensington security cable The security lock Kensington 2853 Campus Drive San Mateo CA 94403 U S A Tel 800 535 4242 http www Kensington com Using the Security Bar Lock In addition to the password protection function and the Kensington lock the Security Bar Opening helps protect the projector from unauthorized use See the following pic...

Page 66: ...ing before proceeding to the problem specific solutions 5 2 Tips for Troubleshooting In each problem specific section try the steps in the order suggested This may help you to solve the problem more quickly Try to pin point the problem and thus avoid replacing non defective parts For example if you replace batteries and the problem remains put the original batteries back and go to the next step Ke...

Page 67: ...he screen 1 Verify the settings on your notebook or desktop PC 2 Turn off all equipment and power up again in the correct order Problem The image is blurred 1 Adjust the Focus on the projector 2 Press the Auto button on the remote control or projector 3 Ensure the projector to screen distance is within the specified range 4 Check that the projector lens is clean Problem The image is wider at the t...

Page 68: ...not obstructed 3 Turn off any fluorescent lights in the room 4 Check the battery polarity 5 Replace the batteries 6 Turn off other Infrared enabled devices in the vicinity 7 Have the remote control serviced 5 7 Audio Problems Problem There is no sound 1 Adjust the volume on the remote control 2 Adjust the volume of the audio source 3 Check the audio cable connection 4 Test the source audio output ...

Page 69: ... I run HDMI cables longer than 10 meters There are many HDMI Adopters working on HDMI typical 10 meter range to much longer lengths These companies manufacture a variety of solutions that include active cables active electronics built into cables that boost amplifiers as well as CAT5 6 and fiber solutions Q How can I tell if a cable is an HDMI certified cable All HDMI products are required to be c...

Page 70: ...t Rear Desktop Ceiling Rear Front Data Compatibility VGA SVGA XGA SXGA SXGA UXGA WUXGA UHD 60hz Mac SDTV EDTV HDTV 480i 576i 480p 576p 720p 1080i 1080p UHD H Sync 15 31 102kHz V Sync 24 30Hz 47 120 Hz Environmental Operation Condition 0 40 C 10 85 No condensing Environmental Storage Condition 20 60 C 5 to 95 No condensation Dimensions 480mm L x 400mm W x 172mm H Weight 11 5 kg Light Output 5000lm ...

Page 71: ...ty Slot Security Bar Note For questions regarding product specifications please contact your local distributor For additional information visit US https www necdisplay com Europe https www nec display solutions com Global https www nec display com global index html For information on our optional accessories visit our website or see our brochure The specifications are subject to change without not...

Page 72: ...n Bottom Throw Distance L A B a Screen Right Side Throw Distance L C PJ Screen Center Lens Center ß A Vertical distance between lens center and screen center B Vertical distance between lens center and bottom of screen top of screen for ceiling application L Throw distance NOTE Distance may vary 5 ...

Page 73: ... 132 3362 267 5 6796 401 4 10195 79 4 2017 79 4 2017 13 2 336 145 6 3698 16 5 11 2 16 5 11 2 1 14 1 71 310 7874 270 6863 152 3860 307 4 7808 461 0 11711 91 2 2316 91 2 2316 15 2 386 167 2 4246 16 5 11 2 16 5 11 2 1 14 1 71 100 2540 87 2214 49 1245 98 1 2492 147 7 3752 29 4 747 29 4 747 4 9 125 53 9 1370 16 7 11 3 16 7 11 3 1 13 1 69 When screen bottom is lower than lens center B s value is negativ...

Page 74: ...0 16 9 60 HDMI Signal Resolution Aspect Ratio Refresh Rate VGA 640 x 480 4 3 59 94 60 72 75 VGA 720 x 400 9 5 70 SDTV 480p 720 x 480 4 3 16 9 59 94 SDTV 480i 720 x 480 4 3 16 9 59 94 SDTV 576i 720 x 576 4 3 16 9 50 SDTV 576p 720 x 576 4 3 16 9 50 SVGA 800 x 600 4 3 60 72 75 XGA 1024 x 768 4 3 60 70 75 HDTV 720p 1280 x 720 16 9 50 59 94 60 WXGA 1280 x 768 5 3 60 Quad VGA 1280 x 960 4 3 60 SXGA 1280...

Page 75: ...0 SVGA 800 x 600 4 3 60 72 75 XGA 1024 x 768 4 3 60 70 75 HDTV 720p 1280 x 720 16 9 50 59 94 60 WXGA 1280 x 768 5 3 60 Quad VGA 1280 x 960 4 3 60 SXGA 1280 x 1024 5 4 60 WXGA 1360 x 768 16 9 60 SXGA 1400 x 1050 4 3 60 WXGA 1440 x 900 16 10 60 UXGA 1600 x 1200 4 3 60 WSXGA 1680 x 1050 16 10 60 HDTV 1080i 1920 x 1080 16 9 50 59 94 HDTV 1080p 1920 x 1080 16 9 23 94 25 29 97 50 59 94 60 WUXGA 1920 x 1...

Page 76: ...e 3D Video Compatibility table Input Resolutions HDMI 1 4a 3D Input Input timing 1280 X 720P 50Hz Top and Bottom 1280 X 720P 60Hz Top and Bottom 1280 X 720P 50Hz Frame packing 1280 X 720P 60Hz Frame packing 1920 X 1080i 50 Hz Side by Side Half 1920 X 1080i 60 Hz Side by Side Half 1920 X 1080P 24 Hz Top and Bottom 1920 X 1080P 24 Hz Frame packing Note 3D glasses must be supported to 144Hz ...

Page 77: ...6 Specifications 58 6 4 Projector Dimensions 480 0m m 18 90 400 0 15 75 158 0mm 6 22 163 0mm 6 42 172 0mm 6 77 ...

Page 78: ... 02H 00H 00H 00H 00H 02H POWER OFF 02H 00H 00H 00H 00H 03H INPUT SELECT COMPUTER 02H 03H 00H 00H 02H 01H 01H 09H INPUT SELECT HDMI1 02H 03H 00H 00H 02H 01H A1H A9H INPUT SELECT HDMI2 02H 03H 00H 00H 02H 01H A2H AAH INPUT SELECT HDBaseT 02H 03H 00H 00H 02H 01H BFH C7H PICTURE MUTE ON 02H 10H 00H 00H 00H 12H PICTURE MUTE OFF 02H 11H 00H 00H 00H 13H NOTE Contact you local dealer for a full list of th...

Page 79: ... and labor warranty and InstaCare service program Visit our web site at www necdisplay com click on support center register product and submit your completed form online Upon receipt we will send a confirmation letter with all the details you will need to take advantage of fast reliable warranty and service programs from the industry leader NEC Display Solutions of America Inc ...

Page 80: ......

Reviews: