background image

85

5. Installation and Connections

TIP:

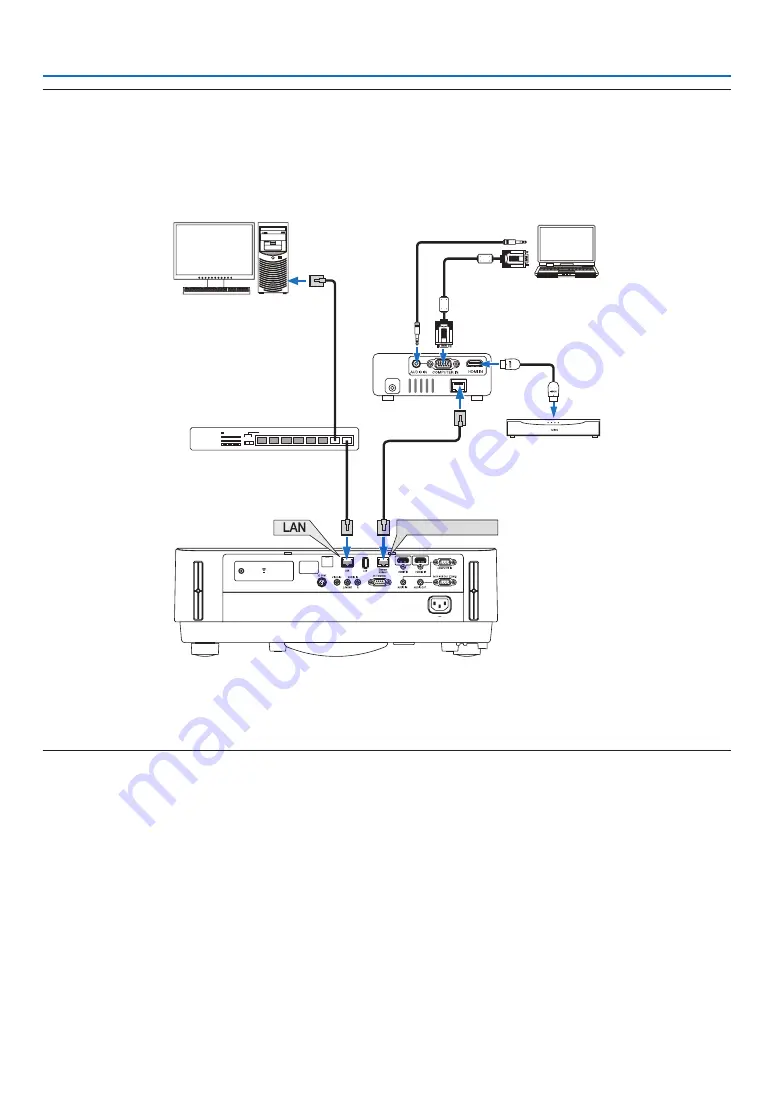
•  With the projector’s Ethernet/HDBaseT port, remote control is not available when the projector is in the standby mode (serial 

communications is not available). (Remote control becomes available when the projector’s power is on). The 2 (two) methods 

below can be used to turn on the projector’s power when it is in standby mode.

1. The projector can be operated by connecting the computer and projector to the network (on the projector, using the LAN port 

and PC Control Utility application with [STANDBY MODE] set to [NETWORK STANDBY] (

 page 

101

).

DC IN

HDBaseT

Ethernet/HDBaseT

Computer (for projector control)

Computer (for output)

Example of a transmitter

Switching hub, etc.

Video device with HDMI output

2. The projector can be operated by RS232C serial communication (On this projector, use the PC CONTROL terminal and the 

application software, PC Control Utility and select [PC CONTROL] for the [SERIAL PORT]) with [STANDBY MODE] set to [NET-

WORK STANDBY].

Summary of Contents for P502HL

Page 1: ...Projector P502HL P502WL User s Manual Model No NP P502HL NP P502WL ...

Page 2: ... Alliance WPA WPA2 Wi Fi Protected Setup Miracast are trademarks of the Wi Fi Alliance Blu ray is a trademark of Blu ray Disc Association CRESTRON and ROOMVIEW are registered trademarks of Crestron Electronics Inc in the United States and other countries Ethernet is either a registered trademark or trademark of Fuji Xerox Co Ltd Google Play and Android are trademarks of Google Inc Other product na...

Page 3: ...Class B digital apparatus complies with Canadian ICES 003 Machine Noise Information Regulation 3 GPSGV The highest sound pressure level is less than 70 dB A in accordance with EN ISO 7779 Disposing of your used product EU wide legislation as implemented in each Member State requires that used electrical and electronic prod ucts carrying the mark left must be disposed of separately from normal hous...

Page 4: ...Reorient or relocate the receiving antenna Increase the separation between the equipment and receiver Connect the equipment into an outlet on a circuit different from that to which the receiver is connected Consult the dealer or an experienced radio TV technician for help For UK only In UK a BS approved power cord with moulded plug has a Black 15 Amps fuse installed for use with this equipment If ...

Page 5: ...s such as paper clips and bits of paper from falling into your projector Do not attempt to retrieve any objects that might fall into your projector Do not insert any metal objects such as a wire or screwdriver into your projector If something should fall into your projector disconnect it immediately and have the object removed by a qualified service personnel Do not place any objects on top of the...

Page 6: ... not connect to the terminal for peripheral device wiring that might have excessive voltage CAUTION Be sure to tighten the screws after attaching the cable cover Failure to do so may cause the cable cover to come off and fall resulting in injury or damage to the cable cover Do not put bundled cables in the cable cover Doing so may damage the power cord resulting in a fire Do not hold the cable cov...

Page 7: ...ition 2014 05 This product is classified as Class 2 of IEC60825 1 Second edition 2007 03 Also complies with FDA performance standards 21 CFR 1040 10 and 1040 11 for laser products except for deviations pursuant to Laser Notice No 50 dated June 24 2007 Obey the laws and regulations of your country in relation to the installation and management of the device Blue laser diodes Wave length 455 nm Outp...

Page 8: ...vi Important Information The labels are stuck on the below indicated position Label 1 Label 2 Label 1 Label 2 ...

Page 9: ... with the following func tions may raise concern about the infringement of copyrights which are protected by copyright law ASPECT RATIO KEYSTONE Magnifying feature and other similar features Turkish RoHS information relevant for Turkish market EEE Yonetmeliğine Uygundur This device is not intended for use in the direct field of view at visual display workplaces To avoid incommoding reflec tions at...

Page 10: ...s viewing 3D images Before viewing be sure to read health care precautions that may be found in the user s manual included with your LCD shutter eyeglasses or your 3D compatible content such as DVDs video games computer s video files and the like To avoid any adverse symptoms heed the following Do not use LCD shutter eyeglasses for viewing any material other than 3D images Allow a distance of 2 m ...

Page 11: ...Connecting Your Computer Connecting the Power Cord 11 Turning on the Projector 12 Note on Startup screen Menu Language Select screen 13 Selecting a Source 14 Selecting the computer or video source 14 Adjusting the Picture Size and Position 16 Adjusting the vertical position of a projected image Lens shift 17 Focus 19 Zoom 19 Adjusting the tilt Tilt foot 20 Correcting Keystone Distortion KEYSTONE 2...

Page 12: ...URE 43 IMAGE OPTIONS 46 Menu Descriptions Functions SETUP 50 GENERAL 50 MENU 53 INSTALLATION 54 OPTIONS 1 58 OPTIONS 2 60 3D 63 Menu Descriptions Functions INFO 65 USAGE TIME 65 SOURCE 1 65 SOURCE 2 65 HDBaseT 65 WIRED LAN 65 WIRELESS LAN 65 VERSION 1 65 VERSION 2 65 OTHERS 65 Menu Descriptions Functions RESET 66 Returning to Factory Default RESET 66 5 Installation and Connections 67 Setting Up th...

Page 13: ...8 Controlling the Projector over a LAN PC Control Utility Pro 4 Pro 5 101 Using the Computer Cable VGA to Operate the Projector Virtual Remote Tool 106 Projecting photos or documents saved on the smartphone over a wireless LAN Wireless Image Utility 112 8 Maintenance 113 Cleaning the Lens 113 Cleaning the Cabinet 114 9 Appendix 115 Troubleshooting 115 Indicator Messages 115 Common Problems Solutio...

Page 14: ...wer cord US 7N080240 7N080243 EU 7N080027 7N080029 Computer cable VGA 7N520089 Lens cap strap For North America only Limited warranty For customers in Europe You will find our current valid Guar antee Policy on our Web Site www nec display solutions com Important Infomation For North America 7N8N6171 For Other countries than North America 7N8N6171 and 7N8N6181 Quick Setup Guide 7N8N6191 7N8N6201 N...

Page 15: ...ion Lens shift mechanism for adjusting the position of the projected image easily The position of the projected image is moved by turning the two dials on the projector cabinet top one for the vertical direction and another for the horizontal direction Videos Wide range of input terminals HDMI 2 HDBaseT etc The projector is equipped with a variety of input terminals HDMI 2 Computer analog Video HD...

Page 16: ...DE for reducing power consumption during use Furthermore the power saving effect when the ECO MODE is set is converted into the amount of reductions of CO2 emissions and this is indicated on the confirmation message displayed when the power is turned off and at INFO on the on screen menu CARBON METER About this user s manual The fastest way to get started is to take your time and do everything rig...

Page 17: ...ote Sensor page 9 Focus Ring page 19 Indicators page 6 Zoom Lever page 19 Lens Monaural Speaker Mounting the lens cap strap 1 Insert the tip of the strap into the lens cap mount hole and pass the knot through Lens cap mount hole 2 Insert the knot into the strap mount hole large on the bottom of the projector then press it into the narrow small hole ...

Page 18: ... pin plug here and plug the other end into an active wall outlet page 11 Exhaust Vent Security chain opening Attach an anti theft device The security chain opening accepts security wires or chains up to 0 18 inch 4 6 mm in diameter Rear Connection for cable cover Left Right Screw holes page 122 This security slot supports the MicroSaver Security System ...

Page 19: ... 24 2 POWER Indicator page 11 12 24 115 3 STATUS Indicator page 115 4 LIGHT Indicator page 115 5 ECO Button page 28 6 SOURCE Button page 14 7 AUTO ADJ Button page 23 8 MENU Button page 37 9 Volume Buttons Keystone Buttons page 13 21 23 37 10 ENTER Button page 37 11 EXIT Button page 37 ...

Page 20: ...page 76 79 8 VIDEO S VIDEO AUDIO IN L MONO R RCA page 76 9 Ethernet HDBaseT Port RJ 45 page 80 84 10 LAN Port RJ 45 page 80 85 11 USB Wireless LAN Port page 83 12 USB Port Type A page 89 13 3D SYNC Terminal Mini DIN 3 Pin page 35 14 PC CONTROL PC CONTROL Port D Sub 9 Pin page 127 Use this port to connect a PC or control system This enables you to control the projector using serial communication pr...

Page 21: ... in this series of projectors 14 APPS Button page 14 88 15 ID SET Button page 56 16 Numeric Keypad Button CLEAR Button page 56 17 FREEZE Button page 26 18 AV MUTE Button page 26 19 MENU Button page 37 20 EXIT Button page 37 21 Button page 37 22 ENTER Button page 37 23 D ZOOM Button page 27 24 MOUSE L CLICK Button This button does not work in this series of projectors 25 MOUSE R CLICK Button This b...

Page 22: ...he batteries polarity aligned correctly Do not use new and old batteries together or use different types of batteries together Dispose of used batteries according to your local regulations The remote control sensor on the back of the projector cannot be used when the separately sold cable cover is mounted on the projector Operating Range for Wireless Remote Control 30 30 30 30 30 30 30 30 23 0 fee...

Page 23: ...tor page 12 Step 3 Selecting a source page 14 Step 4 Adjusting the picture size and position page 16 Correcting keystone distortion KEYSTONE page 21 Step 5 Adjusting a picture and sound Optimizing a computer signal automatically page 23 Turning up or down volume page 23 Step 6 Making a presentation Step 7 Turning off the projector page 24 Step 8 When Moving the Projector page 25 2 Projecting an Im...

Page 24: ...he supplied power cord to the projector First connect the supplied power cord s three pin plug to the AC IN of the projector and then connect the other plug of the supplied power cord in the wall outlet The projector s power indicator will flash for a few seconds and then will light red standby mode This will apply for both indicators when NORMAL is selected for STANDBY MODE See the Power Indicato...

Page 25: ...ctor cabinet or the POWER ON button on the remote control The POWER indicator lights blue and the image is projected on the screen TIP When the message PROJECTOR IS LOCKED ENTER YOUR PASSWORD is displayed it means that the SECURITY feature is turned on page 38 After you turn on your projector ensure that the computer or video source is turned on NOTE When no input signal is present the no signal g...

Page 26: ...ou can select the menu language later LANGUAGE on page 39 and 52 NOTE If one of the following things happens the projector will not turn on If the internal temperature of the projector is too high the projector detects abnormal high temperature In this condition the projector will not turn on to protect the internal system If this happens wait for the projector s internal components to cool down I...

Page 27: ...E button once The projector will search for the avail able input source and display it The input source will change as follows HDMI1 HDMI2 COMPUTER VIDEO HDBaseT APPS With the SOURCE screen displayed you can press the SOURCE button a few times to select the input source TIP If no input signal is present the input will be skipped Using the Remote Control Press any one of the COMPUTER 1 HDMI1 HDMI2 ...

Page 28: ...AULT SOURCE SELECT screen will be displayed page 62 5 Select a source as the default source and press the ENTER button 6 Press the EXIT button a few times to close the menu 7 Restart the projector The source you selected in step 5 will be projected TIP When the projector and computer are connected and the projector is in standby it is possible to turn on the projector s power and project the compu...

Page 29: ...gs and cables are omitted for clarity Adjusting the projected image s vertical and horizontal position Lens shift page 17 Adjusting the focus Focus ring page 19 Finely adjusting the size of an image Zoom lever page 19 Adjusting the projected image s height and horizontal tilt Tilt foot page 20 Correcting the keystone distortion Keystone page 21 To perform keystone correction manually see 6 Correct...

Page 30: ...rizontal dial Turn this clockwise or counterclockwise to adjust the projection position in the horizontal direction Lens shift dial Horizontal Lens shift dial Vertical Downward Leftward Upward Rightward NOTE The dials can be turned more than one full turn but the projection position cannot be moved more than the range indicated on the following page Do not force to turn the dials Doing so may dama...

Page 31: ... ORIENTATION DESKTOP FRONT For the lens shift adjustment range regarding the CEILING FRONT projection see page 71 P502HL 100 V 62 V 100 H 25 H 25 H 25 H 25 H Height of projected image Width of projected image P502WL 100 V 59 V 100 H 28 H 28 H 28 H 28 H Height of projected image Width of projected image Description of symbols V indicates vertical height of the projected image H indicates horizontal...

Page 32: ...19 2 Projecting an Image Basic Operation Focus Use the FOCUS ring to obtain the best focus Focus ring Zoom Turn the zoom lever clockwise and counterclockwise Zoom lever ...

Page 33: ...e 6 Correcting Keystone Distortion KEYSTONE page 21 The tilt feet can be lengthened by a maximum of 20 mm The tilt feet can be used to tilt the projector by a maximum of 4 Up Down Tilt foot NOTE Do not lengthen the tilt feet any more than 20 mm 0 8 Doing so will make the tilt feet s mount section unstable and could cause the tilt feet to come off the projector Do not use the tilt feet for any purp...

Page 34: ...orizontal option of the Keystone menu so that the top and bottom of sides of the projected image are parallel 1 When APPS is not selected as source and the menu is not dis played on press the button on the projector cabinet The Keystone screen will be displayed on the screen Press the KEYSTONE button when using the remote control See page 22 for RESET 2 Press the button to select VERTICAL and then...

Page 35: ... Keystone screen will disappear To perform Keystone correction again press the button to display the Keystone screen and repeat above steps 1 to 6 To return the keystone adjustments to default 1 Press the button to select RESET and press the ENTER button 2 Press the or button to select YES and press the ENTER button The adjustments will be reset When resetting the HORIZONTAL and VERTICAL adjustmen...

Page 36: ...If the Auto Adjust operation cannot optimize the computer signal try to adjust HORIZONTAL VERTICAL CLOCK and PHASE manually page 46 47 Turning Up or Down Volume Sound level from the speaker or audio output can be adjusted TIP When no menus appear the and buttons on the projector cabinet work as a volume control NOTE Volume control is not available with the or button when an image is magni fied by ...

Page 37: ...tor will light red and the STATUS indicator will turn off when NORMAL is selected for STANDBY MODE Power On Steady blue light Standby Steady red light 3 Mount the lens cap Insert the cap s 2 two hooks into the grooves of the projec tor then press at the bottom of the lens cap The stopper is secured to the projector Hook Stopper CAUTION Parts of the projector may become temporarily heated if the pr...

Page 38: ...ng the Projector Preparation Make sure that the projector is turned off 1 If the separately sold cable cover is mounted remove it page 122 2 Unplug the power cord 3 Disconnect any other cables Remove the USB memory if it is inserted into the projector ...

Page 39: ...sound NOTE Even though the image is turned off the menu still remains on the screen Freezing a Picture Press the FREEZE button If the image of a DVD player etc is be ing projected the video switches to a still image Press the FREEZE button again to resume the video NOTE The image is frozen but the original video is still playing back 3 Convenient Features ...

Page 40: ...so 1 Press the D ZOOM button to magnify the picture To move the magnified image use the or button 2 Press the button The area of the magnified image will be moved 3 Press the D ZOOM button Each time the D ZOOM button is pressed the image is reduced NOTE The image will be magnified or demagnified at the center of the screen Displaying the menu will cancel the current magnification ...

Page 41: ...tor switches to the selected mode When in the ECO MODE the LIGHT indicator lights green NOTE The ECO MODE can be changed by using the menu Select SETUP GENERAL LIGHT MODE ECO MODE The LIGHT HOURS USED can be checked in USAGE TIME Select INFO USAGE TIME After a lapse of 1 minute from when the projector displays no signal guidance a blue black or logo screen the projector goes into ECO2 automaticall...

Page 42: ...after the time of power on and the time of power off The CARBON SAVINGS SESSION message will be displayed in the POWER OFF ARE YOU SURE message at the time of power off TIP The formula as shown below is used to calculate the amount of CO2 emission reduction Amount of CO2 emission reduction Power consumption in OFF for ECO MODE Power consumption in ECO1 ECO2 for ECO MODE CO2 conversion factor When ...

Page 43: ... menu To enable the Security function 1 Press the MENU button The menu will be displayed 2 Press the button twice to select SETUP and press the button or the ENTER button to select GEN ERAL 3 Press the button to select INSTALLATION 4 Press the button three times to select SECURITY and press the ENTER button The OFF ON menu will be displayed 5 Press the button to select ON and press the ENTER butto...

Page 44: ...n enabled To turn on the projector when SECURITY is enabled 1 Press the POWER button The projector will be turned on and display a message to the effect that the projector is locked 2 Press the MENU button 3 Type in the correct keyword and press the ENTER button The projector will display an image NOTE The security disable mode is maintained until the main power is turned off or unplugging the pow...

Page 45: ... button The SECURITY KEYWORD screen will be displayed 4 Type in your keyword and press the ENTER button When the correct keyword is entered the SECURITY function will be disabled NOTE If you forget your keyword contact your dealer Your dealer will provide you with your keyword in exchange for your request code Your request code is displayed in the Keyword Confirmation screen In this example K992 4...

Page 46: ...such as nausea dizziness queasiness headache eyestrain blurry vision convulsions and numbness stop viewing them If symptoms still persist consult a doctor View 3D images from the front of the screen Viewing from an angle may cause fatigue or eyestrain LCD shutter eyeglasses recommended Use commercially available DLP Link or other method compatible LCD shutter eyeglasses Steps for viewing 3D images...

Page 47: ...e screen appears by factory default For details see page 53 7 Press either or button to select 3D and press the ENTER button The setting screen for 3D mode will be displayed on 8 Press the button to select ON and press the ENTER button The selected signal will be changed in 3D mode Selecting input connected to a source of 3D images HDMI1 HDMI2 COMPUTER VIDEO HDBaseT This function switches the 3D m...

Page 48: ... 3D compatible Signals other than those listed in Compatible Input Signal List on page 126 will be out of range or will be displayed in 2D Using a 3D emitter This projector can be used to watch videos in 3D using commercially available active shutter type 3D eyewear In order to synchronize the 3D video and eyewear a commercially available 3D emitter needs to be connected to the projector on the pr...

Page 49: ...asses ran down Recharge the battery or replace it The correct eyeglass method is not selected Change the eyeglass method for 3D by using the menu page 63 The viewing distance between the viewer and the screen is too far Move closer to the screen until the viewer gets 3D images Or use the projector s menu to select NON INVERT for L R INVERT There are bright light sources or other projectors near th...

Page 50: ...projector cabinet to select the item you want to adjust or set You can use the buttons on the remote control or the projector cabinet to select the tab you want 5 Press the ENTER button on the remote control or the projector cabinet to display the submenu window 6 Adjust the level or turn the selected item on or off by using the buttons on the remote control or the projector cabinet Changes are st...

Page 51: ...is round button to select an option in a dialog box Source Indicates the currently selected source Off Timer remaining time Indicates the remaining countdown time when the OFF TIMER is preset Slide bar Indicates settings or the direction of adjustment ECO mode symbol Indicates ECO MODE is set Key Lock symbol Indicates the CONTROL PANEL LOCK is enabled Thermometer symbol Indicates the projector is ...

Page 52: ...0 ASPECT RATIO AUTO 4 3 16 9 15 9 16 10 LETTERBOX NATIVE NOISE REDUCTION OFF OFF LOW MEDIMU HIGH SETUP GENERAL KEYSTONE B HORIZONTAL 0 VERTICAL 0 RESET WALL COLOR B OFF OFF WHITEBOARD BLACKBOARD BLACKBOARD GRAY LIGHT YELLOW LIGHT BLUE LIGHT ROSE LIGHT MODE B ECO MODE OFF OFF ECO1 ECO2 ADJUST 100 16 100 CONSTANT BRIGHTNESS OFF OFF ON CLOSED CAPTION OFF OFF CAPTION1 CAPTION2 CAPTION3 CAPTION4 TEXT1 ...

Page 53: ...MI1 COMPUTER HDMI2 HDMI2 HDMI2 COMPUTER HDBaseT HDBaseT HDBaseT COMPUTER BEEP ON OFF ON OPTIONS 2 STANDBY MODE NORMAL NORMAL NETWORK STANDBY DIRECT POWER ON OFF OFF ON AUTO POWER ON OFF OFF ON AUTO POWER OFF 1 00 OFF 0 05 0 10 0 20 0 30 1 00 DEFAULT SOURCE SELECT LAST LAST AUTO HDMI1 HDMI2 COMPUTER VIDEO HDBaseT APPS 3D HDMI1 3D OFF OFF ON GLASSES DLP Link DLP Link OTHERS FORMAT AUTO AUTO FRAME PA...

Page 54: ...AULT 3D SIGNAL SUPPORTED NOT SUPPORTED HDBaseT SIGNAL QUALITY NORMAL WARNING ABNORMAL OPERATION MODE HDBaseT ETHERNET LOW POWER DISCONNECT LINK STATUS NO LINK HDBaseT LOW POWER ETHERNET HDMI STATUS NO HDMI HDMI ON HDCP ON WIRED LAN IP ADDRESS SUBNET MASK GATEWAY MAC ADDRESS WIRELESS LAN IP ADDRESS SUBNET MASK GATEWAY MAC ADDRESS SSID NETWORK TYPE SECURITY CHANNEL SIGNAL LEVEL VERSION 1 B FIRMWARE ...

Page 55: ...nnected to your COMPUTER input terminal signal NOTE When the component input signal is connected to the COMPUTER IN terminal select COMPUTER VIDEO Selects what is connected to your VIDEO input VCR DVD player or document camera HDBaseT Projects the signal transmitted from the terminals supported HDBaseT page 80 81 APPS Display the APPS MENU or the function in the APPS MENU that was used last time ...

Page 56: ...e in a brightly lit room PRESENTATION Recommended for making a presentation using a PowerPoint file VIDEO Recommended for typical TV program viewing MOVIE Recommended for movies GRAPHIC Recommended for graphics sRGB Standard color values DICOM SIM Recommended for DICOM simulation format NOTE The DICOM SIM option is for training reference only and should not be used for actual diagnosis DICOM stand...

Page 57: ...unction will perform gamma correction appropriate for the screen size LARGE For screen size of 110 MEDIUM For screen size of 90 SMALL For screen size of 70 NOTE This function is available only when DICOM SIM is selected for DETAIL SETTINGS Adjusting Color Temperature COLOR TEMPERATURE This option allows you to select the color temperature of your choice NOTE When PRESENTATION or HIGH BRIGHT is sel...

Page 58: ...ference Input signal CONTRAST BRIGHTNESS SHARPNESS COLOR HUE COMPUTER HDMI HDBaseT RGB Yes Yes Yes No No COMPUTER HDMI HDBaseT COMPONENT Yes Yes Yes Yes Yes VIDEO Yes Yes Yes Yes Yes APPS LAN Yes Yes Yes No No Yes Adjustable No Not adjustable RESET The settings and adjustments for PICTURE will be returned to the factory settings with the exception of the following Preset numbers and REFERENCE with...

Page 59: ...nding that might appear This function adjusts the clock frequencies that eliminate the horizontal banding in the image This adjustment may be necessary when you connect your computer for the first time PHASE Use this item to adjust the clock phase or to reduce video noise dot interference or cross talk This is evident when part of your image appears to be shimmering Use PHASE only after the CLOCK ...

Page 60: ...esolution horizontal and vertical frequency its adjustments will be called up and applied To delete adjustments stored in memory from the menu you select RESET CURRENT SIGNAL or ALL DATA and reset the adjustments Selecting Overscan Percentage OVERSCAN This allows you to set the appropriate overscan for an incoming signal AUTO Display an appropriately overscanned image factory setting OFF Does not ...

Page 61: ...t ratio depending on its signal If this occurs select the appropriate aspect ratio from the following 4 3 The image is displayed in 4 3 aspect ratio 16 9 The image is displayed in 16 9 aspect ratio 15 9 The image is displayed in 15 9 aspect ratio 16 10 The image is displayed in 16 10 aspect ratio LETTERBOX The image of a letterbox signal is stretched equally in the horizontal and vertical direc ti...

Page 62: ...when compared to a 4 3 image which is the standard aspect ratio for a video source The letterbox signal has aspect ratios with the vista size 1 85 1 or cinema scope size 2 35 1 for movie film The term squeeze refers to the compressed image of which aspect ratio is converted from 16 9 to 4 3 Turning on Noise Reduction NOISE REDUCTION This function allows you to select the level of noise reduction T...

Page 63: ...t the first item Adjustment values will be overwritten They will not be deleted even when the projector is turned off Using KEYSTONE correction can cause the image to be slightly blurred because the correction is made electronically HORIZONTAL Corrects horizontal keystone distortion page 21 VERTICAL Corrects vertical keystone distortion page 21 RESET Returns all the above items to the factory pres...

Page 64: ...TNESS mode is set to OFF ECO2 ADJUST Brightness can be adjusted in 1 increments from 16 to 100 When several projectors are used for multi screen projection the brightness can be ad justed individually on each projector The adjustment is valid when ECO MODE is set to OFF and CONSTANT BRIGHT NESS is set to OFF CONSTANT BRIGHTNESS OFF CONSTANT BRIGHTNESS mode will be canceled ON Maintains 50 brightne...

Page 65: ...nal extended characters for closed captioning Using Off Timer OFF TIMER 1 Select your desired time between 30 minutes and 16 hours OFF 0 30 1 00 2 00 4 00 8 00 12 00 16 00 2 Press the ENTER button on the remote control 3 The remaining time starts counting down 4 The projector will turn off after the countdown is complete NOTE To cancel the preset time set OFF for the preset time or turn off the po...

Page 66: ...5 SEC The AUTO 45 SEC is the fac tory preset Selecting a Color or Logo for Background BACKGROUND Use this feature to display a blue black screen or logo when no signal is available The default background is BLUE NOTE If the LOGO item is selected for BACKGROUND with the HDBaseT source selected the BLUE item will be selected regard less of its selection When SOURCE DISPLAY is turned on the no signal...

Page 67: ...et Buttons CONTROL PANEL LOCK This option turns on or off the CONTROL PANEL LOCK function NOTE This CONTROL PANEL LOCK does not affect the remote control functions How to release the CONTROL PANEL LOCK 1 When the projector is projecting image or in the sleep mode press and hold the SOURCE button on the projector cabinet for about 10 seconds The CONTROL PANEL LOCK will be released 2 When the projec...

Page 68: ... When HDBaseT is set it will not work when the projector is in the standby mode regardless of whether STANDBY MODE page 60 is set to NORMAL or NETWORK STANDBY the power cannot be turned on The methods below can be used to turn on the projector s power when it is in the standby mode The projector can be operated by connecting the computer and projector by RS232C serial communications on the project...

Page 69: ...l display the menu for canceling the Control ID Assigning or Changing the Control ID 1 Turn on the projector 2 Press the ID SET button on the remote control The CONTROL ID screen will be displayed If the projector can be operated with the current remote control ID the ACTIVE will be displayed If the projector cannot be operated with the current remote control ID the INACTIVE will be displayed To o...

Page 70: ...elected the pattern for adjustment will be displayed on If you find distortion on the pattern adjust the projector installation angle or correct distortion by pressing the KEYSTONE button on the remote If the focus adjustment is required control the focus lever Press EXIT button to close the test pattern and return to the menu Setting the network NETWORK SETTINGS This function display the network ...

Page 71: ...ithout setting to HIGH can cause the projector to overheat and the protector could shut down If this happens wait a couple minutes and turn on the projector Using the projector at altitudes approximately 5500 feet 1700 meters or higher can shorten the life of optical components such as the light module Your setting will not be affected even when RESET is done from the menu Enabling or Disabling WX...

Page 72: ...LECT Make the settings for each audio level when connecting HDMI equipment and Ethernet HDBaseT terminal Select between each equipment and computer HDMI1 HDMI2 Select HDMI1 or HDMI2 to switch the HDMI 1 IN or HDMI 2 IN digital audio signal or select COMPUTER to switch the COMPUTER input audio signal HDBaseT Select HDBaseT or COMPUTER to switch the source connected to the network Enabling Key Sound...

Page 73: ...isabled and the projector will go into the SLEEP mode Sleep mode refers the mode without functional restrictions by the STANDBY MODE Power consumption in the SLEEP mode is relatively higher than the NETWORK STANDBY mode The Status indicator turns on in Green When STANDBY MODE NETWORK STANDBY is selected When NETWORK SERVICE AMX SETTINGS ENABLE is selected When NETWORK SERVICE CRESTRON SETTINGS CRE...

Page 74: ...f the projector wait 5 seconds and input a computer or HDMI signal If a computer or HDMI signal is still present when the projector is turned off the AUTO POWER ON will not work and the projector remains in standby mode Enabling Power Management AUTO POWER OFF The projector has power management functions To reduce power consumption the power management functions 1 and 2 are factory preset as shown...

Page 75: ...MI1 Displays the digital source from the HDMI 1 IN terminal every time the projector is turned on HDMI2 Displays the digital source from the HDMI 2 IN terminal every time the projector is turned on COMPUTER Displays the computer signal from the COMPUTER IN terminal every time the projector is turned on VIDEO Displays the Video source from the VIDEO IN terminal every time the projector is turned on...

Page 76: ...ssible to synchronize depend ing on the glasses This function will not work for VIDEO source FORMAT Sets 3D format AUTO Automatically selects the appropriate format The supported format is HDMI 3D only FRAME PACKING Selects this format for the FRAME PACKING 3D image FRAM PACKING is a format that stores the left and right eye images without compression SIDE BY SIDE Selects this format for the SIDE ...

Page 77: ...difficulty seeing 3D images NON INVERT Normal setting INVERT Changes the order of displaying the images for left eye and right eye NOTE When L R INVERT cannot be operated the L R INVERT screen will not be displayed even when the remote control s video button is pressed ...

Page 78: ...factor in the carbon saving cal culation is based on the OECD 2008 Edition page 29 SOURCE 1 RESOLUTION HORIZONTAL FREQUENCY VERTICAL FREQUENCY SYNC TYPE SYNC POLARITY SCAN TYPE SOURCE 2 SIGNAL TYPE VIDEO TYPE BIT DEPTH VIDEO LEVEL 3D SIGNAL HDBaseT SIGNAL QUALITY OPERATION MODE LINK STATUS HDMI STATUS WIRED LAN IP ADDRESS SUBNET MASK GATEWAY MAC ADDRESS WIRELESS LAN IP ADDRESS SUBNET MASK GATEWAY ...

Page 79: ... can be reset are PRESET CONTRAST BRIGHTNESS COLOR HUE SHARPNESS AS PECT RATIO HORIZONTAL VERTICAL CLOCK PHASE and OVERSCAN ALL DATA Reset all the adjustments and settings for all the signals to the factory preset All items can be reset EXCEPT LANGUAGE BACKGROUND ORIENTATION SERIAL PORT SECURITY COMMUNICATION SPEED CONTROL ID STANDBY MODE FAN MODE LIGHT HOURS USED TOTAL CARBON SAVINGS PROJECTOR NA...

Page 80: ... to telescopic When zoom lever turned to telescopic Screen center line telescopic When zoom lever turned to wide Projector lens center Screen center line wide m m The figures indicated for height of screen from projector lens center on the projection distance table are for a lens shift of 62 V Reading the Table From the upper table on this page to project wide images on a 150 screen install at abo...

Page 81: ...de m m The figures indicated for height of screen from projector lens center on the projection distance table are for a lens shift of 59 V Reading the Table From the upper table on this page to project wide images on a 150 screen install at about 4 1 m from the front Also from the lower table we can see that about 2 1 m are required from the projector s lens center to the upper edge of the screen ...

Page 82: ...0 110 7 62 3 60 132 8 74 7 80 177 1 99 6 100 221 4 124 5 120 265 7 149 4 150 332 1 186 8 200 442 8 249 1 250 553 4 311 3 300 664 1 373 6 P502WL Screen height Screen width Screen size diagonal Size inches Screen width Screen height cm cm 30 64 6 40 4 40 86 2 53 8 50 107 7 67 3 60 129 2 80 8 80 172 3 107 7 100 215 4 134 6 120 258 5 161 5 150 323 1 201 9 200 430 8 269 2 250 538 5 336 5 300 646 2 403 ...

Page 83: ...8 7 4 3 40 1 07 1 86 24 9 5 8 50 1 34 2 34 31 1 7 2 60 1 62 2 81 37 4 8 7 80 2 17 3 76 49 8 11 6 100 2 72 4 71 62 3 14 5 120 3 28 5 66 74 7 17 4 150 4 11 7 08 93 4 21 7 200 5 49 9 45 124 5 28 9 250 6 87 11 82 155 7 36 2 300 8 25 14 19 186 8 43 4 P502WL Screen surface Lower edge of screen with 59 0 V Measurement H Measurement H Lower edge of screen with 0 V Lens center Approximately 92 to 97 mm Pro...

Page 84: ...nd V Vertical refers to the screen height and H Horizontal refers to the screen width The lens shift range is expressed as a ratio of height and width respectively P502HL Lens shifting range Vertical direction 62 0 Horizontal direction 25 100 V 62 V 100 H 25 H 25 H 25 H 25 H Height of projected image Width of projected image P502WL Lens shifting range Vertical direction 59 0 Horizontal direction 2...

Page 85: ...the calculation is approximate WARNING Installing your projector on the ceiling must be done by a qualified technician Contact your NEC dealer for more information Do not attempt to install the projector yourself Only use your projector on a solid level surface If the projector falls to the ground you can be injured and the projector severely damaged Do not use the projector where temperatures var...

Page 86: ... mini D Sub 15 pin terminal on the projector It is recommended that you use a commercial ly available distribution amplifier if connecting a signal cable longer than the cable supplied NOTE For Mac use a commercially available pin adapter not supplied to connect to your Mac s video port Stereo mini plug audio cable not supplied HDMI cable not supplied Use High Speed HDMI Cable Select the source na...

Page 87: ... a DVI signal When the computer has a DVI output terminal use a commercially available converter cable to connect the computer to the projector s HDMI 1 IN or HDMI 2 IN terminal only digital video signals can be input HDMI 1 IN HDMI 2 IN AUDIO IN NOTE When Viewing a DVI Digital Signal Turn off the power of the computer and projector before connecting When a video deck is connected via a scan conve...

Page 88: ...the condition of projector standby when NETWORK STANDBY is set in the Standby mode output from the MONITOR OUT COMP or AUDIO OUT terminal will be stopped In this case pull out the computer cable and set it back after inputting video signal Monitor out and sleep mode The MONITOR OUT COMP terminal will not work when NORMAL is selected for STANDBY MODE The MONITOR OUT COMP terminal will work only in ...

Page 89: ...he source name for its appropriate input terminal after turning on the projector Input terminal SOURCE button on the projector cabinet Button on the remote control VIDEO IN VIDEO VIDEO NOTE Refer to your VCR owner s manual for more information about your equipment s video output requirements NOTE An image may not be displayed correctly when a Video source is played back in fast forward or fast rew...

Page 90: ...ponents COMPUTER IN AUDIO IN 15 pin to RCA female 3 cable adapter ADP CV1E Stereo mini plug to RCA audio cable not supplied Component video RCA 3 cable not supplied Audio cable not supplied DVD player Audio Equipment Select the source name for its appropriate input terminal after turning on the projector Input terminal SOURCE button on the projector cabinet Button on the remote control COMPUTER IN...

Page 91: ...te input terminal after turning on the projector Input terminal SOURCE button on the projector cabinet Button on the remote control HDMI 1 IN HDMI1 HDMI1 HDMI 2 IN HDMI2 HDMI2 When connecting the HDMI 1 IN terminal or HDMI 2 IN terminal of the projector to the DVD player the projec tor s video level can be made settings in accordance with the DVD player s video level In the menu select HDMI SETTIN...

Page 92: ...ion of terminals are vary depending on camera model Please check user s manual of your camera for details Computer cable VGA supplied Video cable not supplied Select the source name for its appropriate input terminal after turning on the projector Input terminal SOURCE button on the projector cabinet Button on the remote control COMPUTER IN COMPUTER COMPUTER 1 VIDEO IN VIDEO VIDEO ...

Page 93: ...ection Ethernet HDBaseT Server Hub LAN cable not supplied NOTE Use a Category 5 or higher LAN cable NOTE About the projector s Ethernet HDBaseT and LAN ports The Ethernet HDBaseT and LAN ports are the same aside from the HDBaseT function To connect to the LAN use only 1 of the ports it is not possible to connect both ports to the LAN For controlling the projector by a HDBaseT transmitter whose con...

Page 94: ... is inserted in the reverse direction with excessive force applied the USB port may break Before touching the USB Wireless LAN Unit touch a metallic object such as a door knob or aluminum window frame to discharge the static electricity from your body Always insert or remove the USB Wireless LAN unit when the main power is turned off Failure to do so may cause projector malfunction or damage to th...

Page 95: ... the unit in NOTE Do not force to insert the USB Wireless LAN Unit 4 Mount the wireless LAN cover 1 Insert the hook on the back of the cover into the groove in the projector and close the wireless LAN cover Groove Hook 2 Turn the screw clockwise to tighten it To remove the USB Wireless LAN Unit disconnect the power cord and use the above procedure NOTE Do not press the button on the USB Wireless L...

Page 96: ...required to set the Wireless LAN settings on the projector menu Select SETUP INSTALLATION NETWORK SETTINGS page 57 The network settings can also be selected from the APPS menu PC with wireless LAN card inserted PC with built in wireless LAN function Wired LAN Wireless access point USB Wireless LAN Unit ...

Page 97: ...are only supported when the projector s power is turned on Connection example Ethernet HDBaseT Computer for control use Computer for output use Example of a transmission device Remote control HDMI output video device NOTE Please use a shielded twisted pair STP cable of Category 5e or higher for the LAN cable sold commercially The maximum transmission distance over the LAN cable is 100 m Please do ...

Page 98: ...operated by connecting the computer and projector to the network on the projector using the LAN port and PC Control Utility application with STANDBY MODE set to NETWORK STANDBY page 101 DC IN HDBaseT Ethernet HDBaseT Computer for projector control Computer for output Example of a transmitter Switching hub etc Video device with HDMI output 2 The projector can be operated by RS232C serial communicat...

Page 99: ...ease do not install the projector in a vertical orientation on top of the floor or table on its own The intake vent may be obstructed resulting in the projector getting warm and the possibility of fire and malfunction occurring For vertical installation install the projector with the intake vent facing downwards A stand for supporting the projector needs to be made for this purpose In this case th...

Page 100: ...bottom face of the projector to secure it to the stand Screw hole center dimension 200 250 mm Screw hole dimension on the projector M4 with a maximum depth of 8 mm Please design the stand such that the rear legs on the bottom face of the projector do not contact the stand The front legs can be turned and removed 3 Horizontal adjustment mechanism for example bolts and nuts in four locations 4 Pleas...

Page 101: ...of your projector http www nec display com dl en pj_manual lineup html APPS MENU screen display Current date and time Important Before utilizing the func tion of APPS MENU set day and time IMAGE EXPRESS UTIL ITY Miracast NETWORK INFORMA TION REMOTE DESKTOP CONNECTION VIEWER FOCUS Indicating the selected item Surrounded in a yellow square Wireless LAN profile selection NETWORK SETTINGS TOOLS WEB SH...

Page 102: ...connected with the projector in the network it enables to transfer images saved on each terminal to the projector and to project them You can connect terminal units in multiple OS Windows OS X Android and iOS with the projector simultaneously The projector receives images transferred from multiple terminal units Max 50 units and projects them on the screen dividing it Max 4 4 at the same time B A ...

Page 103: ...y Lite for utilizing this function PROJECTOR CONTROL It enables to control the projector on the web browser screens on the computers HOW TO ACCESS THE WEB SERVER Connect the projector and computers in a network and access the URL in below by the web browser of the computers URL http IP address of the projector NETWORK SETTINGS Set up below for connecting the projector with a wired wireless LAN PRO...

Page 104: ...formed DATE AND TIME Determine time zone and summer time of your area and set up current date and time ADMINISTRATOR MODE Selecting the menu mode of the projector enable disable to save all set up values of the projector and set up a password for the administrator mode DEFAULT APP When a terminal other than the APPS terminal is selected and you switch to the APPS terminal the function se lected as...

Page 105: ... program Features Virtual Remote Tool Windows only This is a software program used to control the power ON OFF and source selec tion of the projector from your computer by using the supplied computer cable VGA and others page 106 Only via serial connection it is also used to send an image to the projector and register it as the logo data of the projector After registering it you can lock the logo ...

Page 106: ...nect the projector to a LAN Step 3 Start Image Express Utility Lite TIP Image Express Utility Lite for Windows can be started from most commercially available removable media such as USB memory devices or SD cards without the need to install on your computer page 96 What You can Do with Image Express Utility Lite Image transmission for Windows and OS X The screen of your computer can be sent to th...

Page 107: ... 7 1 Click start on Windows 2 Click All Programs Accessories Run 3 Type your CD ROM drive name example Q and LAUNCHER EXE in Name example Q LAUNCH ER EXE 4 Click OK The menu window will be displayed 2 Click Installing Image Express Utility Lite on the menu window The installation will start END USER LICENSE AGREEMENT screen will be displayed Read END USER LICENSE AGREEMENT carefully 3 If you agree...

Page 108: ...hen click Connect When one or more projectors are displayed from the menu on the projector select INFO WIRELESS LAN IP ADDRESS When connected to the projector the Image Express Utility Lite control window appears at the top of the screen The computer can be controlled by operating the control window 4 Operate the control window 1 2 3 4 5 6 1 Source Selects an input source of the projector 2 Pictur...

Page 109: ... Express Utility Lite can be started from commercially available removable media such USB memory or SD cards if it is copied beforehand This will eliminate the trouble of installing Image Express Utility Lite to your computer 1 Copy Image Express Utility Lite to removable media Copy all the folders and files total size approx 7 MB from the IEU_Lite removable media folder in the supplied NEC Projec...

Page 110: ...Lite folder 3 Double click the Image Express Utility Lite icon When Image Express Utility Lite for Mac starts the select window for destination will be displayed At the first time of startup END USER LICENSE AGREEMENT screen will be displayed before the select window for destination is displayed Read END USER LICENSE AGREEMENT and select I accept the terms in the license agreement and click OK 4 S...

Page 111: ... by using a combination of transformational rules prepared in advance This section will show an example for use with 4 point Correction For information about Multi point Correction and Parameters Correction see the help file of Image Express Utility Lite page 96 97 Your correction data can be stored in the projector or your computer which can be restored when necessary The GCT function is availabl...

Page 112: ...tion window will be displayed 8 Click the Start Correction button and then Start 4 point Correction button A green frame and a mouse pointer will be displayed Four marks will be appeared at four corners of the green frame 9 Use the mouse to click the mark of which corner you wish to move The currently selected mark will turn red In the above example Windows screens are omitted for clarification ...

Page 113: ...sappear from the projected image area This will complete the correction 13 Click the X close button on the 4 point Correction window The 4 point Correction window will disappear and the 4 point correction will take effect 14 Click the button on the control window to exit the GCT TIP After performing the 4 point correction you can save the 4 point correction data to the projector by clicking File E...

Page 114: ...trol Utility Pro 4 Pro 5 page 103 105 Step 1 Install PC Control Utility Pro 4 Pro 5 on the computer Step 2 Connect the projector to a LAN Step 3 Start PC Control Utility Pro 4 Pro 5 To run PC Control Utility Pro 4 on Windows 8 1 Windows 8 and Windows XP Microsoft NET Framework Version 2 0 is required The Microsoft NET Framework Version 2 0 3 0 or 3 5 is available from Microsoft s web page Download...

Page 115: ...tion is complete the Welcome window will be displayed 3 Click Next END USER LICENSE AGREEMENT screen will be displayed Read END USER LICENSE AGREEMENT carefully 4 If you agree click I accept the terms in the license agreement and then click Next Follow the instructions on the installer screens to complete the installation When the installation is complete you will return to the menu window TIP Uni...

Page 116: ...d disable its standby sleep mode before running the scheduler Example For Windows 7 Select Control Panel System and Security Power Options Change when the computer sleeps Put the computer to sleep Never NOTE When NORMAL is selected for STANDBY MODE from the menu the projector cannot be turned on via the network wired LAN wireless LAN connection TIP Viewing the Help of PC Control Utility Pro 4 Disp...

Page 117: ...staller screens to complete the installation Step 2 Connect the projector to a LAN Connect the projector to the LAN by following the instructions in Connecting to a Wired LAN page 80 and Con necting to a Wireless LAN Optional NP05LM series page 81 Step 3 Start PC Control Utility Pro 5 1 Open your Applications folder in OS X 2 Click the PC Control Utility Pro 5 folder 3 Click the PC Control Utility...

Page 118: ...er name Application Data NEC Projector User Supportware PC Control Utility Pro 5 Viewing the Help of PC Control Utility Pro 5 Displaying the Help file of PC Control Utility Pro 5 while it is running From the menu bar click Help Help in this order The Help screen will be displayed Displaying the Help using the Dock 1 Open Application folder in OS X 2 Click the PC Control Utility Pro 5 folder 3 Clic...

Page 119: ...he logo to prevent it from changing Control Functions Power On Off signal selection picture freeze picture mute audio mute Logo transfer to the projector and remote control operation on your PC Virtual Remote screen Toolbar This section provides an outline of preparation for use of Virtual Remote Tool For information on how to use Virtual Remote Tool see Help of Virtual Remote Tool page 111 Step 1...

Page 120: ...ts or less P502WL Horizontal 1280 vertical 800 dots or less To put the default NEC logo back in the background logo you need to register it as the background logo by using the image file P502HL Logo NEC_logo2012_1920x1080 bmp P502WL Logo NEC_logo2011_1280x800 bmp inclulded on the supplied NEC Projector CD ROM TIP The projector s COMPUTER IN terminal supports DDC CI Display Data Channel Command Int...

Page 121: ...w will be displayed 3 Click Next END USER LICENSE AGREEMENT screen will be displayed Read END USER LICENSE AGREEMENT carefully 4 If you agree click I accept the terms in the license agreement and then click Next Follow the instructions on the installer screens to complete the installation When the installation is complete you will return to the menu window ...

Page 122: ...Select Virtual Remote Tool and click it 4 Click Uninstall Change or Uninstall When the User Account Control windows is displayed click Continue Follow the instructions on the screens to complete the uninstallation Step 2 Connect the projector to the computer 1 Use the supplied computer cable VGA to connect the COMPUTER IN terminal of the projector directly with the monitor output terminal of the c...

Page 123: ...sy Setup window will be displayed Follow the instructions on the screens When Easy Setup is completed the Virtual Remote Tool screen will be displayed NOTE When NORMAL is selected for STANDBY MODE from the menu the projector cannot be turned on via the computer cable VGA or network wired LAN wireless LAN connection TIP The Virtual Remote Tool screen or Toolbar can be displayed without displaying E...

Page 124: ...ol Displaying the help file using the taskbar 1 Click the Virtual Remote Tool icon on the taskbar when Virtual Remote Tool is running The pop up menu will be displayed 2 Click Help The Help screen will be displayed Displaying the help file using the Start Menu 1 Click Start All programs or Programs NEC Projector User Supportware Virtual Remote Tool and then Virtual Remote Tool Help in this order T...

Page 125: ...documents saved on terminals as a smartphone or a tablet to the projector via the wireless LAN and project them There are two kinds of Wireless Image Utility software one for Android and another for iOS that can be downloaded from Google Play or App Store For Android http www nec display com dl en pj_android wiu_for android html For iOS http www nec display com dl en pj_ios wiu_for ios html ...

Page 126: ...y available plastic lens cleaner Do not scratch or mar the lens surface as a plastic lens is easily scratched Never use alcohol or glass lens cleaner as doing so will cause damage to the plastic lens surface WARNING Do not use a spray containing flammable gas to remove dust attached to the lens etc Doing so may result in fire ...

Page 127: ... the cabinet Vacuum the dust off the ventilation slits or the speaker Poor ventilation caused by dust accumulation in ventilation openings can result in overheating and malfunction These areas should be cleaned regularly Do not scratch or hit the cabinet with your fingers or any hard objects Contact your dealer for cleaning the inside of the projector NOTE Do not apply volatile agent such as insec...

Page 128: ...cle 0 5 sec On 0 5 sec Off Power error Power unit is not working properly Contact your dealer 4 cycle 0 5 sec On 0 5 sec Off Fan error Fans will not work correctly 6 cycle 0 5 sec On 0 5 sec Off Light source error Ask your dealer or service personnel for repair Orange 1 cycle 0 5 sec On 2 5 sec Off Network conflict Both the built in wired LAN and the wireless LAN cannot be connected to the same ne...

Page 129: ... indicator will start to blink 2 cycle On and OFF Should this happen do the following Unplug the power cord after the cooling fans stop Move the projector to a cooler location if the room where you are presenting is particularly too warm Clean the vents if they are clogged with dust Wait about 60 minutes until the inside of the projector becomes cool enough ...

Page 130: ...er For reinstalling or updating your driver refer to the user guide accompanied with your computer or graphics card or contact the support center for your computer manufacturer Install the updated driver or OS on your own responsibility We are not liable for any trouble and failure caused by this installation Signals may not be supported depending on the HDBaseT transmission device IR and RS232C c...

Page 131: ...h one of the 12 function keys gets the external display to come on or off For example NEC laptops use Fn F3 while Dell laptops use Fn F8 key combinations to toggle through external display selections Non standard signal output from the computer If the output signal from a notebook PC is not an industry standard the projected image may not be displayed correctly Should this happen deactivate the no...

Page 132: ...uto image adjustment picture maginification mut ing video power on standby on screen display selection etc Max display resolution horizontal verti cal Analog 1920 1200 handled with Advanced AccuBlend Digital 1920 1080 handled with Advanced AccuBlend Input signals R G B H V RGB 0 7 Vp p 75 Ω Y 1 0 Vp p 75 Ω with Negative Polarity Sync Cb Cr Pb Pr 0 7 Vp p 75 Ω H V Sync 4 0 Vp p TTL Composite Sync 4...

Page 133: ...IGH BRIGHT If any other mode is selected as the PRESET mode the light output value may drop slightly 4 HDMI Deep Color Lip Sync with HDCP What is HDCP HDCP technology HDCP is an acronym for High bandwidth Digital Content Protection High bandwidth Digital Content Protection HDCP is a system for preventing illegal copying of video data sent over a High Definition Multimedia Interface HDMI If you are...

Page 134: ...121 9 Appendix 469 18 5 94 3 7 250 9 8 365 14 4 200 7 9 89 3 5 92 3 6 20 0 8 137 5 4 370 14 6 Cabinet Dimensions Unit mm inch Lens center ...

Page 135: ...er while moving the projector or do not apply excessive force to the cable cover Doing so may damage the cable cover resulting in injury Attaching the cable cover Tool needed Phillips screwdriver plus head about 9 cm 4 inches in length 9 cm 4 inches 1 Align two claws on the cable cover edge with grooves of the projector and push the top end The remaining claw on the cable cover also goes in the pr...

Page 136: ...heeling condition When suspended from the ceiling hold so that the cable cover does not drop The screws cannot be removed 2 Remove the cable cover 1 Rotate a little downwards so that the claw comes out of the projector s groove 2 Slide downwards so that the claw on the cover edge comes out of the projector s groove 2 1 2 ...

Page 137: ...Y Ground 8 Blue Ground Cb Ground 9 Hot Plug 10 Sync Signal Ground 11 No Connection 12 Bi directional DATA SDA 13 Horizontal Sync or Composite Sync 14 Vertical Sync 15 Data Clock HDMI 1 IN HDMI 2 IN Terminal Type A 1 3 5 7 9 11 13 15 17 19 2 4 6 8 10 12 14 16 18 Pin No Signal Pin No Signal 1 TMDS Data 2 11 TMDS Clock Shield 2 TMDS Data 2 Shield 12 TMDS Clock 3 TMDS Data 2 13 CEC 4 TMDS Data 1 14 Di...

Page 138: ...BT2 6 RxD HDBT1 7 Disconnection HDBT3 8 Disconnection HDBT3 USB Port Type A 1 3 2 4 Pin No Signal 1 VBUS 2 D 3 D 4 Grounding PC CONTROL Port D Sub 9 Pin 1 2 3 4 5 6 7 8 9 Communications protocol Pin No Signal 1 Unused 2 RxD reception data 3 TxD transmission data 4 Unused 5 Grounding 6 Unused 7 RTS transmission request 8 CTS transmission allowed 9 Unused ...

Page 139: ...0 768 2 16 9 3 60 1366 768 2 16 9 60 Quad VGA 1280 960 4 3 60 75 SXGA 1280 1024 5 4 60 75 SXGA 1400 1050 4 3 60 WXGA 1440 900 16 10 60 WXGA 1600 900 2 16 9 60 UXGA 1600 1200 3 4 3 60 WSXGA 1680 1050 16 10 60 HD 1280 720 16 9 60 Full HD 1920 1080 16 9 60 WUXGA 1920 1200 4 16 10 60 MAC 13 640 480 4 3 67 MAC 16 832 624 4 3 75 MAC 19 1024 768 4 3 75 MAC 21 1152 870 4 3 75 MAC 23 1280 1024 5 4 65 Compo...

Page 140: ...02H 12H 00H 00H 00H 14H SOUND MUTE OFF 02H 13H 00H 00H 00H 15H NOTE Contact your local dealer for a full list of the PC Control Codes if needed Cable Connection Communication Protocol Baud rate 38400 bps Data length 8 bits Parity No parity Stop bit One bit X on off None Communications procedure Full duplex NOTE Depending on the equipment a lower baud rate may be recommended for long cable runs PC ...

Page 141: ...ownload support page in our web site URL http www nec display com dl en pj_soft lineup html 2 Check if the software installed on the projector in use is updated You can check the software version from either VERSION 1 or VERSION 2 in the onscreen menu INFOR MATION 3 If newer software version than one on the projector in use is uploaded on our website download and save it in an appropriate folder o...

Page 142: ...en The software update is completed and the projector will go into the standby mode NOTE If an error occurs during the software update an error code in below will be displayed in the UPDATING STATUS column 2001 Failed to upload the file 2007 The uploaded file is too large 2011 The uploaded file is broken 2012 The uploaded file is broken 4001 Received no signal of the HTTP transmission The error co...

Page 143: ...e even though you adjust the brightness and or the contrast Input source s resolution and frequency are supported by the projector Image is too dark Remains unchanged even though you adjust the brightness and or the contrast Image is distorted Image appears to be trapezoidal unchanged even though you carry out the KEYSTONE adjustment Parts of the image are lost Still unchanged even though you pres...

Page 144: ...__________ Computer Manufacturer Model number Notebook PC Desktop Native resolution Refresh rate Video adapter Other Video equipment VCR DVD player Video camera Video game or other Manufacturer Model number Signal cable NEC standard or other manufacturer s cable Model number Length inch m Distribution amplifier Model number Switcher Model number Adapter Model number Projector PC DVD player Project...

Page 145: ...n English only visit our website at http www nec display com ap en_projector tco index html The TCO certification designed by TCO Development is an international environmental and ergonomics standard for IT equipment In some cases we may post a list of TCO certified models on our website before the TCO mark is placed on the product This difference in timing is related to the date certification is ...

Page 146: ... and labor warranty and InstaCare service program Visit our web site at www necdisplay com click on support center register product and submit your completed form online Upon receipt we will send a confirmation letter with all the details you will need to take advantage of fast reliable warranty and service programs from the industry leader NEC Display Solutions of America Inc ...

Page 147: ... NEC Display Solutions Ltd 2015 7N952241 ...

Reviews: