4
8
4. Using the Viewer
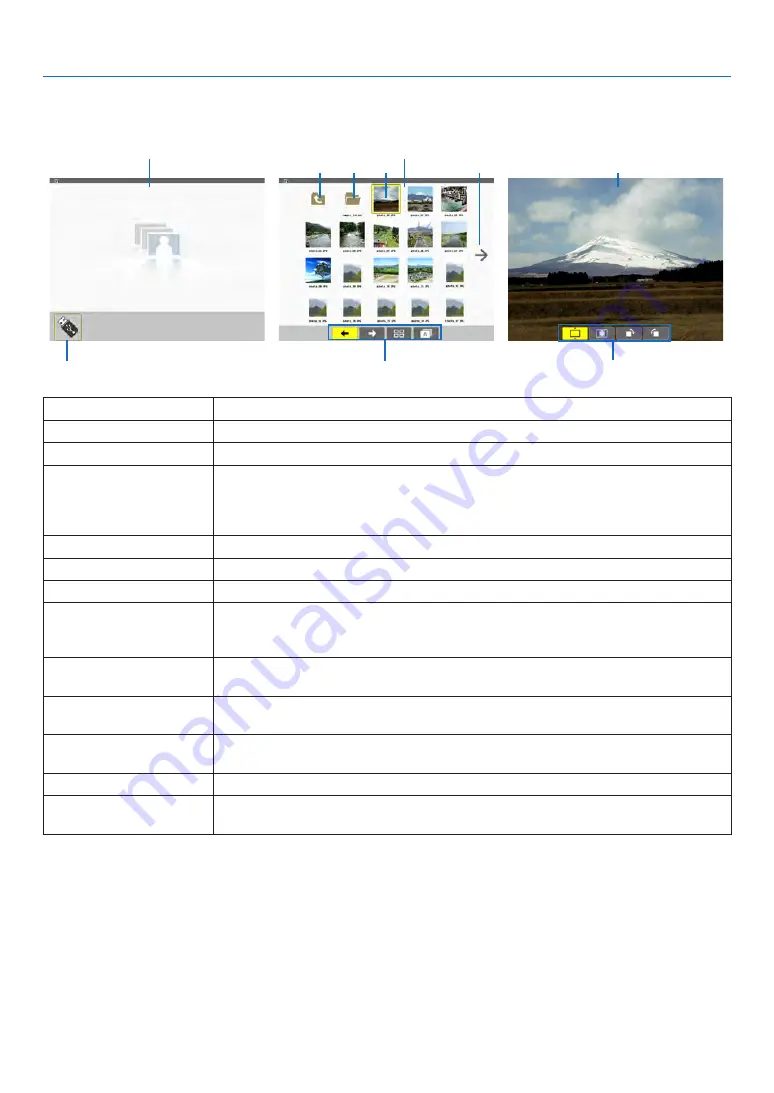
Parts of each screen
The Viewer has four screens.
(1) Viewer start screen
(3) Thumbnail screen
(9) Slide screen/
(11) Slideshow screen
Name
Description
(1)
Viewer
start
screen
(2)
USB
icon
This
icon
indicates
that
the
USB
memory
is
inserted
into
the
projector.
(3)
Thumbnail
screen
This
screen
will
show
a
list
of
folders
and
image
files stored in the
USB
memory.
The
JPEG
Exif
files will
be
displayed
in
thumbnail
screen
only.
•
The
maximum
number
of
image
files or
folders
within
one
page
is
6 × 4 lateral by
longitudinal
.
(4)
Cursor
The
cursor
is
used
to
select
(highlight)
the
folder
or
image
fil
e
by using
▲
▼◀▶
button.
(5)
Back
icon
This
icon
is
used
to
return
to
the
upper
(parent)
folder.
(6)
Folder
icon
This
icon
shows
that
the
USB
memory
has
folders.
(7)
Page
up
(Page
down)
icon
This
icon
shows
further
folders
or
image
files are
available
in
the
next
(previous)
page.
Use the
▶
button
to
go
to
the
next
(previous)
row.
The
PAGE
▽
or
PAGE
△
on the
remote
control
is
used
to
go
to
the
next
or
previous
page
directly.
(8)
Thumbnail
toolbar
This
toolbar
is
used
in
the
thumbnail
screen.
Pressing
the
MENU
button
will
display
this
toolbar.
(
→
page
)
(9)
Slide
screen
This
screen
is
used
for
manual
playback.
The
selected
image
will
be
displayed
in
full
screen.
(10)
Slide
toolbar
This
toolbar
is
used
in
the
slide
screen.
Pressing
the
MENU
button
will
display
this
toolbar.
(
→
page
)
(11)
Slideshow
screen
This
screen
is
used
for
auto
playback.
The
slides
will
be
changed
automatically.
(12)
Slideshow
toolbar
This
toolbar
is
used
in
the
slideshow
screen.
Pressing
the
MENU
button
will
display
this
toolbar.
(
→
page
)
(5)
(6)
(4)
(7)
(8)
(2)
(10) (12)
This screen will be displayed first when you select the Viewer.


