background image

81

4. Projector Adjustment and Connecting

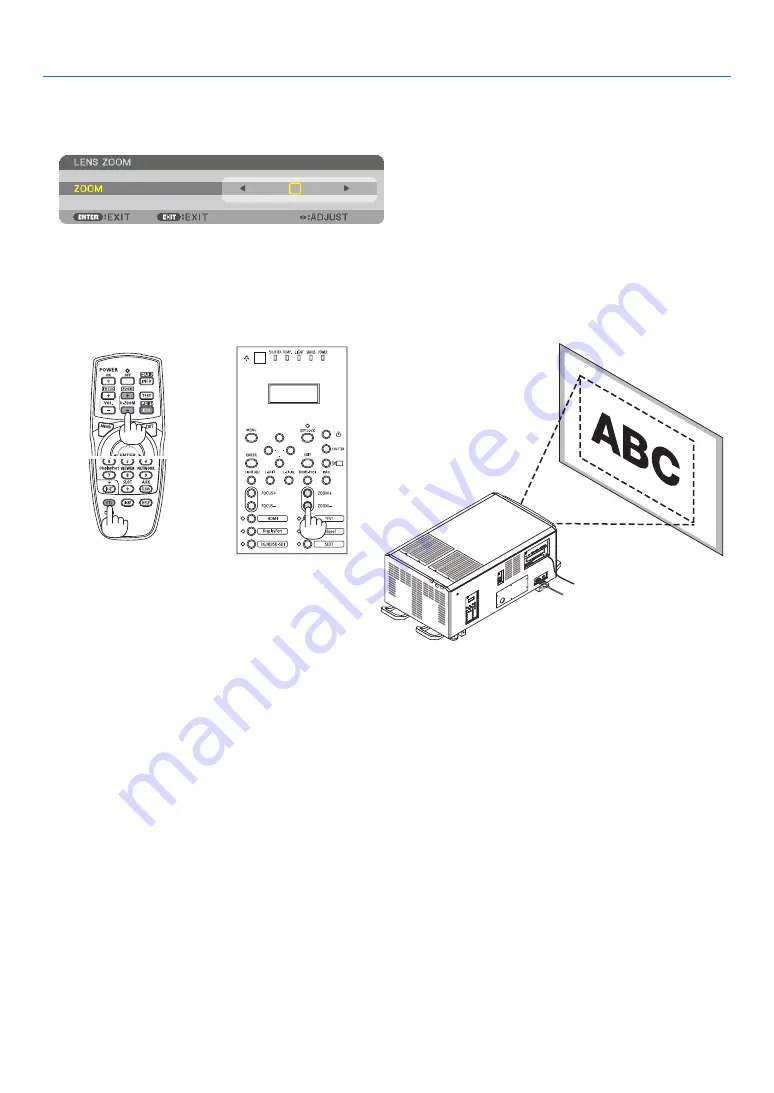
4-4-4. Zoom

1.  Press the ZOOM +/− button.

  The ZOOM adjustment bar will be displayed on.

  The zoom is adjusted.

•  On the remote control, while pressing on the CTL button, press the D-ZOOM/ZOOM (+) or (−) button.
• 

 or 

 buttons on the cabinet or the remote control are available to adjust ZOOM while the ZOOM adjustment 

bar is displayed on.

•  The zoom of the lens unit L2K-10F1 cannot be adjusted.

Summary of Contents for NP-LV01BD

Page 1: ...Projector PH3501QL PH2601QL powered by NP LV01BD Installation Manual Model No NP PH3501QL NP PH2601QL NP PH3501QL NP PH2601QL NP LV01BD ...

Page 2: ...nction has difference by devices the product name is written in the text PH3501QL PH2601QL This product or the projector NP LV01BD LV unit DLP and the DLP logo are trademarks or registered trademarks of Texas Instruments in the United States and other countries Other product and company names mentioned in this user s manual may be the trademarks or registered trademarks of their respective holders...

Page 3: ...of the device CAUTION Use of controls or adjustments of procedures other than those specified herein may lead to hazardous laser radiation exposure Hazardous optical radiation is emitted from this prod uct RG3 IEC 62471 2006 for USA No direct exposure to the beam shall be permitted RG3 IEC 62471 5 2015 Do not do it Do not look into the lens while the projector is on Serious damage to your eyes cou...

Page 4: ...ng so may cause damage to the projector 4 Do not place the projector in direct sunlight near heaters or heat radiating appliances 5 Exposure to direct sunlight smoke or steam could harm internal components 6 Handle your projector carefully Dropping or jarring your projector could damage internal components 7 To carry the projector a minimum of six persons are required Be sure to firmly grip the fr...

Page 5: ... projector power supply AC 200V 240V single phase 50 60Hz light power supply Ensure that your power supply fits this requirement before attempting to use your projector 2 The power cable is not included with the projector Ask your distributor for the power cable to select and purchase Use a power cable that meets the standards and power supply voltage of the country where you are using the project...

Page 6: ...s been dropped or the cabinet has been damaged If the projector exhibits a distinct change in per formance indicating a need for service 4 When using a LAN cable For safety do not connect to the connector for periph eral device wiring that might have excessive Voltage 5 Make sure to mount the power cable stopper before attempting to use your projector Refer to page 36 about the power cable stopper...

Page 7: ...e or remove the internal circuit board and contact the shop where you purchased the product or your local government agency Light Module 1 A light module containing multiple laser diodes is included in the product as the light source 2 These laser diodes are sealed in the light module No maintenance or service is required for the perfor mance of the light module 3 End user is not allowed to replac...

Page 8: ...vi Important Information Label Information Label A Label A Risk Group Lamp Safety Label ...

Page 9: ...vii Important Information Label C Label D Label E Label B Label B Laser Explanatory Label 3263343400 Label C PH3501QL ...

Page 10: ...viii Important Information Label C PH2601QL Label D Label E ...

Page 11: ...the height that will prevent exposures of spectators eyes within the hazard distance IEC62471 5 First edition 2015 IEC62471 2006 for USA Lens RG3 HD m Screen size m H V L2K 10F1 4 1 4 51 2 38 L4K 11ZM Wide 4 6 4 07 2 15 Tele 7 1 4 13 2 18 L4K 15ZM Wide 6 2 4 28 2 25 Tele 9 1 4 33 2 29 L4K 20ZM Wide 8 2 4 14 2 18 Tele 14 0 4 12 2 17 L2K 30ZM Wide 11 0 4 07 2 15 Tele 16 0 4 10 2 16 L2K 43ZM1 Wide 16...

Page 12: ... the validity of taken security measures if appropriate safety zone based on the installed lens is secured Periodically check the validity and keep these results Educate the administrator of the projector operators about safety before starting to operate the projector To use the projector Instruct the administrator of the projector operators to perform inspections before powering on the projector ...

Page 13: ...r of viewing If you or any member of your family has a history of light sensitive seizures consult a doctor before viewing 3D images While viewing 3D images if you get sick such as nausea dizziness queasiness headache eyestrain blurry vision convulsions and numbness stop viewing them If symptoms still persist consult a doctor View 3D images from the front of the screen Viewing from an angle may ca...

Page 14: ...ngestuft Beachten Sie bei der Installation und Verwaltung des Geräts die Gesetze und Bestimmungen Ihres Landes ACHTUNG Die Verwendung von Bedienelementen oder die Änderung von Prozeduren in Abweichung von den in diesem Handbuch beschriebenen könnte zu gefährli chem Kontakt mit Laserstrahlung führen Keine direkte Exposition gegenüber dem Strahl ist zulässig RG3 IEC 62471 5 2015 Nicht tun Schauen Si...

Page 15: ...Heizung oder sonstiger Hitze abstrahlender Einrichtungen 5 Wenn das Gerät direktem Sonnenlicht Rauch oder Dampf ausgesetzt wird können interne Komponenten beschadigt werden 6 Behandeln Sie Ihren Projektor vorsichtig Fallenlassen oder starkes Schutteln kann interne Komponenten beschädigen 7 Zum Tragen des Projektors werden mindestens sechs Personen benötigt Bewegen Sie den Projektor stets indem Sie...

Page 16: ...tquelle Stellen Sie sicher dass die vorhandene Spannungs versorgung diesen Vorgaben entspricht bevor Sie versuchen Ihren Projektor zu betreiben 2 Es wird kein Netzkabel mit dem Projektor geliefert Fragen Sie Ihren Händler welches Netzkabel aus zuwählen und zu kaufen ist Verwenden Sie ein Netzkabel das die Normen und Netzspannung des Landes in dem der Projektor verwendet wird erfüllt Siehe 1 9 Ansc...

Page 17: ...t die einer Wartung bedarf 4 Wenn ein LAN Kabel verwendet wird Schließen Sie es aus Sicherheitsgründen nicht an den Anschluss der Peripheriegeräte Verbindung an das sie eine zu hohe Spannung führen könnte 5 Bringen Sie stets den Netzkabelverschluss an bevor Sie versuchen Ihren Projektor zu benutzen Siehe Seite 50 Wissenswertes über den Netzkabelver schluss Reinigung 1 Schalten Sie vor der Reinigun...

Page 18: ...ntsorgen nicht und entfernen Sie nicht die interne Leiterplatte Wen den Sie sich stattdessen an den Handler bei dem Sie das Gerat erworben haben oder an die zustandige Behorde Lichtmodul 1 Als Lichtquelle dient dem Produkt ein Lichtmodul bestehend aus mehreren Laserdioden 2 Diese Laserdioden sind im Lichtmodul eingeschlos sen Für die Leistung des Lichtmoduls ist keine War tung erforderlich 3 Der E...

Page 19: ...xvii Wichtige Informationen Etiketteninformationen Aufkleber A Aufkleber A Lampe Warnzeichen Etikette ...

Page 20: ...xviii Wichtige Informationen Aufkleber C Aufkleber D Aufkleber E Aufkleber B Aufkleber B Laser erklärendes Etikett 3263343400 Aufkleber C PH3501QL ...

Page 21: ...xix Wichtige Informationen Aufkleber C PH2601QL Aufkleber D Aufkleber E ...

Page 22: ...en Sie einen Abstand von mindestens 3 m zwi schen der Bodenfläche und dem RG3 Bereich ein Bediener müssen den Zugang zum Strahl innerhalb des Gefahrenabstands kontrollieren oder das Produkt so hoch installieren dass die Augen der Zuschauer innerhalb des Gefahrenabstands nicht dem Strahl ausgesetzt werden können Linse RG3 HD m Bildschirmgröße m H V L2K 10F1 4 1 4 51 2 38 L4K 11ZM Breit 4 6 4 07 2 1...

Page 23: ...ingehalten wurden wenn die entsprechende Sicherheitszone gemäß der installierten Linse eingestellt wird Prüfen Sie dies in regelmäßigen Abständen und dokumentieren Sie die Ergebnisse Weisen Sie den Administrator des Projektors Bediener in die Sicherheitsbestimmungen ein bevor dieser mit dem Betrieb des Projektors beginnt Verwendung des Projektors Weisen Sie den Administrator des Projektors Bediene...

Page 24: ... von 15 Minuten Falls Sie oder ein Mitglied Ihrer Familie schon durch Licht ausgelöste Krampfanfälle hatten fragen Sie einen Arzt bevor Sie 3D Bilder betrachten Wenn während des Betrachtens von 3D Bildern Symptome wie Übelkeit Schwindel Brechreiz Kopfschmerzen Augenschmerzen verschwommene Sicht Krämpfe oder Taubheitsgefühl auftreten brechen Sie das Betrachten ab Wenn die Symptome anhalten suchen S...

Page 25: ...ble C1 connection 31 1 8 3 Procedure for connecting the power cable C2 connection 34 1 9 Anschließen des Netzkabels Deutsch 38 1 9 1 Technische Daten zum Netzanschluss 38 1 9 2 Anschluss des Stromkabels Anschluss C1 45 1 9 3 Anschluss des Stromkabels Anschluss C2 48 2 Configuring the projector s initial settings 52 2 1 Initial settings flow 52 2 2 Updating the software 52 2 2 1 Update flow 52 2 2 ...

Page 26: ...6 3 1 Cleaning the Air Filter 94 6 3 2 Resetting the Air Filter Usage Time 97 7 Appendix 98 7 1 Compatible Input Signal List 98 7 2 Indicator Messages 100 7 3 Pin assignments and signal names of main terminals 103 7 4 Remote Interlock Connector 108 7 5 About the ASCII Control Command 110 7 6 Outline Drawing 112 7 7 Special Installation 113 7 7 1 Installing the Projector on the Ceiling 113 7 7 2 In...

Page 27: ...automatically turn off the projectors power Intake vent Exhaust vent Intake vent Intake vent Exhaust vent Exhaust vent Installation conditions for the projector Example 1 If there are walls on both sides of the projector 60 cm 23 6 or greater 60 cm 23 6 or greater NOTE The drawing shows the proper clearance required for the front back and top of the projector The above drawing can also be applied ...

Page 28: ...fore Setting Up Your Projector 2 For ceiling mounting Lens 70 cm 27 6 or greater 30 cm 11 8 or greater NOTE The drawing shows the proper clearance required for the front right left and bottom of the projector ...

Page 29: ...ektor abschalten Eintrittsöffnung Austrittsöffnung Eintrittsöffnung Eintrittsöffnung Austrittsöffnung Austrittsöffnung Bedingungen für die Installation des Projektors Beispiel 1 Wenn sich Wände auf beiden Seiten des Projektors befinden 60 cm oder mehr 60 cm oder mehr HINWEIS Die Abbildung zeigt den ordnungsgemäßen Abstand für die Vorder Rück und Oberseite des Projektors Die obige Zeichnung kann au...

Page 30: ...4 1 Before Setting Up Your Projector 2 Für Deckenmontage Linse 70 cm oder mehr 30 cm oder mehr HINWEIS Die Zeichnung zeigt den richtigen Abstand des Projektor nach vorn rechts links und unten an ...

Page 31: ...or are available for separate sale to support various projection range Note that all descriptions given in this manual assume that the angle of projection is zero degree In case of projection from an upper position or from the right or left it is necessary to calculate the width for the minimum projected image that is a little larger than the screen size Minimum width Screen Screen Minimum height ...

Page 32: ...K 30ZM L2K 43ZM1 L2K 55ZM1 100 2 0 2 7 3 8 3 3 4 6 4 7 7 7 5 9 8 6 8 6 12 1 11 0 17 2 120 2 4 3 3 4 6 4 0 5 6 5 5 9 2 7 1 10 4 10 3 14 6 13 2 20 8 150 3 1 4 1 5 7 5 1 7 0 6 9 11 4 9 0 13 0 13 0 18 3 16 6 26 1 200 4 1 5 5 7 7 6 8 9 4 9 1 15 2 12 1 17 5 17 4 24 6 22 2 34 9 250 5 2 6 9 9 6 8 5 11 7 11 3 18 9 15 1 21 9 21 8 30 8 27 9 43 7 300 6 2 8 3 11 6 10 2 14 1 13 5 22 6 18 2 26 3 26 2 37 0 33 5 5...

Page 33: ... 3 5 8 8 1 7 1 9 9 9 5 16 0 12 7 18 3 18 3 25 8 23 4 36 7 250 5 4 7 3 10 2 8 9 12 4 11 8 19 9 15 9 23 0 22 9 32 4 29 3 46 0 300 6 5 8 8 12 2 10 7 14 9 14 1 23 8 19 1 27 7 27 6 38 9 35 2 55 2 350 7 6 10 2 14 2 12 5 17 4 16 4 27 7 22 4 32 3 32 2 45 5 41 2 64 5 400 8 7 11 7 16 3 14 3 19 9 18 7 31 7 25 6 37 0 36 9 52 0 47 1 73 8 500 11 0 14 7 20 4 17 9 24 8 23 4 39 5 32 0 46 3 46 2 65 1 59 0 92 4 600 ...

Page 34: ...5 2 7 38 9 m L4K 15ZM 131 2 1866 1 3 3 47 4 m L2K 10F1 78 7 822 8 2 0 20 9 m 100 1000 100 1000 100 1000 100 1000 100 1000 100 1000 100 1000 3840 2160 Aspect ratio 16 9 L2K 55ZM1 452 8 7291 3 11 5 185 2 m L2K 43ZM1 354 3 5141 7 9 0 130 6 m L2K 30ZM 244 1 3661 4 6 2 93 0 m L4K 20ZM 192 9 3098 4 4 9 78 7 m L4K 11ZM 111 5 1610 2 2 8 40 9 m L4K 15ZM 138 2 1960 6 3 5 49 8 m L2K 10F1 82 7 866 1 2 1 22 0 ...

Page 35: ...797 4 373 2 947 8 850 751 9 1909 7 396 5 1007 1 900 796 1 2022 1 419 8 1066 3 950 840 3 2134 4 443 1 1125 6 1000 884 5 2246 7 466 5 1184 8 3840 2160 Aspect ratio 16 9 Screen height Screen width 16 9 screen size diagonal Size inches Screen width Screen height inches cm inches cm 100 87 2 221 4 49 0 124 5 120 104 6 265 7 58 8 149 4 150 130 7 332 1 73 5 186 8 200 174 3 442 8 98 1 249 1 250 217 9 553 ...

Page 36: ...hift range is the same for ceiling installation 4096 2160 Aspect ratio 17 9 Lens unit Drawing number L2K 10F1 8 H 27 V L4K 11ZM 17 H 50 V L4K 15ZM 17 H 50 V L4K 20ZM 17 H 50 V L2K 30ZM 8 H 27 V L2K 43ZM1 8 H 27 V L2K 55ZM1 10 H 31 V Example calculation If projecting on a 300 inch screen using an L4K 15ZM lens unit According to the Table of screen sizes and dimensions page 9 H 265 4 674 0 cm V 139 ...

Page 37: ...it According to the Table of screen sizes and dimensions page 9 H 261 5 664 1 cm V 147 1 373 6 cm Adjustment range in the vertical direction the projected image can be moved upwards 0 55 147 1 373 6 cm 81 205 cm downwards approximately 81 205 cm when the lens is at the center position Adjustment range in the horizontal direction the projected image can be moved to the left 0 22 261 5 664 1 cm 58 1...

Page 38: ...tor first turn off the power and always disconnect the power plug from the electrical outlet and check that all of the connecting cables between equipment and the lenses have been removed For C1 connection turn off the projector shut down AC power by using a circuit breaker For C2 connection turn off the projector shut down the AC power to the projector and the light using a circuit breaker Handle...

Page 39: ...over Side panel Air outlet Air outlet Air outlet Air inlet Filter cover Filter NOTE Side panel and Lens cover are equipped with key locks Special keys service key are required to remove or mount them Refer to Position of the key locks on the covers page 14 for details Do not turn on the power when the lens cover and the side panel are removed When removing the lens cover return the lens shift to t...

Page 40: ...ws WARNING TO REDUCE THE RISK OF ELECTRIC SHOCK AND LASER RADIATION DO NOT OPEN COVER NO USER SERVICEABLE PARTS INSIDE REFER SERVICING AND INSTALLATION TO QUALIFIED SERVICE PERSON NEL AND INSTALLATION PERSONNEL NOTE When a cover is removed the power to the unit is automatically turned off by the safety protection system Lens Cover The lock is unlocked when attaching or removing lenses page 64 Side...

Page 41: ...the front filter cover Pull the filter cover in the direction of the arrow to remove it Handle 2 Unlock the lens cover Unlock the cover using the service key 3 Remove the lens cover The lens cover is secured to the projector body by two claws each at the cover top and bottom Hold the cover sides and pull toward you Handle Handle ...

Page 42: ...tes removing the lens cover To mount the cover perform the removal procedure in reverse Make sure to lock the key Hook Lens cover removed condition NOTE If the cover is not properly mounted an error may occur Securely push all claws into the position ...

Page 43: ... service key 3 Remove the side panel The side panel is fixed in place by hooks at the bottom in 2 locations Tilt the side panel toward you and pull up to remove it Do not use force when tilting the side panel Hook 2 locations This completes removing the side panel To mount the side panel perform the removal procedure in reverse Make sure that you do not forget to tighten the screws or to lock the ...

Page 44: ... projector page 19 and always connect the equipment to the ground If the ground is not connected it may cause electrical shocks When connecting the power cable plugs to the AC IN and the electrical outlet securely insert the plugs all the way in If the connection between the power cable plug and the electrical outlet is loose the plug area may generate heat causing burns and accidents In order to ...

Page 45: ...y voltage Projector input current Power cable current capacity AC 200 240V 4 9A 10A or higher Furthermore use plugs cables and connectors that are suitable for the regulations of the country of installation as shown in the following table NOTE For users in North America Use a power cable no longer than 4 5m 14 76 ft according to National Electrical Code For UK only In UK a BS approved power cable ...

Page 46: ...ctor JIS C 8303 HVCTF 3 x 1 25 mm2 IEC60320 C13 China Plug Cable Connector GB2099 RVV 300 500 GB17465 1 Connector Dimensions of the connector of the power cable are shown below 28 0 0 9 20 0 0 7 5 0 5 0 4 0 5 0 2 5 0 5 0 4 R3 5 20 7 0 5 0 7 0 5 0 Unit mm Min Min ...

Page 47: ... Projektor verwendet wird erfüllt Seite 22 und schließen Sie das Gerät stets an Erde an Wenn keine Erde angeschlossen wird kann es zu elektrischen Schlägen kommen Führen Sie die Netzkabelstecker beim Anschließen bis zum Anschlag in den Netzeingang und die Netzsteckdose ein Sitzt der Netzstecker nicht fest in der Netzsteckdose kann Wärme im Steckerbereich erzeugt werden die zu Verbrennungen und Unf...

Page 48: ...ng gemäß IEC60320 zum Anschließen des Netzkabels ausgestattet Verwenden Sie einen IEC60320 C13 kompatiblen Netzkabelanschluss und sorgen Sie dafür dass der Anschluss über die unten angegebene Stromkapazität verfügt Netzspannung Projektor Eingangsstrom Netzkabel Stromkapazität 200 240 V Wechselstrom 4 9 A 10 A oder höher Verwenden Sie zudem Stecker Kabel und Steckverbinder die den Vorgaben des jewe...

Page 49: ...0320 C13 China Stecker Kabel Steckverbinder GB2099 RVV 300 500 GB17465 1 Für Benutzer in UK Verwenden Sie ein Netzteil mit BS Zulassung und 10A Sicherung Steckverbinder Die Abmessungen des Netzkabels sind unten angegeben 28 0 0 9 20 0 0 7 5 0 5 0 4 0 5 0 2 5 0 5 0 4 R3 5 20 7 0 5 0 7 0 5 0 Einheit mm Min Min ...

Page 50: ...ply cable Be sure to follow the contents described in this section Entrust a specialist to carry out the power supply work from the power supply equipment of the building to the place of projector installation Be sure to ground the equipment to ensure safety To avoid electric shock request a professional to carry out the grounding and related works Make sure to ground the equipment before supply o...

Page 51: ...50 60 Hz When using with a C2 connection 200 240 V AC single phase 50 60 Hz projector power supply 200 240 V AC single phase 50 60 Hz light power supply Breakers When connecting the AC power supply from the power supply equipment of the building to the projector be sure to connect it through a breaker The capacity of the breaker must be as indicated below When using with a C1 connection Power supp...

Page 52: ...use an UL listed tool Compatible Cables and Solderless Terminals The specifications of the terminals for attaching the power cables are as follows Power supply terminal L N Grounding terminal G The size of the solderless terminal to use and the fastening torque of the screws varies depending on the type of terminal block Use the cable and solderless terminal that is suitable for the specific type ...

Page 53: ...enerating heat and melting because the terminal block of the light power supply unit cannot be attached correctly Power supply terminal L N Black AC power is provided to the projector power supply and the light power supply by a single cable JIS IEC EN UL CSA Thickness of compatible wiring using solderless ter minal 14 mm2 14 mm2 AWG6 or AWG8 AWG6 or AWG8 Solderless terminal dimen sions M5 x 10 Ti...

Page 54: ... mm2 AWG6 or AWG8 AWG6 or AWG8 Solderless terminal dimen sions M6 x 15 Tightening torque 3 5 to 5 0N m Solderless terminal dimen sions Min 1 0 Min 1 0 Max 2 0 Max 2 0 Max 11 Min 6 1 Max 13 Min 7 5 Unit mm Solderless terminal recom mended part J S T parts Model 8 8NS When using AWG6 Model R14 6 When using AWG8 Model 8 8NS J S T J S T Manufacturing Co Ltd ...

Page 55: ...pinched by the terminal attachment screw Pull back the sleeves from the terminal area before fastening the screw to prevent the sleeves from being pinched Sleeves 2 Attach the sleeves after tightening the screw Tighten the fixing screw to the designated torque Use sleeves and secure the insulation to ensure that terminals do not touch each other If the cables are attached to the power supply termi...

Page 56: ...nal block ensure that parts other than the solderless terminal such as cable wires and fittings are not pinched within the terminal fastening area When correctly fastened When the cable wire has become pinched due to using a solderless terminal with dimensions other than as designated ...

Page 57: ...electric shock may occur High leakage current flows Do NOT connect the power supply before grounding connection 1 Remove the plate inlet Remove the plate inlet by loosening the fixing screws at six points In Europe replace it with the supplied 35 plate inlet Plate Inlet 2 Pass the power cable through the cable hole of the plate If you use the supplied 35 plate inlet pass the power cable through a ...

Page 58: ...s make sure that all the power cable lines are securely screwed A failure to do this could result in an accident causing death injury etc 5 Put the terminal cover on the power supply terminals Follow the reverse procedure to removal of the terminal cover 6 Insert the grounding cable into the grounding terminal and screw it Insert the crimping terminal of the grounding cable into the retaining hole...

Page 59: ... power connector 8 Configure the power supply for C1 connection For C1 connection connect the inner side connector Connect Connect 9 Return the power connector and the fixing bracket to their original position and fix the fixing screws at two points 10 Fix the plate inlet with the fixing screws at six points In Europe fix the supplied 35 plate inlet ...

Page 60: ...pply is disconnected Otherwise a fire or electric shock may occur 1 Follow steps to in 1 8 2 Procedure for connecting the power cable C1 connection page 31 2 Configure the power supply for C2 connection For C2 connection connect the outer side connector Connect Connect 3 Return the power connector and the fixing bracket to their original position and fix the fixing screws at two points 4 Fix the p...

Page 61: ...t the AC power supply cable 1 Connect the AC power supply cable Connect the AC power supply cable to the projector To wall outlet AC input 2 Connect the power plug to the electrical outlet This completes the connection of the AC power supply cable ...

Page 62: ...he power cable with other cables Doing so can generate noise which can affect adversely the signal cable Be careful not to insert the band inversely Once the band is attached it cannot be removed from the slot 1 Set the clamper band to the power cable side and insert the end of band of the power cable stopper into the slot next to the AC IN on the terminal panel Attach the power cable stopper to t...

Page 63: ...d release the knob to lock Knob Knob This completes the attachment of the power cable stopper Removing the power cable from the power cable stopper 1 Pull the knob of the clamper and loosen the band 2 Pull the knob and slide the clamper away from the power plug CAUTION The projector may become hot temporarily when the power is turned off or if the AC power is disconnected while the projector is pr...

Page 64: ... bevor Sie das Netzkabel anschließen Befolgen Sie auf jeden Fall die Anweisungen in diesem Abschnitt Beauftragen Sie einen Fachmann mit der Installation die Stromzufuhr von der Stromversorgungsanlage des Gebäudes zum Aufstellort des Projektors Erden Sie das Gerät um die Sicherheit zu gewährleisten Um elektrische Schläge zu vermeiden beauftragen Sie einen Fachmann mit der Erdung und den damit verbu...

Page 65: ...V AC einphasig 50 60 Hz Stromversorgung des Projektors 200 240 V AC einphasig 50 60 Hz Stromversorgung der Lichtquelle Sicherungen Stellen Sie beim Anschließen der Stromversorgungsanlage des Gebäudes an den Projektor sicher dass dies über eine Sicherung erfolgt Der maximale Kennwert der Sicherung muss den folgenden Angaben entsprechen Bei Verwendung von Anschluss C1 Stromversorgung des Projektors ...

Page 66: ...mit dem UL Listing Prüfzeichen Kompatible Kabel und lötfreie Anschlussklemmen Die technischen Daten für die Anschlussklemmen zum Befestigen der Netzkabel sind im Folgenden aufgeführt Netzklemme L N Erdklemme G Die Größe der zu verwendenden lötfreien Anschlussklemme und das Anzugsmoment der Schrauben hängen von der Art des Klemmenblocks ab Verwenden Sie das Kabel und die lötfreie Anschlussklemme di...

Page 67: ...hlusses des Netzteils aufgrund von Hitzeentwicklung und Schmelzen des Klemmenblocks da der Klemmenblock für die Stromversorgung der Lichtquelle nicht ordnungsgemäß angebracht werden kann Netzklemme L N Schwarz JIS IEC EN UL CSA Leiterquerschnitt kompati bler Kabel bei Verwendung lötfreier Anschlussklemmen 14 mm2 14 mm2 AWG6 oder AWG8 AWG6 oder AWG8 Abmessungen lötfreier An schlussklemmen M5 x 10 A...

Page 68: ... mm2 AWG6 bis AWG8 AWG6 oder AWG8 Abmessungen lötfreier An schlussklemmen M6 x 15 Anzugsmoment 3 5 bis 5 0 N m Abmessungen lötfreier An schlussklemmen Min 1 0 Min 1 0 Max 2 0 Max 2 0 Max 11 Min 6 1 Max 13 Min 7 5 Unit mm Empfohlene Modelle für lötfreie Anschlussklemmen J S T Teile Modell 8 8NS Bei AWG6 Modell R14 6 Bei AWG8 Modell 8 8NS J S T J S T Manufacturing Co Ltd ...

Page 69: ...werden Ziehen Sie die Kabelmanschette von der Anschlussklemme zurück bevor Sie die Schraube anziehen damit die Kabel manschette nicht eingeklemmt wird Manschetten 2 Schieben Sie die Manschetten nach dem Anziehen der Schraube wieder an ihre richtige Position Ziehen Sie die Befestigungsschraube mit dem angegebenen Drehmoment an Verwenden Sie Kabelmanschetten und fixieren Sie das Isolationsmaterial d...

Page 70: ...hlusskl emme darauf dass keine anderen Teile als der Quetschkabel schuh z B Kabeladern undVerschraubungen in der Klemmen befestigung eingeklemmt werden Richtig befestigt Kabeldraht ist verkantet da eine lötfreie Anschlussklemme mit Abmessungen verwendet wurde die nicht den Vorgaben entsprechen ...

Page 71: ...rsorgung nur anzuschließen nachdem die Erdung angeschlossen ist 1 Entfernen Sie die Platte Inlet Lösen Sie die sechs Schrauben und entfernen Sie die Inlet Platte EU Region Tauschen Sie die Inlet Platte mit der als Zubehör beigefügten 35mm Inlet Platte aus Platte Inlet 2 Vergewissern Sie sich dass das Stromkabel durch die Kabelöffnung passieren kann und ziehen Sie das Stromkabel durch die Kabelöffn...

Page 72: ...e Stromkabel gut verschraubt sind Wenn die Schrauben nicht richtig geschlossen sind können Tod und schwere Verletzungen die Folge sein 5 Befestigen Sie den Deckel der Strombuchse Gehen Sie dabei in umgekehrter Reihenfolge zum Entfernen vor 6 Stecken Sie das Erdungskabel in die Anschlussbuchse und schrauben Sie es fest Stecken Sie den Crimpanschluss des Erdungskabels in die Öffnung der Anschlussbuc...

Page 73: ...e die Stromversorgung über Anschluss C1 ein Verbinden Sie Anschluss C1 mit dem hinteren Verbinder Anschluss Anschluss 9 Legen Sie den Stromverbinder und das Fixiermetall zurück in ihre ursprüngliche Position und schließen Sie die zwei Fixierschrauben 10 Befestigen Sie die Platte Inlet mit sechs Fixierschrauben EU Region Befestigen Sie die als Zubehör beigefügte 35mm Platte Inlet ...

Page 74: ...n Es besteht Brand und Stromschlaggefahr 1 Führen Sie die Schritte 1 bis 7 unter 1 9 2 Anschluss des Stromkabels Anschluss C1 Seite 45 aus 2 Richten Sie die Stromversorgung über Anschluss C2 ein Verbinden Sie Anschluss C2 mit dem vorderen Verbinder Anschluss Anschluss 3 Legen Sie den Stromverbinder und das Fixiermetall zurück in ihre ursprüngliche Position und schließen Sie die zwei Fixierschraube...

Page 75: ...ließen Sie das Netzkabel an 1 Schließen Sie das Netzkabel an Schließen Sie das Netzkabel an den Projektor an Zur Wandsteckdose AC input 2 Schließen Sie das Netzkabel an die Netzsteckdose an Dadurch ist der Anschluss des Netzkabels abgeschlos sen ...

Page 76: ...e das Netzkabel nicht mit anderen Kabeln zusammen Dadurch kann elektrisches Rauschen erzeugt werden welches das Signalkabel stören kann Führen Sie das Band nicht verkehrt herum ein Wenn das Band einmal angebracht worden ist kann es nicht mehr aus dem Schlitz entfernt werden 1 Bringen Sie das Klemmenband auf die Netzkabelseite und führen Sie das Ende des Bands am Netzkabelstop per in den Schlitz ne...

Page 77: ... Knopf los um zu sperren Knopf Knopf Damit ist die Anbringung des Netzkabelstoppers abgeschlossen Entfernen des Netzkabels aus dem Netzkabelstopper 1 Ziehen Sie den Klemmenknopf um das Band zu lösen 2 Ziehen Sie den Knopf und schieben Sie die Klemme vom Netzstecker fort ACHTUNG Der Projektor kann vorübergehend heiß werden wenn die Stromversorgung ausgeschaltet wird oder wenn der Wechselstrom getre...

Page 78: ...play label to the projector page 61 NOTE Be sure to update the software before mounting the LV unit Updating the software after mounting the LV unit can cause an update failure 2 2 Updating the software 2 2 1 Update flow Step 1 Installing the DCC on the computer page 53 Step 2 Connecting the computer to the projector and starting up the DCC page 54 Step 3 Updating the projector page 56 Step 4 Exit...

Page 79: ...ribes the installation procedure of DCC Use the same procedure as for installation for version upgrading installation by overwriting Preparatory operation Boot up your PC s Windows If you have already started Windows quit all running application programs If you do not quit all running programs before installing the DCC Software you risk having unsuccessful installation NOTE About the privileges us...

Page 80: ...at 4 2 Turning on the Projector page 70 and set the projector to the standby mode 3 Start up the DCC From the Windows Start menu select All Programs Projector User Supportware DCC The DCC starts up TIP If the Language Select screen appears select the display language To change the display language click Option Language from the toolbar If a Chinese font or Japanese font is not installed on your PC...

Page 81: ... destination devices are set the currently connected device is located at the top of the connection list Enter the network setting of the connection destination device Select the IP address or the host name and enter the necessary items IP Address Host Enter the IP address When entering an address from the connection history double click the IP address Host field then select the connection history...

Page 82: ...PC and projector main unit during the update 1 On the MAINTENANCE Update screen click the Update button The Update screen appears Version File Maintenance Displays the definition file npversion that is read by DCC Select New Version File button Sets the selected file as the new version file Update Displays the screen for selecting the method for updating Full Auto button Begins Full Auto Update Wh...

Page 83: ...atically After that the projector automatically returns to the standby state 4 Check the results of the update If Error is not displayed on the screen bottom of column the update has completed successfully Once the update is completed a message such as the following appears below the screen If the update is successful Update Success If the update is unsuccessful Update has failed 5 Once the update...

Page 84: ...xecute from step 1 through step 7 The projector s IP address can be checked on the setting of WIRED LAN from the onscreen menu The update for the purpose of the initial settings must be done before mounting the LV unit 2 2 5 Exiting the DCC 1 Click File The File menu will appear 2 Click Exit The DCC will close 3 Turning off the Projector Follow the procedure at 4 6 Turning off the Projector page 8...

Page 85: ...ower disconnect the AC power and unplug the power cord Preparation Prepare a Phillips screwdriver Remove the side panel page 17 1 Remove slot blocking panel A 1 Loosen the blocking panel A screws 2 until they turn freely The screws do not come off Blocking panel A 2 Remove blocking panel A 2 Remove slot blocking panel B 1 Loosen the blocking panel B screws 3 located inside the slot until they turn...

Page 86: ...rt the LV unit by following the guide on either side of the slot guide left right 2 Tighten the screws 4 on the front of the LV unit to fasten NOTE Set the LV unit s displays in the proper direction according to the projec tor Inserting the LV unit upside down can result in damage Tighten the screws securely This completes installing of the LV unit Next attach the controls indicator panel display ...

Page 87: ... the default attached label 2 Peel the label off the backing paper and attach it to the projector s control panel Line up the corners of the label with the four protrusions Install carefully making sure the label does not touch the buttons Protrusion Protrusion Protrusion Controls indicator panel display label This completes mounting of the controls indicator panel display label Mount the side pan...

Page 88: ...e projector according to the procedure below This chapter describes the installation of procedure until turn ing on of the power Step 1 Installing the projector page 63 Step 2 Mounting the Lens Unit page 64 3 Setting Up Your Projector ...

Page 89: ...stortion may appear on the screen For setting the projector perpendicular to the screen when viewed from the side utilizing the level adjusters equipped at each corner of the projector bottom page 76 Example for adjustment To install as shown below see 7 7 Special Installation page 113 Installing the Projector on the Ceiling Installing using eye bolts Installing with free tilting Portrait projecti...

Page 90: ... or installed When installing or removing the lens unit first confirm that the main power switch to the projector is off and then disconnect the AC power supply After the AC power supply has been disconnected allow the projector to sufficiently cool before starting this work Never touch the lens surface while the projector is operating Be very careful not to let dirt grease etc on the lens surface...

Page 91: ...e the lens with the face upward Check that the place for putting the lens is flat before the work It is recommended to keep the lens cap set so as to protect the lens from any damage 3 Insert the lens holder from under the lens Align the lens holder slits with two lens insertion guides and insert the lens holder 4 Fix two mounting metals of the lens holder with four mounting screws Lens insertion ...

Page 92: ... of the lens cover Refer to 1 5 1 Removing and Mounting the Lens Cover page 15 When mounting the L4K 20ZM loosen the screws 4 on the back of the lens cover then remove the ring Be sure to store the ring and screws you have removed in a safe place When replacing the L4K 20ZM with another lens unit be sure to mount the ring on the lens cover Mounting the ring 1 Line up the protruding part on the bac...

Page 93: ...til it cannot go further Insert the lens holder into the fixing hole of the lens ring and mount it with rotating it clockwise Pay attention not to catch the lens control cable here Fixing hole of the lens ring Control cable 8 Tighten the two fixing screws for the lens holder 9 Connect the control cable ...

Page 94: ...cause structural failure of the lens shift while too loose wire rope can cause the lens unit to fall off Be sure to adjust the flexure of the wire rope to allow for 20 mm of flexure and secure it 10 Attach the lens cover For details on attaching the lens cover refer to 1 5 1 Removing and Mounting the Lens Cover page 15 This completes the installation of the lens unit Removal is done in reverse ord...

Page 95: ...the projector orientation page 74 Step 3 Adjusting the Picture Size and Position page 75 Display the test pattern to adjust the screen size screen ratio and focus Step 4 Connecting to Other Equipments page 82 Step 5 Turning off the projector page 85 This chapter explains the adjustment and connection of the projector with Steps from 1 to 5 The adjustment and connection of the projector is complete...

Page 96: ...is page 1 Turn on the projector power switch and light power switch of the projector Your projector is set in a standby state 2 Press the POWER button on the projector cabinet or the POWER ON button on the remote control Your projector is turn on Turning power off page 85 1 Press the POWER button on the projector cabinet or the POWER OFF button on the remote control The confirmation message will b...

Page 97: ...R ON but ton When there is no signal the unit will project a blue screen factory default menu settings If the picture is blurry adjust the screen focus page 79 When it is dark press the lights button The indicator panel backlight and the LED lamp on the right side of the projector will turn on TIP The lens shutter remains closed even when the power is turned on with the Power On Shutter function P...

Page 98: ...the L CALIB button on the projector or hold down the CTL button on the remote control then press the INFO L CALIB button to carry out LENS CALIBRATION By carrying out LENS CALIBRATION the adjustment range of the zoom of the LENS MEMORY is calibrated If you need to install or replace the lens unit contact your distributor and have them do it for you ...

Page 99: ... this has been done you can proceed to the menu operation If you want you can select the menu language later NOTE If the message PLEASE SET DATE AND TIME is shown please set the current date and time When the KEY LOCK indicator is flashing that means CONTROL PANEL LOCK has been set and pressing the button will not cause the unit to power on Release CONTROL PANEL LOCK While the POWER indicator is b...

Page 100: ...rojection ceiling rear projection desktop rear projection and ceiling front projection NOTE Please consult the distributor if you require special installation services e g when mounting the projector to a ceiling or suspend ing from the ceiling using eye bolts Never install the projector on your own This may result in the projector falling down and causing injury to people DESKTOP FRONT CEILING RE...

Page 101: ...ns shift page 77 Adjusting the focus Focus page 79 Finely adjusting the size of an image Zoom page 81 In this chapter drawings and cables are omitted for clarity TIP Built in test patterns can be conveniently used for adjusting the picture size and position A press of the TEST button will display the test pattern The or button can select one test pattern To close the test pattern change the source...

Page 102: ...tion may appear on the screen For setting the projector perpendicular to the screen when viewed from the side utilizing the level adjusters equipped at each corner of the projector bottom Maximum Adjustable length of the level adjuster is 10 mm 0 39 Example for adjustment Raise Raise Lower Lower Level adjuster NOTE Do not lengthen each of the level adjusters any more than 10 mm 0 39 The force of d...

Page 103: ... edges of the image to become dark or will cause some shadows Adjusting with buttons on the cabinet 1 Press the L SHIFT button The LENS SHIFT screen will be displayed 2 Press the or button Use the buttons to move the projected image Returning the lens shift position to the home position Press the HOME POSI button to return the lens shift position to the home position nearly center position ...

Page 104: ...age TIP The figure below shows the lens shift ranges projection mode desktop front for 3840 2160 images 16 9 aspect ratio for the L4K 11ZM L4K 15ZM and L4K 20ZM lens units See page 10 for the details of other lenses 100 V 55 V 55 V 100 H 22 H 22 H 22 H 22 H Height of projected image Width of projected image Description of symbols V indicates vertical height of the projected image H indicates horiz...

Page 105: ...vailable to adjust FOCUS while the FOCUS adjustment bar is displayed on TIP To obtain the best focus perform the following for fixed installation Preparation Warm up the projector for one hour 1 Use the FOCUS buttons to make sure you obtain the best focus If you do not move the projector back and forth 2 Press the TEST button on the remote control to display the test pattern 3 Keep pressing the FO...

Page 106: ...K 11ZM L4K 15ZM or L4K 20ZM lens units perform the image surface adjustment before adjusting the lens focus Adjustment procedure 1 Loosen the lock bolt 2 Set the dial to the value of the projection distance Example If the projection distance is 20 m set the dial to between 15 and 25 3 Tighten the lock bolt 45 25 15 12 10 7 5 m Dial Lock bolt ...

Page 107: ...ll be displayed on The zoom is adjusted On the remote control while pressing on the CTL button press the D ZOOM ZOOM or button or buttons on the cabinet or the remote control are available to adjust ZOOM while the ZOOM adjustment bar is displayed on The zoom of the lens unit L2K 10F1 cannot be adjusted ...

Page 108: ...al equipment No connection cables are included with this unit Use the appropriate cables for the connections CAUTION For HDMI DisplayPort BNC and LAN please use a shielded cable Use of other cables may cause interference with radio and television reception 3 4 2 1 Professional video equipment etc Computer etc Blu ray player etc HDBaseT transmission device etc ...

Page 109: ...ojector supports HDMI signals HDCP from transmission devices control signals from external devices serial LAN and remote control signals IR commands The maximum transmission distance over the LAN cable is 100 m the maximum distance is 70 m for a 4K signal Please do not use other transmission equipment between the projector and transmission equipment The picture quality may be degraded as a result ...

Page 110: ... the two screws on the SLOT cover of the LV unit Remove the two screws and the SLOT cover NOTE Keep the two screws and the slot cover 2 Insert the optional board into the slot Make sure that the board is inserted into the slot in the correct orientation Incorrect orientation may cause miscommunication between the optional board and projector 3 Tighten the two screws on both sides of the slot Be su...

Page 111: ... orange the buzzer sound is released when NOTIFICATION SET TING for BUZZER is ON Power On Steady green light Standby Steady orenge light Press twice 3 After the projector enters the standby state turn off the projector power switch 1 then the light power switch 2 The POWER indicator will go off and the main power will turn off While the POWER indicator is blinking green in short cycles the power c...

Page 112: ...g images While the power is on During the cooling after the power is turned off After you have made the adjustments and closed the adjustment screen do not turn off the projector power switch and light source power switch or pull out the power plug from the wall outlet or shut down the AC power supply for about 10 seconds The adjustment values may be initialized if the AC power supply is shut down...

Page 113: ...RGE MEDIUM SMALL COLOR TEMPERATURE 3 DYNAMIC CONTRAST OFF MOTION IMAGE STILL IMAGE LIGHT MODE LIGHT ADJUST CONSTANT BRIGHTNESS OFF OFF ON WHITE BALANCE CONTRAST R 0 CONTRAST G 0 CONTRAST B 0 BRIGHTNESS R 0 BRIGHTNESS G 0 BRIGHTNESS B 0 COLOR CORRECTION RED 0 HUE SATURATION GREEN 0 HUE SATURATION BLUE 0 HUE SATURATION YELLOW 0 HUE SATURATION MAGENTA 0 HUE SATURATION CYAN 0 HUE SATURATION COLOR SETT...

Page 114: ...2 SDI3 SDI4 HDMI1 HDMI2 DisplayPort1 DisplayPort2 SUB3 INPUT SDI1 SDI2 SDI3 SDI4 HDMI1 HDMI2 DisplayPort1 DisplayPort2 PORTRAIT ANGLE 0 0 90 270 MAIN POSITION SUB POSITION GEOMETRIC CORRECTION MODE OFF OFF KEYSTONE CORNERSTONE HORIZONTAL CORNER VERTICAL CORNER WARP PC TOOL KEYSTONE HORIZONTAL VERTICAL TILT THROW RATIO CORNERSTONE TOP LEFT TOP TOP RIGHT LEFT RIGHT BOTTOM LEFT BOTTOM BOTTOM RIGHT HO...

Page 115: ...00 H 2000 H 5000 H 10000 H 20000 H MENU 2 MENU ANGLE 0 0 90 270 MENU POSITION CENTER TOP LEFT TOP CENTER TOP RIGHT CENTER LEFT CENTER CENTER RIGHT BOTTOM LEFT BOTTOM CENTER BOTTOM RIGHT INSTALLA TION 1 ORIENTATION DESKTOP FRONT DESKTOP FRONT CEILING REAR DESKTOP REAR CEILING FRONT SCREEN TYPE FREE FREE 4 3 SCREEN 16 9 SCREEN 16 10 SCREEN WALL COLOR OFF OFF WHITEBOARD BLACKBOARD BLACKBOARD GRAY LIG...

Page 116: ...0 30 01 00 01 30 02 00 02 30 03 00 03 30 04 00 04 30 05 00 05 30 06 00 06 30 07 00 07 30 08 00 08 30 09 00 09 30 10 00 10 30 11 00 11 30 12 00 12 30 13 00 DATE AND TIME SETTINGS DATE MM DD YYYY TIME HH MM INTERNET TIME SERVER OFF ON IP ADDRESS UPDATE SUMMER TIME SETTINGS ENABLE OFF ON MON START 1 2 3 4 5 6 7 8 9 10 11 12 DAY START FIRST WEEK SECOND WEEK THIRD WEEK FOURTH WEEK LAST WEEK SUN MON TUE...

Page 117: ...E OPTIONS 1 DEFAULT INPUT SELECT LAST LAST AUTO HDMI1 HDMI2 DisplayPort1 DisplayPort2 HDBaseT SDI1 SDI2 SDI3 SDI4 SLOT SEAMLESS SWITCHING OFF OFF ON BACKGROUND BLUE BLUE BLACK LOGO EDID VERSION HDMI1 MODE2 MODE1 MODE2 HDMI2 MODE2 MODE1 MODE2 HDCP VERSION HDMI1 HDCP2 2 HDCP2 2 HDCP1 4 HDMI2 HDCP2 2 HDCP2 2 HDCP1 4 HDBaseT HDCP1 4 HDCP2 2 HDCP1 4 SOURCE OPTIONS 2 SDI LINK SINGLE QUAD QUAD 2SI DUAL D...

Page 118: ...AN 1 NETWORK INTERFACE IP ADDRESS SUBNET MASK GATEWAY MAC ADDRESS DNS WIRED LAN 2 NETWORK INTERFACE IP ADDRESS SUBNET MASK GATEWAY MAC ADDRESS DNS VERSION 1 FIRMWARE DATA FIRMWARE2 OTHERS DATE TIME PROJECTOR NAME MODEL NO SERIAL NUMBER CONTROL ID 4 LENS ID CONDITIONS INTAKE TEMPERATURE1 INTAKE TEMPERATURE2 INTAKE TEMPERATURE3 INTAKE TEMPERATURE4 ATMOSPHERIC PRESSURE ACIN VOLTAGE HDBaseT SIGNAL QUA...

Page 119: ...ed to accumulate there may cause heating inside which leads to functional trouble The interval which can vary with the location of your projector is about 100 hours Do not damage the cabinet by scratching it or allowing hard objects to hit it This can scratch the projector Consult your dealer distributor about cleaning the inside of the projector NOTE Do not allow insecticide or other volatile liq...

Page 120: ...ter first turn off the power make sure the cooling fan has completely stopped then turn off the AC power Make sure the unit has cooled down completely before cleaning the filter Removing the filter cover while the unit is running could result in burns or electric shock from contact with internal parts The unit uses a two layer metal mesh filter installed behind the filter cover With regular cleani...

Page 121: ...op part of the air filter towards you Once you have freed the upper half of the air filter remove the filter by pulling it diagonally upwards 3 Lift the air filter in the direction of the arrow and re move it 4 Remove the air filters 1 Slide the upper air filter to the position shown below ...

Page 122: ... sides of all the filters 2 Remove the dust from the grates on the outside of the projector as well Be sure to also remove any dust stuck to the louver blind with angled horizontal slats with a vacuum cleaner NOTE Whenever you vacuum the filter use the soft brush attachment to vacuum This is to avoid damage to the filter Do not wash the filter with water Doing so can result in dam age to the filte...

Page 123: ...lean the other intake vent air filters in the same way Clean the other intake vent air filters in the same way as in steps 2 to 7 NOTE Before turning on the power make sure that all filter covers are in place If they are not fitted properly dust could get inside the projector causing it to malfunction Reset air filter usage time after cleaning the filters 6 3 2 Resetting the Air Filter Usage Time ...

Page 124: ...0 60 HDTV 1080i 1920 1080 16 9 48 50 60 HDTV 720p 1280 720 16 9 50 60 SDTV 480p 720 1440 480 4 3 16 9 60 SDTV 576p 720 1440 576 4 3 16 9 50 SDTV 480i 1440 480 4 3 16 9 60 SDTV 576i 1440 576 4 3 16 9 50 DisplayPort Signal Resolution dots Aspect Ratio Refresh Rate Hz VGA 640 480 4 3 60 SVGA 800 600 4 3 60 XGA 1024 768 4 3 60 HD 1280 720 16 9 60 WXGA 1280 768 15 9 60 1280 800 16 10 60 Quad VGA 1280 9...

Page 125: ...60 HDBaseT DisplayPort 3D Signal Resolution dots Aspect Ratio Refresh Rate Hz 3D Format 1920 1080p 16 9 23 98 24 Frame Packing Side By Side Half Top and Bottom 25 Frame Packing Side By Side Half Top and Bottom 29 97 30 Frame Packing Side By Side Half Top and Bottom 1280 720p 16 9 23 98 24 Frame Packing Side By Side Half Top and Bottom 25 Frame Packing Side By Side Half Top and Bottom 29 97 30 Fram...

Page 126: ...S Indicator Indicator display Projector status Procedure Off No problem Flashing Green short flashes Shutter is closed Green long flashes Power on The light mod ule is turned off Orange Button has been pressed while projector is in key lock mode The projector s keys are locked The setting must be can celed to operate the projector Projector s ID number and remote control s ID number do not match C...

Page 127: ...room temperature SHUTTER Indicator Indicator display Projector status Off Shutter is open Flashing Green Performing the lens calibration Orange Lens calibration implement request Lit Green Shutter is closed Orange On screen muting KEY LOCK Indicator Indicator display Projector status Off CONTROL PANEL LOCK OFF Lit Orange CONTROL PANEL LOCK ON REAR LED When REAR LED under NOTIFICATION SETTINGS is s...

Page 128: ...or s temperature protector is simultaneously activated and the projector s power turns off If this happens do the following Unplug the power cable from the power outlet If using in a place where the surrounding temperature is high move the projector to a different cool place If there is dust in the ventilation holes clean page 93 94 Wait as such about 1 hour for the projector s internal temperatur...

Page 129: ... 1 3 5 7 9 11 13 15 17 19 2 4 6 8 10 12 14 16 18 20 Pin No Signal Pin No Signal 1 Main link lane 3 11 Grounding 0 2 Grounding 3 12 Main link lane 0 3 Main link lane 3 13 Configuration 1 4 Main link lane 2 14 Configuration 2 5 Grounding 2 15 Supplementary channel 6 Main link lane 2 16 Grounding 4 7 Main link lane 1 17 Supplementary channel 8 Grounding 1 18 Hot plug detection 9 Main link lane 1 19 R...

Page 130: ...ntrol IN 6 EXT_GPIN2 Control IN 7 EXT_GPIN3 Control IN 8 EXT_GPIN4 Control IN 9 GPOUT1 External 3D L R Output Reference OUT 10 reserved OUT 11 reserved OUT 12 reserved OUT 13 reserved OUT 14 reserved OUT 15 reserved OUT 16 reserved OUT 17 NC not connected 18 GND PWR 19 GND PWR Pin No Signal Name I O 20 reserved IN 21 reserved IN 22 reserved IN 23 reserved IN 24 EXT_GPIN1 Control IN 25 EXT_GPIN2 Co...

Page 131: ...wing functions apply depending on the combination of input terminals OFF OFF OFF ON Power ON OFF OFF ON OFF Power OFF OFF OFF ON ON Shutter CLOSE OFF ON OFF OFF Shutter OPEN OFF ON OFF ON Select HDMI1 OFF ON ON OFF Select DisplayPort1 OFF ON ON ON Select SDI1 ON OFF OFF OFF Select SDI2 ON OFF OFF ON Select SDI3 ON OFF ON OFF Select SDI4 ON OFF ON ON Select HDBaseT ON ON OFF OFF Select SLOT ON ON O...

Page 132: ...106 7 Appendix Timing chart of GPIO control Example of Select HDMI1 Off at least 300 ms at least 300 ms approx 300 ms Execute Select HDMI1 time 5 24 7 26 6 25 8 27 on off on off ...

Page 133: ...ector 8 3D_INPUT_REFER ENCE IN 3D L R timing signal Connects to the anode of the input diode of the photo coupler inside the projector 9 12V PWR Supplies power 12V to the 3D image system 10 3D_INPUT_REFER ENCE IN 3D L R timing signal Connects to the cathode of the input diode of the photo coupler inside the projector 11 3D_DISPLAY_REFER ENCE IN 3D L R display timing signal Connects to the anode of...

Page 134: ...abnormality occurs in the projector Follow the following procedure to recover from the interlock state 1 Disconnect the AC power supply to the projector body 2 Remove the plate inlet or side panel page 17 31 3 Connect the contacts to the remote interlock connector and attach the plate inlet or side panel 4 Connect the AC power supply to the projector body Remote interlock connector exterior view 1...

Page 135: ...rnal contacts can be connected If you are only using a single set of external contacts connecting the shorting wire to the interlock terminal you are not using The minimum rating required of the external contacts is 2mA When the length of the wiring is at least 5 m approximate Remove shorting wire 1 and shorting wire 2 and connect the external device to the projector interlock terminals 2 and 3 do...

Page 136: ...the type of LAN cable please ask to your network administrator CONNECTION INTERFACE 1 Connection thru the serial port Communication Protocol Item Information Baud rate 115200 38400 19200 9600 4800 bps Data length 8 bits Parity bit No parity Stop bit 1 bit Flow control None Communications procedure Full duplex 2 Connection via network Communication Protocol Connection via LAN Item Information Commu...

Page 137: ...splayport1 or displayport DisplayPort2 displayport2 displayport2 HDBaseT hdbaset hdbaset or hdbaset1 SDI1 sdi1 sdi1 or sdi SDI2 sdi2 sdi2 SDI3 sdi3 sdi3 SDI4 sdi4 sdi4 SLOT slot slot or slot1 Status command Response Error Status error temp Temperature error error fan Fan trouble error light Light source trouble error lens Lens trouble error system System trouble ...

Page 138: ...112 7 Appendix 1180 46 5 116 4 6 1412 55 6 697 27 4 244 5 9 6 278 5 11 519 1 20 4 454 6 17 9 64 5 2 5 410 16 1 7 6 Outline Drawing Unit mm inch ...

Page 139: ...g or inclining the projector check that all the filter covers are properly mounted If not the stoppers may come off during the installation procedure and the filter covers could fall 7 7 1 Installing the Projector on the Ceiling To install the projector on the ceiling install it by referring to the following specifications 170 840 97 5 985 48 5 600 320 540 131 8 433 4 Max M8x20 Max M8x20 Max M8x20...

Page 140: ...or side surface of the blocks shown in the diagram below Max M10x20 Max M10x20 Max M10x20 Max M10x20 NOTE Cautions when using eye bolts When mounting eye bolts on the side surface and suspending the projector from the side be sure to use swivel eye bolts Also use a cushioning material over the wire in parts where it comes in contact with the projector to protect the projector from scratches ...

Page 141: ...amage malfunction or hazardous laser radiation exposure Also the intake vent may become blocked causing the unit s internal temperature to rise resulting in malfunction and risk of fire For portrait installation the intake vents must be installed at the top and bottom To ensure air flow to the bottom intake vent a rack to support the unit is necessary Please hire an installation service provider f...

Page 142: ...take openings on the front intake openings on the top side Make sure that the design does not obstruct these open ings Also make sure to secure enough space to allow easy removal of the filter cover for cleaning the filter Remove the level adjusters or the projector handles in case these hit against the stand For removing the level adjuster rotate the level adjuster itself and for removing the han...

Page 143: ...rectly on top of one another when installing them When the projectors are piled up on top of one another they may fall down resulting in damage and failure The following installation is recommended when combining the installation of two projectors Please leave sufficient space on the left and right of the projector Cabinet WARNING Please request the retail store for special installation services s...

Page 144: ...t Terminates DCC Select Projector Displays the Projector Select screen See page 55 Option Always on Top Select whether the DCC screen is always displayed as the first screen At activation Not display first is selected Not checked The DCC screen is not displayed in the foreground Checked The DCC screen is always displayed in the foreground Disp Local Time Sets the date and time for when logs are di...

Page 145: ... menu buttons to the menu bar by dragging the menu buttons from the tree menu found on the left To remove menu buttons that you have added right click on the menu button you want to remove then click Delete menu Shield button The DCC controls can be disabled by this button to prevent inadvertent operation The Shield button is displayed in orange Press the Shield button again to return to the origi...

Page 146: ...nu selected here appears on the right part of the main window Tab display The windows displayed on the main window appear as tabs at the bottom of the screen and you can change the display by clicking on a tab Click x to close a tab ...

Page 147: ...s of the projector is displayed through a number of icons 2 1 3 1 Laser warning icon Indicates whether the laser is illuminated or not on or off yellow Laser light ON gray Laser light OFF 2 Shutter icon Displays the status of the shutter open closed yellow Shutter is open gray Shutter is closed 3 Error Status Icon Displays an error or warning Error is displayed in red and Warning is orange ...

Page 148: ... 2 Click the button of the mode to change 3 Input the passcode and click OK button When changing to the User mode you do not need to input the passcode is not needed NOTE When you enter the password pay enough attention to people around for the password abuse prevention If you have anxiety the password is cheated change the password immediately Before entering the password inspect the password ent...

Page 149: ...123 7 Appendix TIP When the mode is changed the Change mode button is displayed as shown below User mode Service mode ...

Page 150: ...unit Status Allows you to check version information You can also save the logs that are saved in the projector main unit onto a computer Usage Displays the usage times of the following System Light Phosphor Diffuser Filter Fan etc Temperature Displays the temperatures and atmospheric pressure of each part of the projector FAN Speed Display the fan speeds of each part of the projector as well as th...

Page 151: ...125 7 Appendix INFORMATION Screen Status Click the STATUS button from the menu bar to go to the STATUS screen From the STATUS screen you can check the Projector setting status ...

Page 152: ...o display the INFORMATION Usage screen This screen allows you to check the usage times of the main projector unit cooling fan light source phosphor and diffuser as well as other information such as the air filter usage time and the number of times the light source has been turned on ...

Page 153: ...RMATION Screen Temperature Click the Temperature button on the tree menu to display the INFORMATION Temperature screen This screen displays the temperatures and atmospheric pressure of each internal part of the projector ...

Page 154: ...ORMATION Screen FAN Speed Click the FAN Speed button on the tree menu to display the INFORMATION FAN Speed screen This screen displays the fan speeds of each part of the projector as well as the Phosphor Diffuser speeds ...

Page 155: ...mperature Log button Displays the Temperature Log screen This displays a record of the temperature from when the projector was turned on until it was turned off peak hold Pressure Log button Displays the Pressure Log screen This displays a record of the atmospheric pressure from when the projector was turned on until it was turned off peak hold FAN Speed log button Displays the FAN Speed Log scree...

Page 156: ...t setting 30days Displays the log for the last 30 days including today 2years Displays the log for the last 2 years including today Manual Displays the log for the specified period from From to To From Selects the start date of the period for which to display the logs To Selects the end date of the period for which to display the logs Click Today in the calendar to set to today s date OK button Di...

Page 157: ...131 7 Appendix System Error Log Screen This screen displays a log inside the projector main unit errors Filter button Sets the period of the log to display Exit button Returns to the previous screen ...

Page 158: ...Button Sets the period of the log to display Data Time Displays the date and time Reset Displays the reset subject Usage Displays usage time prior to resetting System AC On Displays the projector usage time AC On prior to resetting System Power On Displays the projector usage time Power On prior to resetting Clear button Clears the usage reset log and closes the screen Refresh button Updates the d...

Page 159: ...og when the power is turned off is displayed in sequential order in the Temperature Log detail screen When saved as a log information at the time when the log was recorded all temperatures fan speeds and light outputs within the projector is also saved in addition to the maximum tem perature and date and time of each item Temperature Log detail screen Log button Displays previous logs Pressure Log...

Page 160: ...red and dates and times for each item from when the power was last turned on until now The information that is saved in the log when the power is turned off is displayed in sequential order in the Fan Speed Log detail screen FAN Speed Log detail screen Operation Log Screen This screen displays a record of the operation of the projector 7 8 4 Creating logs 1 Click the Create log button on the menu ...

Page 161: ...tion range and click the OK button 3 Select where to save the log and click the Save button Log creation processing starts The progress bar is displayed while the log is being created Once the log has been created the normal screen reappears ...

Page 162: ...ort thedrgroup co nz In Asia NEC Display Solutions Ltd Address 686 1 Nishioi Oi Machi Ashigarakami Gun Kanagawa 258 0117 Japan Telephone 81 465 85 2369 NEC China Co Ltd Address 6F Landmark diplomatic office building D2 No 19 East Road Chaoyang District Beijing 100600 R P C Telephone 010 59342706 NEC Hong Kong Ltd Address 25 F The Metropolis Tower 10 Metropolis Drive Hunghom Kowloon Hong Kong Telep...

Reviews: