background image

AIT Data Cartridge 29

AIT Data Cartridge

This chapter explains how to handle the AIT data cartridge.

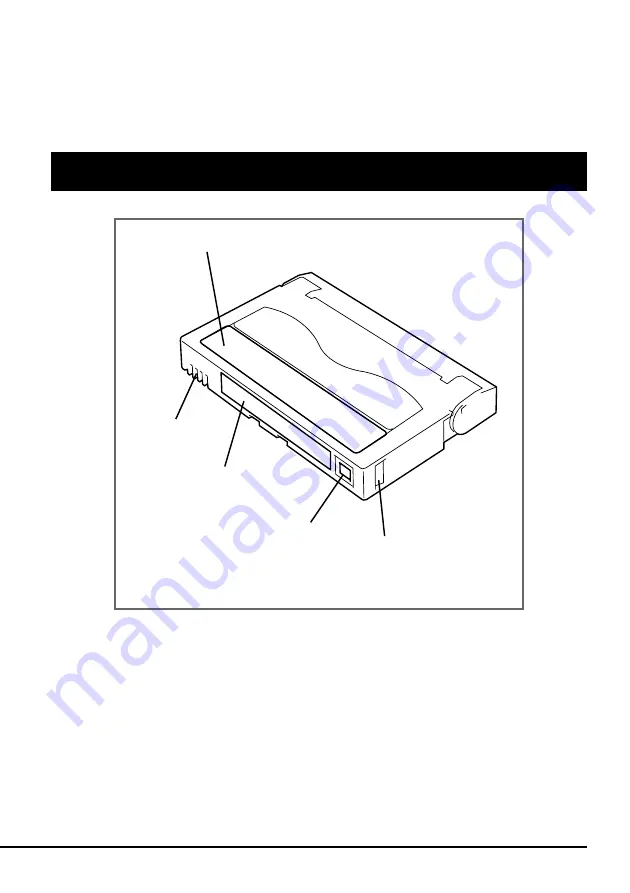
Data Cartridge Part Name and Function

Label paste position

Label paste position

Write-protect plug

Handle for insertion/ejection
(The same one is provided on
the opposite site.)

Memory terminal

Summary of Contents for N8551-29F

Page 1: ...4 651 174 11 1 N8551 29F Built In AIT Auto Loader Unit Instruction Manual Make sure you read this manual before using the product After reading this manual carefully store it in a safe place ...

Page 2: ...s situations The instruction manual uses the words WARNING and CAUTION to indicate the degree of the danger Each word is defined as below WARNING This symbol indicates the presence of a hazard that may result in death or severe personal damage if the given instructions are not strictly followed CAUTION This symbol indicates the presence of a hazard that may result in burn or injury and property da...

Page 3: ...The marks used in this manual and their meaning are shown below Awareness of caution Indicates that you may receive an electric shock if this instruction is ignored Indicates that the unit may generate smoke or catch fire if you ignore the instruction Prohibited Do not disassemble repair or remodel the Built In AIT Auto Loader Unit as it may cause an electric shock or fire Indicates general things...

Page 4: ...tions WARNING Do not disassemble or modify the Built In AIT Auto Loader Unit Do not disassemble or modify the N8551 29F Built In AIT Auto Loader Unit If you do so a fire or you may receive an electric shock Do not use the Built In AIT Auto Loader Unit if it emits smoke or a bad odor or makes an abnormal noise If smoke odor or abnormal noise is detected immediately turn off the basic processing uni...

Page 5: ...ly Connect the cable as explained in Mounting on the basic processing unit on page 7 of this manual Do not bend the cable Do not bend twist or bind the power and connection cables Also do not put a load on the cable or catch the cable between things The cable could be damaged and this may cause a fire or electric shock Do not connect or disconnect the cable without removing the plug When connectin...

Page 6: ...e caused Do not block the fan Do not block the fan on the rear of the Built In AIT Auto Loader Unit The inner temperature will rise and may cause a malfunction fire and electric shock Do not put water or foreign materials in the Built In AIT Auto Loader Unit Do not put water other liquids or foreign materials such as pins and clips in the Built In AIT Auto Loader Unit This may cause a fire electri...

Page 7: ... Built In AIT Auto Loader Unit in a humid place for example near a hot water supply If you reinstall the Built In AIT Auto Loader Unit a fire may be caused Do not use cellular phones or pagers near the unit Do not use cellular phones or pagers near this unit Doing so may cause a machine malfunction ...

Page 8: ...e backup data Do not store the Built In AIT Auto Loader Unit in a place exposed to direct sunlight The Built In AIT Auto Loader Unit may not be able to operate correctly Do not store the Built In AIT Auto Loader Unit in a place subject to corrosive gas chemicals or splashing of chemicals The Built In AIT Auto Loader Unit may get deformed or damaged and may not operate correctly Do not store the Bu...

Page 9: ...Do not store the magazine in a dusty humid place or in a place subject to direct sunlight Data within the data cartridge set in the magazine may be damaged Do not store the magazine in a place subject to drastic temperature fluctuations Data within the data cartridge set in the magazine may be damaged Do not store the magazine in a place subject to strong vibrations The magazine may be damaged and...

Page 10: ...ine s write protect plug is set to Write Disabled REC It is recommended that you should label the magazine so that you can check the contents of the data cartridge set in the magazine Use the magazine specially designed for the N8551 29F Built In AIT Auto Loader Unit If you use a magazine of another make a read write error may occur In addition data may be damaged and Built In AIT Auto Loader Unit...

Page 11: ...ment For the disposal of the N8551 29F Built In AIT Auto Loader Unit and its cartridge observe the waste disposal rules of your local government For details contact the local government office Important If a driver failure occurs because you have used a device or interface cable of another manufac turer the third party or those which have not been approved by NEC you may not be provided with the N...

Page 12: ...or approval is prohibited 2 The information contained in this document is subject to change at any time without prior notice 3 Reprinting or changing of this document without prior approval of NEC is prohibited 4 All efforts have been made to ensure that the contents of this manual are correct however should any doubts arise or errors or missed entries be detected NEC would greatly appreciate it i...

Page 13: ... Unit The Built In AIT Auto Loader Unit will ensure smooth backup application and management of your important data To maximize the N8551 29F Built In AIT Auto Loader Unit functions please read the instruction manual carefully before use and fully understand how to handle the device ...

Page 14: ...T Auto Loader Unit is being used first time refer to the instruction manual in the following sequence to perform the setup after unpacking the driver 1 Check the contents in the package Package Contents P xvi 2 Learn the operational precaution Precautions during Use P iv 3 Learn the parts of the Built In AIT Auto Loader Unit Part Name and Function P 2 to 3 4 Set before installation Setup P 4 to 7 ...

Page 15: ... see the beginning of the manual Important Indicates the points which must be observed when handling the Built In AIT Auto Loader Unit and the issues to which special attention must to be paid Check Indicates the points which you should check when handling the Built In AIT Auto Loader Unit Hint Indicates useful information and operational help ...

Page 16: ...nt or part is missing or damaged contact your dealer Important Locking parts contained in the package or box will be required when removing the Built In AIT Auto Loader Unit for transportation Store them securely Copy a backup from the provided floppy disk Keep the provided floppy disk as the master disk and use the backup disk in actual applications Screws 4 Instruction manual this manual Instruc...

Page 17: ...rtridge 11 Ejecting the AIT data cartridge 14 Setting the magazine 16 Selecting the AIT data cartridge 17 Ejecting the magazine 18 Reading writing data 18 LCD 18 Lamp indication 20 Precautions during Use Please read this chapter Safety Considerations iv For Correct Operation viii Others xi Transfer to a third party xi Disposal of consumed parts and equipment xi Introduction xiii Organization of th...

Page 18: ... 25 Cleaning 26 Cleaning the read write head 26 Cleaning the driver 27 AIT Data Cartridge Data Cartridge Part Name and Function 29 Operation Storage and Transportation Requirements 30 Label 30 Label paste position 30 Precautions on entry to label 31 Write protect 31 Precautions on Handling 32 Operational precautions 32 General precautions 32 Usage Inhibition Standard 33 Service Life 33 Storing Imp...

Page 19: ... and 25 to 50 GB of data on the AIT1 Data Cartridge The basic processing unit automatically determines whether data recorded on the AIT data cartridges is compressed It can also read data recorded on AIT data cartridges with conven tional AIT drives 1 The compression rate for recorded data may differ depending on the user environment and the type of data 100 GB can be recorded when using twice the...

Page 20: ...P 21 ENTER button Press this button when setting the AIT data cartridge selected with SELECT button in the read write drive in within the Built In AIT Auto Loader Unit P 17 You can also use this when creating a menu using a LCD P 21 LCD An indicator which shows the status of the Built In AIT Auto Loader Unit and the AIT data cartridge set in the Built In AIT Auto Loader Unit P 18 You can also use ...

Page 21: ...2 3 4 5 6 7 8 ON DIP switch Switches which set the Built In AIT Auto Loader Unit P 6 Magazine Write protect plug A switch which enables disables writing to the inserted AIT data cartridge P ix Data cartridge slot A slot into which an AIT data cartridge is inserted P 11 Release switch Press this switch when ejecting the inserted AIT data cartridge P 14 Safety lock This hook prevents magazines with ...

Page 22: ...In AIT Auto Loader Unit SCSI ID factory set to ID4 Parity function factory set to Enabled Hint SCSI ID pin 0 to 3 from right Unused NC Parity PD Without strap means that one strap is attached to one of the two pins or that the strap has been removed altogether If you remove the strap make sure you store it in a safe place Hint With strap means a status that the straps are attached to two pins With...

Page 23: ... Check Check that the Built In AIT Auto Leader Unit s SCSI ID is not duplicated with SCSI ID of other SCSI device SCSI ID Pin 3 Pin 2 Pin 1 Pin0 0 1 2 3 4 1 5 6 7 2 8 9 10 11 12 13 14 15 With strap Without strap 1 Factory set value 2 Do not set SCSI ID to ID7 Pin 3 Factory set to Without strap Pin 2 Factory set to With strap Pin 1 Factory set to Without strap Pin 0 Factory set to Without strap ...

Page 24: ... function Enabled Without strap Setting the Built In AIT Auto Loader Unit Setting with the DIP switch The DIP switch on the bottom of the Built In AIT Auto Loader Unit enables you to change the following settings Terminator Power Terminator power supply Factory set to ON DC Control 1 Data compression setting Factory set to ON DC Control 2 Data compression setting Factory set to OFF 1 2 3 4 5 6 7 8...

Page 25: ...ession function Setting data compression DC Control 2 Set whether control of data compression from the backup software is enabled or disabled Use Switch 8 Setting Switch 8 to ON will disable control of data compression from the backup software setting Switch 8 to OFF factory set to OFF will enable control of data compression from the backup software Mounting on the basic processing unit CAUTION Be...

Page 26: ... of the basic processing unit 4 Remove the mounting reel of the 5 25 inch device bay of the basic processing unit Example of the mounting reel of the basic processing unit The mounting reel may differ from the following illustration depending on the type of basic processing unit you are using Mounting reel 5 Mount the mounting reel removed in step 4 on the Built In AIT Auto Loader Unit Check Fix t...

Page 27: ...nectors of the provided power relay cable to the power connector on the rear of the Built In AIT Auto Loader Unit and the other side of the power relay cable to the power cable connector of the basic processing unit Check This unit does not have a built in terminator When connecting this unit to the last terminal of the SCSI bus terminal attach a terminator to the end of the SCSI cable when mounti...

Page 28: ...orientation of the Built In AIT Auto Loader Unit s LCD can be changed so that it fits the Built In AIT Auto Loader Unit s installation orientation in the basic processing unit see P 24 Check Set the maximum transfer rates as follows according to the number of devices connected to the bus and the SCSI cable length SCSI ID Maximum transfer Data bus Maximum cable Maximum number rate Mbyte s width bit...

Page 29: ...magazine in which only three or less cartridges are contained a machine failure or damage of backup data may be caused The AIT data cartridges set in the magazine are assigned numbers as below Do not set them in the wrong order 3 2 4 1 Check When write protect is enabled using the AIT data cartridge write protect plug so that you cannot write data in the data cartridge the write protect indicator ...

Page 30: ...own at right 2 Insert AIT data cartridges No 1 and No 2 into the lower row of the magazine in this order 3 Insert AIT data cartridges No 3 and No 4 into the upper row of the magazine in this order Important Insert the AIT data cartridges in the correct orientation Wrong examples Continue to the next page ...

Page 31: ...ty lock on the magazine is protruding preventing the magazine from being inserted into this unit Check that the safety lock is not protruding before inserting the magazine Further do not force the magazine into this unit when the safety lock is protruding This will result in damaging the safety lock the magazine and other components and the AIT data cartridges The following precautions are written...

Page 32: ...nd hold the magazine up rightly Check Do not face the magazine slot down ward when ejecting the cartridge The cartridge may fall and get damaged 2 While holding down the release key on the magazine push out the cartridge along the magazine groove AIT data cartridge No 1 is slightly ejected from the slot 3 Remove the cartridge from the magazine by holding its both edges ...

Page 33: ...remove them from the magazine 5 Face the magazine slot upward Shake it up and down and apply a soft material such as a palm to the magazine Then the AIT data cartridges set in the upper row shift down to the lower row 6 In the same manner as in step 2 push out AIT data cartridge No 4 and remove it from the magazine ...

Page 34: ...t plug so that you cannot write data in the data cartridge the write protect indicator lights after the magazine is set in the Built In AIT Auto Loader Unit 1 Turn on the basic processing unit Check that the driver s BUSY lamp and TAPE lamp go off 2 Insert the magazine into the Built In AIT Auto Loader Unit s slot in the orientation as shown at right By inserting the magazine to the extent the dat...

Page 35: ...ocessing unit They can also be selected using the button and the LCD on the front of the Built In AIT Auto Loader Unit Select the cartridges as shown below Check The Built In AIT Auto Loader Unit does not function at all by pressing the SELECT button in the following situations Within 75 seconds after setting the magazine When Ready does not appear in the LCD While the BUSY lamp is blinking The Bu...

Page 36: ...ected from the Built In AIT Auto Loader Unit after pressing the EJECT button The Built In AIT Auto Loader Unit does not do anything by pressing the EJECT button while the BUSY lamp is blinking Reading writing data To read write the data from to the AIT cartridge and compress the data to be written refer to the instruction manual provided with the backup software LCD The LCD on the front of the Bui...

Page 37: ...rtridge number lights again Write protect indicator Lights when the AIT cartridge or the magazine is write protected To enable the write protect function use the write protect tab of the AIT cartridge or the magazine AIT cartridge types Displays the type of AIT data cartridge AIT1 or AIT2 set in the read write drive Data compression indicator Lights when the Built In AIT Auto Loader Unit can use t...

Page 38: ...AIT data cartridges BUSY lamp green Lights when the SCSI interface is enabled Blinks while the AIT cartridge set in the read write drive is being read written or searched or while the tape is rewinding TAPE lamp green Lights when the AIT cartridge is set in the read write drive Blinks while the AIT cartridge is being inserted into or ejected from the read write drive ...

Page 39: ...set in the Built In AIT Auto Loader Unit you can display the menu screen to change and check settings only when Ready appears in the LCD However to change the setting of Language you must remove the magazine in advance 1 Check that the basic processing unit is ON 2 Hold down the SELECT button for 5 seconds The LCD indication is switched to the menu screen 3 Press the SELECT button to place the cur...

Page 40: ...on the right On this screen you can set operations for the first cartridge after you have inserted the magazine OFF Only checks the cartridges in the magazine Default setting Use this mode for normal operation ON The first cartridge is automatically loaded into the read or write drive after the cartridges in the magazine have been checked 1 Press the SELECT button to place the cursor at the requir...

Page 41: ... item To cancel the selection and return to the menu screen press the EJECT button 2 By pressing the ENTER button after selection the setting value is saved and the menu screen appears again Contrast Adjust brightness When selecting Contrast from the menu screen the sub menu as shown at right appears On this screen you can control the LCD brightness contrast Every time you press the SELECT button ...

Page 42: ...with the Built In AIT Auto Loader Unit installation orientation Hint When the orientation is set in the menu the top of the Built In AIT Auto Loader Unit is always displayed upward Set Horizontal when the Built In AIT Auto Loader Unit is installed horizontally Set R side down when the Built In AIT Auto Loader Unit is installed vertically with its right side down Orientation Horizontal R side down ...

Page 43: ...guage Important Before setting Language remove the magazine from the Built In AIT Auto Loader Unit Other wise you cannot change the Language setting When selecting Language from the menu screen the sub menu as shown at right appears On this screen you can set the language of messages to be displayed in the LCD You can select English French German or Spanish Press the SELECT button to place the cur...

Page 44: ...ridge tape surface or rewind the tape You can use the cleaning cartridge for about 70 times When the STATUS lamp blinks at a given interval during cleaning the cleaning cartridge tape comes to the end Eject the cleaning cartridge tape and check that all the tapes are wound around the right reel Purchase a new cleaning cartridge tape 1 Set a cleaning cartridge and three AIT data cartridges in the m...

Page 45: ...uld clean the read write head using the cleaning cartridge once a week The cleaning frequency varies depending on the operating environment generation of dust and dirt and the operation frequency When using the Built In AIT Auto Loader Unit every day in a typical office a weekly cleaning is recommended Cleaning the driver When the Built In AIT Auto Loader Unit looks contaminated gently wipe it wit...

Page 46: ......

Page 47: ...s chapter explains how to handle the AIT data cartridge Data Cartridge Part Name and Function Label paste position Label paste position Write protect plug Handle for insertion ejection The same one is provided on the opposite site Memory terminal ...

Page 48: ...emperature 5 to 32 C Humidity 20 to 60 The maximum temperature of wet bulb is 26 C Storage condition Store an AIT data cartridge in a protective case with cover You can place the case horizontally or vertically Transportation requirement Temperature 40 to 45 C Humidity 5 to 80 The maximum temperature of wet bulb is 26 C Temperature gradient 10 C hour Transportation condition Store an AIT data cart...

Page 49: ...g a label other than the specified INDEX label its size should be the same as the specified label Enter the date when starting to use the cartridge in the provided INDEX label It will help you check the AIT data cartridge service life Write protect Write enable Write disable Write protect plug Write enable Write disable Write protect plug AIT2 AIT1 By setting the write protect plug as shown at rig...

Page 50: ...oader Unit Set the cartridges as explained in Setting the AIT data cartridge Close the empty protective case firmly and store it in a place free of dust and dirt After use Be sure to put the AIT data cartridge that you used in the protective case and store it in a place free of dust and dirt You can place it horizontally or vertically General precautions Tape cover Tape surface Do not touch the me...

Page 51: ...ce Life The service life of the AIT data cartridge varies greatly depending on temperature and humidity in the operating storage environment dust and dirt and head abrasion condition You can judge its service life in the following sequence Assign a management number to a new AIT data cartridge Enter the number in the AIT data cartridge label Create the AIT data cartridge management book Record the...

Page 52: ... due to dust or dirt you can recover the data from the other tape Thus you can prevent loss of important data and programs Managing 3 generation Data To store the data on the disk you should manage the data in the three generations To manage the 3 generation data use three tapes A B C On the first day store the data on the disk in tape A On the second day store the data in tape B On the third day ...

Page 53: ... Burst data transfer speed SCSI 40 Mbyte second max synchronous Magazine IN OUT time 2 5 seconds average Cartridge replacement time 55 seconds average when SCSI is running Rewind time Less than 105 seconds when using AIT2 Data Cartridge Environmental requirement During operation Temperature 5 C to 40 C Humidity 20 to 80 no dew condensation allowed Highest dry bulb temperature 26 C During non opera...

Page 54: ... arm internal part move error E 030300 E 040100 E 040200 Drive arm internal part move error E 040300 E 050100 Push arm internal part move error E 050200 E 060100 Magazine slider move failure E 060200 E 070100 Magazine ejection error E 090100 Initialization error 040300xx Drive error peripheral device write error 040900xx Drive error error of devices after track 041501xx Drive error mechanical part...

Page 55: ... name version service pack batch application SCSI bus configuration SCSI ID device on the same bus Built In AIT Auto Loader Unit Auto Loader Unit installation environment Built In AIT Auto Loader Unit Auto Loader Unit installation environment temperature humidity dust Cartridge type Cleaning cartridge type Cleaning cartridge usage method of managing cleaning frequency operation frequency and start...

Page 56: ...Printed in Japan Printed on recycled paper ...

Reviews: