Release 6.0
320
User Guide
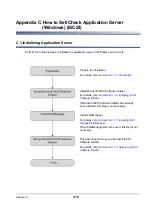
Appendix C How to Set/Check Application Server (Windows) (iSCSI)
C.1.1 Preparation
Perform the following steps to prepare for installation of application server in Windows environment:
1. Provide IP addresses for an application server
Prepare IP addresses to be assigned to the application server as many as the NIC (1000BASE-T or
10GBASE-SR) ports. In addition, prepare the subnet mask and gateway addresses by asking the
network administrator.
2. Attach NIC (1000BASE-T or 10GBASE-SR)
Attach the NIC to the application server as described in the manuals provided with the NIC and
application server.
3. Install the NIC (1000BASE-T or 10GBASE-SR) driver
Install and set up the driver according to the setup procedure in the manual provided with the NIC
equipped in the server, or by referencing information provided on the Web, etc.
4. Specify the network settings
Select
Start
>
Control Panel
>
Network Connection
, and then open
Local Area Connection
Properties
to specify the IP address, subnet mask, and default gateway.
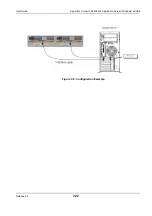
5. Connect to the disk array unit
Use a 10-Gbps or 1-Gbps cable to connect the application server to the host port (HP connector) of
the disk array unit.
Unit equipped with NF53x1-xF21xx (unit with 10Gbps iSCSI 2port controllers)
10-Gbps cable
Connector shape: LC connector
Unit equipped with NF53x1-xF11xx (unit with 1Gbps iSCSI 2port controllers)
1-Gbps cable
Connector shape: RJ-45 connector
If the NIC has already been attached to the application server, this step is not
necessary.
If the driver has already been installed and set up for the NIC equipped in the
application server, this step is not necessary.
NF9320-SJxx (FC cable) can be used.
CAT6 LAN cable is recommended.
Either straight cable or crossover cable can be used.
Summary of Contents for M100
Page 25: ...Release 6 0 25 User Guide About Warning Labels Power Supply AC Power Supply ...
Page 27: ...Release 6 0 27 User Guide About Warning Labels Battery ...
Page 29: ...Release 6 0 29 User Guide About Warning Labels Power Cable AC Power Supply ...
Page 40: ...Release 6 0 40 User Guide Chapter 1 Overview 1 2 1 4 Controller CONT ...
Page 48: ...Release 6 0 48 User Guide Chapter 1 Overview 1 2 3 3 Controller CONT ...
Page 260: ...Release 6 0 260 User Guide Chapter 8 Installing Optional Parts Figure 8 12 Removing the DIMMs ...
Page 459: ...NEC Corporation 7 1 Shiba 5 chome Minato ku Tokyo 108 8001 Japan URL http www necstorage com ...

