79
1.
Return Message Schedule
This feature allows a telephone user to register a return
schedule when leaving the office and have the
schedule display on the calling telephone LCD.
Set Return Message Schedule
(1) Press the
Speaker
key.
You receive a dial tone.
The Speaker key lamp lights red.
(2) Dial the
Return Message Schedule
access code
or press the
Return Message Schedule
feature
key.
(3) Dial the number corresponding to desired
message.
Message Patterns:
❍
Press
0
or
1
and the dial desired time.
❍
Press
2
or
3
and dial the month and date
(Example: for June, 8, enter “0608”)
(4) Press the
Speaker
key.
The Speaker key lamp goes off.
The Return Message Schedule is registered.
Cancel Return Message Schedule
(1) Press the
Speaker
key.
You receive a dial tone.
The Speaker key lamp lights red.
(2) Dial the
Return Message Schedule
cancel code.
(3) Press the
Speaker
key.
Speaker key lamp goes off.
The feature access code/feature key is set by
system data setting at initial installation.
For details, contact the system administrator.
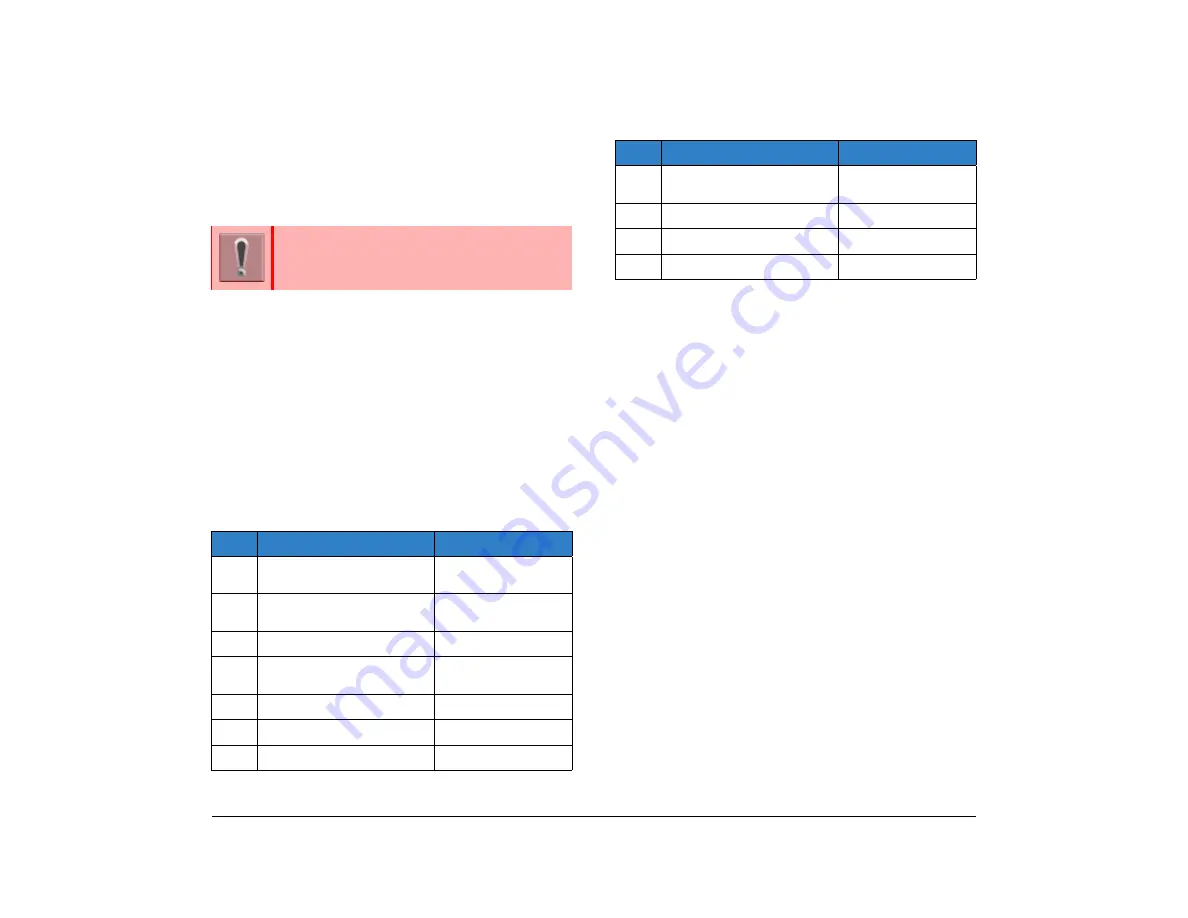
No.
Message
Change “#” to...
1
IN MEETING UNTIL ##:##
Time (when meeting
done)
2
MEETING ROOM - ########
Room name or
extension
3
COME BACK ##:##
Time (when returning)
4
PLEASE CALL ###########
11 digit telephone
number
5
BUSY CALL AFTER ##:##
Time (when returning)
6
OUT FOR LUNCH BACK ##:## Time (when returning)
7
BUSINESS TRIP BACK ##/##
Date (when returning)
8
BUSINESS TRIP ##########
10 digits (where
reached)
9
GONE FOR THE DAY
10
ON VACTION UNTIL ##/##
Date (when returning)
11 ~20 MESSAGE 11~20
No.
Message
Change “#” to...
Summary of Contents for ITK-8LCX
Page 2: ......
Page 4: ......
Page 18: ...2 1 Face Layout DT920 ITK 8LCX 1 Self Labeling Model DT930 ITK 8TCGX 1 Touch Panel Model ...
Page 21: ...5 1 Keys and Parts DT920 ITK 8LCX ...
Page 22: ...6 1 DT930 ITK 8TCGX Touch Button Area 15 ...
Page 110: ...A 14 1 This page is for your notes ...
Page 117: ...B 7 1 ...
Page 118: ...B 8 1 ...
Page 120: ...B 10 1 This page is for your notes ...
Page 123: ...C 3 1 4 Press the Enter key the following is displayed ...
Page 125: ...C 5 1 1 From the Home screen click on Telephone Setting ...
Page 128: ...C 8 1 4 To upload an image from another extension click Cancel and repeat from step 2 above ...
Page 129: ...C 9 1 5 When image upload is complete click Home to exit the Telephone Setting screen ...
Page 130: ...C 10 1 6 From the Home screen click the Logout icon to log out ...
Page 131: ......